GamersHeroes Thursday, July 31, 2025 9:41 PM Serving professionals dedicated to the art and science of making games, the Game Developers Conference (GDC) has appointed longtime GDC advisor and video game advocate Mark DeLoura as the Executive Director of Innovation & Growth. The post GDC Appoints Games Industry Luminary Mark DeLoura as Executive Director of Innovation & Growth appeared first on GamersHeroes. |
GamersHeroes Thursday, July 31, 2025 5:33 PM Now available for PC and consoles, the way of the ninja awaits with the release of The Game Kitchen and Dotemu's NINJA GAIDEN: Ragebound. The post NINJA GAIDEN: Ragebound Now Available appeared first on GamersHeroes. |
GamersHeroes Thursday, July 31, 2025 3:32 PM After making waves on the Nintendo Switch, Drecom's whimsical colony-sim Hungry Meem is now available for the PC via Steam. The post Whimsical Colony-Sim Hungry Meem Now Available on Steam appeared first on GamersHeroes. |
Kotaku Thursday, July 31, 2025 3:48 PM
Matt Ryan got candid at a signing when asked about Edward Kenway's rumored return The post <i>Assassin's Creed </i>Actor Says Ubisoft Threatened To Sue Him For Hinting At <i>Black Flag </i>Remaster appeared first on Kotaku. |
Kotaku Thursday, July 31, 2025 3:15 PM
Each time I saved someone via the new feature, I felt like the coolest action movie hero The post One Of The Best Parts Of <i>Battlefield 6</i> Is Dragging Your Buddies To Safety appeared first on Kotaku. |
Kotaku Thursday, July 31, 2025 3:00 PM
Battlefield 3 and Battlefield 4 fans will feel right at home when EA's big FPS arrives this October The post After 4 Hours With <i>Battlefield 6</i> I'm Convinced It Has The Juice appeared first on Kotaku. |
Kotaku Thursday, July 31, 2025 2:41 PM
The prequel RPG is streamlining its story to let you recruit its characters throughout the game The post <i>Octopath Traveler 0 </i>Is Based On A Mobile Game, But Is Leaving The Gacha Behind appeared first on Kotaku. |
Kotaku Thursday, July 31, 2025 2:20 PM
A July Nintendo Direct mostly showed games players already knew about The post Nintendo's Game Key Card Showcase Leaves Fans Severely Underwhelmed appeared first on Kotaku. |


PCGamesN Thursday, July 31, 2025 7:05 PM Finding the best Grounded 2 settings is tricky, if only because there are so few options available to change. In the event that your gaming PC or laptop isn't getting the performance you're happy with, you don't have many ways to squeeze out a higher frame rate. As an early access title, Grounded 2 isn't expected to run perfectly on PC just yet, but some frustrating stuttering and slowdowns have been present throughout our testing. Even if your gaming PC has the Grounded 2 system requirements handily beat, like our testing rig does, that doesn't guarantee a super-fast frame rate and stable performance. Still, thankfully you won't need one of the very best graphics card picks from our buying guide to start playing the game. We'd also expect future Grounded 2 updates to improve the overall performance of the game on PC. Continue reading Best Grounded 2 settings for PC and Steam Deck MORE FROM PCGAMESN: Best graphics card, Best gaming PC, Best SSD for gaming |
PCGamesN Thursday, July 31, 2025 6:58 PM The Battlefield 6 system requirements are official, at least for the upcoming open beta. Although these specs are still entirely subject to change as we move ever closer to release, they very closely mirror the Battlefield Labs specs we spotted earlier in the week. Battlefield 6 is set to be one of the biggest games of 2025, and while we wait for the official PC specs, we've been given a set for the upcoming open beta. The good news? If these specs do end up being somewhat close to what is needed to run Battlefield 6 come release day, you're not going to require one of the best graphics card picks from our buying guide to start playing. Continue reading Battlefield 6 system requirements MORE FROM PCGAMESN: Best graphics card, Best gaming PC, Best SSD for gaming |
PCGamesN Thursday, July 31, 2025 7:23 PM July 31, 2025: See out July with three new Bingo Blitz credit links. What are the new free Bingo Blitz credits? You won't be playing much bingo without them, that's for sure. Even if you've exhausted your usual free credits in Bingo Blitz through login rewards and premium subscriptions, the secret to playing another round is through our Bingo Blitz credits links. New Bingo Blitz free credits links work in much the same way as Monopoly Go dice links. One click and your account is automatically topped up with credits ready to be used on multiple rounds or one big blow-out session with multiple cards. The choice is yours. Continue reading Free Bingo Blitz credits July 2025 MORE FROM PCGAMESN: Bingo Blitz credits, Best card games, Best PC board games |
PCGamesN Thursday, July 31, 2025 5:50 PM The Clubs game mode has come a long way since I first started playing it - a long time before FIFA morphed into EA FC. Creating a bizarre-looking pro, jumping into a lobby with your mates, and howling with laughter as you all make defensive blunders and miss open goals is one of the best ways to play the soccer sim series. FC 26 Clubs is going to deliver one of the biggest leaps forward for the game mode in ages, with new player Archetypes, the ability to play for multiple clubs at once, and a progression system that will literally make you an Icon. Continue reading FC 26's next Icon is you, thanks to a new Clubs mechanic MORE FROM PCGAMESN: EA Sports FC 26 system requirements, Best sports games, Best soccer games |
PCGamesN Thursday, July 31, 2025 3:42 PM What is the Battlefield 6 release date? When Battlefield is firing on all cylinders, it's a thing to behold: tactical, dynamic, and immersive, there isn't much else like it out there. Some games have tried to emulate the feel of Battlefield, admittedly with mixed results, so a brand new, numbered entry in one of the best FPS series is something to get excited about. The last Battlefield game that graced our screens was 2042, and it left a bitter taste for some, having eschewed some of the core principles that made the multiplayer game great. Battlefield 6 looks to learn from those mistakes, hopefully capturing some of that early magic, gathering old players and, with any luck, a new audience in the process. Continue reading Battlefield 6 release date, trailers, and latest news MORE FROM PCGAMESN: Best FPS games, Best multiplayer games, Best war games |
PCGamesN Thursday, July 31, 2025 3:23 PM The street ahead is riddled with debris, my ammo is low, and the remains of a scorched tank are my only cover. In any other shooter, that'd mean all hope is lost. But after playing for a solid five hours, it's clear that Battlefield 6 isn't just another shooter. Across my time with a slice of its multiplayer suite, it was clear that this is a swift, skillful course correction and - whisper it - an exciting return to form for the beloved FPS series. MORE FROM PCGAMESN: Best FPS games, Best multiplayer games, Best war games |
PCGamesN Thursday, July 31, 2025 3:39 PM In a recent interview with PCGamesN, EA executive vice president Vince Zampella confirmed that Battlefield 6 won't run on the Steam Deck at launch but hasn't yet ruled out support for other PC gaming handhelds. Although we don't yet have confirmation of the Battlefield 6 system requirements, an early look at the specs for Battlefield Labs suggests the game won't run on anything below an Nvidia RTX 2060. This would naturally make it challenging for even the best handheld to run, but we suspect the lack of compatibility is down to other factors. What we do know is that the Steam Deck is a complete non-starter, according to Zampella. MORE FROM PCGAMESN: Best graphics card, Best gaming PC, Best SSD for gaming |
PCGamesN Thursday, July 31, 2025 3:38 PM When is the Battlefield 6 beta? As well as unveiling some explosive multiplayer gameplay, the Battlefield 6 beta dates have also been revealed by EA. Before it launches later this year, everyone will get a couple of opportunities to give Battlefield 6 a spin, and there's some early access on offer for some players as well. Continue reading Battlefield 6 beta guide and how to play early MORE FROM PCGAMESN: Best FPS games, Best multiplayer games, Best war games |
PCGamesN Thursday, July 31, 2025 3:00 PM One of Battlefield 2042's biggest pitfalls at launch (and there were many…) was its lack of a campaign. For all of 2042's downsides, its near-future setting - in which the world is thrown into chaos due to economic downturn, environmental disasters, and international feuds - seemed ripe for a gripping narrative. DICE attempted to build a world and storylines through its seasonal content, but it just didn't land. Battlefield 6 is looking to make amends. Motive Studio - one of the quartet of developers working on Battlefield 6 and the team behind the brilliant Dead Space remake - is helping to deliver a blockbuster campaign, and according to franchise chief Vince Zampella, it's "crushing it." MORE FROM PCGAMESN: Best FPS games, Best multiplayer games, Best war games |
PCGamesN Thursday, July 31, 2025 3:00 PM Battlefield 6 just got its full gameplay reveal, and one of the big takeaways is that the series' trademark destruction is absolutely here to stay. In an interview with EA executive vice president Vince Zampella at a pre-reveal event in Los Angeles, he tells us more about BF6's new approach to destruction, and how it will offer new ways to experience each map without causing complete devastation. MORE FROM PCGAMESN: Best FPS games, Best multiplayer games, Best war games |
Rock Paper Shotgun Latest Articles Feed Thursday, July 31, 2025 4:27 PM  EA have given us our first proper look at Battlefield 6's multiplayer, after revealing the game with a single player trailer last week. They've also confirmed the new shooter's release date - 10th October 2025 - and announced dates for a series of beta weekends in August. The game they're pitching is a return to the contemporary warring of Battlefield 3 and Battlefield 4, after the mildly futuristic disappointments of Battlefield 2042. It's got four familiar classes, the old Battlefield mode trinity of conquest, breakthrough and rush, and maps that incline towards close quarters combat or wide-open vehicular blasting or some blasphemous hybrid of the twain. It seems fine. And loud. |
Siliconera Thursday, July 31, 2025 5:00 PM
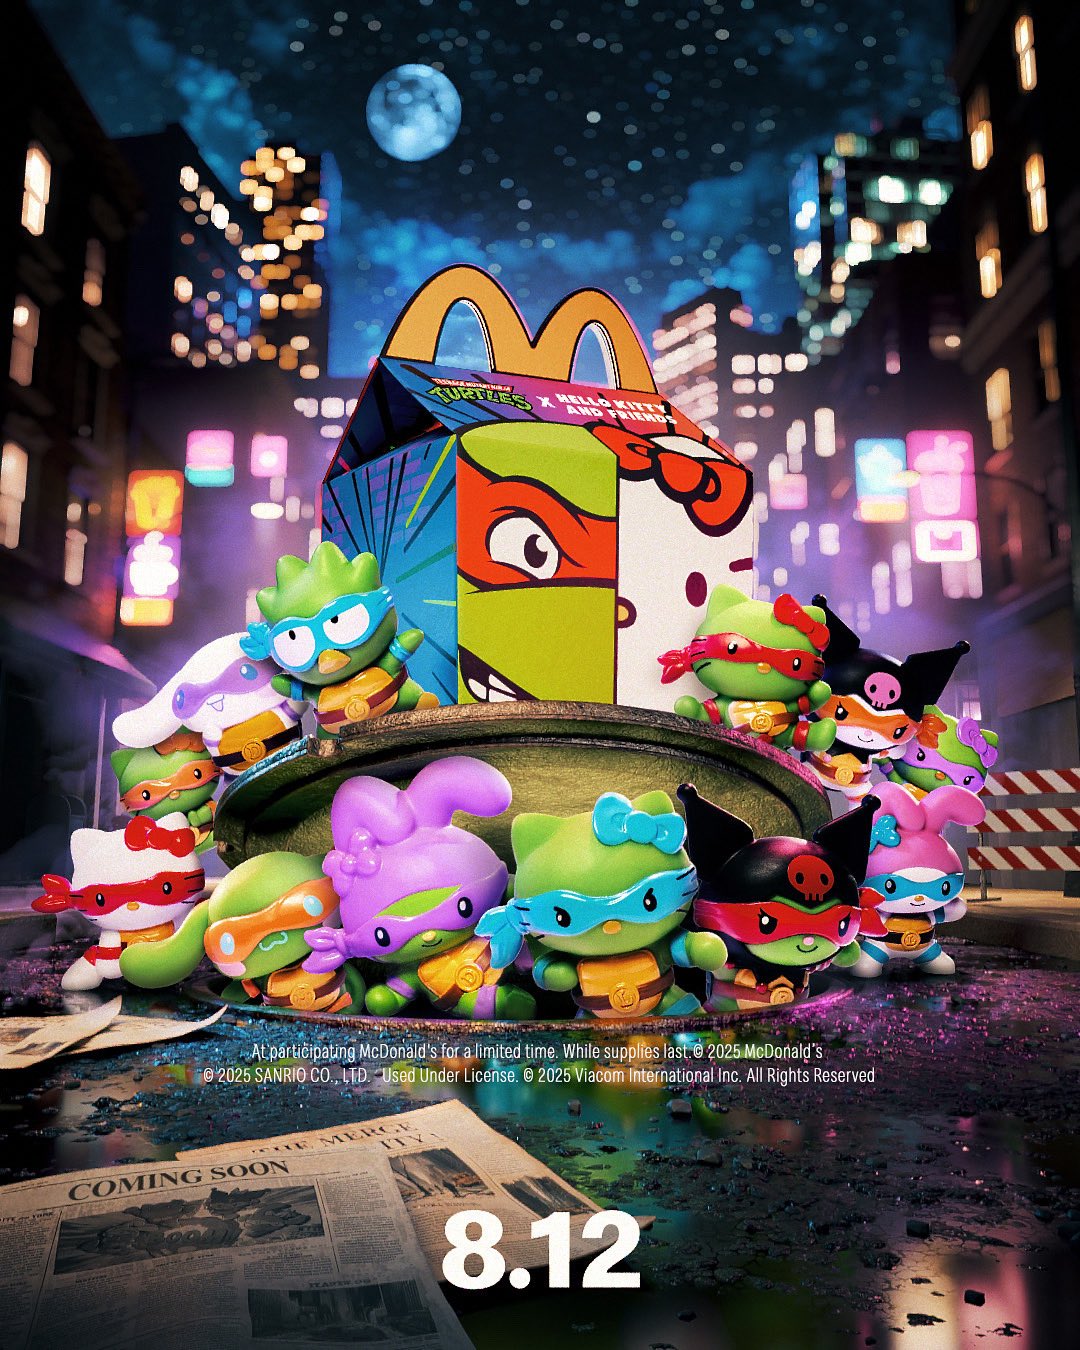
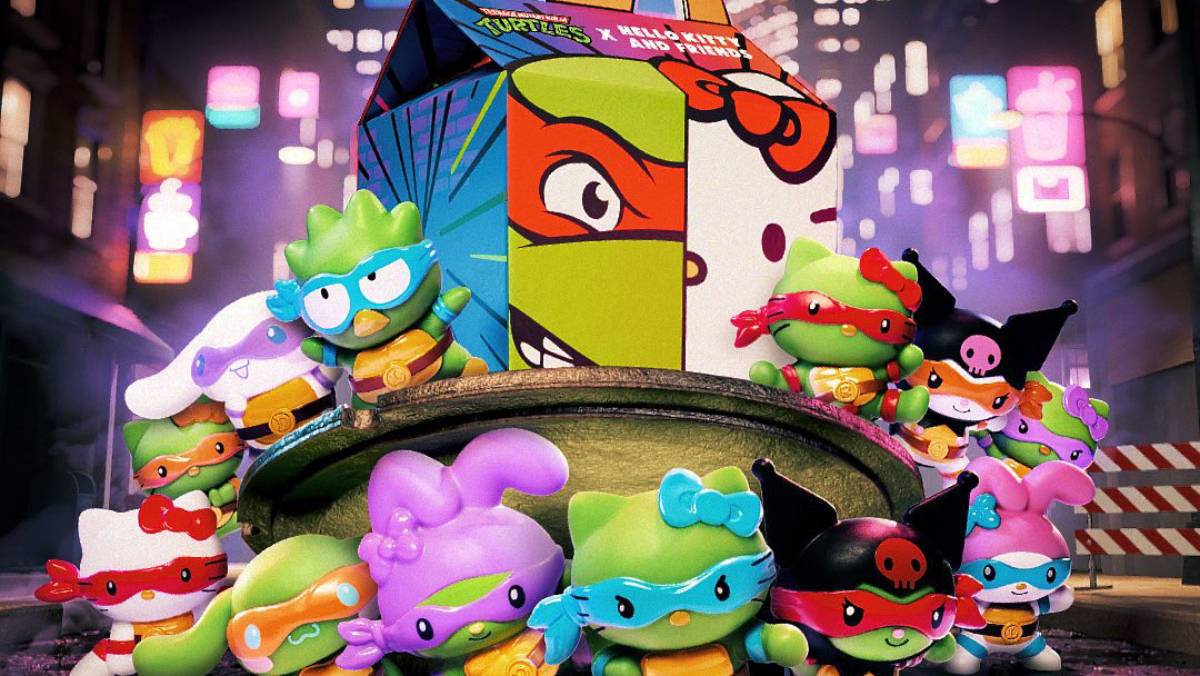
McDonald's announced on social media that the Sanrio TMNT Happy Meal toys, which turn mascots like Hello Kitty, My Melody, Kuromi, Cinnamoroll, and Badtz Maru into characters from the Teenage Mutant Ninja Turtles, will appear in the US. Previously, it appeared in Asia and Europe. They will start to launch in restaurants on August 12, 2025.
Since these are part of an existing McDonald's Happy Meal toy crossover, we know all of the characters in the Sanrio TMNT mashup. There are five variants of Hello Kitty, two of Kuromi, two of My Melody, two of Cinnamoroll, and one of Badtz Maru. They are organized as such that there is one team of the characters with their white fur color, but the rest are green like the Teenage Mutant Ninja Turtles would be. There is one full set of Hello Kitty toys as the heroes, while the others include a collection of four that include her and another that features others in the line.
Here are all the characters in the collection:
And here's the teaser image showing them all with the Happy Meal box.
This follows a 2024 Hello Kitty crossover at the restaurant that involved Yu-Gi-Oh.
The Sanrio TMNT Happy Meal toys of characters in crossover costumes will be at McDonald's in the US starting on August 12, 2025.
The post Sanrio TMNT McDonald's Happy Meal Toys Teased appeared first on Siliconera. |
Siliconera Thursday, July 31, 2025 4:00 PM
HoYoVerse teased some of the new additions that will be part of the 3.6 Honkai: Star Rail update, and one of them will be an Anomaly Arbitration "high difficulty" mode. This is a feature that will need to be unlocked, so it may not be immediately accessible once the update arrives this fall. Also, as 3.5 is the next patch on the horizon, we probably won't see it in the new Special Program on August 2, 2025.
When bringing up the new "hight difficulty" mode, HoYoVerse first explained how we'll even access Anomaly Arbitration in Honkai: Star Rail. It will be locked behind the three other types of optional challenges Apocalyptic Shadow, Memory of Chaos, and Pure Fiction. You need to get four stars in Difficulty 4, Stage 4, and Stage 12, respectively, for each of those three modes. Once you do, this new one will become available.
As for how it works, we know the general procedure and some of the possible rewards. We need to make four teams, though initially we start with three. Those three go through three "trial stages." You you manage to clear them, then you make a new team for the fourth one. If you survive and defeat it, you can get cosmetics like avatar frames and items to level up characters and Light Cones.
Honkai: Star Rail is available for the PS5, PC, and mobile devices, and the Special Program stream for 3.5 airs at 4:30am PT/7:30am ET on August 2, 2025. The 3.5 patch should arrive on August 13, 2025.
The post Honkai: Star Rail Anomaly Arbitration High Difficulty Mode Arrives in 3.6 appeared first on Siliconera. |
Siliconera Thursday, July 31, 2025 3:00 PM
The Japanese Persona 3 Reload Switch 2 website is now live following the Nintendo Direct Partner Showcase, and the physical copy details and cover showed it is a game-key card title. The US site hasn't updated yet.
All Switch 2 game-key card titles don't have the full game on the cartridge, which means people who get a Persona 3 Reload physical copy will still need to download the title. It's 25.4GB, before patches, for the base game. However, since it is tied to the cartridge, that must always be inserted in the system to play the JRPG on the system. When the physical release was mentioned in the Nintendo Direct, it didn't mention it was only a game-key card.
Here's Atlus' image of the Japanese physical copy Switch 2 box art, which notes Persona 3 Reload is a game-key card release.

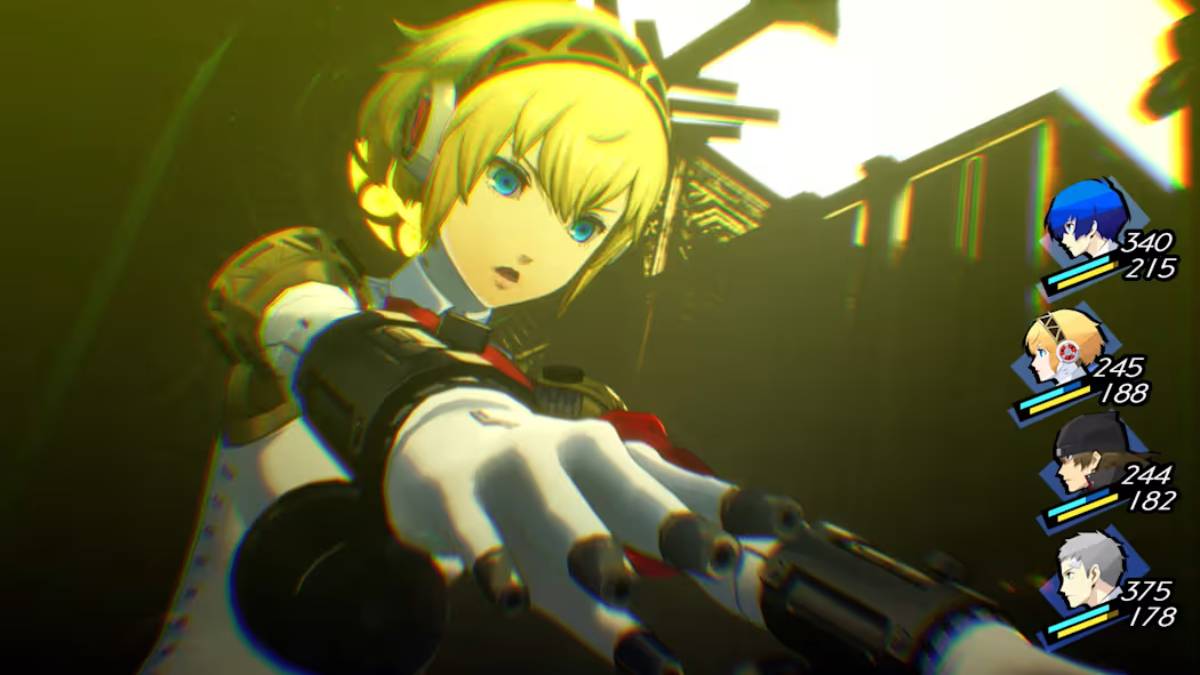
Following the Nintendo Direct, Atlus also shared an extended announcement trailer for the Switch 2 version of the game. You can see that longer version of the video below:
We also learned Yakuza Kiwami 2 is headed to the Switch 2 in November 2025 during the presentation.
Since the eShop page for Persona 3 Reload, we know about the different versions available. The base game is $59.99. A Digital Deluxe Edition is $69.99, and it includes a digital art book and soundtrack. The Digital Premium Edition has the art book and soundtrack, and it includes seven cosmetic and BGM DLC packs based on Persona 4 Golden and Persona 5 Royal. There's no mention of any release with the Aigis expansion.
The Persona 3 Reload remake will show up on the Nintendo Switch 2 on October 23, 2025, and it is already on the PlayStation 4, PlayStation 5, Xbox One, Xbox Series X, and PC.
The post Persona 3 Reload Switch 2 Physical Copy Is a Game-Key Card appeared first on Siliconera. |

Destructoid Thursday, July 31, 2025 5:26 PM
New York Mysteries 4: The Outbreak continues your adventures in 1960s New York, where our main character, Laura, is investigating a disease spreading around the city. The story takes place over several regions, requiring you to solve dozens of puzzles to learn more about the world's circumstances.
Let's dive right into a complete walkthrough of New York Mysteries 4: The Outbreak, including every item you need to find to progress through each part.
Table of contents
Complete New York Mysteries 4: The Outbreak walkthrough
You'll initially start your playthrough by listening to the narrator, Laura, describe the events leading up to the present day. Turns out, she's been kidnapped, and it's up to us to get her out so she can explore the city. These events lead up to the game's tutorial within the first area.
Tutorial room
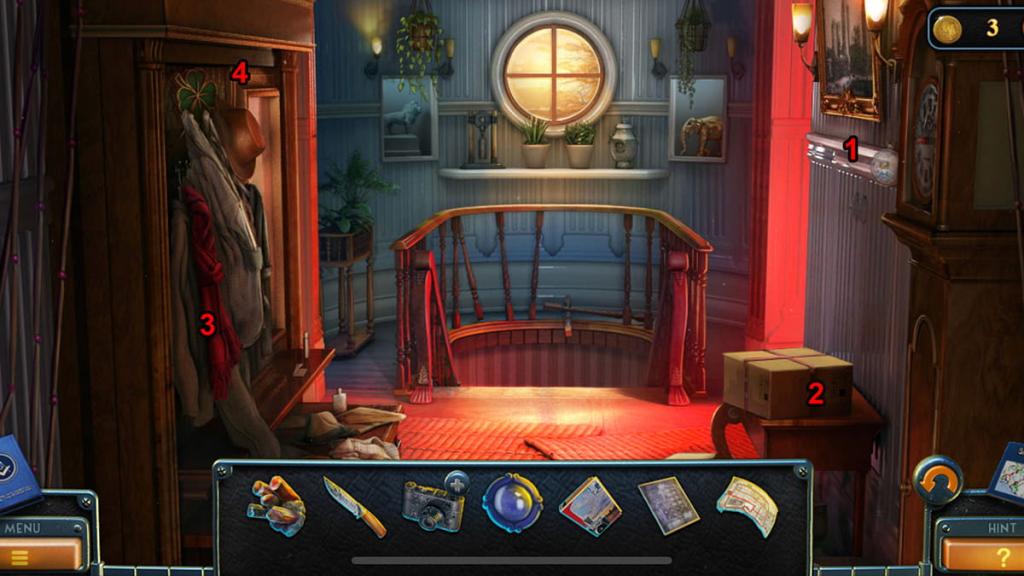
After you wake up in a mysterious party room, you'll decide whether to start an optional tutorial. This tutorial will guide you through how to exit the room, but in case you skipped it, we'll briefly explain how to complete it.
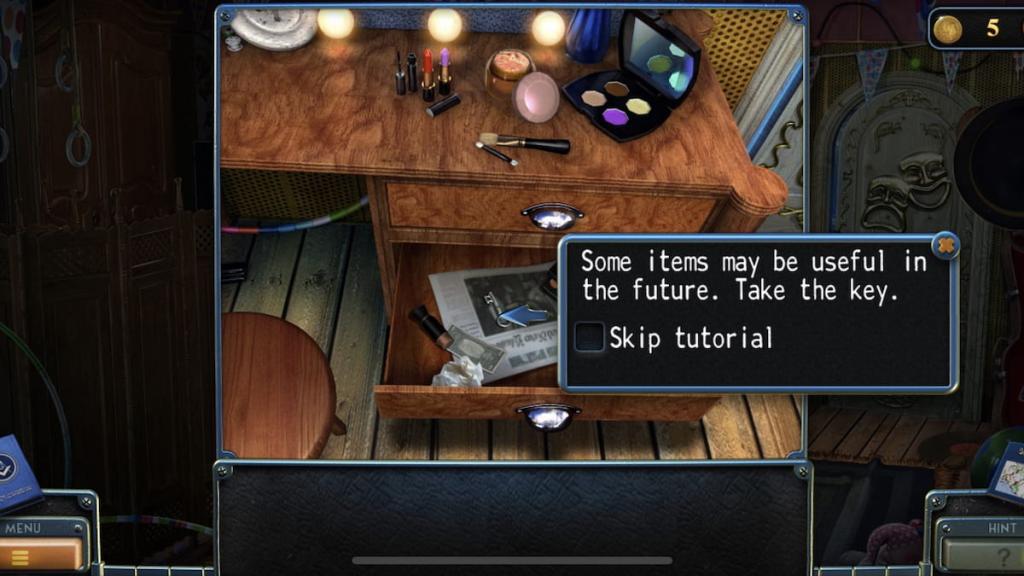
Here's a complete step-by-step to leaving the tutorial room:
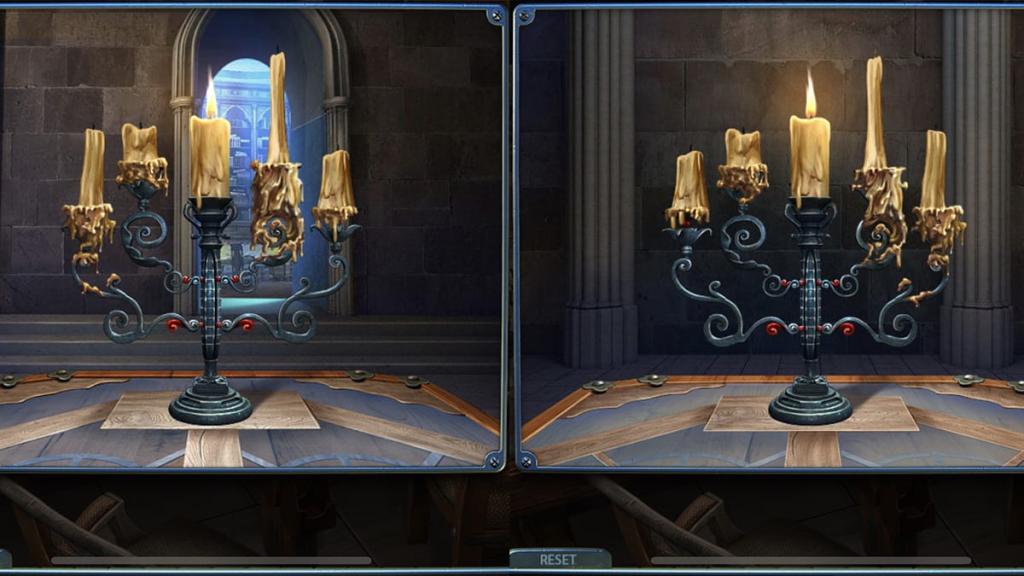
Congratulations, you're now out of the tutorial room and into the rest of the map. It's time for the real challenge to begin. Before leaving, though, take note of the Mask puzzle next to the wardrobe. You don't need to do anything with this yet, but we will be returning to it later.
Park walkthrough
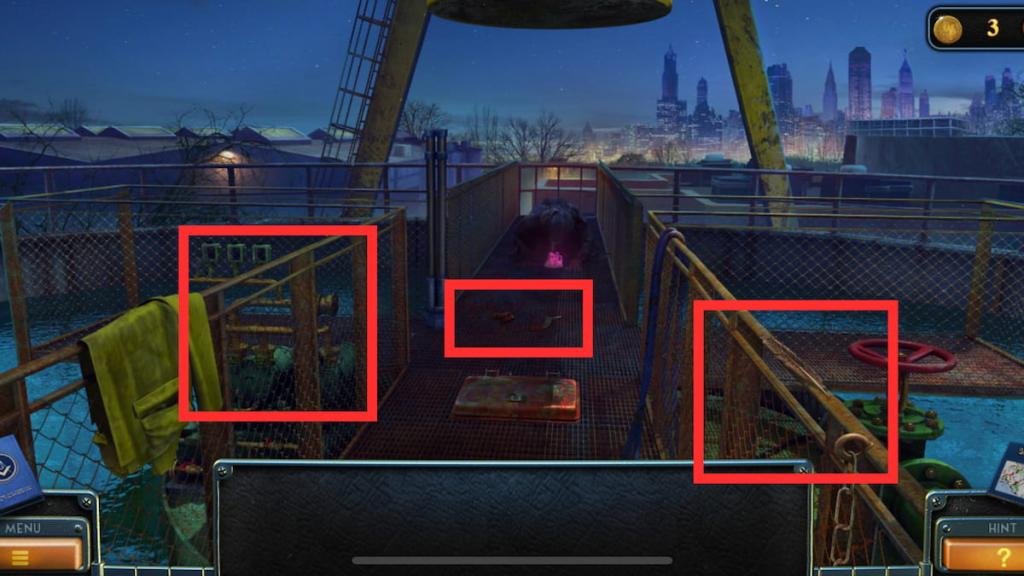
The first part of New York Mysteries 4's starting area begins immediately after leaving the tutorial and entering an abandoned carnival zone. You'll have multiple spots to interact with, including a back gate leading out of the park and a river to the right.
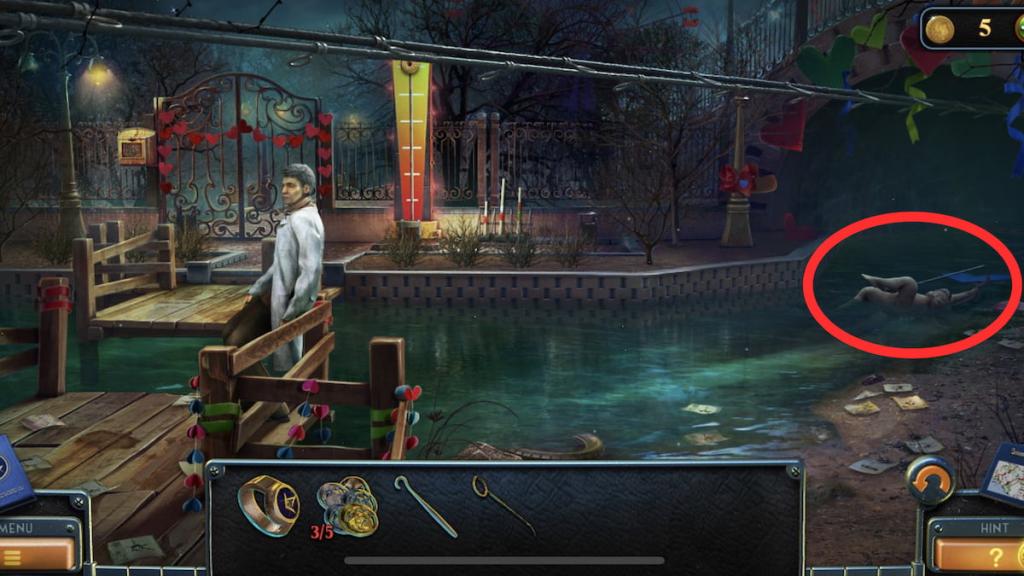
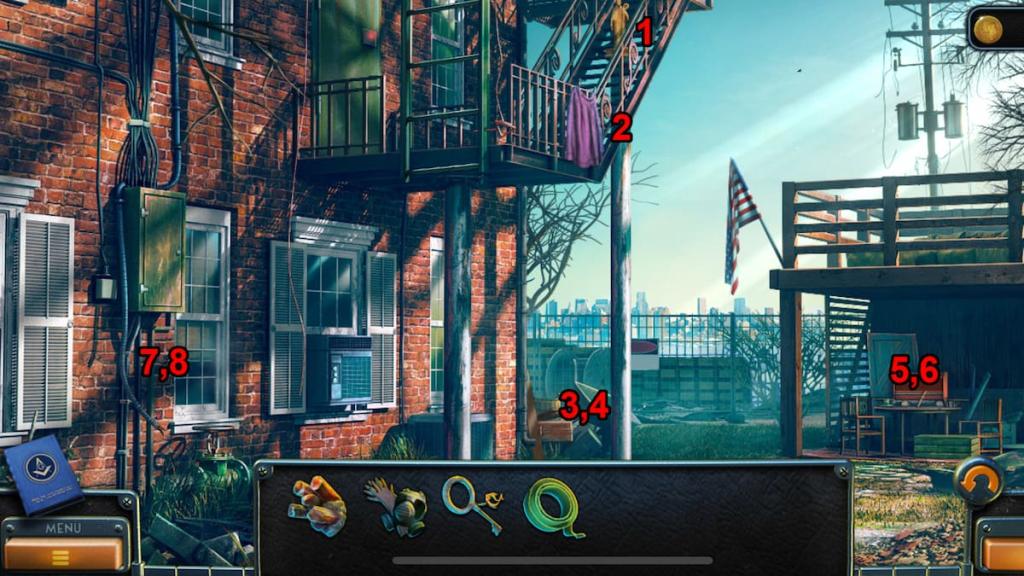
First, we'll start in the area to the right. Tap the right side of your screen to enter an area with a river and a swan boat. From here, we can solve the first set of puzzles using the steps below:
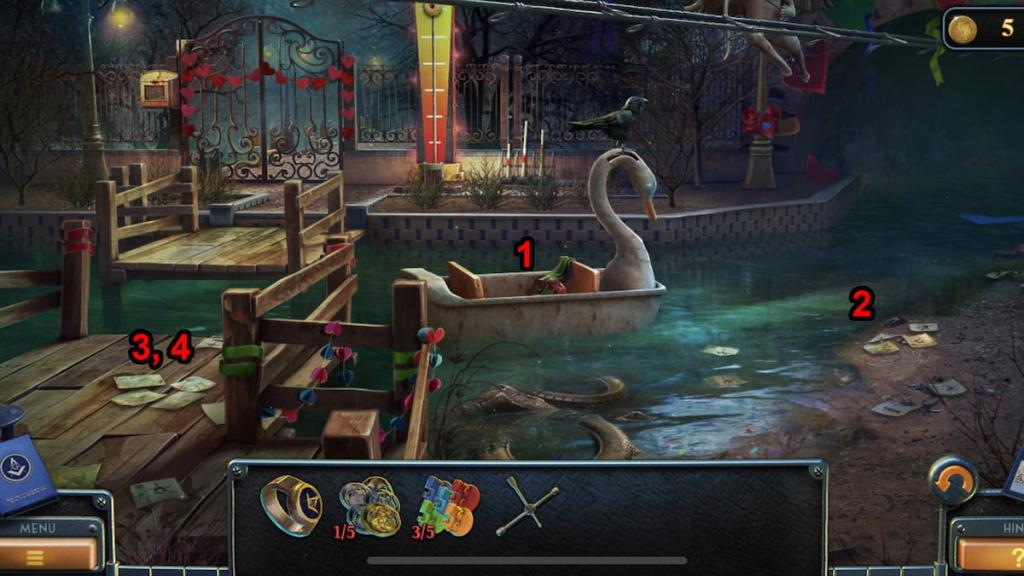
Now that we have several helpful items from this first region, it's time to head to the opposite side of the region. Go back to the carnival area before clearing away some balloons to reveal a side gate. From here, take the following steps to uncover more secrets:
You'll also spot a record on the ground near a bench and your first morphing object atop the metal fence.
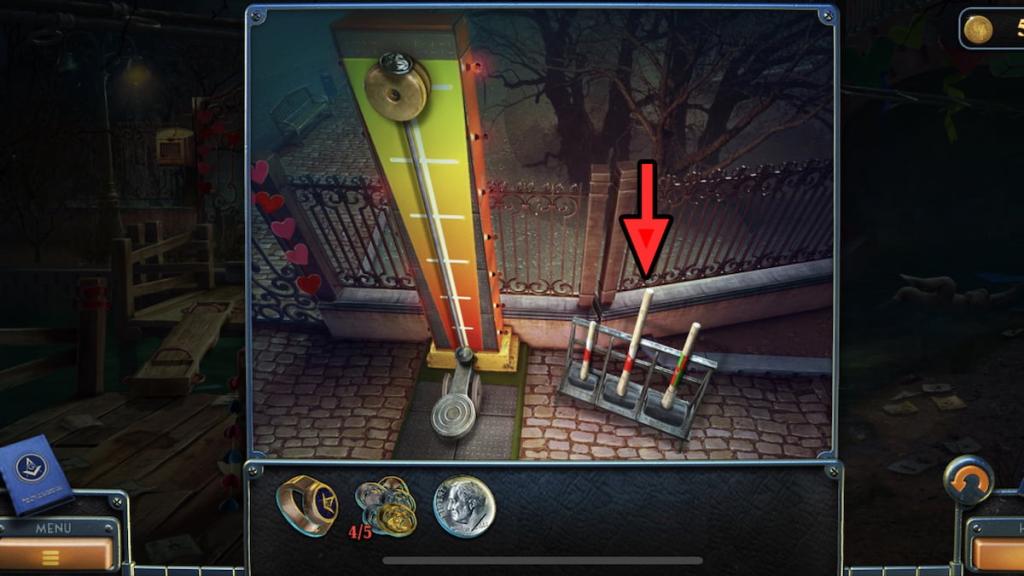
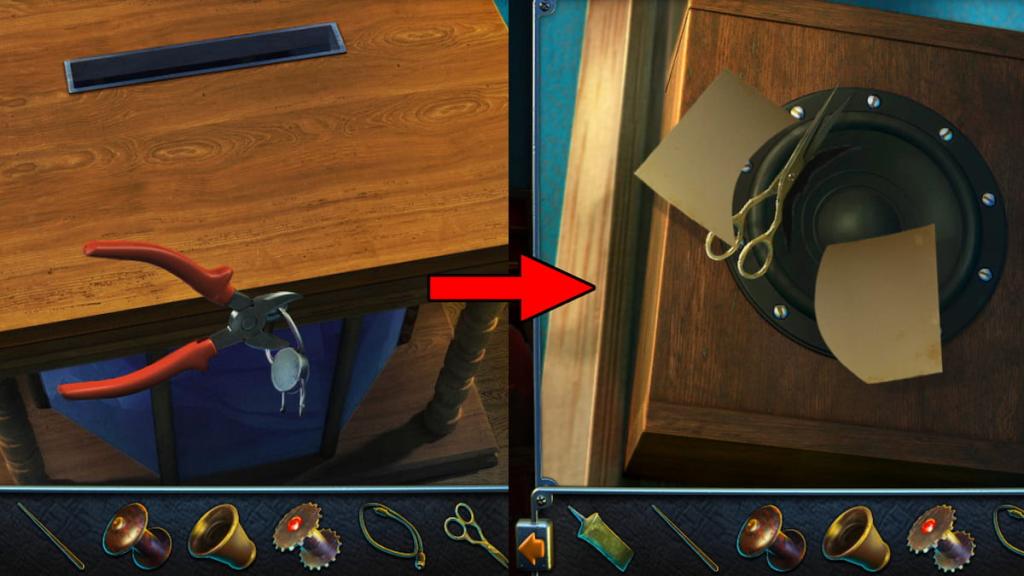
Now that we have several helpful items from these regions, we're safe to return to the original carnival area. Use the arrow at the bottom of your screen to return here before taking the following steps to solve the next set of puzzles:
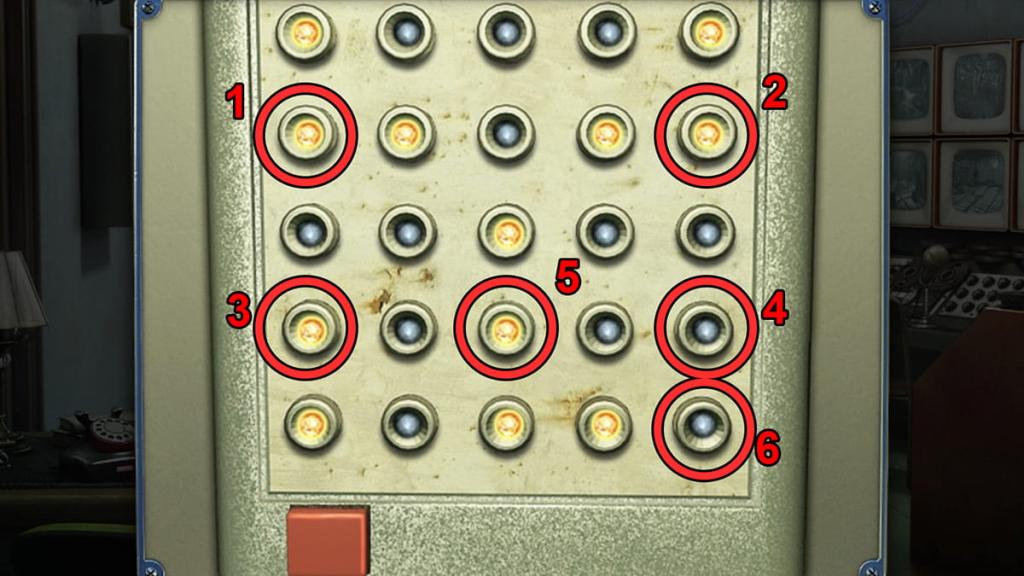
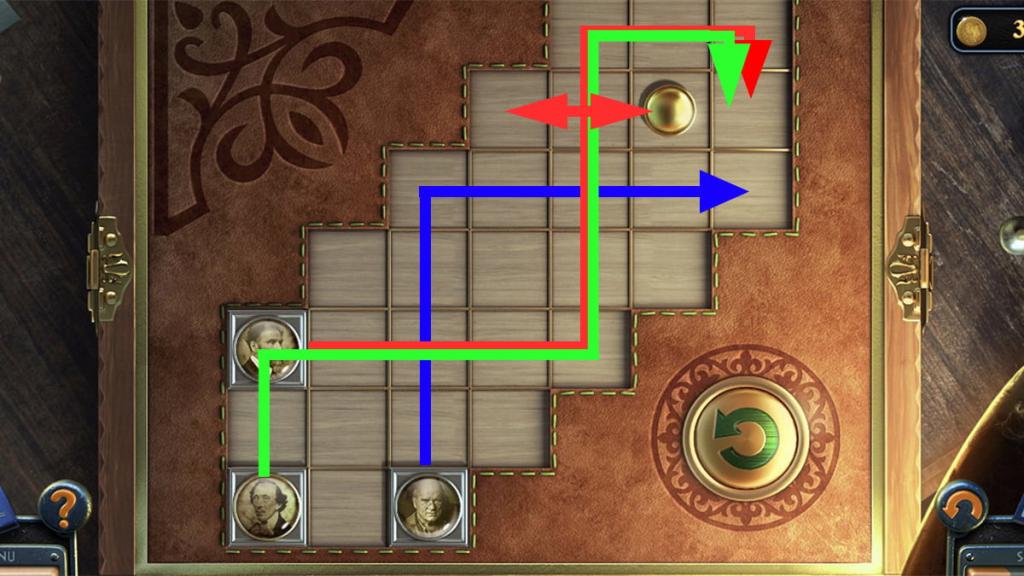
Although the puzzles to this point have been tricky, this is the first one you can very easily get stuck on. By pressing the two arrow buttons on the left and right sides of the circle, you'll rotate it, allowing the balls to roll through its paths. Below is the sequence you need to solve this puzzle:

That's quite the mouthful. Overall, your goal is to lead the orange balls into dead ends so the silver ball can smoothly roll across the path. Once you complete the puzzle, you'll obtain a Hook-and-loop to use later.
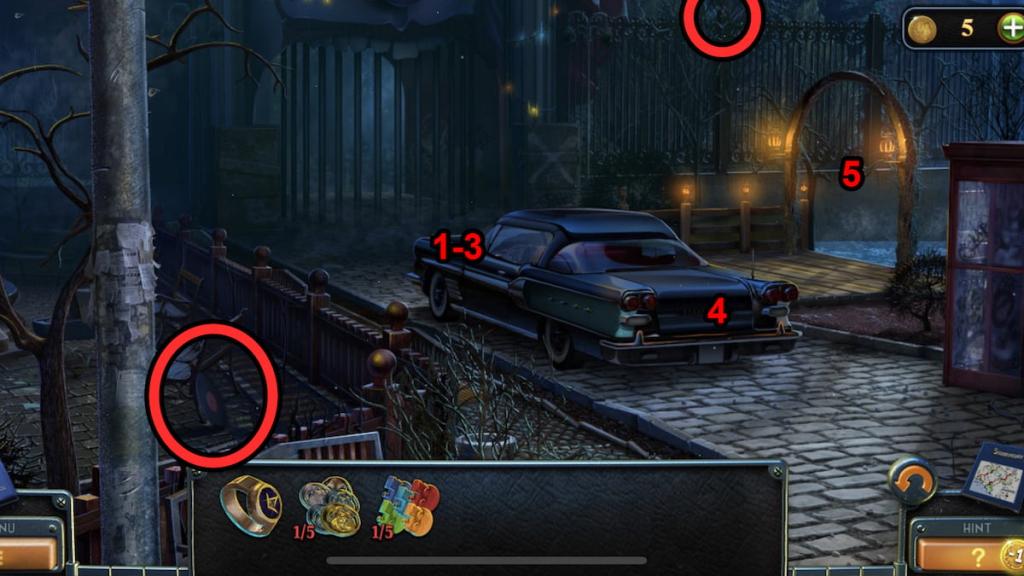
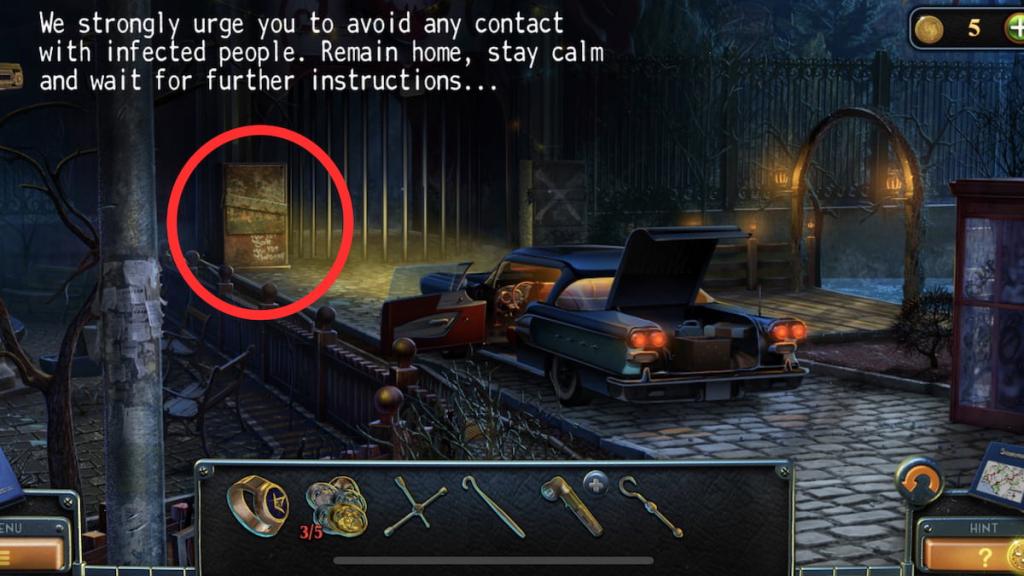
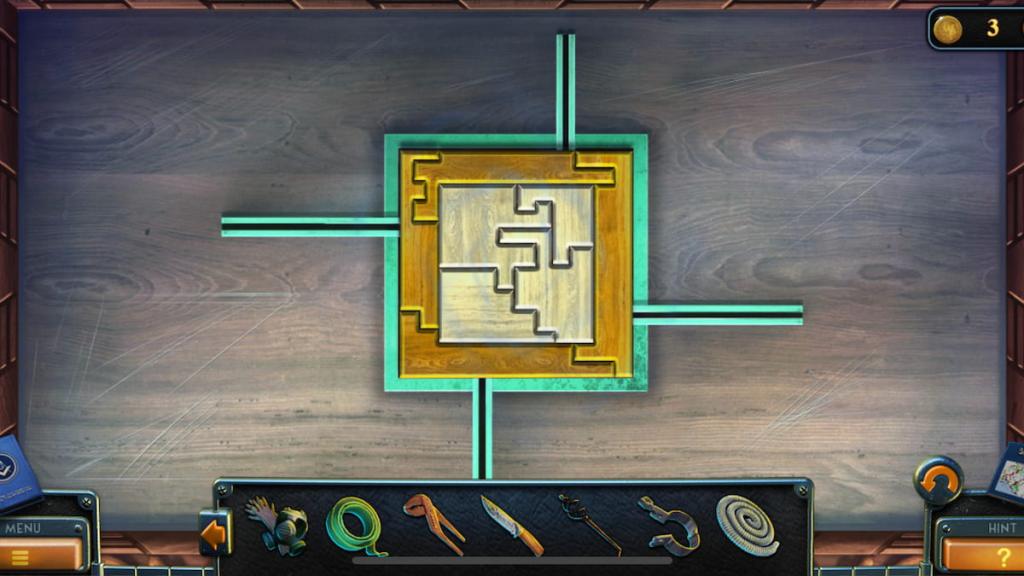
By now, you should have all five game pieces, two tokens, and five other objects from previous steps. You now have the means to solve the puzzle box in the car's trunk. Interacting with this will begin a colored train puzzle, which you complete by tapping each train to send it along a straight path. Here's a complete list of which trains to select for the first sequence:
Afterwards, you're met with a second sequence. Here's a list of which trains to select for this one:
It's not over yet, though. There's another sequence you'll need to complete. Below is the exact solution:
Completing this puzzle will reward you with a handle for the car's glove compartment. Using the handle on the glove compartment will give you a mask token, bringing your total up to three of the five we need.
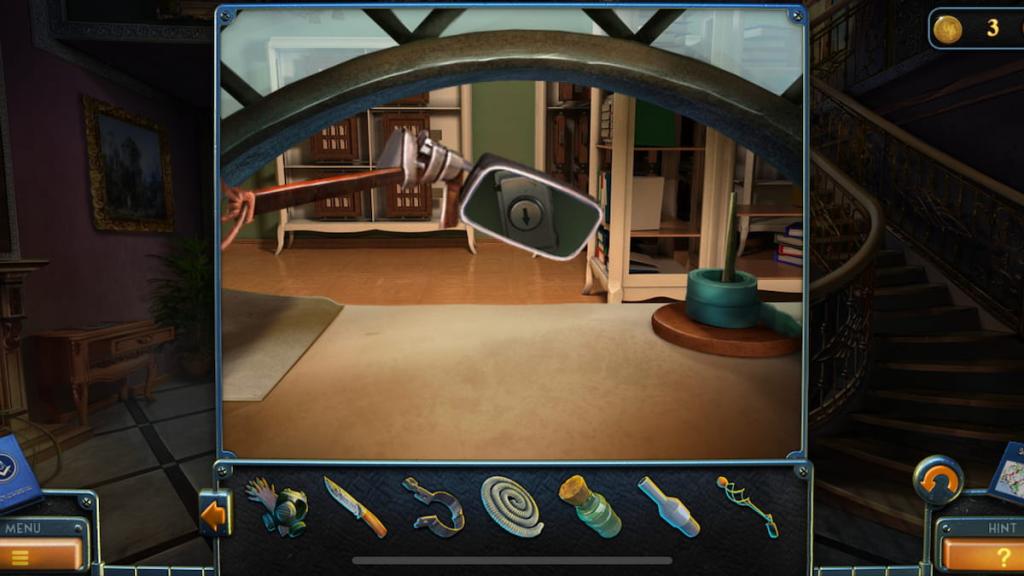
While you're in the car, use the car key to turn on its lights. You'll now see a rusted metal box with a latch you can open. Open it before using the wrench to unscrew its bolts, revealing a screwdriver inside.
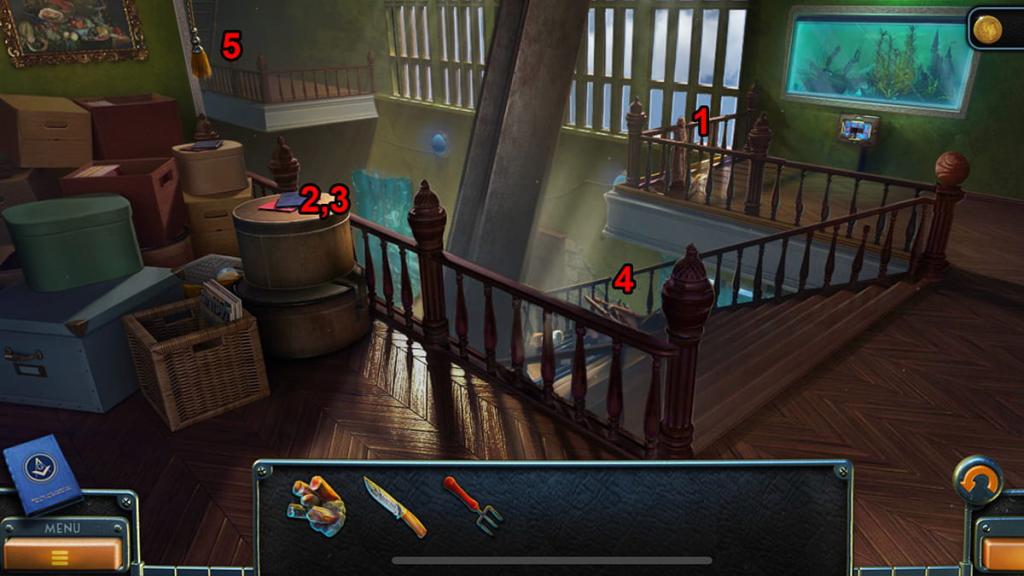
It's time to return to the tutorial room. Use the screwdriver on the music box in the room's center to obtain a battery, which you can then combine with the flashlight before returning to the swan boat. Using the Hook-and-loop will initiate a cutscene, letting you start the second half of this story section.
We're now inside a sewer, with multiple hidden objects to find. Here's a complete step-by-step to solving this area:


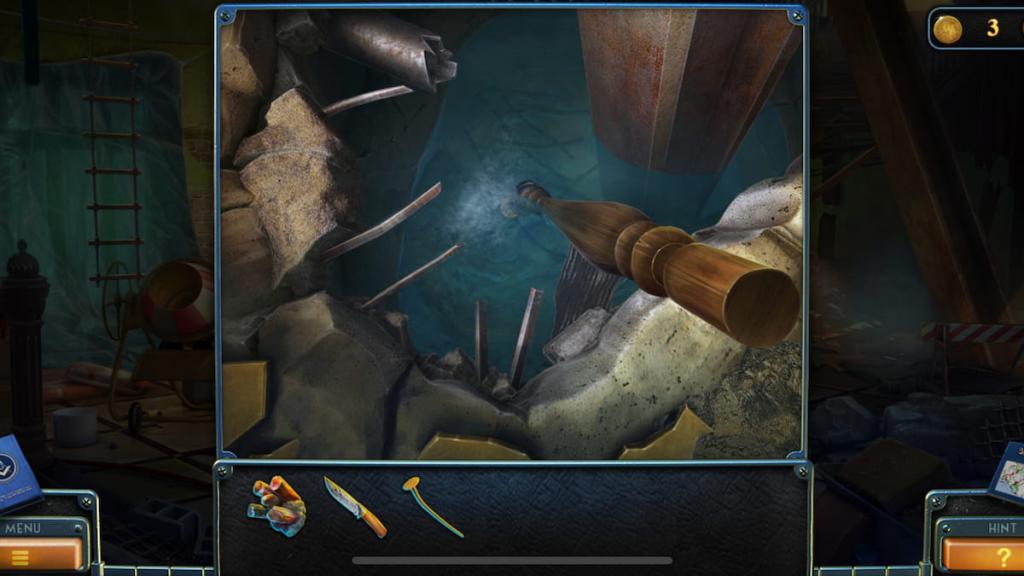
After talking to Travis, you'll now focus on crossing the river and wrapping up this area. In particular, you'll spot a broken statue in the water on the right side of the screen. Select the statue to claim a metal rod.
Now, you have everything you need for two different objectives. Here's a breakdown of each step from here:
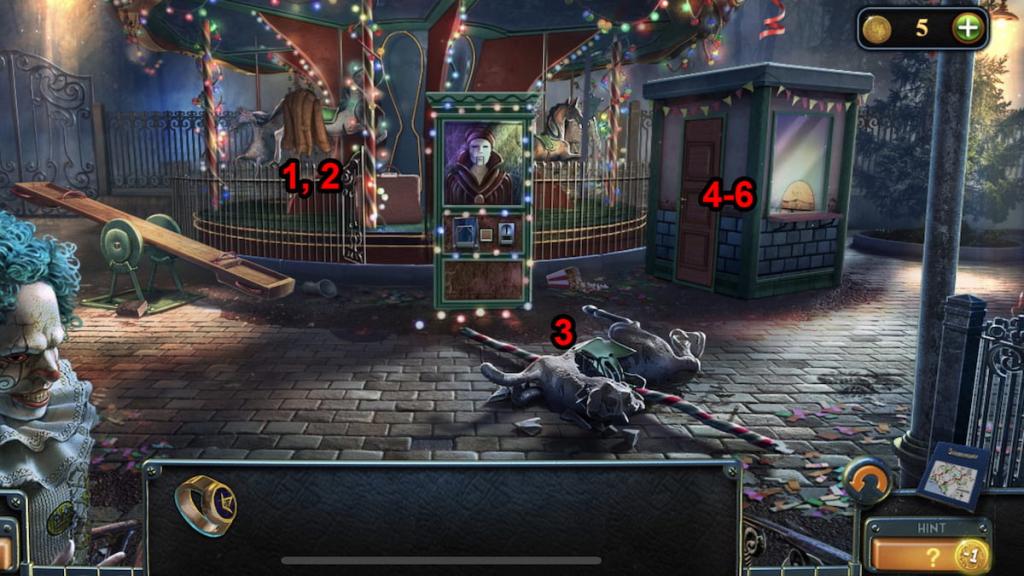
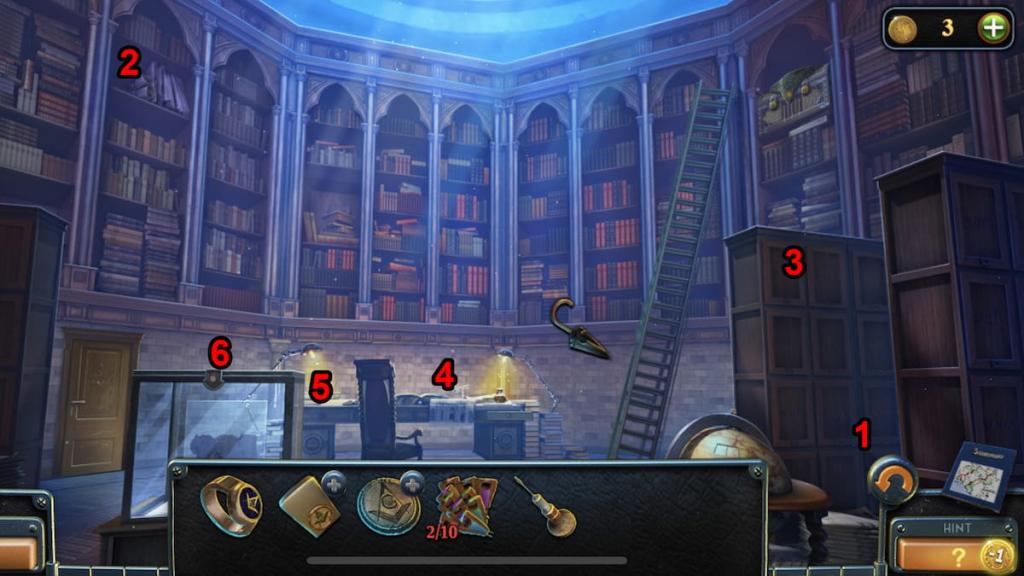
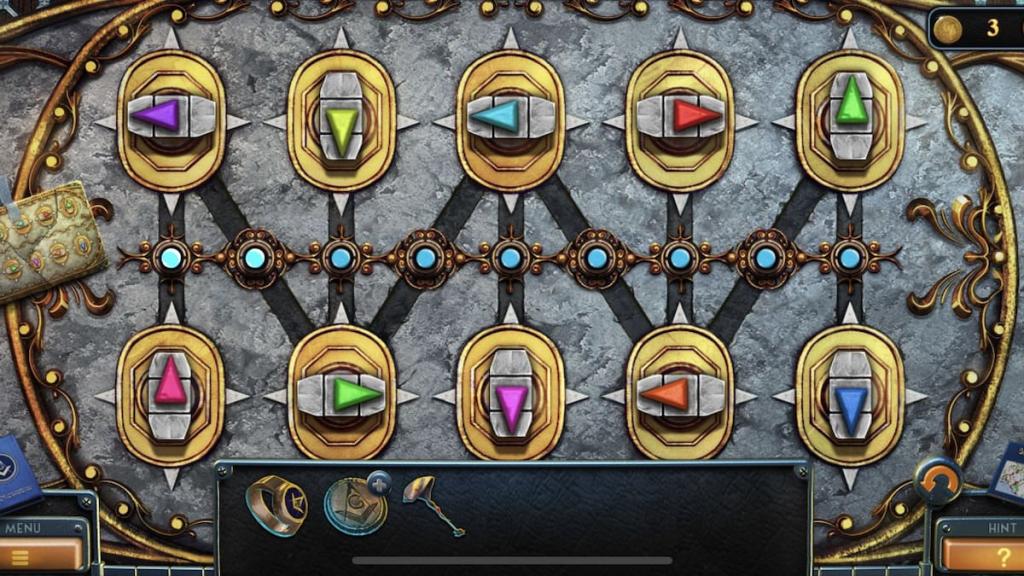
With all five mask tokens on hand, return to the tutorial room and activate the mask box from earlier. Use the five tokens to begin a minigame. Your goal is to arrange them so there's no repeating emotions or color in each row and column. The image below shows the exact solution.

You'll receive a token upon completing the puzzle and opening its box. One of two things can happen from here: either you will automatically initiate a cutscene, or you'll be stuck in this room.
If you're stuck in the room, head to the previous area, insert the token into the fortune-telling machine in front of the carousel, and open its prize to obtain a gear. Bring this gear to the car area's rusty box and activate its machinery to open the gate, letting you progress into the next area.
With that out of the way, we're now officially done with what we can consider the game's first chapter. Let's head into New York Mysteries 4's second of many parts.
Cathedral walkthrough
The beginning of this second chapter has Laura and Travis traveling to a cathedral. Here's a step-by-step to starting in this new area:
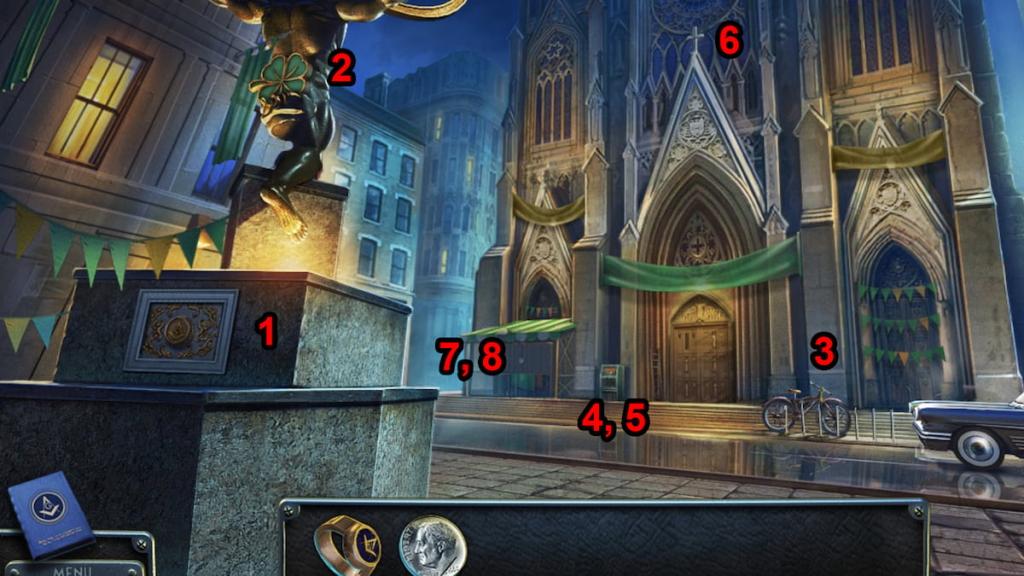
While many of the early steps lead to you discovering puzzles, you won't be able to solve them yet. Instead, you'll need to start with the door we just unlocked, where you'll find St. Patrick's Day-themed items. Here's a complete list of objects you'll need to obtain:
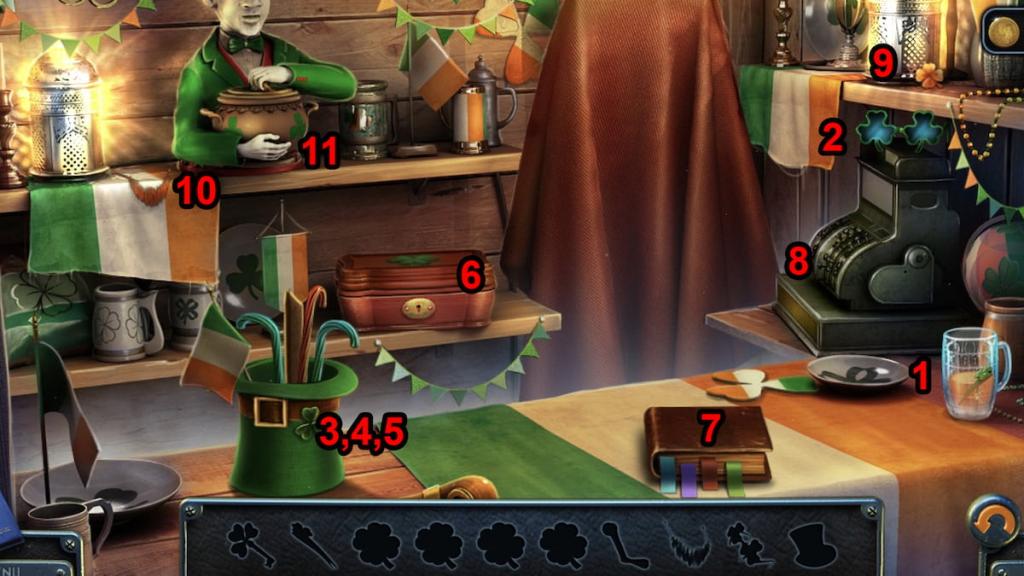
Now that you have all four clovers, select the statue encased in glass and place all four in their respective slots. You'll receive the Figurine of St. Patrick, which you can now use to solve a puzzle inside the cathedral.
Once you're ready, enter the cathedral to find a wall of statues with one empty slot. Place the Figurine of St. Patrick and the two buttons you found previously to begin the puzzle. From here, you can put the newspaper on the left wall to show you the correct order. Below is the completed figurine wall:
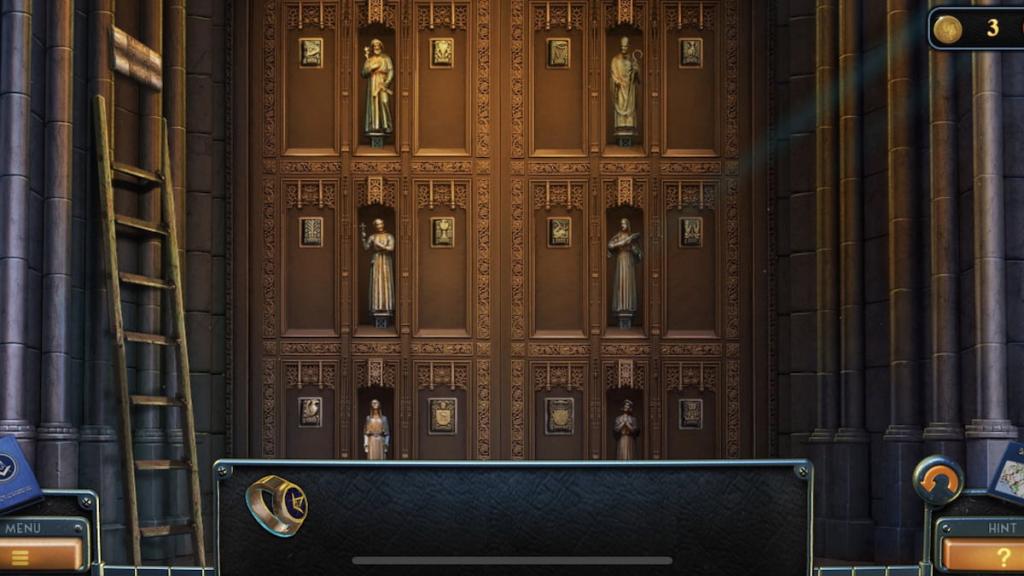
Once you solve this puzzle, the cathedral will open, allowing you to venture inside and investigate further. Below is a step-by-step to revealing more puzzles within the cathedral:
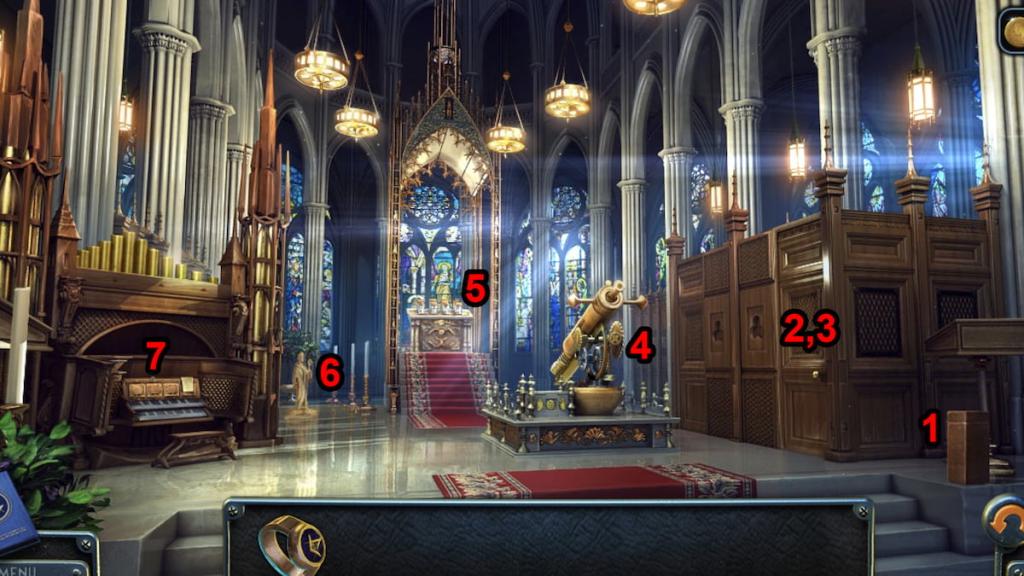
Before you can obtain your sixth lens, you'll need to use the drawing with keys on the piano. From here, follow the sequence by sliding your finger, mouse, or stylus across the top and bottom keys in the direction the image shows. Doing so unlocks a cupboard containing another lens.
The seventh and final lens is outside of the cathedral, inside the bicycle. Select it and use the clip to open its pouch, letting you obtain the lens and a wrench to use later. Along the way, go back to the plaque from before and insert the Atlus Statue figurine inside. We won't be tackling this just yet, but keep it in mind for later.
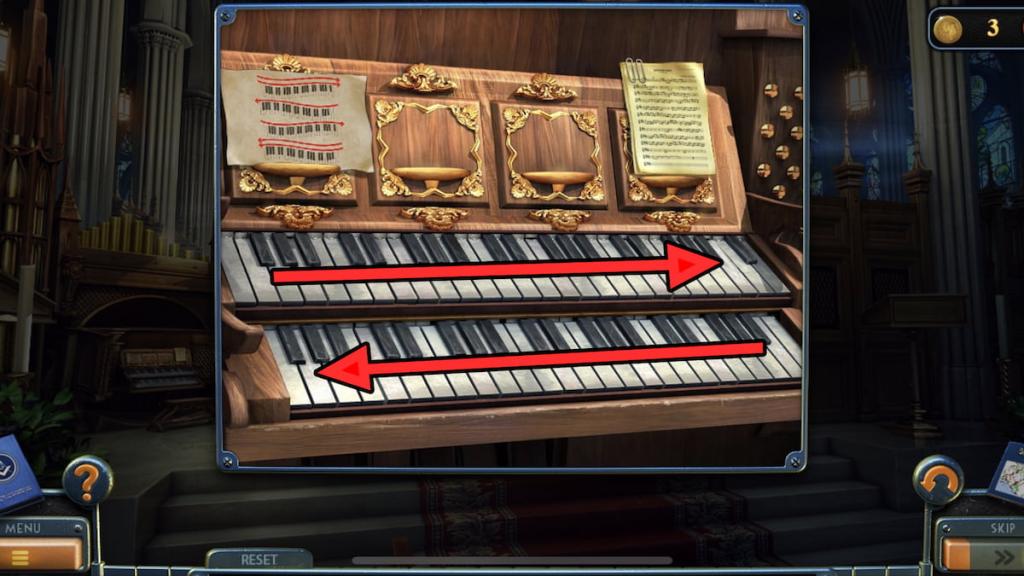
Before you can activate the telescope, you'll need a battery to power it. Head inside the car, open it, and disconnect the wires. Now, you can use the wrench on it to obtain a battery. Bring it and your seven lenses inside the cathedral to activate the telescope.
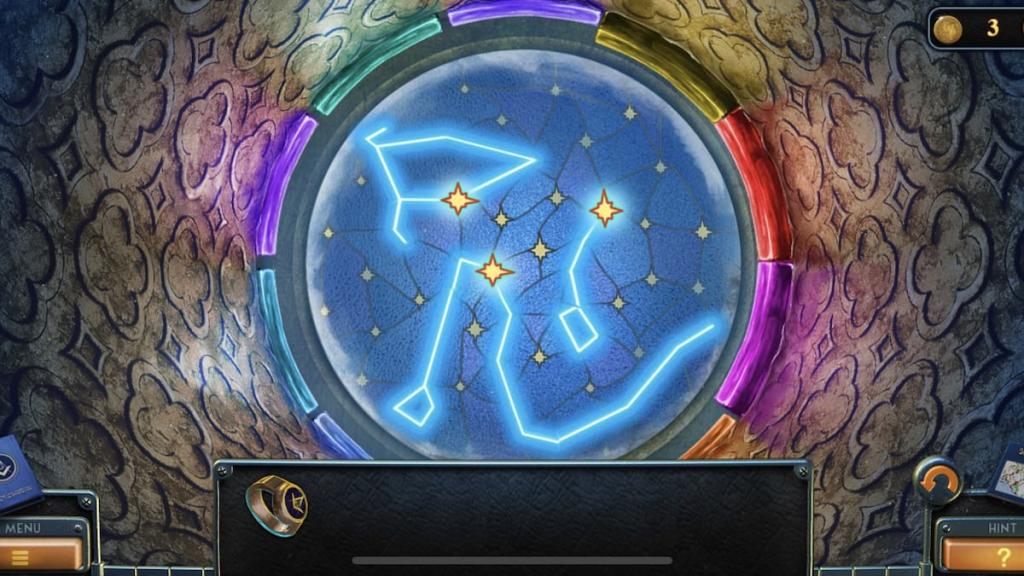
Upon activating the telescope, you'll find a rainbow ring and, initially, the cathedral's wall. Tap on the rings until you find a constellation screen with three bright stars. Your goal is to create constellations containing only these stars, making sure not to include any that are off to the side of your screen.
To solve this, tap on every color except yellow, red, and magenta. These will create three constellations, rewarding you with a map of the starry sky.
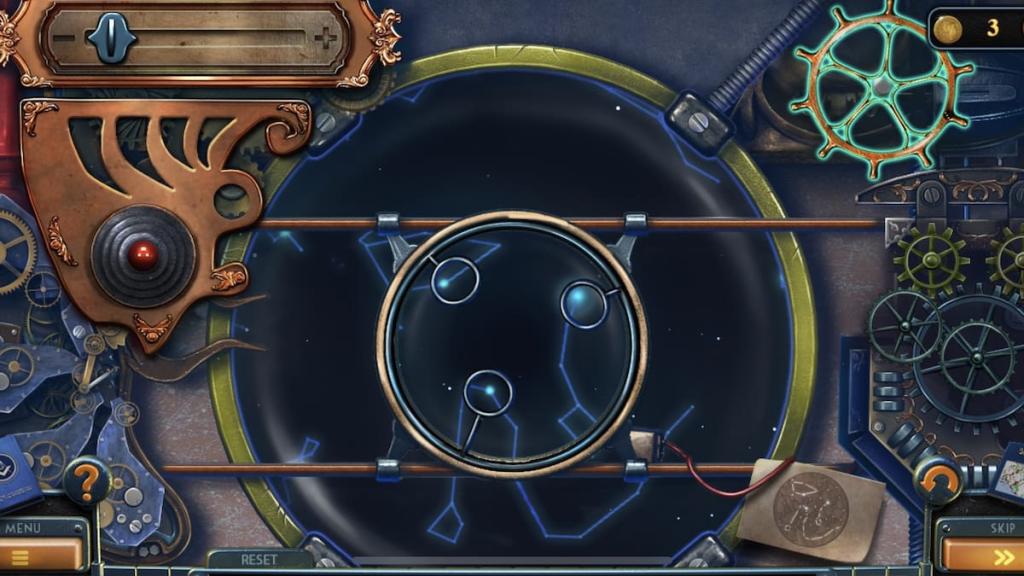
Now that you have the map, you have everything you need to solve the plaque puzzle from the previous steps. Head outside, select the plaque, and use the map on the center circle. Now, you have it on hand as a reference.
There are three components to this puzzle:
Using these three controls, move the constellation's screen around so it matches the map. Upon completing it, you'll receive the answer to the number pad puzzle inside the cathedral: 573353.
Now that you have another set of numbers, head back inside the room with the bench. Use all six numbers on the numpad inside the wooden panel to initiate a cutscene.
Order walkthrough
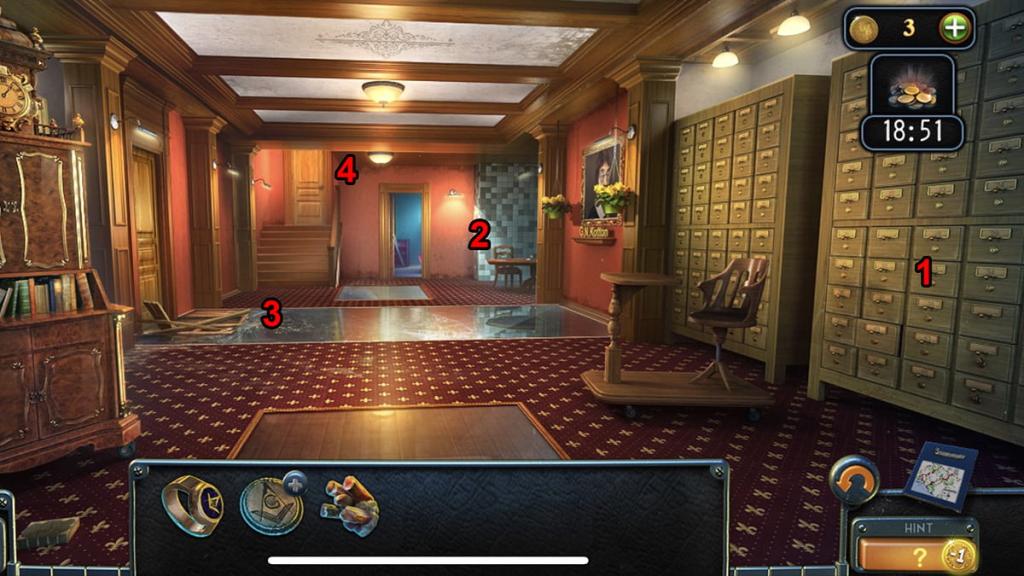
Your next objective after entering the Order is to find a way to access the laboratory. Here are some steps you can use to start this process:

Since you need two candles for each candlestick, we'll ignore this part for now. In the meantime, head into the blue doorway to discover a library. Here are some steps to uncover its items:
Although there's more to do in this room, we first have to leave the area and go back to the main foyer. Before leaving, use the compass figurine on the Medallion of the Order to insert it into place. Although this doesn't complete the puzzle, it'll help you clear out your item list slightly.
By now, you should have the following items:
In the main foyer, use the umbrella on the dinosaur skeleton to obtain another key. You'll also gain a sharp tooth, which you can use to cut open the miscolored cushion from earlier. Do this to claim a second "parts of the scheme" paper and a cotton ball.

Now that we have some extra items, go back to the library and return to the taped book on the desk. Use the sharp tooth to cut it open, letting you claim a part of the mosaic item. We can now return to the main foyer once more for another puzzle.
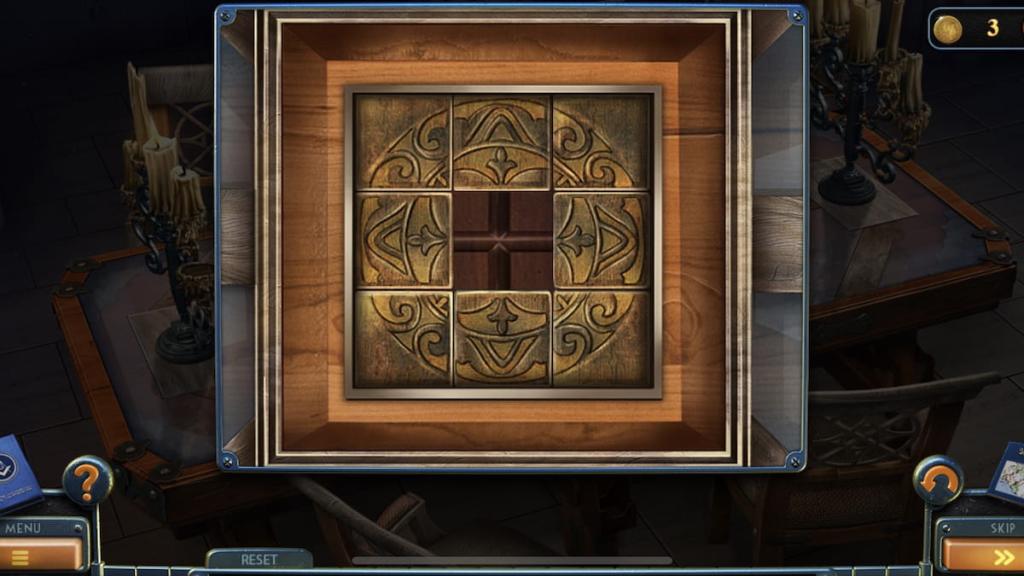
More specifically, you want to interact with the candle table from before. Now that we have part of the mosaic, we can place it inside the table and complete a miniature puzzle. The easiest way to complete this is to move each curved piece into its respective corners before connecting the lines with the remaining portions so they create a token-like circle. Completing this puzzle will reward you with a second candle.
Now that you have both candles, place them inside both candlesticks on this table. Your next goal is to align each candle so that the height of each side matches.
Starting with the left candlestick, arrange them in the following order, starting from left to right:
Next, we have the right candlestick. Arrange each candle in the order below, starting from left to right:
Finishing both puzzles will open a compartment in the table, revealing a hint to another puzzle. With this hint on hand, tap on the wooden box next to the table and use the paper on its display as a reference. The key is counting each clover leaf for the answer.
Counting each will give you an answer of 6245 if you begin from the top-left dial and move clockwise. Inputting this code will let you open the box, allowing you to collect a shotshell, a sixth key from within the red drawers, and tweezers from inside another wooden drawer. Use the paper you picked up previously on the shotshell to receive paper with powder.
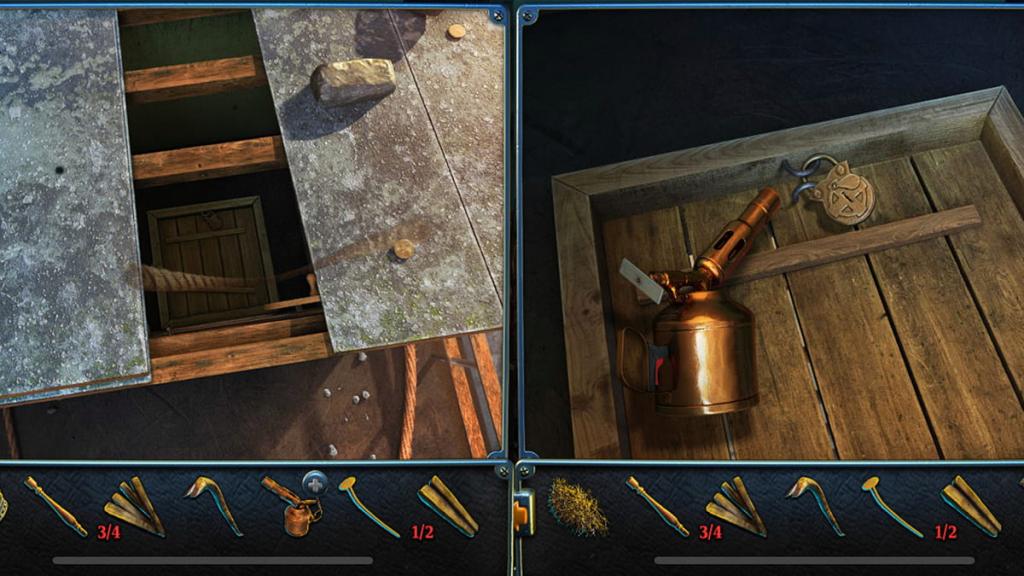
It's time to swap back to the library once more. With the tweezers on hand, go back to the desk and toss both the dry wick and cotton ball inside the kerosene flask. Pick both up using your tweezers to receive cotton soaked in fuel and a wick. Use the fuel-soaked cotton on the lighter in your inventory.
At long last, we're ready to blow up and unlock the lab's door. Use your paper with powder, wick, and lighter on it to unlock the door, letting you enter the Order's lab and meet your next character.
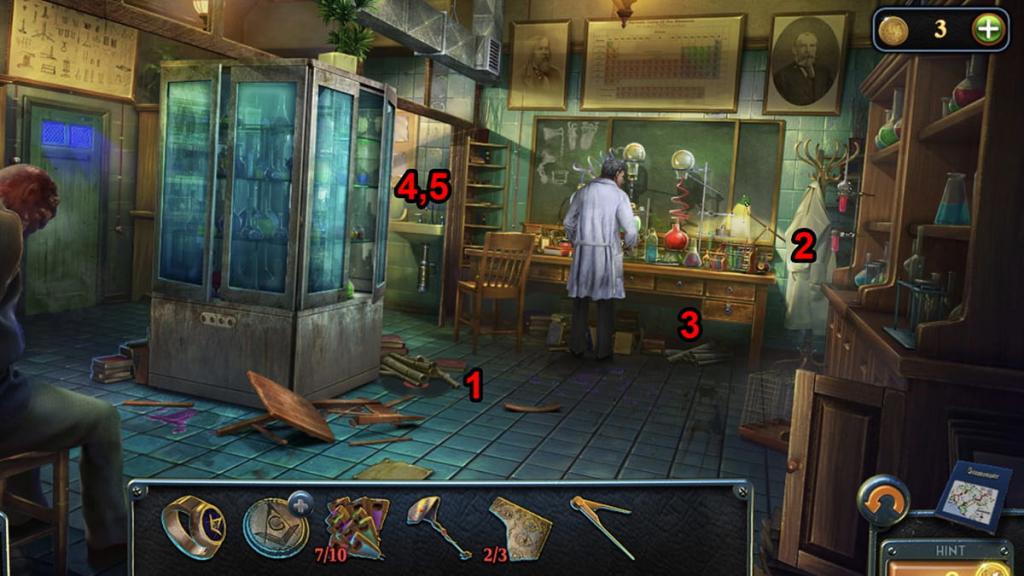
Order: Laboratory walkthrough
After finding Bishop and talking to Travis more about the current situation, you'll officially be ready to explore the laboratory in hopes of developing a healing serum for the currently ongoing epidemic as part of New York Mysteries 4's storyline.
Here are some initial steps you can take in this new room:
Now that we have all three parts of the Scheme, you can interact with it in your inventory to piece it back together. Place the Scheme inside the photo tray before using the photo development liquid on it. You'll restore the page's colors as part of a later puzzle.
By now, you should have the following items in your inventory:
Within the lab, you'll notice a green locked door above Bishop. Leave the room and go back to the library before using your scalpel on the globe. Doing this reveals a door key inside it, which you can use to open this door and access a storage room.
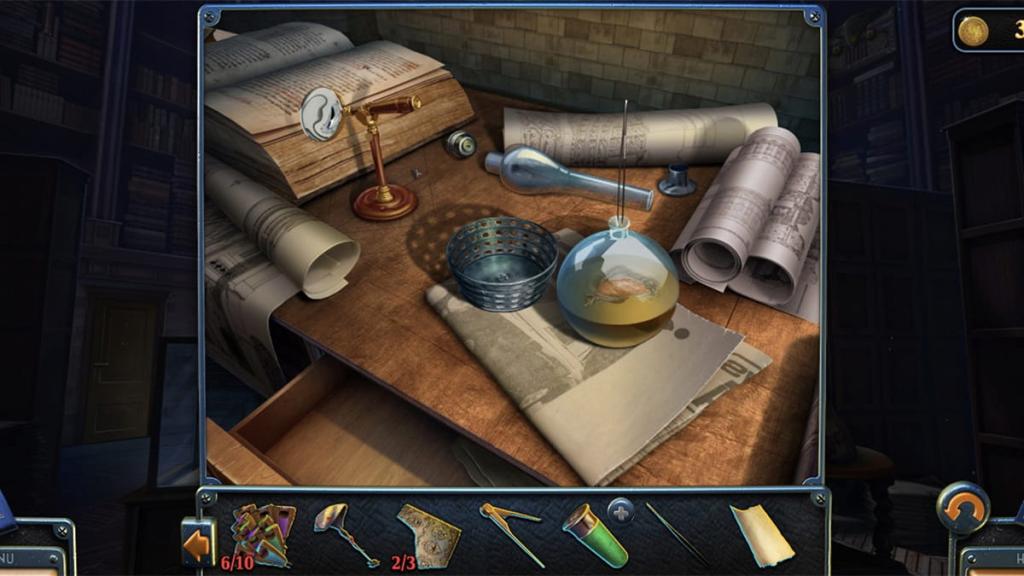
As you open the room, you'll have a list of 15 items to collect. Below is every item and their locations:
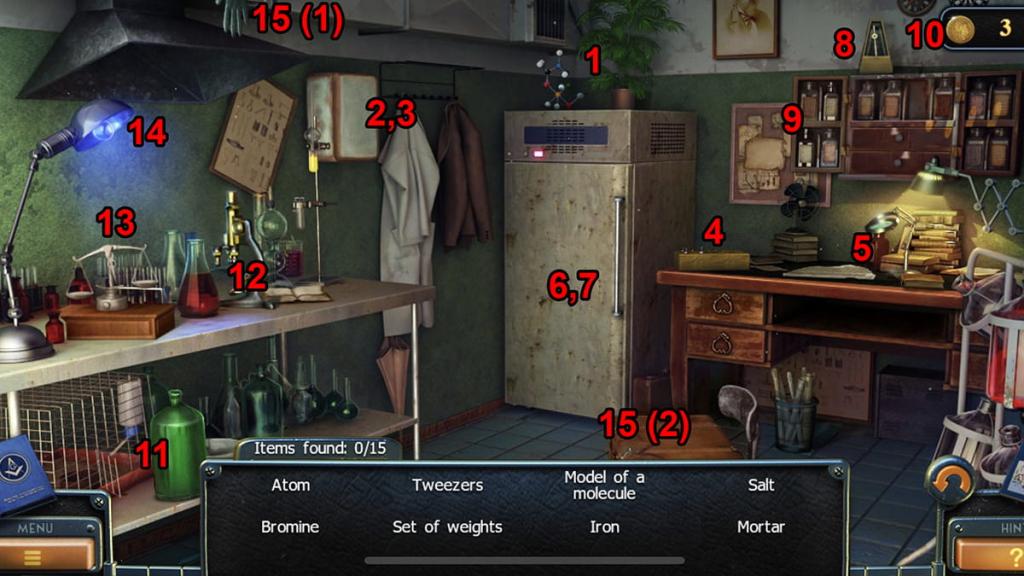
Once you find all 15 items, you'll receive a UV light bulb to use on the lamp in your inventory. Open the glass cabinet in the center of the lab and shine the UV lamp on its bottles. Move the lamp to the bottom-left and middle-right shelves to make two bottles glow, allowing you to collect two chemical agents.
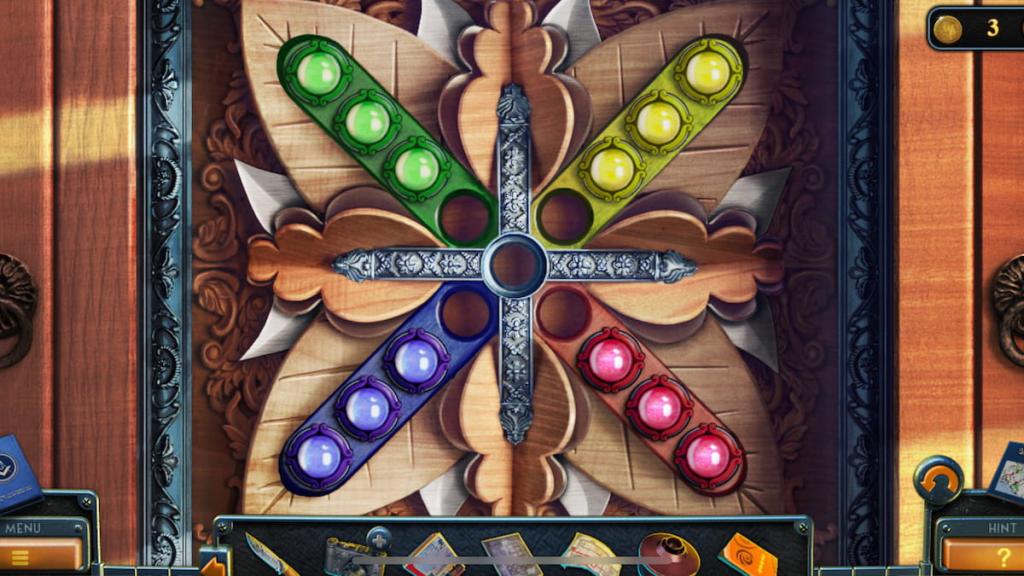
Give what you have to Travis to initiate a cutscene. He'll give you the tenth and final key you need for another puzzle. Leave the lab and interact with the ornate wooden door to the lab's right. You'll spot ten empty slots, which you can use your keys on to activate. Now, use your Scheme to officially begin.
The objective of this puzzle is to move each key along the paths using each blue button. For example, pressing the leftmost button will swap the orange and green keys, as those are the two connected to the vertical line.
The best strategy to use for this puzzle is to focus on one key at a time, starting from either the left or right side. Since the pink-red key is at the end of the path, move it along using the button until it reaches its bottom-left slot to match the Scheme. Repeat this with purple, yellow, green, and the rest that follow until you reach the end. Once they're in the right spots, tap on each one until their arrow's direction matches that on the Scheme.
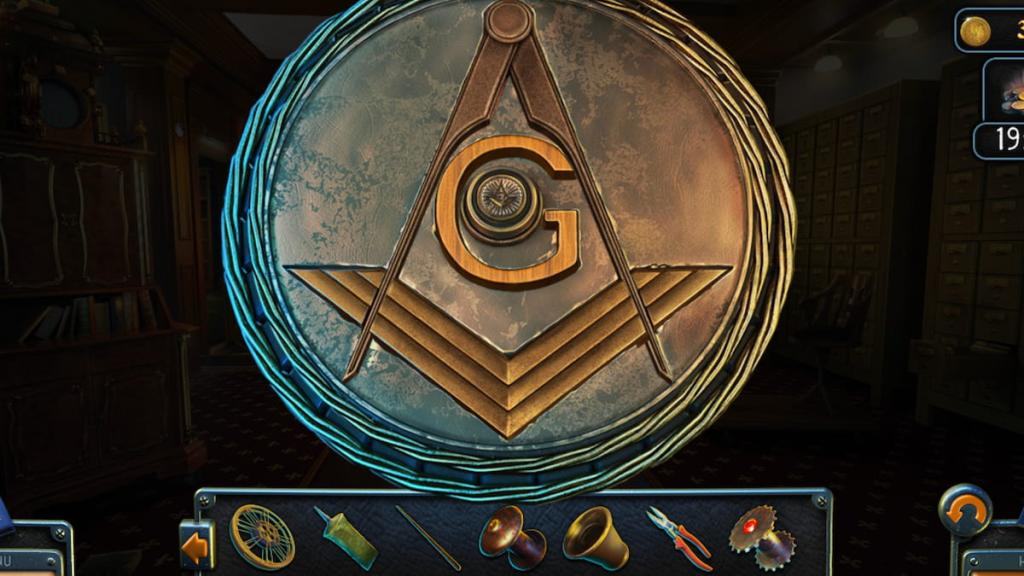
Once you complete the puzzle, another door will unlock, revealing a massive storage room with a "G" that matches your Medallion. Tap on the glass display on the far end of the room and use your ring on its lock. You'll unlock the display, letting you obtain Elbaite for Travis. Several cutscenes will ensue, revealing some important information about New York Mysteries 4's story.
Order: Security and mail room walkthrough
With that plot twist out of the way, Bishop will immediately tell us our first objective: get through the Order's vent system to access the security room. Tap on the crowbar on the floor in front of the dais before selecting the vent to the right of the "G." Tap on the boxes to stack them before using the crowbar on the vent.
Upon entering the vent, you'll have several branching paths, with most of them leading to dead ends. Here's the exact path you'll need to take to reach the end:
After reaching the end, you'll find a second vent with a wire attached to it. Grab it before tapping on the latches along the vent's corners to unlock it, letting you access the security room.
Inside the security room, you'll have another set of items to obtain, with dark outlines being your only hint for what to find. Below is a list of every item and its locations:
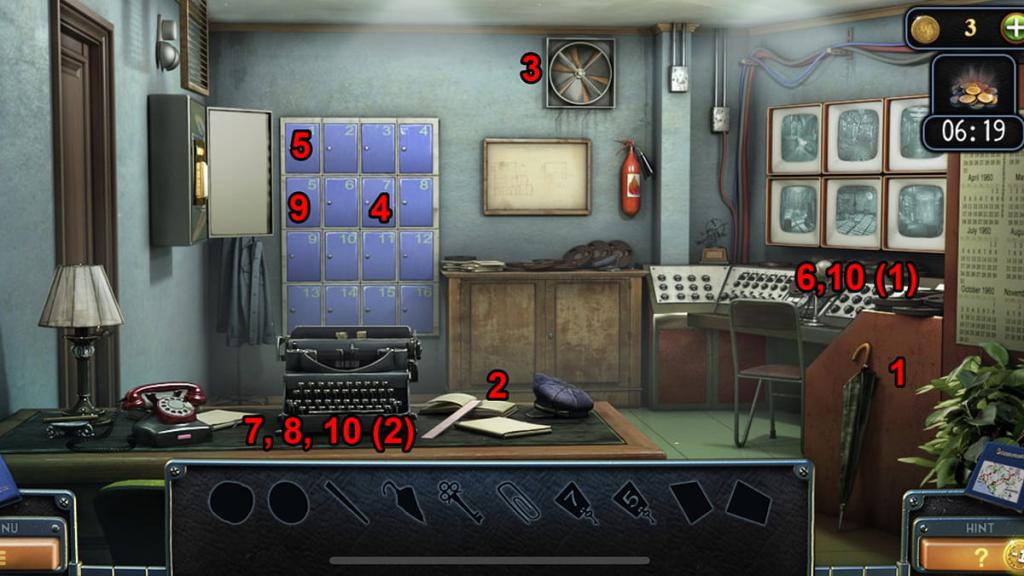
By the end of it all, you should have the key card and calendar on hand. Tap on the keycard reader next to the door to start your next set of puzzles. By looking at the calendar, look for four numbers circled in red ink rather than blue. These four digits, 1458, are the passcode you need to punch into the keypad before swiping the keycard.
Inserting this code will reveal a second puzzle. Your goal is to turn off every chip on the display by tapping on each light. When you select one, it'll turn on or off while activating those directly adjacent to it. Tap on the following lights to finish the puzzle:
After pressing all six buttons and tapping the red button, you'll leave the storage room and reunite with Bishop. After a brief conversation, he'll give you a green snake key. For now, though, we'll focus on the storage area we were just in.
Within the storage room, you'll find several cardboard boxes in the bottom-left corner of the room, directly to the right of some pallets. Move the boxes to find some rubber gloves. Now, by selecting the hook near the room's ceiling, you can open its panel and use your gloves to attach the wire. The hook is now operational, allowing you to move heavy objects with it.

After selecting the hook again and activating its directional arrows, move it right before letting it descend. It'll grab a metal cart, which you can tilt up to reveal a roller. Grab it before returning to the Order's library. Use the roller on the ladder to move it, letting you access a peculiar snake chest.
Fortunately, we have the two keys needed for this chest. Use them to open it, letting you read a book and collect a key. Open the library's door with the key to access a mailroom.
Here are some steps to take after entering the mailroom:
Before heading into this newly unlocked room, enter the one next to it. Here, you'll find a presentation room that houses the following items:
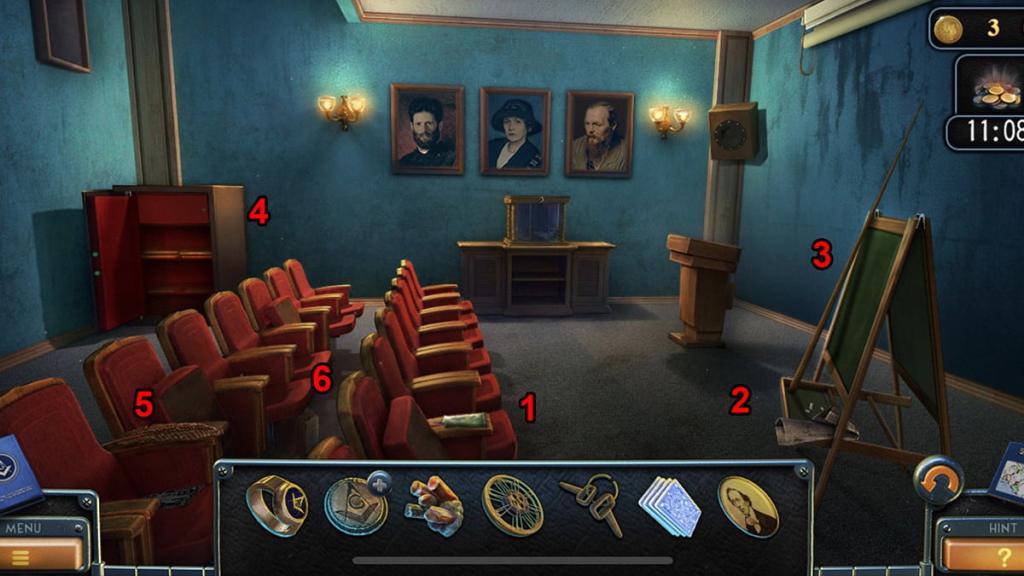
We'll be returning to this room a few times. For now, with these new items on hand, it's time to enter the second room. You'll find all kinds of equipment that you'd expect in a movie theater. Here are some extra items to pick up within it:
It's time for another puzzle. Using any of the three portraits on the board, your goal is to move one of them onto the golden circle near the top of the screen. Here's a complete step-by-step to doing so:
You'll find a minute hand inside that you can use on another puzzle in the mailroom. Save it for later, though, as we'll knock out the entire puzzle once we obtain every hint for it. Instead, use the hammer you found in the previous room to detach the broken floorboards, which will allow you to access another room.
Much like the science lab, you'll need to find 15 objects within this room. Below is every item and their locations:
Once you find every item, you'll receive a projector lens, which you'll need for the broken projector in one of the previous rooms. Before returning here, though, head back to the science lab, open the sink, and use the dry rag on it.
With a wet rag on hand, head back to the movie theater room and combine your lockpin and sliding ladder. You can now access a window, which you'll need to clean off with your wet rag. You'll find another clock puzzle hint, 2:55.
You'll then encounter your third and final clock hint by heading back into the projector room. Tap on the desk where you found the portrait puzzle and clean the coffee stain with the wet rag to find a clock with 12:40 as its time.

We now have all three hints required to complete the puzzle. Go to the clock in the mailroom and move both hands until you set it to the following times:
Each time you move the minute and hour hands to their correct times, you'll unlock a latch. Opening all three rewards you with nippers, a gear, and an angle bracket figurine.


With these three items on hand, tap on the painting in between the two hanging flower pots to find a G.N. Kotton portrait. Use the nippers on the G to cut it off, allowing you to insert it and the angle bracket figurine into the Medallion of the Order. Now, the Medallion has the G and a compass figurine inside, allowing you to activate it with your ring. Doing so powers it up, converting it into a Medallion.
Now that you have the assembled Medallion, return to the blue movie theater room and use it on the podium under the speaker. Inside, you'll find an audio cable and scissors, which you'll need very soon.
Before using them, however, we can get another item by tapping on the blue glass box under the paintings and using the nippers on its lock. You'll unlock the case, letting you grab some paper and a stencil.
You now have enough items to repair the speaker above the podium. Use the paper, scissors, and glue to fix the speaker. There are multiple parts to this section, with this being the end of one of its major components.
Next, we have a mini-puzzle to tackle in the movie projector room. With your new stencil on hand, tap on the puzzle above the desk and insert the stencil. Your goal is to move each row until the film matches the stencil. Thankfully, this isn't too tricky, as you only need to press each button until you find all three matches. Doing so reveals a projector bulb, giving you the last item you need to fix the projector.
By now, if you haven't been returning items to the projector, you should have the following resources in your inventory:
Six of these eight items can go inside the broken projector. Following the assembly guide next to it, place everything except the Elbaite and pointer inside each projector slot. The wheel goes at the top, while four of the remaining items require tapping on the projector's body and inserting them into their respective slots. You can slot in the bulb by tapping on the circle to open a lid, letting you slot it inside and complete the repair process. The last step is to activate its screen by tapping on the orange "down" arrow on the wall.
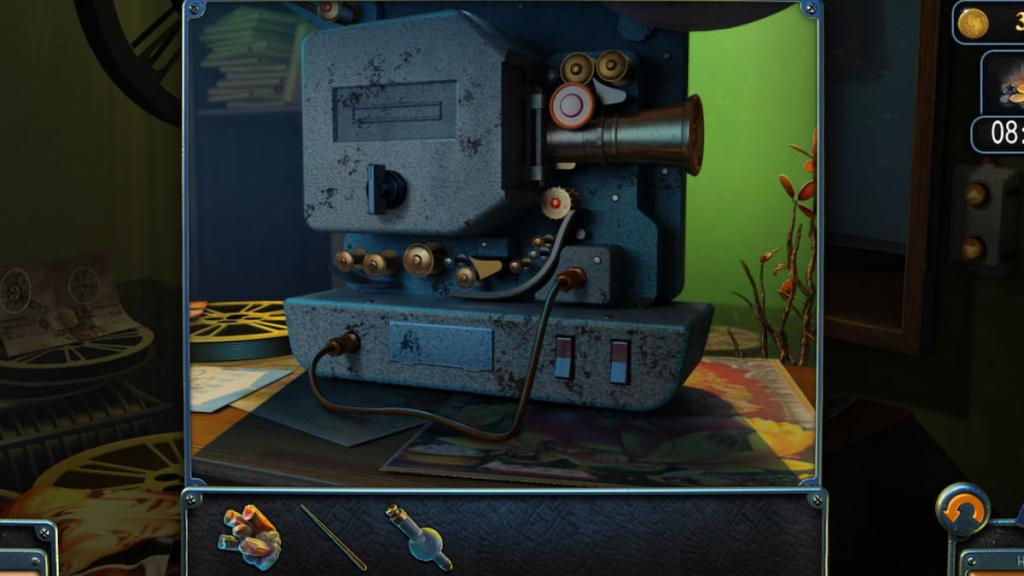
There's a small hiccup, though. Although the screen will go down slightly, it won't descend fully. To fix this, head back into the theater room and use your pointer to fling its band away, letting it fall in full display.
With that done, return to the projector and turn it on to witness a cutscene, concluding this part of New York Mysteries 4's story and letting you move on to its next region.
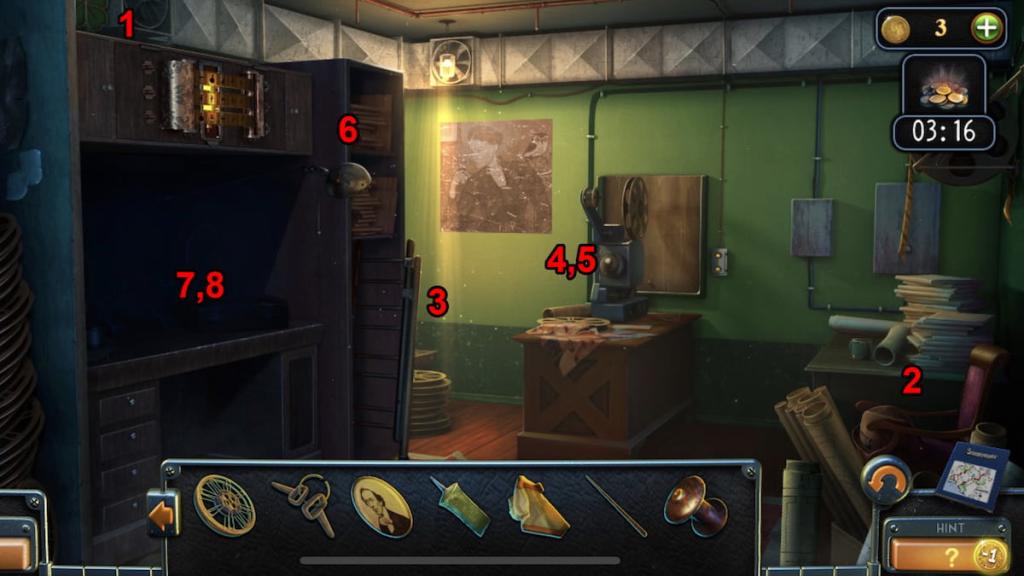
Research Institute walkthrough
We've now arrived at a research institute to search for more clues about Travis. Here are some initial tasks to help you progress in this area:
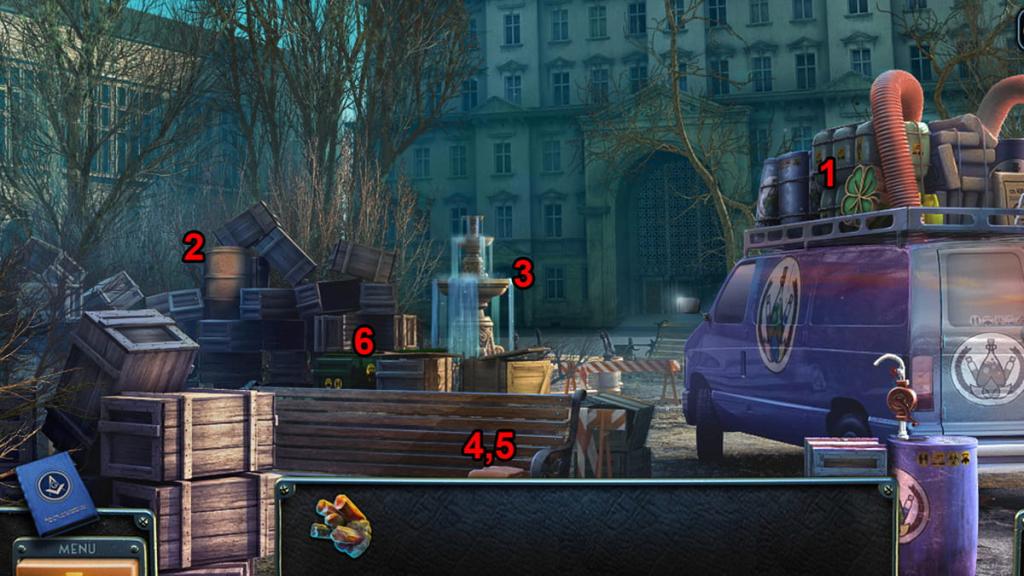
There are a few other components here, most notably the van's puzzle, the barrel of acid, and the van's mirror. However, we don't yet have the required items to tackle them. Instead, head to the next area before taking the steps below to claim more items:
There are two paths from here. Since we don't have enough items to tackle the left path, go inside the building. There are four spots to interact with initially:
Right away, you can use the sleeping pills on the ham to prepare it for a future puzzle. When you're ready, head up the stairs and interact with the window before reattaching its handle. You'll find a ladder, which you can activate to access another helpful area. We don't have everything we need for this new region just yet, but at least it's ready for later.
With that part prepared, return to the first area and use the thick key you found earlier on the van's back doors. Doing this unlocks our first major puzzle of this region.
Your goal is to use the central "key" mechanism to rotate each outer ring until the "empty" metal parts align with the spring on the lock's right side. You do this by using the long metal peg to nudge each section in a given direction.
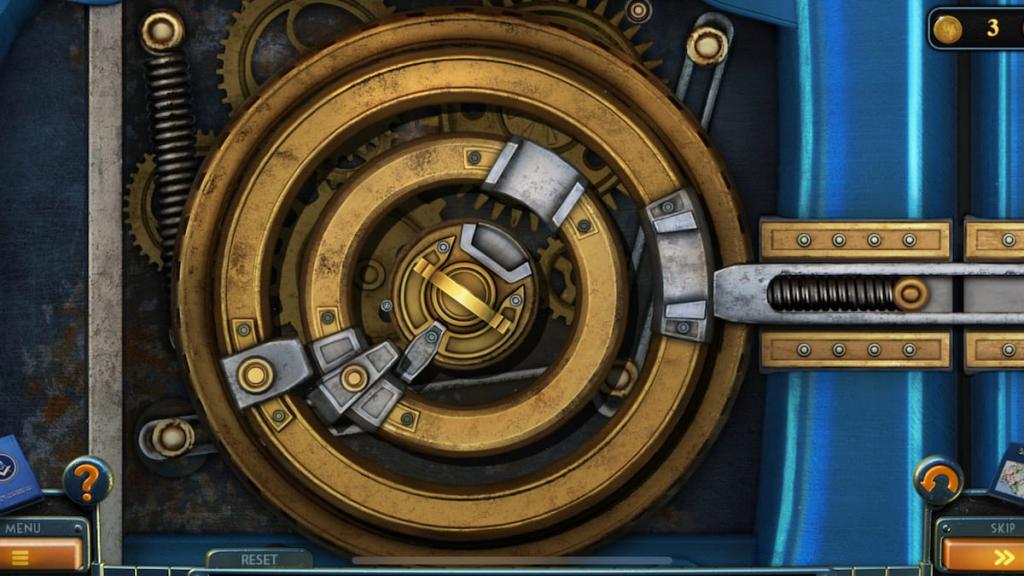
The best strategy for solving this is to turn the center dial clockwise until it picks up the other two rings. From here, you can turn it until the outer ring's metal latch aligns with the spring. Once it's in the right spot, turn the center circle counterclockwise until the middle latch is in place. Lastly, you'll turn the center circle clockwise again to complete the puzzle. If at any point you accidentally move a latch into the wrong area, you can backtrack by linking the three circles and re-rotating the latches into their right spots before repeating this process.
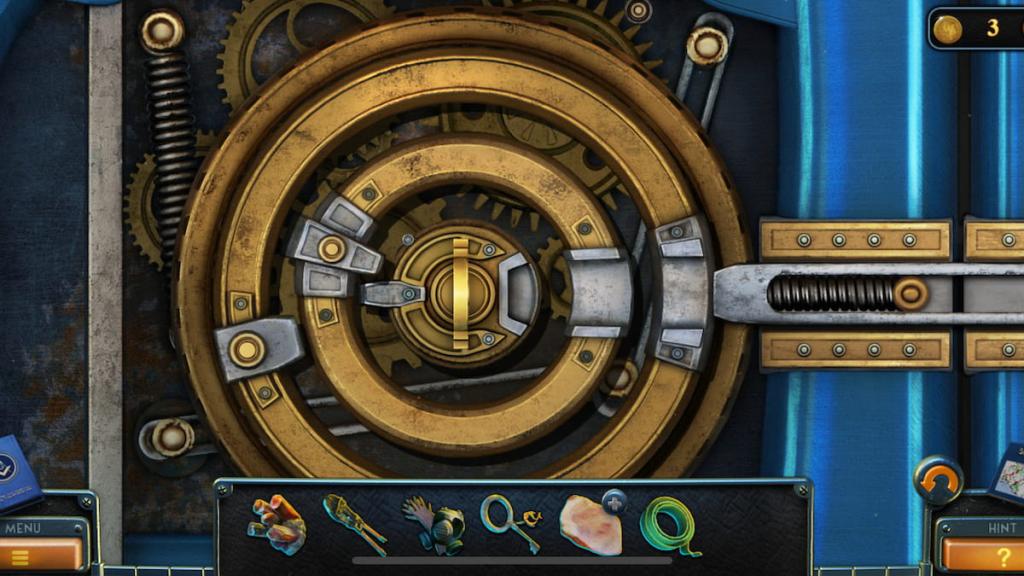
Completing this puzzle will open the van, giving you a 15 item scavenger hunt again. Below is a list of every item and their locations:
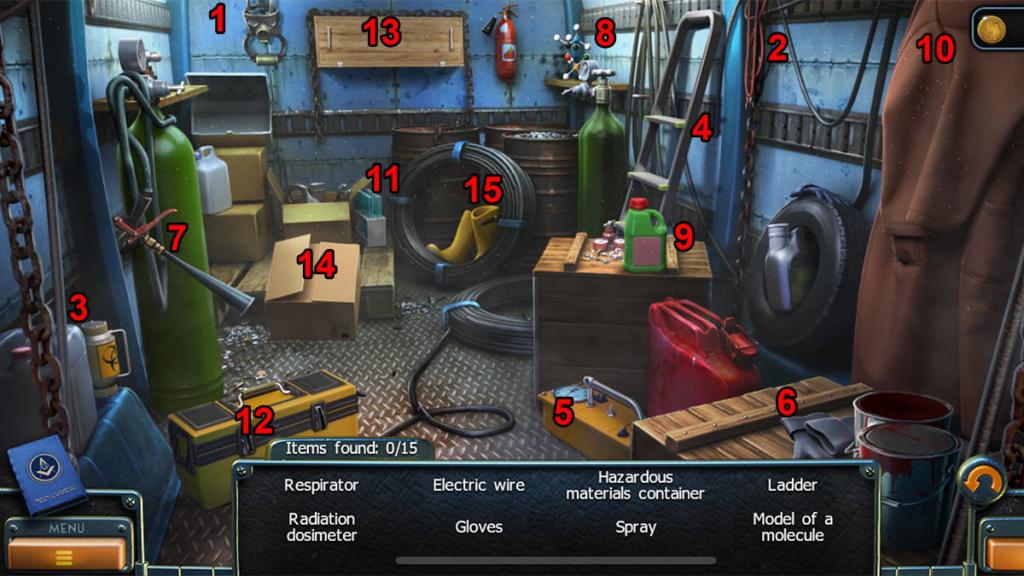
Your reward for finishing this mini scavenger hunt is a lever. We now have everything we need to return to the path with the ladder, letting us activate a crane atop the building's rooftop using this newfound lever. Use the crane to lift up the pallet of wooden crates, revealing a dog on the other side.
Normally, this'd be quite cute. Unfortunately, this dog is a little aggressive, so we'll need to get it to relax before we can proceed. Use the tin snips to cut through the gate's chains before tossing the pill-filled ham to the dog. It'll take a brief nap, allowing us to access another new region.
There is a lot going on in this area, from collectibles to gameplay items to pick up. Here are some resources we can pick up right now:
With all of these items on hand, tap on the ladder leading up to the apartment door and use the fishing rod to make it descend. You won't be able to unlock this door until much later, but we at least have access to it when the time comes to progress beyond this point.
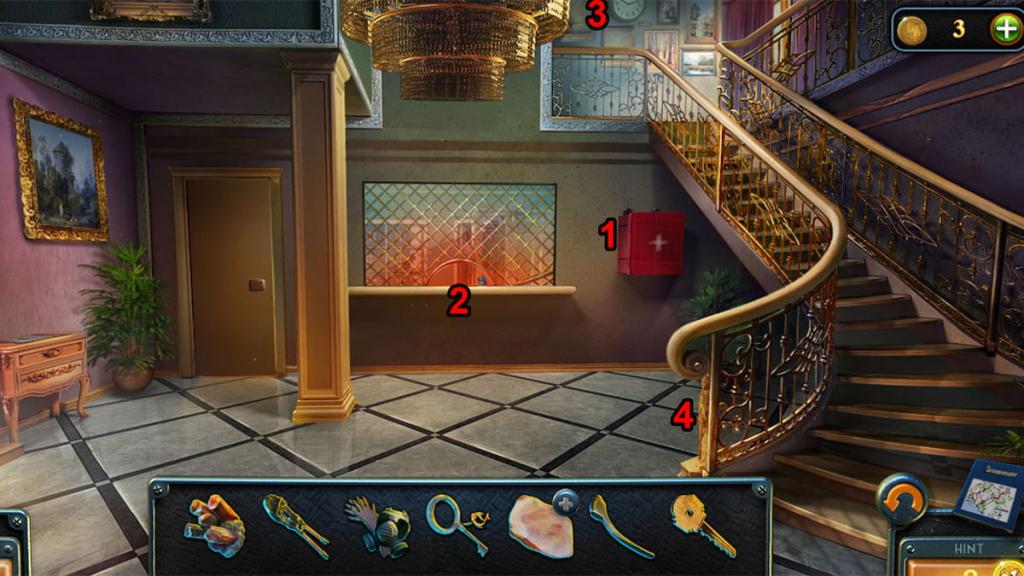
For now, we have a key component for solving another puzzle. Head to the institute's main foyer—the room with the first aid kit—and interact with the nightstand. Insert the wooden figurine inside before starting the puzzle.
Your objective here is to move each piece toward the figurine's center so they form a large square. First, we'll move the following beige pieces, in this order:
Next, we'll move the yellow pieces in the following order:
With this mini puzzle complete, you can now open the drawer, letting you claim a glass container.
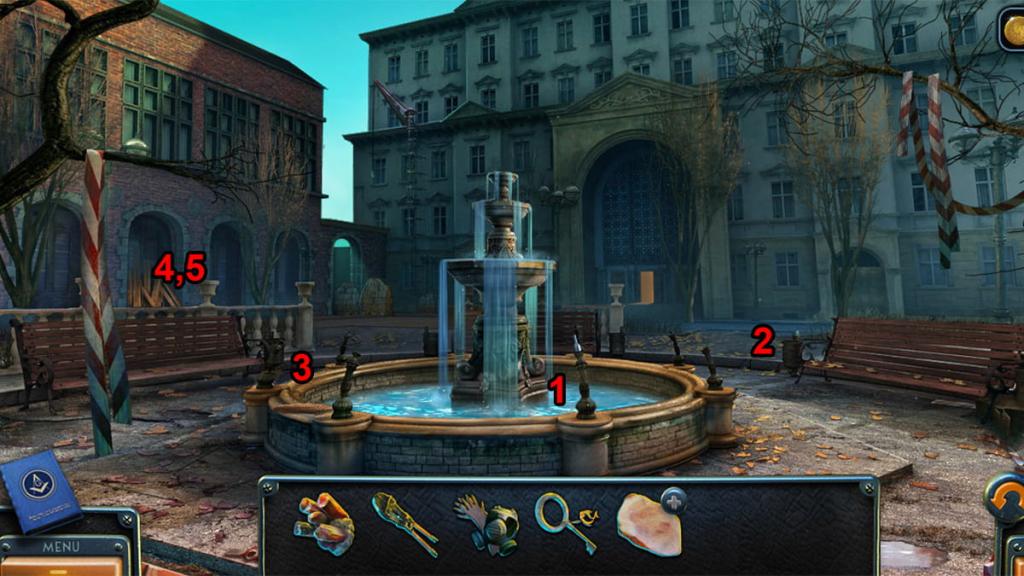
Heading out of this building, we can now remove the strange lid from the fountain using our adjustable wrench. Tap on the fountain and use the wrench on the lid to receive a nozzle before returning to our starting area. Our next goal is to remove the van's mirror using the barbeque poker, allowing us to claim it as a quest item for later.
If you interacted with the red blinking lights in the foyer earlier, you may have noticed the hint involving this mirror. In your inventory, combine the poker with the mirror and packing tape. You'll now have a mirror attached to a poker, which'll help you spot an orange button behind the desk. Right now, the counter is in the way, so we need a way to remove it.
What's the best way to do this? Acid. Head back to the institute's starting area and interact with the acid barrel. You'll need to use the following items on this screen:
With every item on your screen, attach the nozzle and hose to the barrel's spout before attaching the clamp. Tapping on the glass container, turning the lever, and interacting with the red wheel will cause you to pour acid in the container to use on the foyer's counter.
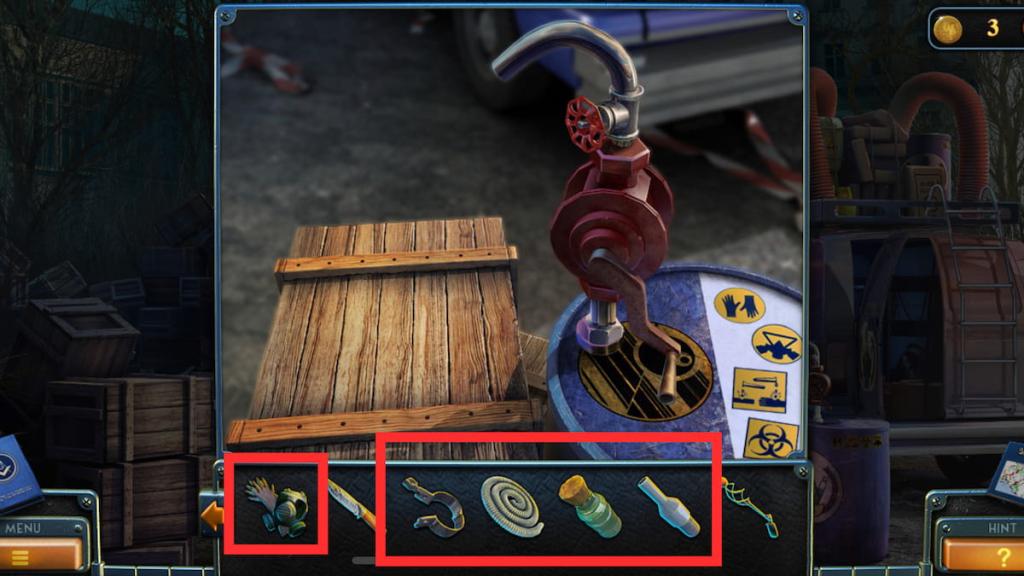
With a bottle of acid on hand, return to the red blinking light and use the acid bottle on the counter while wearing the protective kit. You can now use the mirror-poker on the area again, this time being able to turn off the light and open the door.
We're now entering an office room within the research institute. We have another mini scavenger hunt to take part in, with the list below revealing every item's location, in order:
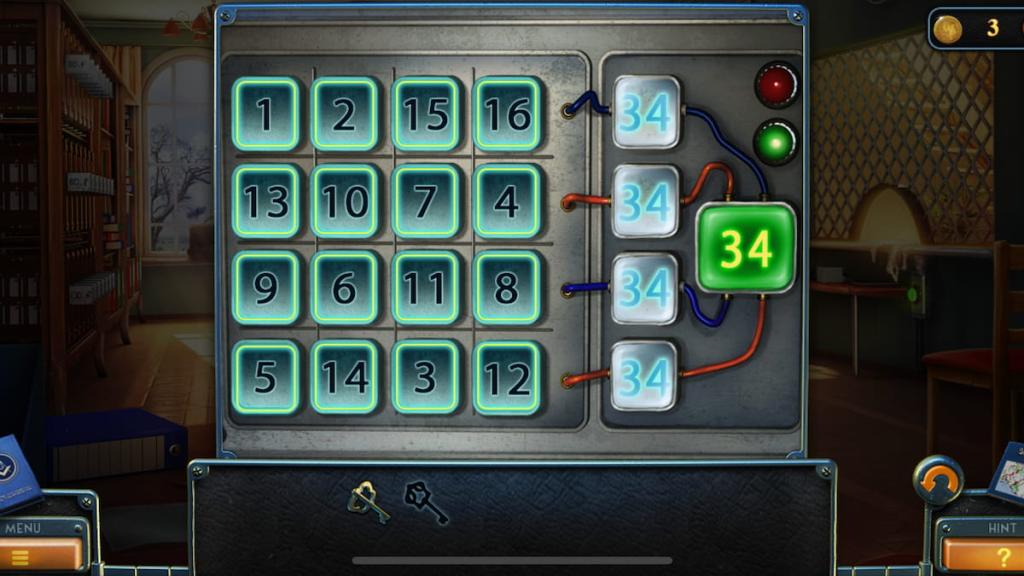
You'll need to complete the safe puzzle using the three buttons to obtain the final key. Tap on the safe in the bookshelf, slot in all three buttons, and rearrange each number until each row equals 34.
There are multiple solutions to this puzzle. Here is a set of numbers you can use during your playthrough:
Now that you have the second key from the safe, open "03_f" from the side wall and unlock its display. Claim the 01_f_20 keycard before returning to the apartment door from earlier. Entering this room will initiate another cutscene.
Travis' Office walkthrough
After making it into Travis' office, take the steps below to find some initial items:
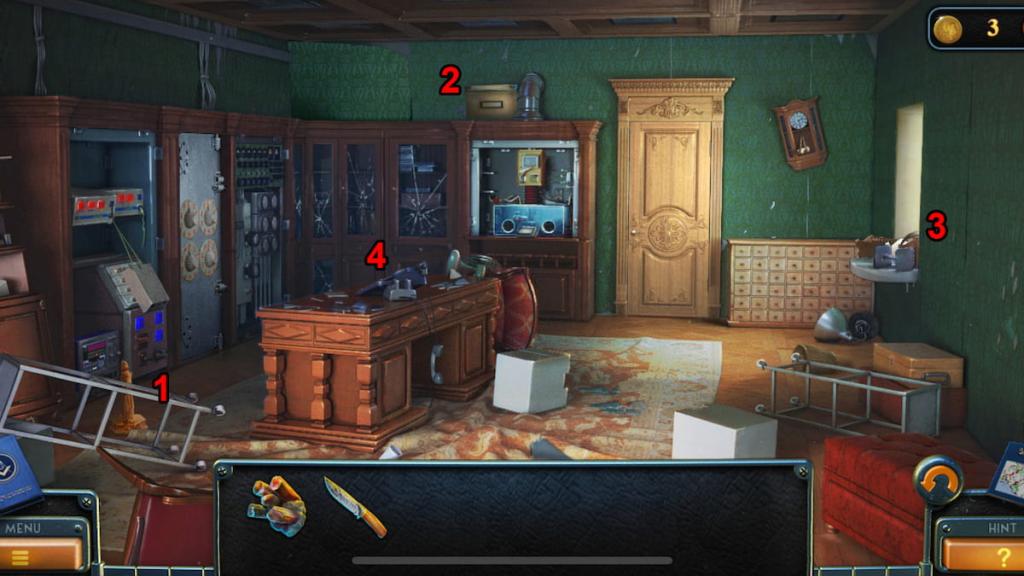
With this note, we can solve the safe puzzle that's against the left wall. Tap on the safe, place the note inside, and turn the dials according to its hints. Since the answer relies on the moons and stars on each dial, the solution is 8519.
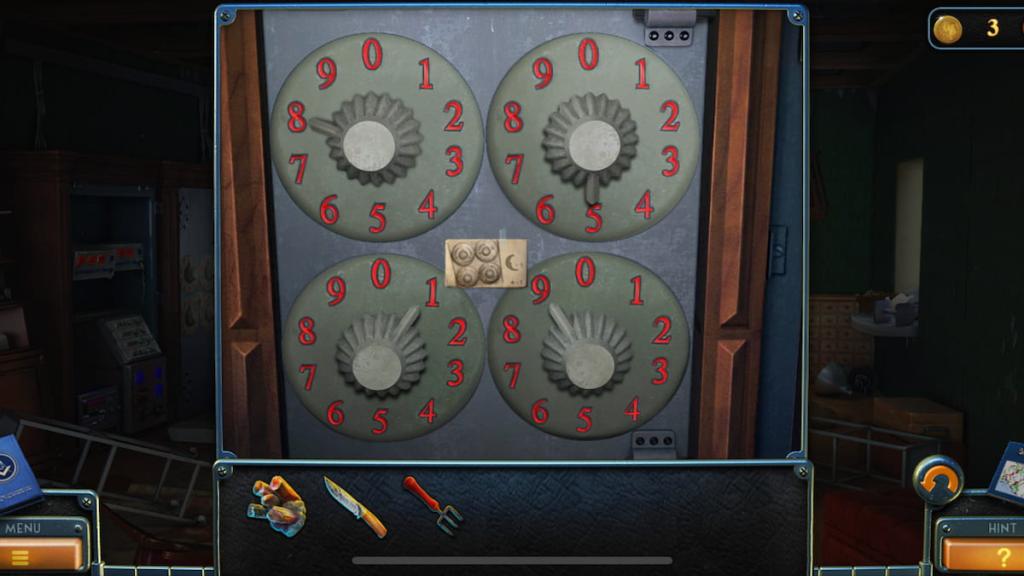
Once you unlock the safe, open the door to find an orange tube. For now, place it inside the analyzer that's next to the door and close its latch. Attempting to pump air out of it will reveal that the pump system is broken, with a key jammed inside one of the pipes. Pick up the key before exiting the screen and unlocking the room's door.
With another area unlocked, you can pick up the following items:
While we'll be returning here later for another puzzle, for now, head up the stairs and search for the following items:

With these resources on hand, tap on the crow on the roof before climbing the building's ladder. You can now remove the nails with your nail remover, revealing an entrance that's accessible with the rope you just picked up. Inside, you'll find a door with a lock, which you can heat by filling your empty burner with kerosene and igniting it with your nail remover.
We now have access to a basement. Here are some initial items to collect:
In the back-right corner of the room, you'll also spot a metal box containing various colored wires. This is another puzzle that requires you to connect one side to the next, all the while passing through every node, aside from those that are broken. The only assistance you get is being able to rotate angled wires for easier passage.
Here are the solutions for all three parts:


Once you complete all three sections, insert the knife switch handle into the wire terminal and activate it. Before we can go any further with this, we'll need to obtain a cable from a later puzzle.
For now, head back to the rooftop and interact with the tar tank. You'll need to use the following items on it:
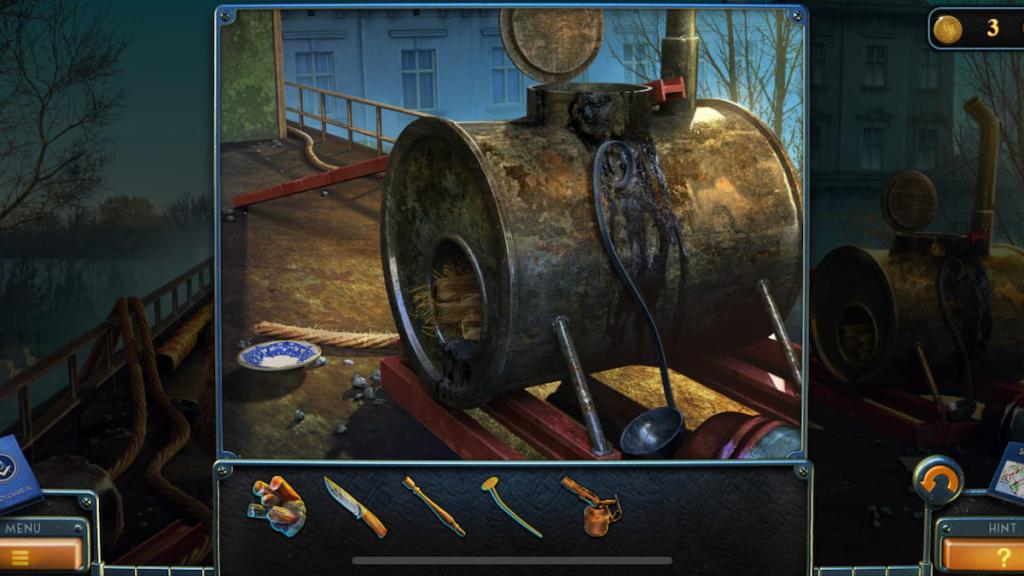
With all four items in, use the spoon on the screen to scoop out some tar, allowing you to claim the tar as an item. Dunk the baluster inside the tank as well, as you'll need it for later. You can now head back down to Travis' office, where we first began this section, and use the tar on the analyzer pipe.
With the pipe fixed, turn the red dial, pour the orange liquid into the small container in front of the mortar and pestle, and place the container on the blue lift. Pressing the red button will tell you about the virus strain on a screen. More importantly, you can now cut the machine's cable twice with your knife before returning to the basement.
Now that you have a cable for the basement, place it into the hole below the red and white cannon before exploring the pit where you found the wooden boards. Use your tar-covered baluster to pick up a trinket in the water.
Speaking of water, our next stop is the fish tank near the office's staircase. Tap on the display underneath the tank and use your trinket on the pearl to activate its puzzle. Your goal is to get the pearl to the white circle in the bottom-right corner of the display while moving around its blocks. Pressing each arrow will move everything around, including the pearl and each block, if possible.
With this information in mind, press each arrow in the following order to complete the puzzle:
Finishing the puzzle unlocks a treasure chest, sending a key up to the tank's opening. Use your nail to fish it out before going back down to the basement, unlocking the door, and witnessing another cutscene.
Old Lady's house walkthrough
We're finally getting closer to finding Travis and figuring out what's going on with this massive mystery. Follow the steps below for some initial items to collect:
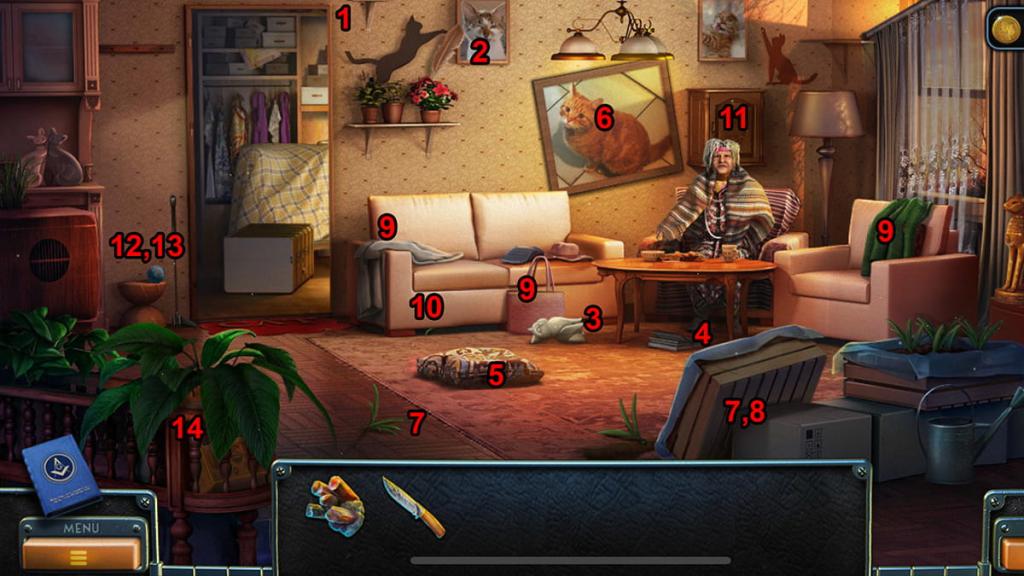
In the next room, there's a second room full of objects to collect. Here's a list of tasks you can complete here for the time being:

Now that you have a bunch of new items to play with, return to the room with the old lady. She'll give you a cellar key, which you can use to unlock another room soon. Before doing so, tap on the plant crates and use the following items on them:
Doing this gives you your fifth and final thread. You can now tap on the display case behind the old lady and place both the balls of yarn and thread inside. Your last task in this room is to use your push broom on the curtain to fix it.
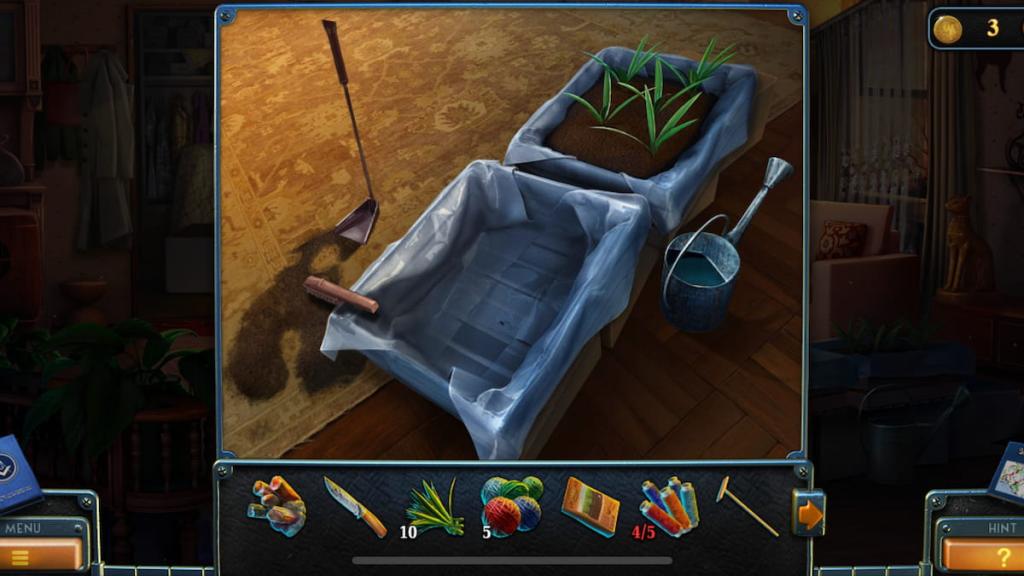
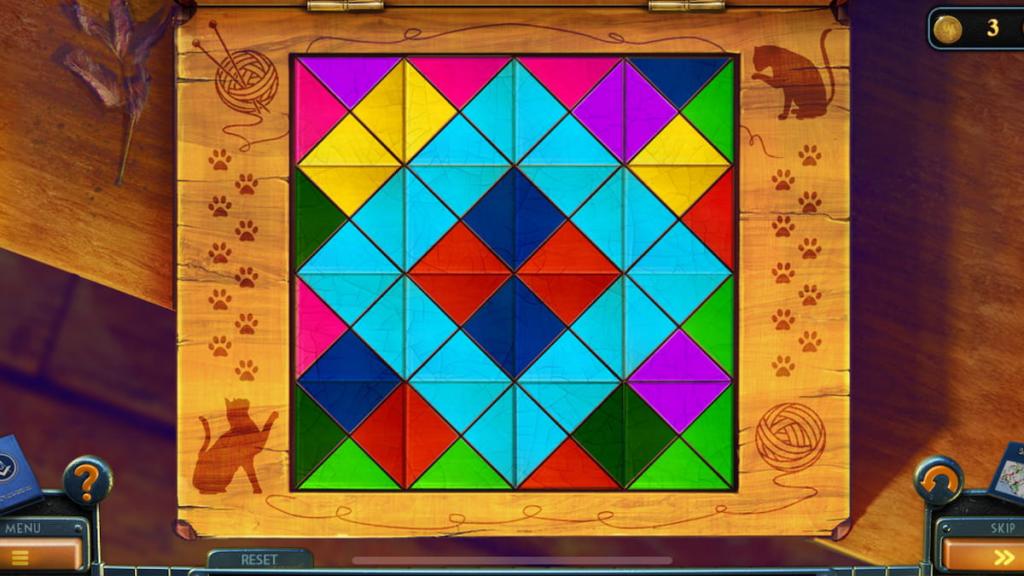
By now, you should only have Elbaite, the knife, and a cellar key in your inventory. Head into the bedroom and use your key to unlock the door next to the dresser. You'll enter a pantry full of food and a scavenger hunt to find 15 colored cubes. Here's a list of every cube's location:
With all 15 cubes on hand, insert them into the puzzle box to begin your next challenge. Using the two placeholders as reference, your objective is to create a cohesive image using every cube. The complete solution will create a light blue diamond with red and dark blue in the center, as shown below:
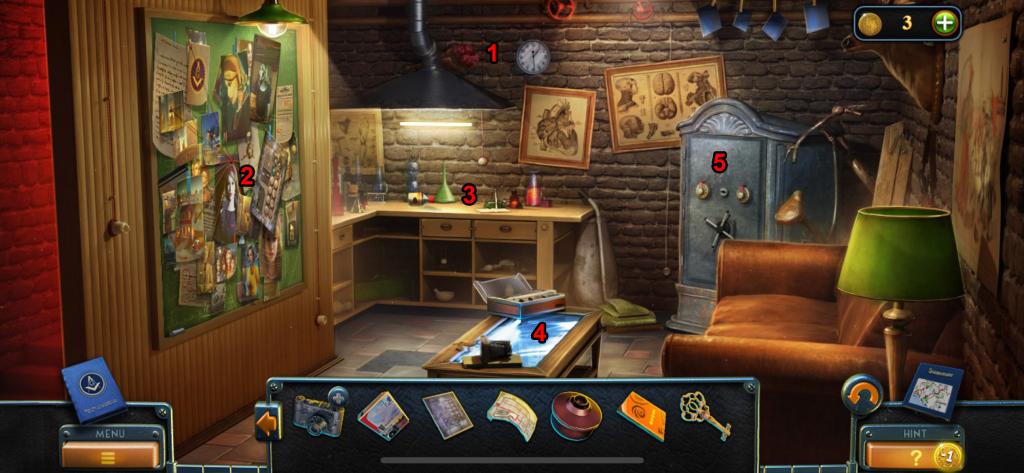
Finishing the puzzle will reward you with glasses to return to the old lady. She'll give you a key in return to use on the secret door in the bedroom. Clear away the wooden boards and other debris to uncover the door, allowing you to enter Travis' home.
Travis' house walkthrough
We've officially made it into Travis' house. Here are some initial steps to take in this new region:

With these initial five steps done, head into the room to your right to find a hallway. Here are some additional steps to take:
Before going down the stairs, return to Travis' bedroom and use the key to unlock the wardrobe's locked compartment. You'll find a colorful puzzle to slot your chip into.
To complete this puzzle, you'll need to slide each chip around so it lands in its respective color section. However, they can only go into the empty slot closest to the center and can't jump over other chips. Here's a step-by-step guide to solving this puzzle:
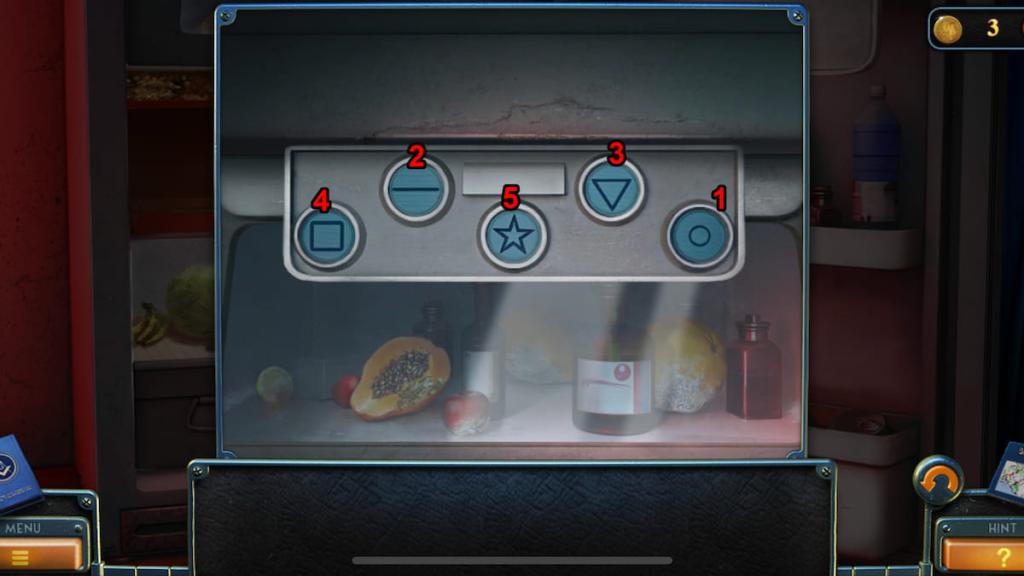
Completing this puzzle rewards you with another key to use later in this part. Before heading down the staircase in the other area, we need to tackle the mystery with this camera. For now, head into the red doorway and select the fridge to start a mini scavenger hunt. Here's a list of every item and their locations:
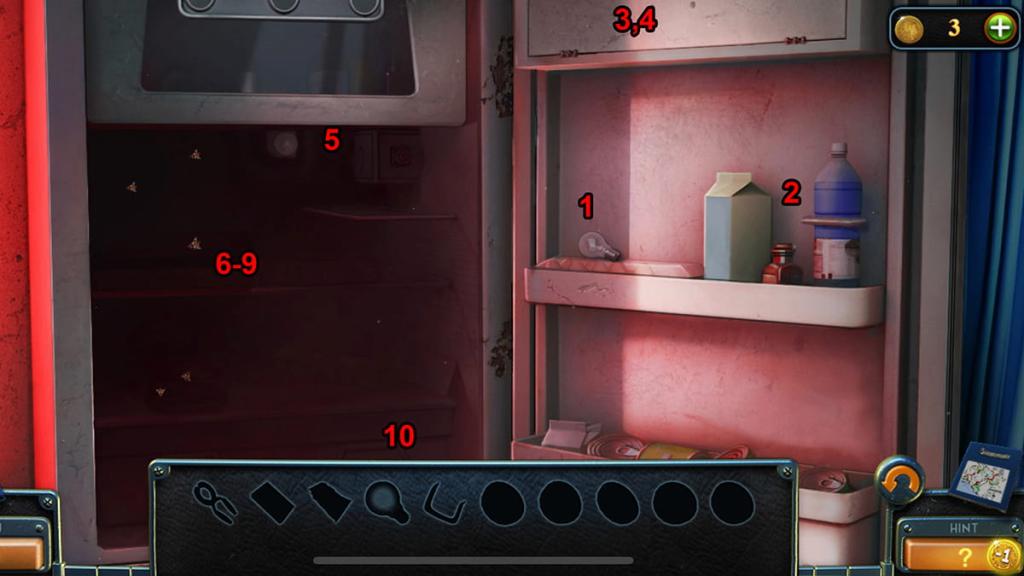
Now that you have all five buttons, tap the top of the fridge and insert them. The correct order to press them depends on the number of lines in the shape. In short, you need to press Circle, Line, Triangle, Square, and Star. Upon opening the area, collect the Sodium sulphate solution and Benzol before moving on.
We now have two key ingredients to help us develop these photos. Leave this room and head down the stairs before taking the following steps:
Now that we have the developing solution and cleared some inventory space, use the tank and solution on your camera. You'll remove the film, place it inside the tank, and use the solution to develop it.
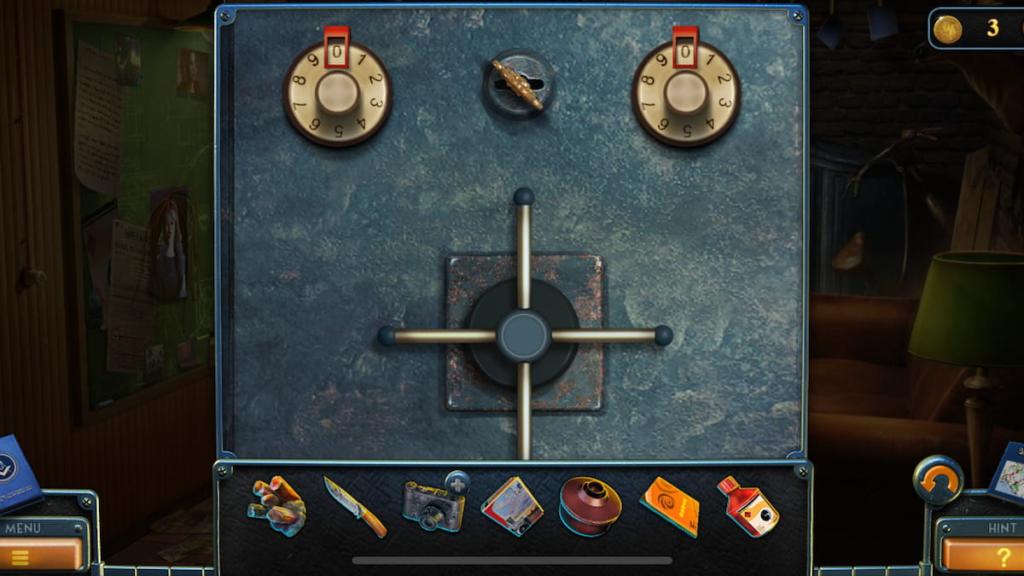
Before we go back upstairs, we're ready to tackle the safe. Use the key on it and read the combination page that appears on it. Using the colored circles on the page, we'll discover 95 is the solution to it. You'll find Fixing solution inside, giving you the final piece you need for the photo development process.
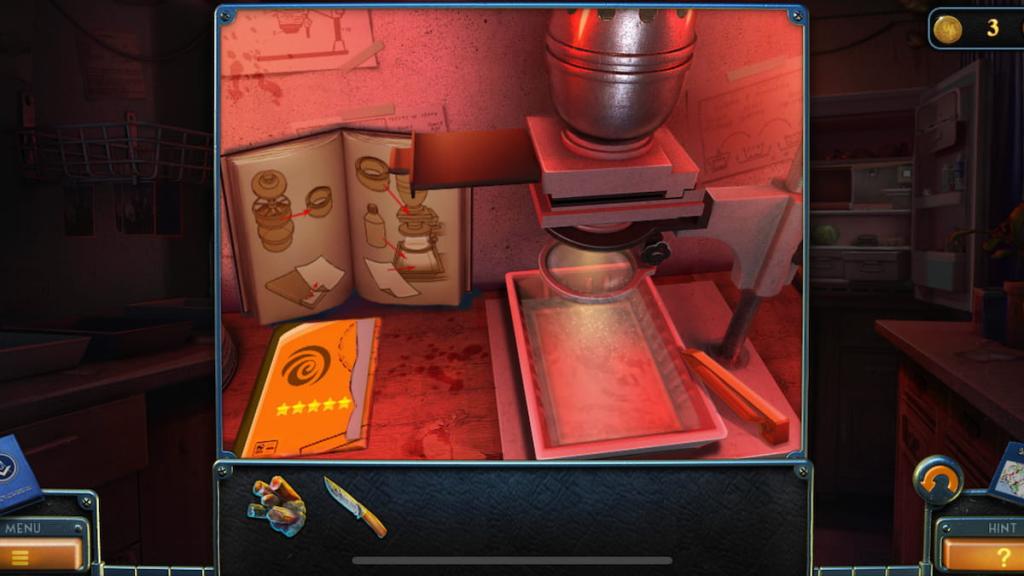
Here are the steps to developing Travis' photo after returning to the red room and interacting with the film analyzer:
With the final photo on hand, return to the safe's room and place the picture on the blueprint table. You'll initiate a cutscene, leading you directly to the final part of New York Mysteries 4's storyline.
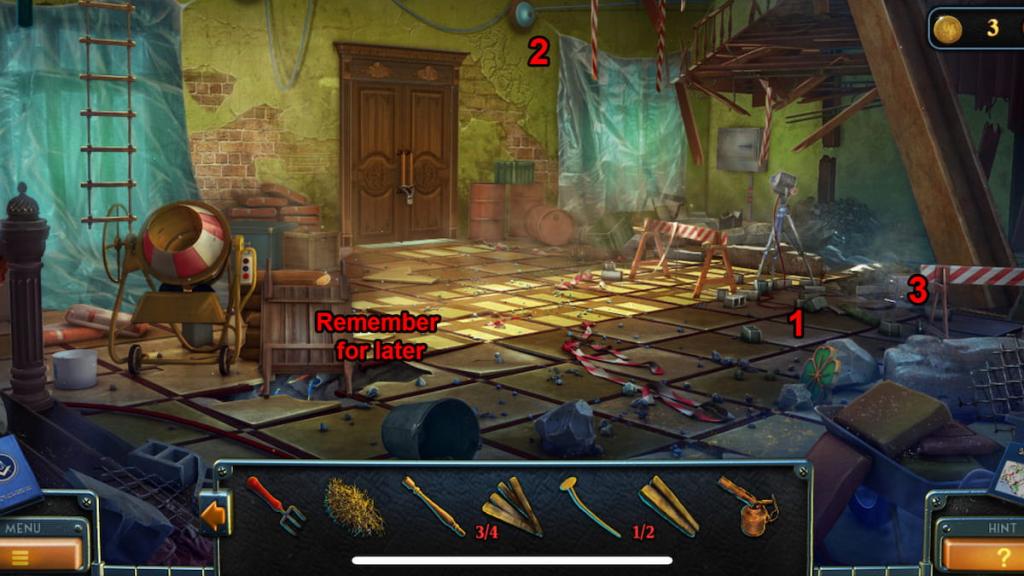
Water-pumping station walkthrough
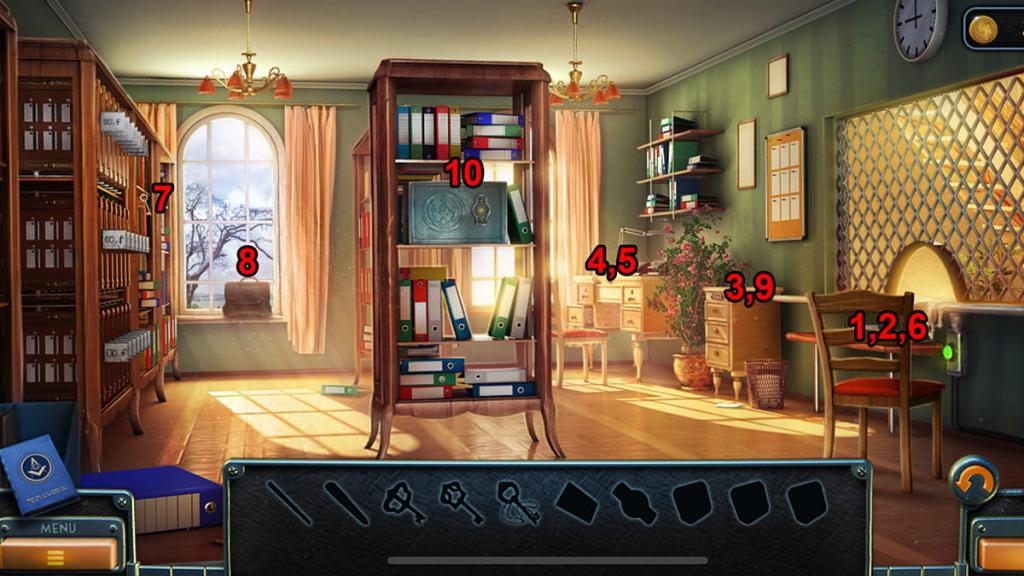
The last section we'll explore is the water-pumping station. Here are some first steps to take before advancing:
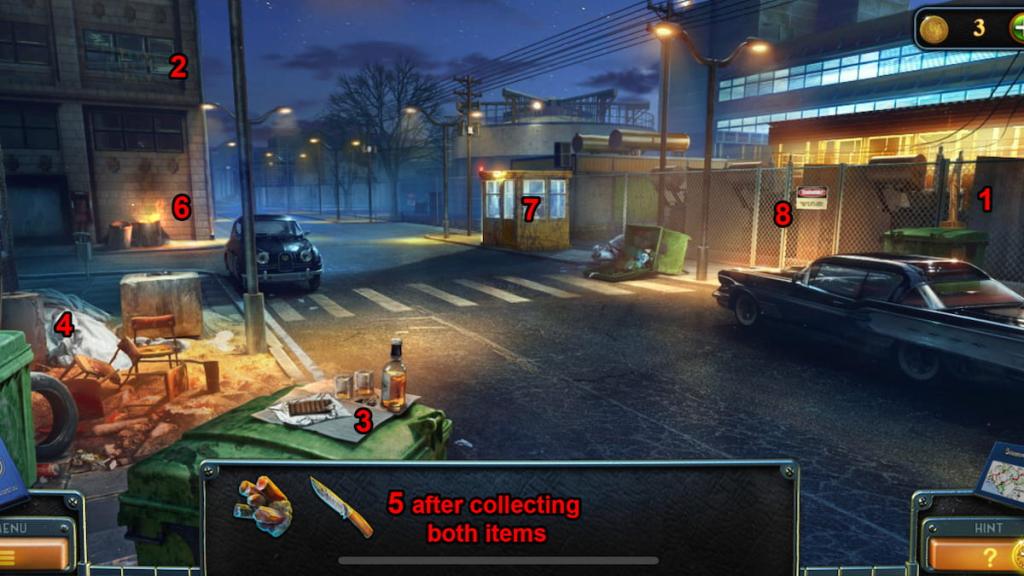
We're now inside the water-pumping station facility in search of Travis. After collecting the morphing object next to the staircase, open the wooden crate within the workshop area on the left side of your screen. You'll find a valve inside, which you can use on a yellow door on the opposite side of the facility.
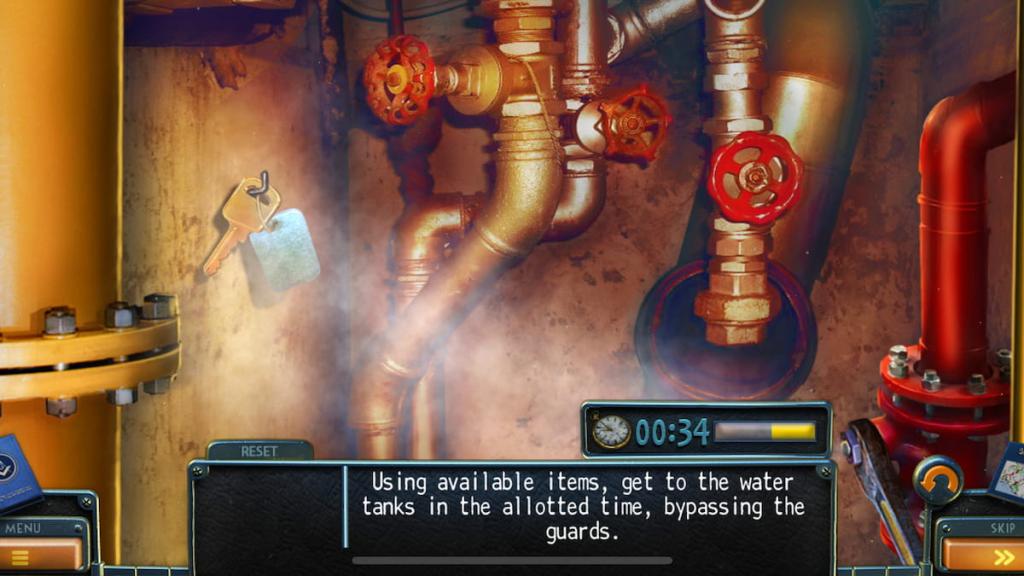
The next section is a timed trial. You'll have just over a minute to make it to the end. Here's the exact path to take to exit this area:
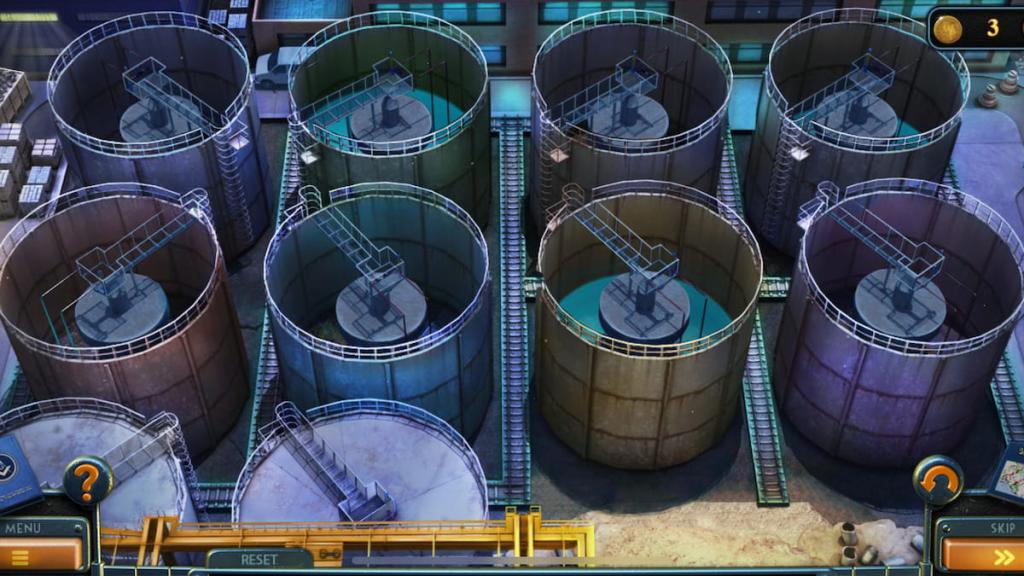
Now that we've exited that stressful situation, it's time to move forward. Open the yellow jacket to collect a keycard. Backtracking to the water-pumping station's facility and climbing the stairs will now lead to a locked door you can unlock with this keycard.
Within this new room, tap on the two areas lit up with lamps. One will require pressing a red button, rewarding you with a key. Before leaving, you can find a morphing object underneath the right-most desk. From here, return to the bridge and use the key to unlock the latch in the ground, leading to a small puzzle.
During this puzzle, you'll place various objects in your inventory based on blue highlights to reassemble and activate a water reservoir. Here are all the components you'll need to activate:

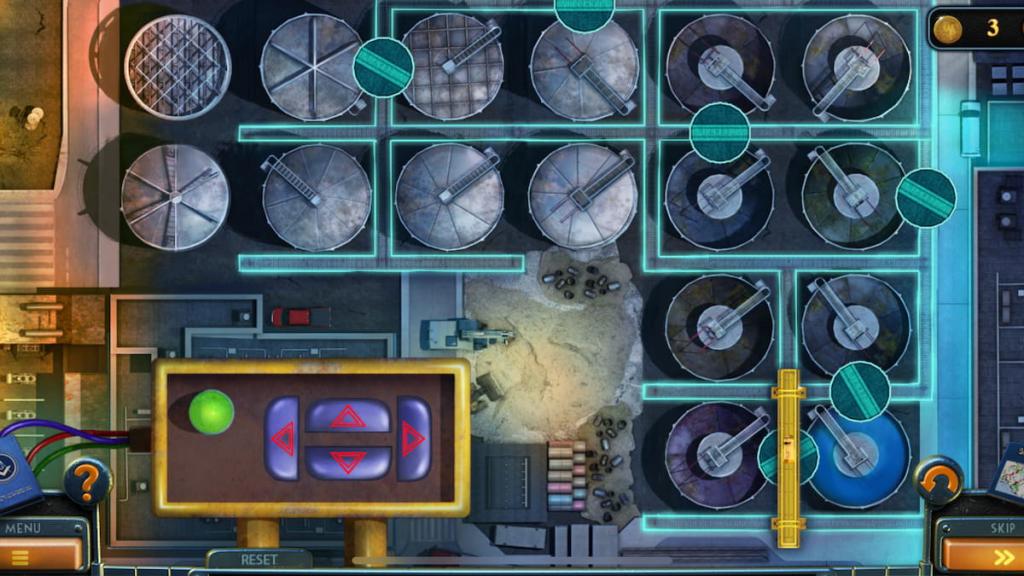
With that done, return to the security room and use the right terminal to redirect water into the upper right tank. This'll require another puzzle where each tank redirects in different directions. Since the yellow tank is the only one that sends water to the upper right one, our goal is to send water here before transporting it all to the top-right.
Here's a complete guide to solving this puzzle:
Once you finish the puzzle, interact with the left terminal to initiate another puzzle. Here are the steps to completing it:
With all that done, return to the water-pumping station's inner facility and leave through the yellow door to witness another cutscene. After watching it, you'll have one last task: repair your signal pistol.
There are ten pieces to collect in this area. Four are on the bridge directly in front of Travis, while two more are on the right in the same spot as a collectible feather. The last four are obtainable by tapping the water generator-like machine on the left side of the bridge.
With all ten parts available, select the pistol in your inventory to reassemble it. You'll need to slot each part together using the blue outlines as a guide, starting with the small bolt in the gear. Following these guidelines will let you repair the pistol, which you'll need to use on Travis to wrap up New York Mysteries 4's story.
The post New York Mysteries 4 walkthrough appeared first on Destructoid. |
Destructoid Thursday, July 31, 2025 5:15 PM
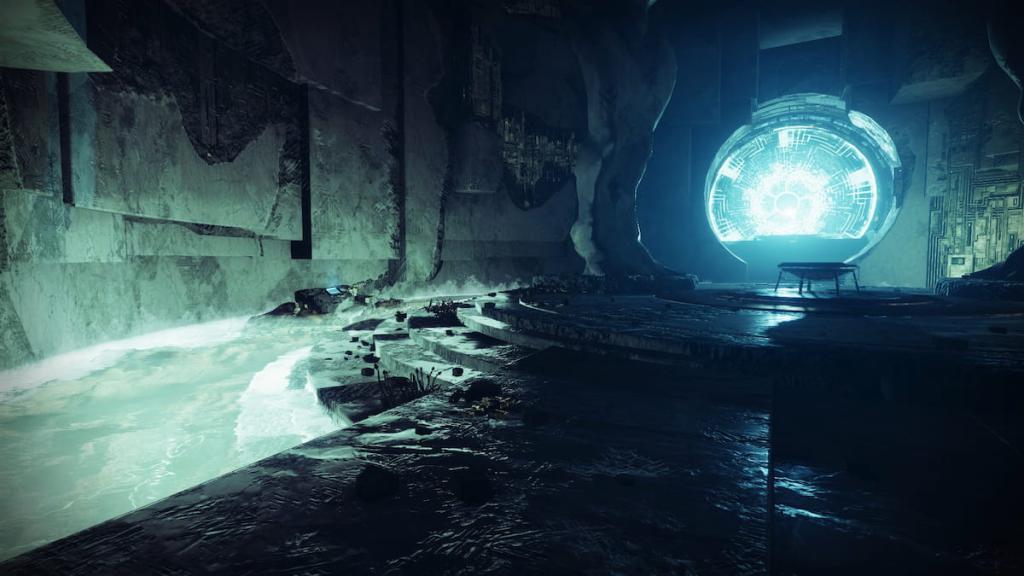
The third part of Destiny 2's Pinnacle Data Pad Retrieval seasonal challenge is bringing you into Whisper, the old mission that returned with Into the Light.
Whisper is a labyrinthian area deep in the heart of Io, which disappeared with the vaulting of several destinations in Beyond Light. As such, it wasn't accessible until Bungie decided to bring it back in the run-up to The Final Shape.
If you haven't done this mission yet, you can get the Whisper of the Worm Exotic sniper rifle as a reward. It's not as powerful as it used to be, more due to the sandbox's shifts than its actual merit, but it's still a good weapon to bring to most scenarios. The rifle can help with Raid bosses like Oryx, with huge critical spots that let you unload all your ammo in one go if your aim is good enough.
Where to find all data pads in The Whisper in Destiny 2

There are two data pads in Whisper, and both are located close to each other. You must get through a long jumping section before you make it there, though.
Whisper first data pad location in Destiny 2

When you reach this area with the fake portals, look to your right to find the data pad by a wall. Collect it and head through the last portal on the right side of the wall, taking the one on the top. Others will likely lead you to your untimely demise.
Whisper second data pad location in Destiny 2

The second data pad in Whisper is located just after the overgrown room with a jumping puzzle that takes you around the walls. As soon as you get here, look for a hole in the wall behind you for a shortcut. Follow it to come out into a dark, open area, then look to your right to find the second and final Whisper data pad. You may have a hard time making the jump on a Hunter, though.
The post All Whisper Data Pad locations in Destiny 2 Edge of Fate (Pinnacle Data Pad Retrieval Part 3) appeared first on Destructoid. |
Destructoid Thursday, July 31, 2025 4:43 PM
The July 31 Nintendo Direct was boring. I wasn't expecting fireworks since it was just a Partner Showcase, so we have no news about Mario or Zelda games, except for Hyrule Warriors. The show was all about titles other companies will release on the original Nintendo Switch and/or the Switch 2, like Borderlands 4 and the weirdly titled action RPG The Adventures of Elliot: The Millennium Tales.
While I risk sounding like an old man yelling at a cloud, the magic of the original Switch just isn't there with the Switch 2. I remember wanting to buy the new edition at launch, but now I realize I was lucky that scalpers snatched up all the units in the first weeks, because the current games lineup still isn't that impressive, aside from Donkey Kong Bananza.
Steam Deck ruined the Switch 2
It's not that Monster Hunter Stories 3 or Hela don't look fun. But the Steam Deck and the ROG Ally have been letting us play PC games from our couches for years now, so the feeling of carrying my games around that made the original Switch so novel doesn't hit the same. This strategy of porting games from other platforms doesn't cut it for me.
While watching this Nintendo Direct, I kept thinking I'd rather just wait and play these games on my Steam Deck when they go on sale. Most will come to PC anyway.
And that's the problem. "Most" isn't "all", so I'll end up buying the Switch 2 when a mainline Pokémon or Zelda game drops. I know I will. Those are some of my favorite games, so I'm exactly the kind of person who buys the console just to play the games I love and can't get anywhere else.
But that makes buying the Switch 2 feel like a tax. Since I already own the original Switch, the sequel feels like a problem I'll have to solve just to access new entries in my favorite franchises—which are also expensive. I dread the moment I'll say, "Oh no, now I have to buy a Switch 2," instead of, "Hell yeah, I want to buy a Switch 2!"
I can't believe I may not be part of the Switch 2's target audience
For the first time, I'm sure the Switch 2 is the ultimate console for casual and new gamers. And weirdly, that makes me feel like I'm no longer the target audience. All my criticism only makes sense because I'm looking through the lens of a long-time gamer. I already own a Switch, a gaming PC, and a Steam Deck. But for people and families whose last console was probably the Nintendo Wii, the Switch 2 is an incredible all-in-one solution: you get all the fun, family-friendly Nintendo titles, while also being able to explore newer third-party games that never would've come to past Nintendo consoles.
So even if the Switch 2 isn't the console for me, I'll pay the tax if it means playing the 10th generation of Pokémon during the franchise's 30th anniversary in 2026. If that happens, maybe I won't feel so annoyed about buying a Switch 2 after all.
The post The Switch 2 feels like a tax I'll eventually have to pay appeared first on Destructoid. |
Destructoid Thursday, July 31, 2025 4:06 PM
Destiny 2's The Edge of Fate kicked off with a set of seasonal challenges, and one of them sends you looking for data pads scattered around three maps in the new Solo Ops playlist.
The Solo Ops Data Pad Search seasonal challenges hide those devices in multiple Solo Ops missions, giving players a little extra to hunt for when completing the Portal activities. You don't always have to go at it alone, though: Bungie hid data pads in other playlists such as Fireteam Ops, Empire Hunts, Onslaught, and even Pinnacle missions such as Kell's Fall, Encore, and Starcrossed.
Here are the locations of all Solo Ops data pads we've found so far, ordered from the most recent to the oldest.
Table of contents
All Solo Ops Data Pad Search Part Three locations in Destiny 2

The third part of the quest brings you to two different locations: K1 Logistics on the Moon and Creation on Europa. The former is different in its Portal form, and Creation is new to the Solo Ops playlist.
Where to find the Data Pad in K1 Logistics in Destiny 2

This part of the Solo Ops Data Pad Search seasonal challenge brings a collectible to our favorite Portal activity to farm (sorry, Caldera). Continue through the mission until you enter the long hallway leading to the boss room. Stop at the door and look for this data pad in the small room on the right.
Where to find the Data Pad in Creation in Destiny 2

The Creation data pad is early into the mission. Capture the plate, get past the lasers, and look for the data pad before dropping down deeper into the old Bray Exoscience facility. It's located behind some crates, though your quest marker will give it away.
All Solo Ops Data Pad Search Part Two locations in Destiny 2

The second part of the Data Pad Search triumph only has one destination: the Conflux on Nessus. It's not the dwelling of the boss, informally known as Carl (famous for being the go-to practice dummy before the addition of the Tower's Firing Range).
Where to find the Data Pad in the Conflux in Destiny 2
The data pad in the Conflux mission is located before the boss room, and it's hard to miss. After defending the Confluxes, you'll come out in an area with a large Vex portal, some statues, and an object that looks like a brazier. Look for the data pad on the left side of this room, on a rock surrounded by Vex milk.
All Solo Ops Data Pad Search Part One locations in Destiny 2

Three locations are required to complete the Solo Ops Data Pad Search Part One challenge:
More of those scavenger hunt-esque objectives will likely appear in the following weeks, taking players through other locations in the playlist.
The data pads spawn even in the lowest difficulties, in our experience, so don't worry about buffing your enemies to complete this seasonal objective. Here's where you can find each of them.
Skywatch Solo Ops Data Pad location

The data pad in Skywatch is hard to miss. Progress through the mission until your screen shows you're entering Skywatch, then just to your left to find this data pad on top of a barrel.
The Salt Mines Solo Ops Data Pad location

The data pad in the Salt Mines appears in one of the last areas in this Solo Op, after you've cleared two Taken Anchors. As you're on your way to the third and final Taken Anchor, you'll encounter a drop in one of the EDZ's rocky areas. The data pad is on top of a rusted crate, almost in front of you.
Kepler Solo Ops data pad location

The data pad in the Kepler Solo Ops appeared after we sabotaged the Fallen depots as part of the main objective. This led us to a cave with some derelict constructions. The data pad is to your right as soon as you enter the area and see the terrain change, just opposite a ruined building.
The post All Solo Ops Data Pad locations in Destiny 2 Edge of Fate (Solo Data Pad Search all parts) appeared first on Destructoid. |
Destructoid Thursday, July 31, 2025 4:02 PM
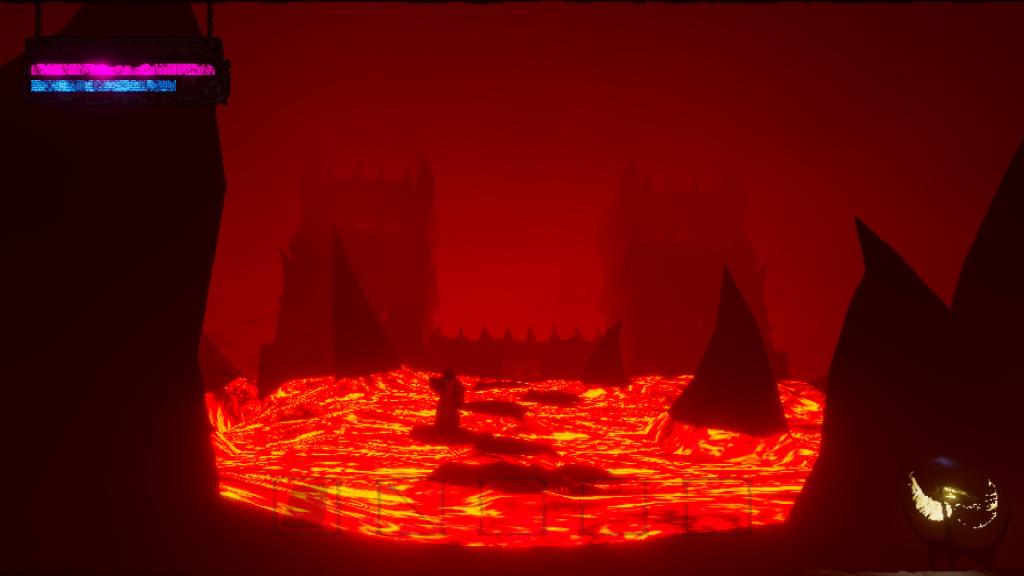
At its core, Mage Arena appears like a PvP shooter where you use magic spells instead of guns, and you won't be wrong with that assumption.
However, the core aspect of gameplay is significantly different because you have to "literally" speak the commands. In Mage Arena, you use your voice command to cast various spells and defeat your opponents. But things are slightly more complex than that; this guide will help you understand all the basics.
Mage Arena tutorial
Mage Arena is a strictly PvP game where you play squad-based matches or duel individually in deathmatch. So how do you play?
For starters, you'll need a mic. This could be a standalone microphone or a headphone with an in-built mic. For identification, the device should be compatible with your Windows OS. Next, you complete the in-game tutorial. If you don't care, here is the key information to note.
That covers the basics, so let's dive into the more advanced concepts.
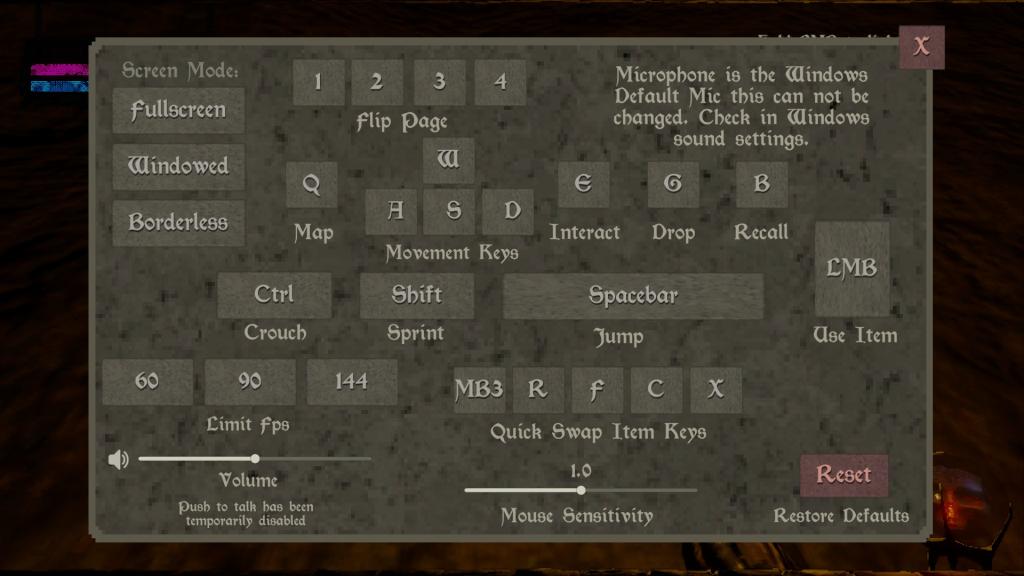
Mage Arena controls
While you activate the spells with your voice, there are additional controls to master.
All Mage Arena game modes
As of July 31, Mage Arena offers two game modes: 1v1 Deathmatch and 4v4 Capture the Flag.
That's all you need to know to excel at the game. Remember not to shout at the mic, remember the cooldowns, and use the spells strategically.
The post How to play Mage Arena – Tutorial, controls, modes, & complete guide appeared first on Destructoid. |
Destructoid Thursday, July 31, 2025 3:56 PM
The Battlefield franchise is back in a big way with some more modern warfare, and it's time to kick things into gear with the game's open beta ahead of launch in October.
Battlefield 6 brings the fight in the year 2027, including modern weaponry and soldiers along with their equipment, like tanks, jets, choppers, and more, in everything from large-scale battles to smaller skirmishes.
Battlefield 6's open beta rolls out across two weekends in August 2025, and we've got all the details on how to play it as soon and as much as possible, with the earliest possible time to play coming on Thursday, Aug. 7.
The full game launches on Oct. 10, but gamers everywhere can try out Battlefield 6 in the open beta. Read on to learn more about what it all entails.
Table of contents
How to play Battlefield 6 open beta

Battlefield 6 open beta schedule
BF6's open beta is playable on Aug. 7-8, Aug. 9-10, and Aug. 14-17. Here's all of the information needed on how to get in to play.
Battlefield 6 platforms
BF6's beta and full game are only available on these platforms:
Battlefield 6 PC system requirements

Battlefield 6 open beta rewards

Playing in the different weekends of the BF6 beta will unlock rewards at launch. Here's what you can get:
What's included in the Battlefield 6 open beta?
"This is your shot to jump in early, squad up, and rack up rewards before launch," EA said about the beta for BF6. "Whether you're a battle-hardened veteran or hitting the frontlines for the first time, this is your chance to make your mark in the most expansive Battlefield Open Beta ever. Our Open Beta has a number of maps, modes, and features for you to try across these two weekends, including the opportunity to play with Closed Weapons."
The post How to play the Battlefield 6 open beta appeared first on Destructoid. |
Destructoid Thursday, July 31, 2025 3:19 PM
Destiny 2: The Edge of Fate added a new campaign, location, and raid, but there are also some new triumphs and quests to grind as part of refreshing older content in the game.
As part of seasonal Triumphs and unlocking new rewards, Data Pads can be found all over the Portal's activities, including Fireteam Ops. Here are the locations of all of the Data Pads as part of Vanguard Data Pad Investigation triumphs and quests in Destiny 2's Season 27: Reclamation.
Table of contents
Destiny 2 Edge of Fate - All Fireteam Ops Data Pad locations
There should be several weeks of Data Pads to find during season 27 of Destiny 2. This article will be updated with their locations whenever they are added to the game.
Destiny 2 Vanguard Data Pad Investigation - Part I
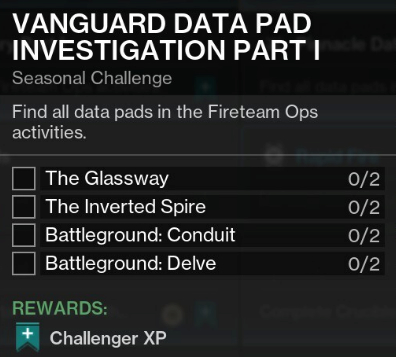
The Glassway Data Pad locations
While on the "Prevent the Vex From Swarming Europa" step, the first Data Pad can be found off to the right off where you fight the first miniboss in the Strike, a large Fallen named Warrior's Enforcer. It's location is pictured below.

The second Data Pad is found in the large open room shortly after you fight the second miniboss, another large Fallen named Technocrat's Assistant. It's found on the far right side of the room at the end of a platform sticking out from the rest, shown in the image below.

Inverted Spire Data Pad locations
The first Data Pad is found on this platform below you before you drop down into the section of the Strike where you get inside of tanks.

The second Data Pad is found after the section where you must stand on three plates and climb upwards towards the drill. You can see it on the left side of the area before jumping up.

Battleground: Conduit Data Pad locations
At the very beginning of the activity, jump down the ramp and slide into this room where the Data Pad can be found on the left side before dropping into the hole.

After hacking and defending the conflux and right before moving into the area with the final boss, this Data Pad is found on the right side of the pathway.

Battleground: Delve Data Pad locations
The first Data Pad is found immediately when you spawn in. Drop down and run up a little ways near the Radiolarian river and it can be found to your left at the base of a small pillar.

The second Data Pad is right before you enter the final boss room, on a ledge to the left of the walkway into the encounter area.

Destiny 2 Vanguard Data Pad Investigation - Part II
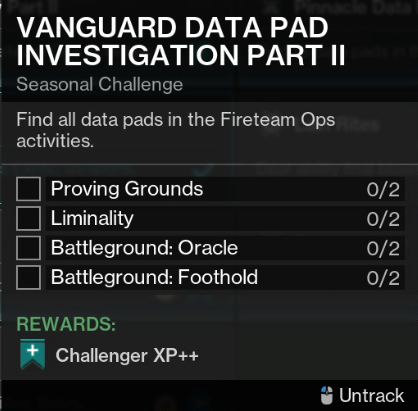
Proving Grounds
The first data pad is found on the floor shortly after clearing out the massive hangar and multiple tank enemies, on the way to your next objective.

The second data pad is found off to the right before heading into the final boss room.

Liminality
The first data pad can be found in the traversal room, where you have to climb upwards, found on top of one of the big pillars in the center of the room. When you're heading up the final ramp, turn around and jump up to it.
After jumping through a portal while chasing the boss after it runs away, you end up in a shiny room. The second data pad can be found on the table immediately next to you, alongside a button you need to activate.

Battlegrounds: Oracle
After the first encounter and on your way downwards towards the second, the first data pad is found on the right side of one of the platforms.

The second data pad is found on the platform right next to the portal into the boss arena, near where the aiming reticle is in the image below.

Battlegrounds: Foothold
The first data pad is behind Ghost while it's hacking the door, and you need to protect it from waves of Hive.

The second data pad can be found in the first small building you see when you exit into the open area of Skywatch.

Destiny 2 Vanguard Data Pad Investigation - Part III
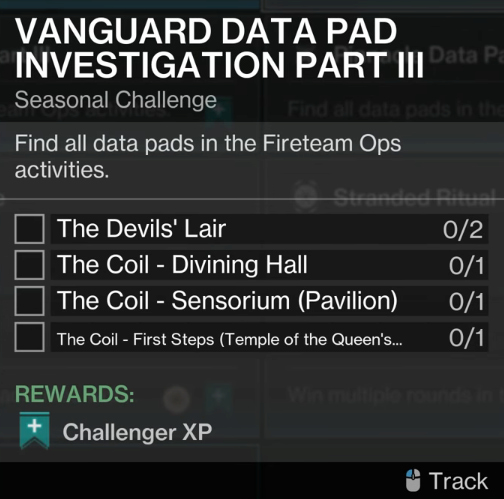
The Devils' Lair
The first data pad can be found on your way to the second encounter after clearing out the enemies while Ghost hacks. It can be found on the right side of the room, behind a small barrier, before you leave and head out into the large open battle with Brigs and many Fallen.
The second data pad is found on the left side of the doorway before entering the boss arena.
The Coil - Divining Hall
This data pad is found directly next to the rally flag before entering the Divining Hall encounter, which appears at random in The Coil, making these last three of the week a bit of a slog if you don't get the right encounters.
The Coil - Sensorium (Pavilion)
This data pad is also found behind the rally flag before the Sensorium (Pavilion) encounter, which is a fight where you have to "defeat Mephitic Hosts to gain the Ephemeral Virus."
The Coil - First Steps
Again, this one is unfortunately next to a random rally flag in an area called Temple of the Queen's Wrath. Keep your eyes peeled for the glowing data pads and HUD icons when you are near rally flags throughout the Coil activity.
This article will be updated with new information whenever necessary.
The post All Fireteam Ops Data Pad locations in Destiny 2 Edge of Fate – Vanguard Data Pad Investigation appeared first on Destructoid. |
Destructoid Thursday, July 31, 2025 3:03 PM Battlefield 6 multiplayer's glorious vibe and awesome destruction physics promise the chaos we crave
Battlefield 6's multiplayer has just been revealed, showcasing a ton of destructibility, chaos, and international warfare, finally resurrecting that true BF vibe we all know and love. It's gritty, realistic, and off the charts military, and I just hope it plays as good as it looks.
EA has just revealed Battlefield 6's multiplayer and gameplay, showcasing destructibility like we've never seen before. Nearly every part of every map is completely destructible, and you can bet that continuously raining hellfire over these levels will totally flatten them. The futuristic pseudo-militaristic vibes of 2042 are completely gone, with players now taking the role of actual soldiers stuck in the midst of chaos and the horrors of war—exactly what Battlefield is supposed to be.
Classes are making a major comeback, replacing the highly unpopular operators from 2042. Assault, Support, Engineer, and Recon are going to be your options in BF6, each with its own specializations. Of course, as their names imply, they're meant for head-on combat, healing, provisions, sniping, and information.
What's more, Supports (i.e. Medics) can drag downed allies across the map and into safety for a proper, behind-cover revive.
Gameplay will be oriented around these new classes and sprawling, destructible maps, requiring players to be on edge almost constantly, adding a ton of atmosphere and pressure to each match.
With the environment playing such a significant part in the game's core design, vehicles are going to be much stronger, with tanks smashing through entire buildings or planes blowing a scraper sky-high. What's more, players using explosives and other ordnance will have much more power in their hands, being able to open up new passages by exploding everything to Kingdom Come.
The Portal mode of 2042 is making a return, as are various modes we've seen in previous games. Maps will include various real-life locations, including Egypt, Gibraltar, Tajikistan, and even New York, US. Each map will support different forms of combat, from open-ended all-out wars to more grounded, urban conflicts.
Conquest, Breakthrough, Rush, Team Deathmatch, Squad Deathmatch, Domination, King of the Hill, and a new mode, Escalation, are going to feature in the game, with each map tailored precisely for the modes, which EA claims were "rigorously playtested" to be made to feel "true" to BF's gameplay.
Custom maps and experiences, made possible by a new version of Portal mode, will also allow for more community creativity.
The post Battlefield 6 multiplayer's glorious vibe and awesome destruction physics promise the chaos we crave appeared first on Destructoid. |
Destructoid Thursday, July 31, 2025 2:19 PM
The first gameplay reveal of NBA 2K26 had plenty to unpack in terms of changes coming to this year's game, and there are widespread refinements across multiple areas.
ProPLAY, which was introduced to current-gen versions previously, will be the backbone of all actions on the court. However, the technology has evolved from what we were used to a couple of years back. This guide will provide you with all the highlights of the reveal.
Table of contents
NBA 2K26 ProPLAY Motion Engine explained
The new and evolved ProPLAY will promote dynamic motion in the game, which will be directly influenced by real-world NBA footage. The new game engine is said to be the biggest change since NBA 2K21, and will focus on utmost realism.
There will be machine-learning technology in the background, which will reportedly be the biggest difference as far as general gameplay is concerned. Thanks to the evolution of the feature, expect realistic on-and-off-ball movements from the NBA stars on the virtual court.
NBA 2K26 Enhanced Rhythm Shooting
NBA 2K25's Rhythm Shooting is back and better this time around. You'll have complete control over every shot without any significant changes in the controls. However, your Shot Timing and Tempo will manipulate how a throw looks visually. There will be a noticeable difference when you manage to time a shot and when you fail.
While this allows you more freedom when it comes to making shots, it also lets you counter a defender unexpectedly.
Offense
Defense
Control
NBA 2K26 AI enhancements
The enhanced AI will adapt to every move you make and react accordingly.
There are plenty of finer changes noted on the patch notes, and they should translate into better gameplay in NBA 2K26.
The post NBA 2K26 gameplay overhaul – Better rhythm shooting, custom layups, and more appeared first on Destructoid. |
Destructoid Thursday, July 31, 2025 2:15 PM Marvel Rivals is planning a big crackdown on toxic game chat in its next update, so watch your mouth
When Marvel Rivals' newest seasonal update goes live next week, you will want to keep your salty language in check more than ever before, according to developer NetEase Games.
The new hero, Blade, along with a new game mode and map, will come in the season 3.5 update for the hero shooter on Aug. 8, but so, too, will a new host of options and abilities to keep the game friendly and "a fun and welcoming experience for all."
In what NetEase is calling Operation: Shield the Community, the game's systems will "automatically screen in-game voice chat in addition to the existing player reports and manual review, with oversight from real people" so that the team will be able to "catch more toxic behavior, and anyone using inappropriate language will face penalties."
"First and foremost, we sincerely ask all our Rivals to keep their cool, stay composed, and remember: even if a match looks hopeless, don't give up because a good strategy and mindset can turn the tide faster than Hulk can smash!" NetEase said, with an emphasis on voice chat over text chat since inappropriate content appears more often in the former. "Currently, our voice content review relies on player reports and manual review. But soon, we're rolling out automated systems that'll catch trouble faster than Spider-Man's Spidey Sense. This means even if no one reports a villainous act, our system will swing in to proactively identify and penalize violations."
Basically, this means all voice chat is being recorded, and you need to watch what you say. Once the potential infractions are flagged by NetEase's system, the dev's moderation team will be "on call around the clock to review ambiguous cases and make final decisions," which won't happen instantly like can happen with text chat.
Speaking of text chat, NetEase is giving players more control of it by giving them the ability to add custom muted words, automatically filtering out the message before it appears in game chat.
"We know it's impossible to eliminate all inappropriate language, but we're committed to protecting the experience of as many players as possible," NetEase said. "We hope everyone will join us in this mission. By watching your own words and actions, and by reporting any violations you encounter, you'll help keep our community worthy of its heroes."
Season 3.5 of Marvel Rivals goes live on Aug. 8, so if you have to cuss in game chat, do it before then.
The post Marvel Rivals is planning a big crackdown on toxic game chat in its next update, so watch your mouth appeared first on Destructoid. |
Destructoid Thursday, July 31, 2025 2:00 PM
Season 3.5 has yet to go live in Marvel Rivals, but the Dev Vision Vol. 8 has given us early glimpses of what will arrive in the mid-season refresh.
The latest video, over seven minutes long, was chaired by Creative Director Guangguang, who shared information about new heroes, Team-Ups, and more. Let's quickly look at what we can expect after the patch for Season 3.5 goes live on Aug. 8.
Table of contents
Marvel Rivals Season 3.5 patch notes
In short, once Season 3.5 goes live on Aug. 8, we will get new heroes, maps, and more.
New Hero
Hero buffs and nerfs
Buffs
Nerfs
New and changing Team-Ups
There are some significant changes to Team-Ups. Four existing teams will undergo changes, and there are a couple of new additions and deductions.
New game mode and map
The August 22 update will introduce a new game mode called Resource Rumble, which will have its own new map, Throne of Knull. It will be available in Quick Match first and further fine-tuned before being added to competitive play.
Quality-of-life changes and improvements
A lot of strong moves are being made to improve the player experience and prevent cases of cyber-bullying.
Finally, there will be no more waiting for the shaders to compile, as that process will happen automatically in the background. This will save players much time moving forward to the mid-season update.
For the full list of patch notes in the update set to go live on Aug. 8, check out the Marvel Rivals website.
The post Marvel Rivals Season 3.5 patch notes – All hero buffs and nerfs appeared first on Destructoid. |

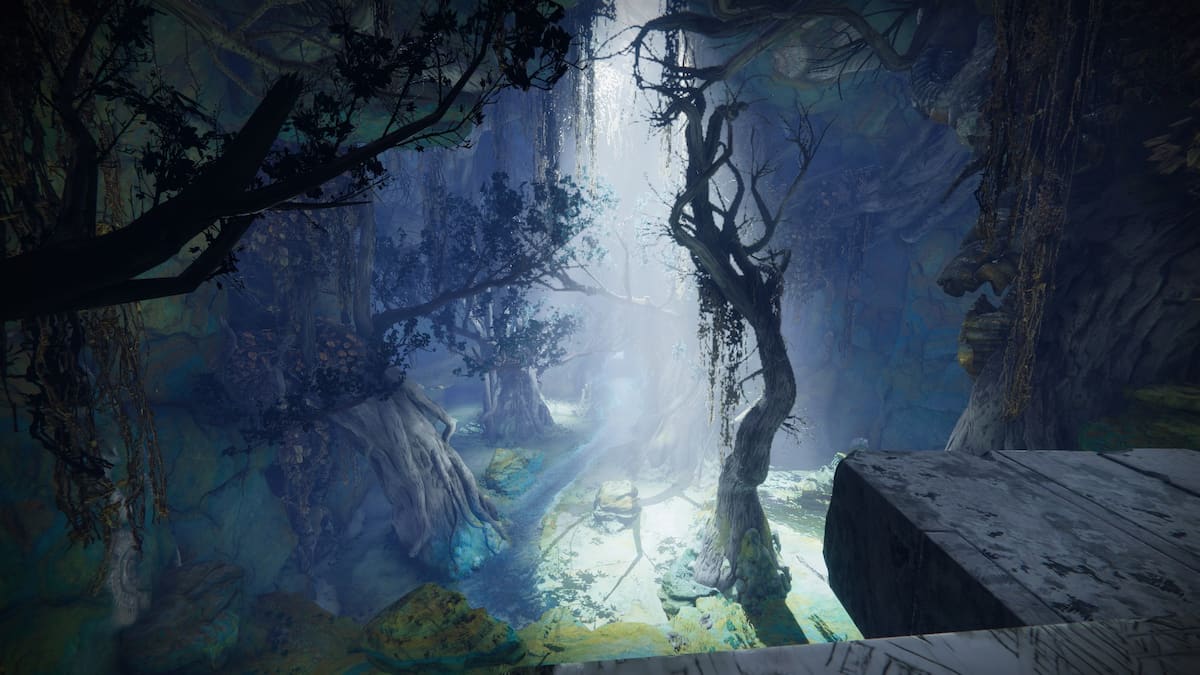


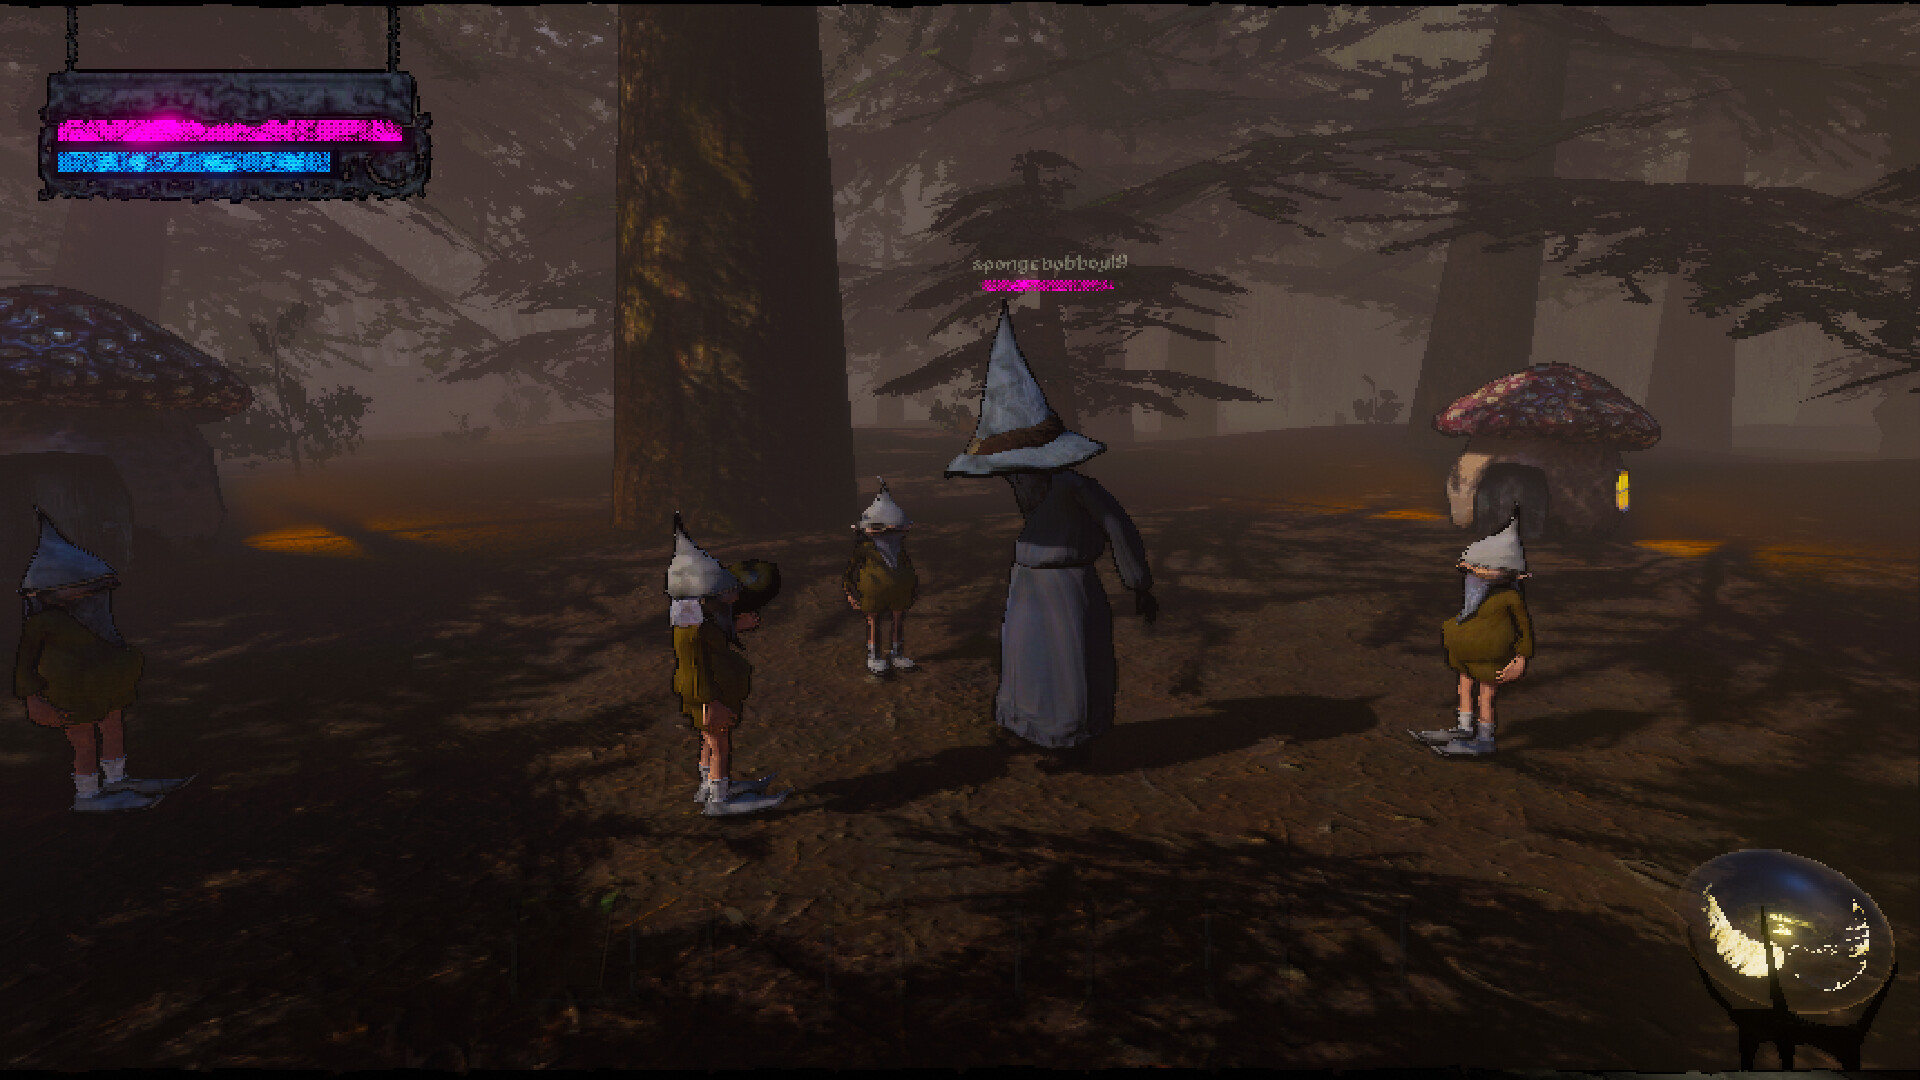


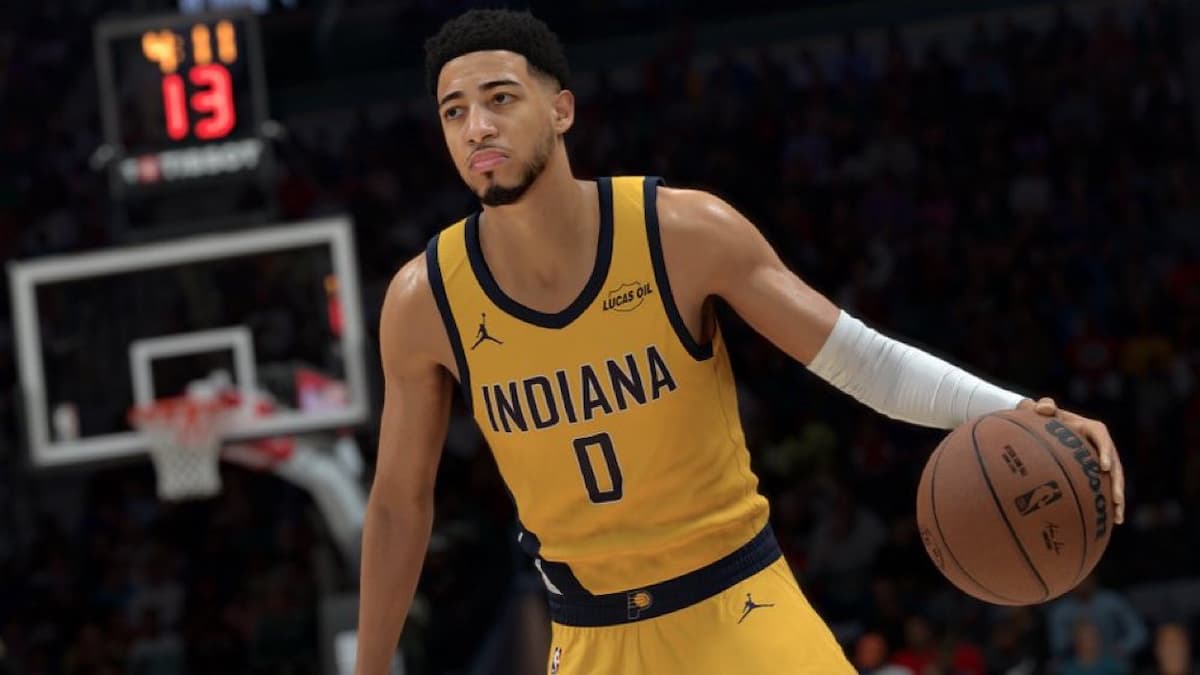


Gaming Instincts – Next-Generation of Video Game Journalism Thursday, July 31, 2025 5:16 PM A trailer was also released. The post Monster Hunter Stories 3: Twisted Reflection Announced appeared first on Gaming Instincts - Next-Generation of Video Game Journalism. |
Gaming Instincts – Next-Generation of Video Game Journalism Thursday, July 31, 2025 4:48 PM A trailer was also released. The post Octopath Traveler 0 Announced For PC and Consoles appeared first on Gaming Instincts - Next-Generation of Video Game Journalism. |
Gaming Instincts – Next-Generation of Video Game Journalism Thursday, July 31, 2025 4:24 PM Several trailers were also released. The post Battlefield 6 Release Date And Beta Dates Announced appeared first on Gaming Instincts - Next-Generation of Video Game Journalism. |
Gaming Instincts – Next-Generation of Video Game Journalism Thursday, July 31, 2025 3:53 PM A trailer was also released. The post Persona 3 Reload Nintendo Switch 2 Version Announced appeared first on Gaming Instincts - Next-Generation of Video Game Journalism. |
MonsterVine Thursday, July 31, 2025 6:00 PM Square Enix has announced The Adventures of Elliot: The Millennium Tales, a new single-player action RPG developed by Team Asano, best known for Octopath Traveler and Bravely Default. A free "Debut Demo" is now available exclusively on Nintendo Switch 2, letting players experience an early taste of the game ahead of its full release in […] |
MonsterVine Thursday, July 31, 2025 5:00 PM Square Enix today revealed Octopath Traveler 0, coming December 4, 2025, to Nintendo Switch 2, Nintendo Switch, PlayStation 5, PlayStation 4, Xbox Series X|S, and PC via Steam and Microsoft Windows. A Fresh Start: Custom Protagonist & Rebuild Your Hometown Positioned as a prequel to the original Octopath Traveler, this new entry begins before the saga and introduces an entirely customizable hero—a […] |
MonsterVine Thursday, July 31, 2025 4:00 PM The halls of Kousei Academy open next month—but what you'll find inside may not be entirely human. Today, Japanese publisher Furyu Corporation announced that pre-purchase is now live for Varlet, a bold new high school RPG coming to PC, PlayStation 5, and Nintendo Switch on August 28, 2025. Switch players can pre-order the Standard Edition […] |
MonsterVine Thursday, July 31, 2025 2:58 PM Battlefield 6 is a bit of a reset for EA's series, following the tepid Battlefield 2042 four years later. Looking to avoid the mistakes of the past, the direction Battlefield 6 is taking is directly inspired by Battlefield 3 & Battlefield 4. While it is easy to be skeptical, unlike Battlefield 2042, this game will […] |