BitLife is getting wacky with its latest Cunning Cougar challenge. This challenge is about turning your character's 30s and 40s into an adventure, especially when meeting new people. This one is trickier than usual, but there are a few strategies to make it easier to complete.
BitLife Cunning Cougar challenge guide
BitLife's Cunning Cougar challenge has five tasks to complete:
Be born a female in Canada
Become a forensic scientist
Hook up with five or more people 10+ years younger than you
Marry someone 10+ years younger than you
Have twins after age 35
While the first four tasks involve choosing the right country, university degree, and romantic partners, the last is almost entirely luck-based. Having the Golden Pacifier makes this a cakewalk, but trying to do this legitimately may take a few resets.
Be born a female in Canada
The first task of BitLife's Cunning Cougar challenge is to be born as a female in Canada. Doing this requires picking female as your starting gender and Canada as your country. You can customize the rest of the character creator options however you wish as long as you meet these two requirements.
Screenshot by Destructoid
If you have God Mode, setting your character's fertility to 100 may help you have twins later. However, it isn't required; there are a few ways to do this without changing your stats. If you struggle with completing the last task after a couple of attempts and already own God Mode, it's at least worth trying.
Become a forensic scientist
After aging up your character and graduating from secondary school, it's time to pursue a Forensic Scientist career. First, though, you'll need a university degree in Criminal Justice. Although other science-related programs like biology or chemistry also work, you have much higher odds of finding a Forensic Scientist role if you get a criminal justice degree. Look for this in your university program list or use the Golden Diploma before pursuing the job.
Screenshot by Destructoid
Once you're ready to become a Forensic Scientist, head into your full-time job list and scroll through until you see either Crime Scene Analyst or Crime Scene Technician roles. By selecting these, you'll see they're technically "Forensic Scientist" careers, even if they're not listed as such. Nonetheless, applying for and landing these jobs will knock out the task, bringing you one step closer to finishing the challenge.
Hook up with and marry someone 10 years younger than you
Now that you have a successful career as a forensic scientist, it's time to meet some new people. This section of the challenge is split up into two parts:
Hooking up with five or more people 10+ years younger than you
Marrying someone 10+ years younger than you
To complete these two tasks, you'll need to age up until your character is at least 28 years old. Your best bet is to age up a little more until they're around 35 to line up with the fifth and final challenge task. Once your character is somewhere in the 28-35 range, head into Activities, Love, and Hook Up before finding anyone who's ten years younger than your character.
Screenshot by Destructoid
After completing that task, you can find a lifelong partner to marry. This one is much simpler, as you can use the Dating App to find someone within a desired age range — in this case, someone 10 years younger than you — before sealing the deal and getting married.
Have twins after age 35
Once you get married and finish the other four tasks of the Cunning Cougar challenge, you'll be ready for the one and only luck-based objective. If you have the Golden Pacifier, you can get your character pregnant before choosing twins as your option. Otherwise, you can try to have twins naturally or pursue IVF.
Screenshot by Destructoid
IVF, also known as in-vitro fertilization, will raise your odds of having twins when your character gets pregnant. Since you only have until age 45 or so to have children, going for IVF and having a few children will give you the best odds of having twins without resorting to pay-to-win means.
Alternatively, you can go the natural route and create new characters until you get lucky and have twins. It's possible to do without IVF, but it is much rarer. More often than not, you won't have twins even if you constantly get pregnant from age 35 to 45 or older. Finishing this task may be luck-based, but doing so will complete BitLife's Cunning Cougar challenge and reward you with a random character cosmetic.
The new Ashfall update in Fisch has added some interesting content, which includes solving a puzzle to open the secret Bunker at Birch Clay.
This spot was initially locked in the game, but the Volcano Eruption event has activated it. You can now visit the place and open the Bunker to head inside. To do so, you'll have to find a way to open the door.
How to get to the secret Bunker in Fisch
The first job is to reach the location where the Bunker is located. This part will be a lot easier if you already have a GPS device with you. Just go to the following coordinates, and you'll be at the correct location (XYZ: 1700, 143, -2400). Once you reach the location, you'll come across the white birch tree behind the arch.
Here, you'll find the secret Bunker, which you can open by just interacting with it. I am not sure if this was how the developers intended it to work. It seems that the main task is just to locate the Bunker, as you don't have to do anything more. Once you open the door, a dark tunnel will be revealed. Use the tunnel to travel all the way underground.
Once you head inside, you won't find anything with which you can interact with. It has a couple of lockers on either side of the room. There's a white-colored table as well, and you'll find a couple of photo framers. I believe that this location will be required as part of a future event to some degree, but so far, we don't have a precise idea.
Of course, you can complete the Dr. Finneus quest inside the game, which will require you to complete a hard task. Doing so will help you unlock an exclusive in-game title, along with a free boat themed around the Ashfall island.
Playing as the archer is a classic in all D&D-inspired games ever released. But if you want to play as the ranger in Avowed, then you might be wondering which skills to prioritize. We will give you all the details on the best ranger build in the game.
Best attributes for a Ranger
You start out with 10 skill points you can assign to your character, since you are just starting out we would recommend focusing on a classic Ranger build, at least for the moment. It is possible to take your build in a different direction later on.
Since at the start, you can assign a maximum of three points per Attribute, we would recommend focusing on Dexterity and Perception, in particular. Later on, you can also invest in raising your maximum health points and resistance, by focusing on Constitution.
Image via Destructoid
Might will rule how much you can carry before becoming encumbered, so keep an eye on it. Intellect might also be a stat to invest in, but only if you are planning to build a Ranger wizard. At the start, it is safe to ignore.
Best skills for a Ranger build
There are several skills you can start with as a ranger, such as Tanglefoot which summons vines that block enemies. We would recommend prioritizing Parry first, along with Evasive, as that will allow you to take less damage right from the start.
While you can also choose others in the Fighter class, such as Charge, none of them are particularly game-changing. If you are planning for your ranger to be a magic user, then Magic Missile could be a good choice, otherwise, sticking to Tanglefoot for your first hours is also fine. Survivalist is also a good skill to focus on, allowing you to make good use of potions and health-recovering items.
Here is a breakdown of all the skills.
Skill name
Level required
Tips
Tanglefoot
1
Good skill to start out with
Parry
1
Prioritize
Survivalist
1
Prioritize
Steady Aim
1
Prioritize if you don't want to engage in melee combat
Evasive
1
Prioritize
Shadowing Beyond
5
Good one to prioritize
Marksmanship
5
Depends on the build (see below)
Scavenger
5
Low priority
Finesse
5
Depends on the build (see below)
Power Slide
10
Low priority
Arrow Deflection
10
Low priority
Quick Switch
10
Low priority
Bear Ally
15
Low priority
Critical Strike
15
High priority
Sniper
15
Low priority
Staggering Shot
20
Depends on the build (see below)
Flurry of Blows
20
Depends on the build (see below)
Once you have reached level 5, you should decide what kind of Ranger you want to be. The Piercing Thrusts skill is great if you are planning to use daggers or any kind of melee weapons for special attacks. Finesse, instead, prioritize if you prefer classic one-handed weapons. If you are not using any of those and just prefer your bow and arrow, then focus on Marksmanship.
Naturally, you might also want to spread your points across all three and try out how they work. In case you change your mind, you can always re-spec your ranger. Shadowing Beyond might be the most useful skill of them all in order to find places to attack from.
Once you reach level 10, you have some more skills you can choose from. Out of them all, Quick Switch might be good if your build requires you to juggle between different weapons a lot. Power Slide is okay but not really required. Arrow deflection goes well with Parry if you are building a classic Ranger.
Finally, on Level 15, you get something interesting. Critical Strike? Yes, please, you want your strikes to deal as much damage as possible so invest in that. Bear Ally is pretty fun, as you get to summon a bear that can be used to distract other enemies, good if you aren't very strong on the melee front. Sniper requires you to be very stealthy, so, depending on your build, it can be skipped. Finally, at Level 20, if you want to keep building your Ranger with a melee flavor, then Flury of Blows is for you, and Staggering Shot is for classic archers.
Best skills for a Ranger wizard
Image via Xbox Game Studios
There are not a lot of Wizard skills that are absolutely mandatory for your Ranger unless you are in love with the idea of using magic spells a lot. You can add your magic spells as an additional ranged attack, which will allow for better flexibility when dealing with enemies.
The following are Wizard skills that can be useful for your Ranger.
Blast (Level 5)
Wand Mastery (Level 5)
Crackling Bolt (Level 5)
Harvest Essence (Level 10)
Spirit Lance (Level 10)
Blackbow (Level 15)
As mentioned, if you want to keep your options flexible, then both Mastery abilities, the Wand and Grimioire ones, will be good choices. Naturally, it depends on whether you are planning to use your wand or prefer to simply cast spells through your spellbook.
If you want to keep using magic spells, then Harvest Essence will be a great help to avoid running out of Essence, as you can harvest it from enemies at twice the quantity. While we recommend focusing on both Spirit Lance and Blackbow as additional magic skills, as they offer greater flexibility, you can also choose to focus on other kinds of magic damage (Fire, Shock, Poison, and Ice).
Best skills for a Ranger fighter
If you want to build your Ranger to be a strong melee fighter, keep an eye out for some Fighter skills that you can definitely use. In particular, you want your Ranger to be a bit tanky, so choose Toughness to improve your health points and Constant Recovery to make sure you won't run out of HP.
Here are the Fighter skills you want to choose from your Ranger.
Constant Recovery (Level 5)
Toughness (Level 5)
Devastating Criticals (Level 10)
Built to Destroy (Level 15)
Retribution (Level 15)
Clear Out (Level 20)
Also, if you are planning to be wearing anything except simple Light armor, then by leveling up the Armored Grace skill you will be able to run much faster than usual.
If your Ranger is particularly skilled with melee weapons, then the combo of Devastating Criticals and Clear Out will deal a massive amount of damage to your enemies as you whirlwind your way through them.
An unconventional ARPG where one battle enemies through musical encounters, Chris Nordgren, Jordi Roca, and Foreign Gnomes' Everhood 2 will have a playable demo as part of Steam Next Fest.
This week's roundup of our hot takes from the past week includes a plea for Nintendo to let us buy older games again on the Switch 2 like we could in the days of the Wii's Virtual Console instead of just locking all that stuff behind a subscription paywall and letting us pay for the privilege of "accessing" it, but…
This week gave us PlayStation's first State of Play presentation of 2025. It was 40-plus pretty packed minutes that showed off plenty of games coming to Sony's console in the future, and we've collected every last trailer and announcement. Also, big changes are coming to Overwatch 2, and Marvel Rivals rapidly changed…
February 15, 2025: We've added the latest Monopoly Go dice links for free dice rolls and tokens.
How can I get Monopoly Go free dice links? The household favorite board game has been reimagined as a free-to-play app on smartphones, allowing everyone to experience the thrills of Monopoly on practically any device. Everything that makes the board game special is here in Monopoly Go, so you'll be collecting properties and building hotels as you go around the board, and there are a variety of multiplayer minigames to get through along the way.
You're going to need to get your hands on Monopoly dice rolls, but they are difficult to come by no matter how far you are into the board game. There are ways to earn additional dice rolls, including logging into the game every day to collect daily bonuses, progressing further in the game, and inviting friends to try Monopoly Go. While you can also spend real money to unlock more dice rolls, you may want to give our list of Monopoly Go dice links a try instead, especially if you're waiting for the next Monopoly Go Golden Blitz event. Take a look at all the currently active Monopoly Go free dice links for today.
With so many survival games around these days, new releases have got to do whatever they can to set themselves apart. RailGods of Hysterra understands this, and so is bringing a Lovecraftian demon train to the party in the hopes of waltzing through the front door. It's such a bizarre idea that it just might work, and you can test that for yourself right now. The game has a new Steam demo you can try, if you fancy your chances in a place overrun with Eldritch horrors.
Monster Hunter Wilds gives you a choice between fourteen different weapon types, and making that decision remains one of the series' greatest strengths. The options all feel unique, each filling a specific niche, and learning just one is as intricate as mastering a fighting game character. But that list hasn't changed since Monster Hunter 4 over a decade ago. Monster Hunter Wilds boasts the same lineup, one we've seen in both World and Rise. Ahead of its launch, I sat down with Wilds director Yuya Tokuda and producer Ryozo Tsujimoto and asked whether we might see the fabled fifteenth weapon one day.
Every once in a while, a videogame's visual style completely knocks me off my feet. Since I first saw it, 4X strategy adventure Songs of Silence has done just that. It's got a truly colourful aesthetic and a bountiful mix of genres, making it unlike anything I've ever played. You've been able to play it in full for some time now, but another update is right around the corner, alongside a big new DLC to get excited about.
February 15, 2025: Haikyuu Legends has been renamed. Look out for Volleyball Legends codes from now on.
What are the new Volleyball Legends codes? Taking to the volleyball court in this Roblox adventure will have you itching to get ahead of the competition. Inspired by the Haikyuu anime, you'll participate in volleyball matches in teams of six and compete to be the best.
This unofficial, fan-made Roblox game isn't strictly affiliated with Haikyuu, but the imagery and references to the manga series are plain to see. Unlike the latest Blox Fruits codes or Dress to Impress codes, Haikyuu Legends codes won't get you currency, but they can have a direct effect on your skill level in the game, so take note.
February 15, 2025: A bunch of new Anime Last Stand codes just arrived.
What are the newest Anime Last Stand codes? Plenty of anime-inspired tower defense games are available on the Roblox platform, and Anime Last Stand is the latest to emerge from its testing phase. You can now collect your favorite anime heroes and villains to guard your base, but you'll need a stash of emeralds to afford them.
RGB gaming PCs are plentiful, but few look as impressive as this white and purple gaming PC build. This gorgeous PC is a testament to its creator, featuring top-spec components from both Nvidia and Intel inside a classically designed Thermaltake case with impeccable cable management. Few builds look this flawless, but as far as aesthetics are concerned, this one gets pretty close.
This Intel powered gaming PC build has specs that would rival some of the best gaming PCs built out there over the last few years, with a 20-core Intel Core i7 14700K gaming CPU working alongside an Nvidia GeForce RTX 3090 graphics card. All of the components are visible inside a huge Thermaltake CTE 3600 PC case, with front and side glass paneling that provides a great view of the impressive build held within.
February 15, 2025: A new DTI code drop for Valentine's Day 2025 brings back a year-old dress.
What are the new Dress to Impress codes? Look no further if you want to strut your stuff on the catwalk with all the latest fashion accessories. The latest DTI codes grant you the hottest cosmetics to add to your ensemble and create a stunning new look, and it's as simple as entering a code or two.
As the name suggests, Dress to Impress is all about fashion, collecting new clothes, and trying out different styles. Unlike most Roblox games, these DTI codes permanently unlock a set of items to add to your wardrobe. If you're looking for extra freebies, we also have codes for some of the other best Roblox games such as Blox Fruits codes to help you get an edge on the competition. Alternatively, you can check out our list of Dress to Impress outfit ideas.
February 15, 2025: There's a new Blue Lock Rivals code to mark Valentine's Day.
What are the new Blue Lock Rivals codes? While your metavision may let you play the perfect pinpoint pass, you'll need a little extra assistance perceiving all of the freebies the Roblox game has to offer.
Blue Lock Rivals throws you into world soccer's biggest pressure cooker, putting your skills to the test as you channel the playstyles of the hit series' biggest hitters on the field. Whether you're consuming your opponents Rin-style, or sending them to the store with your Nagi-esque tekkerz, you'll need to be on your A-game to succeed in the Roblox experience. Read on to find out the anime game's latest codes and how to redeem them.
I don't have an Elden Ring Nightreign network test code, and if you're here, I'd wager you don't either. Plenty of people across Twitch and social media have been playing FromSoftware's upcoming spinoff, and it looks like they're having a great time with the co-op roguelike take on one of the best RPGs ever made, but the rest of us have to wait. Luckily, however, we can all kill time knowing that Nightreign is currently on offer at a pretty nice discount, before it's even out.
February 15, 2025: We've added the complete Ashfall bestiary list with preferred bait and weather conditions below.
What's new with the Fisch Volcano Eruption event? As the big lead-in to the Roblox game's Mariana's Veil expansion in the second half of February 2025, the promise of this long-standing geological structure's imminent explosion is a tantalizing taste of what's to come in one of the biggest Roblox game's of the last year.
As with each weekly update big or small, there's bound to be a whole host of new fish to catch, new rods to unlock, tricky puzzles to solve, and a bunch of cleverly hidden lore snippets to seek out. We'll walk you through the entire Roblox Fisch Volcano Eruption new content drop below. Once you're done, check out the best Roblox games before you jump back in with the next update.
Civilization 7 hasn't quite been the 4X game many of us hoped for so far. Huge changes to progression and issues with the user interface have marred the launch, but developer Firaxis is already hard at work bringing the historical strategy game back with plenty of patches. If you'd rather step away from Civ 7 while these changes come into effect, however, there's another, somewhat forgotten 4X experience getting some love. Humankind had a mixed launch, but the latest update offers up some big improvements.
Momodora: Moonlit Farewell is the final game in the Momodora series that released on PC last year to great acclaim. Now it's come to consoles, and it's clear that the Switch is the perfect home for an already fantastic game.
For those that haven't dipped into the Momodora series, or didn't check out any trailers, I'll hit you with a quick refresher. You play as Momo Reinol, a priestess in the village of Koho. Demons have begun to appear after someone has rung an ominous Black Bell, so it's up to Momo to fight off the invasion while tracking down the culprit. This requires a lot of Metroidvania platforming, steadily gathering new abilities and opening up new locations.
Despite being the fifth game in the series, Momodora: Moonlit Farewell is meant to be a suitable point for newcomers to jump in. As a newcomer myself, I'd say it was successful. The premise is simple enough to understand, and while characters don't get many grand introductions spelling out who they are, they don't need them either. This isn't a particularly complicated plot to begin with, and the character writing is strong enough that I warmed to everyone easily. I especially loved the little interactions with regular shop character Cereza, as simple as they were.
Screenshot by Siliconera
Gameplay remains as solid as it was on PC a year ago. Or so I assume, as my experience with the Switch version was similar to what was described in our review last year. Good movement mechanics are always the key thing that sell me on a Metroidvania, and Momodora: Moonlit Farewell does a great job here. It's not quite up there with some of the best in the genre but it's snappy and responsive. In particular, the combination of the double jump and wall jump is delightfully satisfying to play around with.
Combat is also strong, providing a decent challenge throughout. However, I did sometimes feel the difficulty was balanced backwards, with a lot of standard enemies causing me trouble while I often breezed through bosses with little issue. It was odd but nothing that hurt the experience for me. I also found myself enjoying the Sigil customization a lot more than I expected, since their effects usually had versatile use cases. Some of them made a huge difference to some of the trickier parts of the game.
Screenshot by Siliconera
All this works incredibly well on the Switch. Nintendo's console has been showing its age for a while, but Momodora: Moonlit Farewell is exactly the type of game that still works well for it. Being a side scroller built around more old school visuals, there's nothing here that causes the system to panic, so it was a smooth experience all round. In fact, the gorgeous pixel art looks even better in handheld mode, with the smaller screen reducing some of the jagged edges. I imagine the OLED version might bring it out better but sadly, I have a first-year Switch so I cannot personally confirm this.
Moonlit Farewell is also a great game for playing in handheld mode. The distance between checkpoint bells is rarely long, so it's easy to jump in and out in between other tasks. Gameplay is challenging and satisfying enough that even in short bursts it can be rewarding and entertaining. The only problem I found is how difficult it often was to tear myself away, so those "short burst" sessions became a few hours. The world of Momodora is captivating and the gameplay feels so good that I found myself wanting to stay in it for as long as possible. Of course, this is a short enough game that you can blast through it in a chill weekend on the couch, or maybe a long journey.
Screenshot by Siliconera
If you played this on PC already, it's unlikely you'll need this version, however. As far as I can tell, the console version is a straight port with no new features or modes. I've been singing its praises as a handheld title, but if you already own the Steam version and a Steam Deck, you'll already be able to experience that.
If you skipped out on Momodora: Moonlit Farewell on its initial release, though, then the Switch version is worth your time. It's an excellent Metroidvania that does a lot to please fans of the genre even if it doesn't do much to push the genre forward. But it also feels tailor-made for the handheld experience with its shorter length, simple mechanics and visuals that seem to work best on a smaller screen.
Momodora: Moonlit Farewell is out now for PC, Nintendo Switch, PS5 and Xbox Series X/S.
With a compelling story, endearing characters, and breathtakingly beautiful pixel art and animations, WSS Playground, the studio behind Needy Streamer Overload, has done it again with Boyhood's End. Since the game is in early access, the story isn't complete, and is still half a year from completion (if things go according to schedule). Despite a rather short five hours' worth of content available as of the time of writing, though, it's already sucked me in. The true Symbiosis Program was this game all along.
In the far future, the AI Oversee-R Karellen rules over humanity to give people the chance to live the happiest and most fulfilling life they can lead. That doesn't mean, however, that everyone deserves this opportunity. Every human has a score, which goes up or down depending on their family history, academic or professional performance, and actions throughout the day. Even tripping and falling on your face warrants deduction. On the flip side, higher scores give rewards like better meals, romantic prospects, and the like.
Giovanni Stylus, a student of the Galactic Gymnasium, has the lowest score of anyone in the universe. His father, Ihatov Stylus, was an illegal hacker who once cracked into R Karellen's mainframe. Meanwhile, he and his mother are the sole survivors of a collapse six years ago, in which everyone else in Grakkis Prime's District 1984 died. Now, Giovanni works as the hacker, Handler, to earn money for his mother's medical fees. However, a change in Karellen's policy for those with a negative human score forces Giovanni to take a high-paying job to raise enough money to keep his mother alive and in medical care. As for the job? Hacking into Karellen's mainframe.
Left with no choice, Giovanni accepts and hacks his way into Karellen, which puts a target on his back. With hostile robots and facilities around every corner, Giovanni's seconds away from death when Campanella DeMillion—a popular third-year student who recently broke a universal high score on a Mental Acuity Test, and boasts superior physical prowess and marksmanship on top of that—saves him. The two work together to escape from the Galactic Gymnasium to find like-minded outlaws. But Karellen's eyes are all over the universe, and she's on the warpath.
Screenshot by Siliconera
While the plot of Boyhood's End can read like a sci-fi that deals with themes of surveillance, humanity versus machinery, and such, it's important to note that some scenes warrant a trigger warning. WSS Playground markets it as a sci-fi "horror," after all. I'll describe some scenes that I believe have that potential, and so if you don't want to read any spoilers, skip this following paragraph.
The game doesn't shy away from showing the bullying Giovanni receives from his peers. Granted, you have to look into an optional chatroom to see more of it. A character on Planet Mollian is a drug addict, whose scenes include peer pressuring Giovanni to get high with her (though she backs down quickly) and making him insert the needle into her vein. These are just the scenes I saw with my choices, and there could be more in future updates as well. I do think if you can handle Needy Streamer Overload, you can handle this, though.
Screenshots by Siliconera
Speaking of which, since Giovanni's a hacker, I expected the gameplay to be similar to Needy Streamer Overload in that you spend all your time on Giovanni's laptop. Most of the time, you control him on the field and solve environmental puzzles. To hack something, Giovanni needs to first find the R-Code of what he wants to crack. Sometimes, it's as easy as going up to the obstacle or item in question. Others, however, require ingenuity or another tool, which you'll also need to hack to use. Later on, Giovanni learns to full dive, which has him entering a virtual space and solving puzzles. Most of these puzzles require pushing objects to clear paths to a key he needs to grab, with a time or turn limit to add some pressure. Despite Giovanni only having this one skill, WSS Playground provides a variety of puzzles to keep things fresh.
Considering how much I enjoy Boyhood's End, I feel a little petty complaining about this, but the speed Giovanni moves at can mess you up when you're not used to it. He runs surprisingly fast for a scrawny nerd. So if you're in a rush—say, an enemy is hot on your trail, or you're racing another hacker to solve a puzzle—it's easy to run past the turn you need to take. It almost felt like I was playing The Witch's House with how many times I died escaping the Galactic Gymnasium, because I kept overshooting the R-Code I needed or running into a Clean-R and letting my pursuers catch up to me. The cursor on his laptop feels equally fast when you're using WASD, so I always have to be cautious I'm not clicking on the wrong option or R-Ticket.
If the problem is with the WASD, then the obvious solution is to use the mouse, right? Though I started playing this with a combination of mouse and keyboard, I eventually shifted to only using the keyboard. Too many times, I clicked to go to the next dialogue line, only for the conversation to end. This means I'd end up clicking on the map, which would cause Giovanni to go to that spot. Thankfully, Giovanni never died as a result, and only ever needed to go back to where he was standing. But after about ten times of this happening, it got so grating that I stopped using the mouse unless I needed more finesse to solve a puzzle.
To go back to the narrative of the game, Boyhood's End has a cast of surprisingly endearing characters. Despite the poor first impressions Zanelli and Zero Day made on me, I found myself warming up to and wanting to learn more about them as further details about their pasts or personalities came out. Giovanni's a fantastic protagonist, and I enjoy his interactions with characters like Campanella, Zanelli, and the members of Zero Day. Unfortunately, I can't go into details about the latter two without spoiling things. I'm really looking forward to seeing more about them in future updates.
Screenshot by Siliconera
What immediately caught my attention was Giovanni and Campanella's relationship. Aside from the insane opening sequence (I had to rewatch my recording the next day to make sure I didn't hallucinate), they work well in tandem and their personalities complement each other well. I'm not the only one who saw the BL coding between them, as multiple comments from other users mention it, too. The game hammers it home with a relationship compatibility quiz that says they're perfect for each other. I don't want to give the impression that this is a BL game, since I want as many people as possible to play and I know it can be a turnoff. But it's kind of hard to ignore. I choose to believe that Campanella is genuine about everything, and that his villainous countenance on the key visual is a red herring. Campanella, I trust you!
Finally, the visuals and presentation of this game are amazing. WSS Playground really stepped up the pixel animation from Needy Streamer Overload, with everything flowing like a traditional 2D anime style. I was wowed by the little details, like how Campanella's cloak ripples around him when he moves. Even as a total noob when it comes to pixel animation, I know it wasn't an easy feat to get it to look this smooth. On the store page for this game, WSS Playground said the game is in early access so it can release the story in a "manga-like serialized format." Content-wise, it can feel like a manga as well, with panels of close-up shots and sequences that look like a motion comic. Like with the animations in cutscenes, the quality of these shots is phenomenal, and they use them to great effect throughout the story.
I'd like to note that I've not experienced any bugs when playing Boyhood's End. At most, when playing on my laptop, some cutscenes lag a little before a character come in from out of frame. If I hadn't played this on my PC first, I might've assumed this was on purpose. I'm not sure if this is an issue with my game, or with my laptop (which is getting on in age). While some reviews on Steam mention bugs or performance issues, I can't say what they are or how annoying they are, since I didn't come across any when playing. Until my friend told me and I caught up with the story, I didn't even realize the game was in early access since the quality of the build was just that good. WSS Playground's updates do note when it patches out bugs, though, so I must have been lucky.
Screenshot by Siliconera
As a general rule of thumb, I don't play story-rich early access games if it's not finished yet. I'm not the most diligent person when it comes to keeping up with things, and ideally, I'd rather not have to wait on a cliffhanger. In the most positive way, Boyhood's End reinforced this for me, because I'm champing at the bit to see more of the world, characters, and plot. I'm already counting down the days until the next update and marking it down on my calendar.
Boyhood's End is in early access, and you can play it on the Windows PC via Steam. Judging by the description on Steam, if all goes well, the game's story should wrap up in early September 2025 (or at least, that's when early access ends) with five chapters in total.
Version 2.1 of Wuthering Waves introduces Echo Control, a rather useful new mechanic that lets you turn even the most hostile Echoes into temporary allies, with a few catches. With the right know-how, you can manipulate battles, solve Echo-related puzzles, uncover secrets, and shift the tide in your favor to gain a true tactical advantage.
How to Unlock the Ability to Control Echoes in Wuthering Waves
Before you can start bending Echoes to your will, you'll need the Clearance Module: a special gadget handed to you by Zani during the opening moments of the Version 2.1 main story quest. No Clearance Module means no control, so if you haven't progressed far enough, it's time to push forward in the story.
Image by Destructoid
The catch here is that not all Echoes can be controlled. Only those radiating a golden aura are fair game. If an Echo lacks that shimmering gold glow, its will cannot be dominated by any means. Any attempt to control an Echo without this aura will simply result in it attacking you.
Once you've got the Clearance Device, you can temporarily turn these golden-aura Echoes into allies. As long as you remain somewhat near, they will fight alongside you, giving you an edge in battle, and they can even help solve puzzles in the new Vault Underground zone added with 2.1.
Why Should You Control an Echo in Wuthering Waves?
The Vault Underground zone is where you'll be doing the majority of your Echo Controlling as it features puzzles that require Echo assistance to solve. If you want to advance through it and reach full completion of the area, you'll need to make use of this mechanic constantly.
Specifically, the Echo Challenge: Dancer Hacking puzzle requires you to use Echo Control to control a Dancer and use it to reach the other side of the room while navigating obstacles in its wake. You'll be doing this one a few times during your exploration of the vault, so be on the lookout for them.
Image by Destructoid
Then, there is the combat aspect of Echo Control. Sometimes, a hectic fight can get overwhelming, and a little self-prescribed backup can go a long way toward shifting the tide in your favor. Instead of facing every single enemy head-on, why not have a nearby Echo do some of the heavy lifting for you? Controlled Echoes can serve as extra damage dealers, distractions, or even shields, giving you the breathing room you need to turn the tide of a tasking battle.
Echo Control gives you more flexibility and strategic depth in Wuthering Waves. Upgrade your Clearance Device to take command of more Echoes at a time, and use this mechanic to dominate both puzzles and fights within Vault Underground with style.
The Complete Winger Evolution is now live in EA FC 25, and you can complete it to upgrade a card of your choice.
While the evolution requires you to spend 60,000 coins to unlock, the offered boosts could be well-worth your expenses. Let's take a look at the requirements, followed by the upgrades along with the best players to use.
EA FC 25 Complete Winger Evolution requirements
Here are the requirements of the Complete Winger Evolution in EA FC 25.
Overall Max. 88
Position LW
Max PS 10
Max PS+ 2
Pace Max. 94
Shooting Max. 90
EA FC 25 Complete Winger Evolution upgrades
There are three levels of upgrades, and here are the required conditions.
Upgrade level 1
Rarity In-Progress Evolution
WF +2 ★
PlayStyle Whipped Pass (^10)
PlayStyle Technical (^10)
Overall +1
Dribbling +4 (^91)
Aggression +5 (^89)
Upgrade level 2
Rarity In-Progress Evolution
SM +1 ★ (^4)
Role++ LW Winger++
PlayStyle Rapid (^10)
PlayStyle First Touch (^10)
Pace +2 (^92)
Passing +3 (^88)
Upgrade level 3
Rarity Grassroot Greats Evolution
Role++ LW Inside Forward++
Role+ LW Wide Playmaker+
PlayStyle+ Technical (^2)
Overall +1
Shooting +4 (^88)
Stamina +5 (^90)
Upgrade level 1 requirements
Play 2 matches in Rush, Rivals, Champions, or Squad Battles on Min. Semi-Pro using your active EVO player in game.
Win 2 matches in Rush, Rivals, Champions, or Squad Battles on Min. Semi-Pro using your active EVO player in game.
Upgrade level 2 requirements
Win 4 matches in Rush, Rivals, Champions, or Squad Battles on Min. Semi-Pro using your active EVO player in game.
Assist 3 goals with your active EVO player in Rush, Rivals, Champions, or Squad Battles on Min. Semi-Pro.
Upgrade level 3 requirements
Win 5 matches in Rush, Rivals, Champions, or Squad Battles on Min. Semi-Pro using your active EVO player in game.
Score 4 goals with your active EVO player in Rush, Rivals, Champions, or Squad Battles on Min. Semi-Pro.
Best players to use in EA FC 25 Complete Winger Evolution
Here are some of the best cards to consider for this evolution.
Xavi Simmons TOTW
Wilfried Zaha Thunderstruck
Savio Globetrotters
Harry Kewell Track Stars Hero
Neymar Total Rush
Son TOTW
Raphinha Trailblazers
Giacomo Raspadori Moments
Ewa Pajor Thunderstruck
Diogo Jota RTTK
These are some of the best items for this evolution, considering the upgrades, but you can include plenty of other great cards as well.
The Diogo Jota Flashback SBC is now live in EA FC 25, and you can complete the challenge to obtain a special card for your Ultimate Team squad.
The 90-rated card has some interesting stats and playsytles, and the SBC seems pretty affordable. Let's take a look at how you can complete the SBC to unlock the new card.
EA FC 25 Diogo Jota Flashback SBC tasks
The Diogo Jota Flashback SBC has five tasks, and here are the conditions.
Task 1 - Portugal
Min. 1 Players from: Portugal
Min. Team Rating: 85
Task 2 - Liverpool
Min. 1 Players from: Liverpool
Min. 1 Players: Team of the Week
Min. Team Rating: 86
Task 3 - Premier League
Min. 1 Players from: Premier League
Min. Team Rating: 87
Task 4 - Top Form
Min. 1 Players: Team of the Week
Min. Team Rating: 87
Task 5 - 88-Rated Squad
Min. Team Rating: 88
Diogo Jota Flashback SBC solutions
Here's a set of solution you can use to unlock the new Jota card in Ultimate Team.
Task 1 - Portugal
Any 10 85-rated items
Vitinha 85
Task 2 - Liverpool
Lavelle 87
Blundell 84
Pajor 87
Sommer 87
Palacios 84
Ruben Neves 84
Vlahovic 84
Gundogan 87
Engen 84
Any 87-rated TOTW item
Gakpo 83
Task 3 - Premier League
Osimhen 87
Palmer 85
Musiala 87
Pedri 86
Pajor 87
Mateo 85
Gabriel 86
Hansen 90
Girellli 85
Bruno Fernandes 87
Benzema 86
Task 4 - Top Form
Osimhen 87
Palmer 85
Musiala 87
Pedri 86
Any 87-rated TOTW item
Mateo 85
Gabriel 86
Hansen 90
Girellli 85
Bruno Fernandes 87
Benzema 86
Task 5 - 88-Rated Squad
Pajor 87
Renard 88
Osimhen 87
Gundogan 87
Hegerberg 89
Gabriel 86
Mead 88
Messi 88
Kobel 88
Ederson 88
Reiten 88
While the Jota item isn't bad, things could have been so much better. The card has decent Pace (90) and 5* Weak Foot, but misses out on 5* Skills. The base Shooting (88) isn't good enough, but the combination of Finesse Shot+ and First Touch+ is decent.
Had this SBC been cheaper, I would have gladly completed the challenge, as Jota has always been pretty good to use in the game's meta. Unfortunately, a SBC that costs upwards of 400,000 coins worth of fodder should offer a better item at this stage of the game. In contrast, the Fernando Torres Future Stars Icon SBC offers far better returns, although it's more expensive.
To a certain crowd, survival and crafting are almost synonymous with each other. For a long while, possibly due to Minecraft's success, in-depth crafting systems were always accompanied by some survival elements. However, that is no longer the case.
Some of the most complex and compelling crafting games ever made, like Factorio and its first expansion, feature almost no combat and survival at all. That said, it's also true that nothing makes brewing a good cup of coffee as intense as the post-apocalypse or Half-Life-inspired alien invaders. If you're looking for this oddly specific thrill, you want a survival crafting game.
1# - Don't Starve
Image via Klei Entertainment
Even though it's approaching its twelfth anniversary, this ugly-cute, roguelite survival game comes with depth that would make most modern competitors envious. It certainly helps that, in the years since its release, Don't Starve has received a wealth of updates, expansions, and DLCs, the last of which was a crossover with 2023's Cult of the Lamb.
Don't Starve isn't focused on telling a story, but as far as survival games go, it does a pretty good job of it. It even integrates its backstory with the description of craftable items, which are tied to game progression, and with the various characters' reactions to them. The more talkative and interesting characters are unlocked later in the game, just as the most curious items are only available during the late game.
#2 - 7 Days to Die
Image via The Fun Pimps
A classic survival crafting game that helped popularize the genre in the early 2010s, 7 Days to Die is as divisive now as it was 10 years ago. Over 10 years in early access did not manifest in a stable, bug-free 2024 1.0 edition, but it helped create a crafting system that is tied to game progression without being too linear.
What you can and can't craft in 7 Days to Die, as well as the quality of what you will create is tied to your crafting skills. However, unlike ability scores and perks that increase when leveling up through normal play, crafting skills only improve when reading the appropriate magazines found in the game world.
#3 - Core Keeper
Image via Fireshine Games
Core Keeper's early access period was short lived but managed to create a unique, creative, and – most importantly – complete game that stands out even in the crowded genre of survival games with crafting mechanics. It does so in part with a classic but extensive tier-based crafting system, and in part with multiplayer co-op up to eight players, but the biggest selling point is probably its unique setting.
Lots of games in the genre feature mines and dungeons, so lengthy resource-gathering sessions have to take place in a dangerous environment. Core Keeper goes one step further and sets the whole game in an inhabited cave system which players are encouraged to mine through and make their own.
4# - Project Zomboid
Image via The Indie Stone
Project Zomboid is a lot of things, but it's not what most players imagine when they think of a survival crafting game. But don't let appearances fool you. Even if it looks like a city management game from the early 2000s, Project Zomboid is one of the most in-depth and open-ended survival games out there. And with the right mods, it can also be a management game.
If you ever want to be intimidated by a game, just take a look at the (incomplete) list of crafting recipes in Project Zomboid, which has more categories than some games have items. But while crafting is a big part of this game, looking at this massive list can't even begin to explain how much there is to do. You can build a house from scratch. Starting from the B42 Project Zomboid patch, you can run your own farm. You can no longer be killed by a tree but hey, no game is perfect.
5# - Empyrion – Galactic Survival
Image via Eleon Game Studios
Some survival games try to stand out by having an original storyline. Many go all-in on a unique mechanic or a weird design quirk. Others, like Empyrion – Galactic Survival, are very, very big. While it's nominally a survival game, Empyrion is also a shooter action RPG, a ship/settlement/anything builder, and a space exploration flight sim.
If that isn't enough, Empyrion comes with a massive crafting system and extensive mod support to add even more possibilities. And while it's not as complex as software engineering simulator Factorio, there is some automation to make the most tedious aspects of resource gathering go by smoother.
6# - Abiotic Factor
Image via Playstack
Abiotic Factor begins its life as a mix of Lethal Company's sense of humor with a healthy dose of Half-Life references. The highly unstable concoction is then trapped in a survival game with story progression until the chaotic energy of six player co-op increases pressure and leads the mixture to break containment. It's pretty fun!
The first of Abiotic Factor's many twists is that the protagonists are scientists in a top-secret research facility. While they don't have the inexplicable survivor instinct of a classic survival game protagonist, they're pretty good at building makeshift batteries and overclocked laser pointers. Things only get weirder once they get their hands on alien technology and objects of unspeakable evil.
#7 - Subnautica
Image via Unknown Worlds Entertainment
Subnautica is one of the most popular survival games of the last few years, and for good reasons. In a genre full of cannibal islands and zombie apocalypses, crash landing in the middle of an alien ocean is a refreshing setup, while de-emphasized combat makes for a unique gameplay rhythm. The slow drip of story beats certainly helps, too.
However, what attracted hundreds of thousands of players is almost certainly the crafting and especially base building. Lots of survival games have crafting recipes written down in a wiki, but how many have a fan-made crafting helper website?
8# - Vintage Story
Image via Anego Studios
Originally based on a Minecraft mod, Vintage Story is sure to be familiar to anyone who ever fell into the rabbit hole of hardcore Minecraft crafting. Yet, unlike that game, creating an item here isn't just a matter of having the ingredients and knowing the recipe. Making an axe in Minecraft means drawing the right shape with the right materials. In Vintage Story, an axe is made through knapping.
What's knapping? Why, it's the most ancient form of stone crafting, which involves smashing a durable rock on a sharp but fragile rock. Take off the right shape, stick it on a stick, and you have your stone age axe. Not every bit of crafting is as involved, but pottery and smithing are just as complex, if not more, than knapping, making Vintage Story one of the best survival games out there when it comes to crafting.
The Ashfall update in Fisch has introduced the Dr. Finneus quest in the game, and you can complete it to get a free boat for your efforts.
The Ashfall update is a mini-update, which comes ahead of the Mariana's Veil Core update. That said, you shouldn't sleep on the new content, and what better way to celebrate than to unlock a new boat! Let's take a look at how you can complete the quest, along with the new boat on offer.
Fisch Dr. Finneus quest guide
In case you're still unaware of it, the Ashfall location is situated near Roslit Bay. The event can only be accessed when the Roslit Bay volcano erupts. Once you reach the island, wait till the volcano erupts. If you have a GPS device, travel to the following coordinates (XYZ: -1450, 135, 750).
After the volcano erupts, go to the Central Bay area. Finneus can be found at the Volcano Research boat, and you'll have to talk with him. He will assign you a very simple task: complete the Ashfall Bestiary.
There are nine new types of creatures to catch if you want to complete the quest. All nine species are exclusive to the Ashfall region. Make sure to check out our complete guide about the preferred setup and weather conditions for all of them. This will help you to finish the bestiary quicker.
Once you complete your Ashfall Bestiary, head over to Dr. Finneus and talk with him. He will thank you for your efforts and offer you two rewards.
Volcanic Research Boat
Volcanic Helper Title
Here are the stats for the new boat.
Speed: 135 S/ps
Steering: 45
Acceleration: 0.3 S/ps
In terms of speed and acceleration, Fisch has better boats. That said, you don't have to spend any Robux or credits to buy it, and it can be a great choice for relative beginner players. Additionally, you'll get a new notification about a Mysterious Rock once you complete the Dr. Finneus quest.
Wuthering Waves 2.1 drops you into a brand-new zone filled with fresh challenges, hidden secrets, and surprises waiting to be uncovered. At the heart of it all is the Clearance Level system: your key to bypassing security restrictions, unlocking powerful rewards, and fully exploring the mysterious new Underground Vault area and its many dangers.
What is Clearance Level in Wuthering Waves?
Clearance Level determines how much access you have to different sections of the vault and how much security hates your guts. When you first enter the new Underground Vault added in Wuthering Waves 2.1, you'll start with limited access and face restrictions on a constant basis. However, as you progress through the area, you'll get the opportunity to upgrade your Clearance Level, which will allow you to open new pathways, uncover unique puzzles, and stake your claim to previous inaccessible rewards.
The Upgrade Process
To increase your Clearance Level, you'll need to interact with specific objects located in the vault's Security Rooms. These objects look sort of like kiosks, and they tend to stand out from everything else near them.
Image by Destructoid
The Security Rooms themselves are not immediately accessible, but they become available to you as you advance through the main story quest in Vault Underground, the new Version 2.1 zone. Here's a step-by-step breakdown:
Follow the Main Story – The Security Rooms that contain clearance upgrades are typically unlocked through story progression. You can't miss them.
Interact with Security Consoles – Inside of Security Rooms, you'll find consoles or devices that allow you to boost your clearance when activated. These do not require any materials from you, only that you've already obtained your Clearance Module from Zani, earlier in the main story.
Utilize the Echo Train – As your clearance rises, more areas of the vault will become accessible via the Echo Train, unlocking even deeper mysteries. Finishing the main story will also unlock new activities in the Underground Vautl, which you'll need a proper Clearance Level for.
With every Clearance Level gained, you'll gain access to new puzzles, challenges, and previously unreachable areas, all full of rewards (Asterites) for the taking.
If you want to reach the safety of the 80km city, you will need to be well prepared. Weapons are an essential tool for survival in Dead Rails, and in this article, we will take a look at all of them and see which ones give you the highest chance of survival in this harsh wasteland. Follow along with our Dead RailsWeapons guide and tier list to find your ideal loadout.
Dead Rails Weapons Tier List
Image by Tiermaker
Sadly, you will not be able to find all of these weapons in every round of Dead Rails you start, so making good use of the starting weapons is crucial if you want to make it far. The Revolver + Ammo combo at the beginning is a tried and proven method, but saving money for better weapons is also a viable strategy. Sadly, you cannot buy all weapons, like the Vampire Knife, and you have to find them in the wasteland.
Dead Rails Weapons List
Weapon
Damage and Stats
Vampire Knife
•Damage - 20/40 •Cooldown - 0.5 Seconds •Cost - Cannot be bought in the game store. •Extremely high attack speed and life-steal when damaging and killing enemies.
Mauser C96
•Damage - 25(body)/50(head) •Cooldown - Instant •Cost - Cannot be bought in the game store. •Ammo - Six Bullet Magazine, 24 bullet amo boxes, $15 in the store. •A much better version of the revolver, good at all stages and cost-effective.
Maxim Machine Gun
•Damage - 25(body)/50(head) •Cooldown - Instant •Cost - $125 •Ammo - 100 Turret Ammo Magazine, 100 ammo boxes, $12 in the store. •Perfect for groups of enemies, but has to be set down on the ground.
Sawed-Off Shotgun
•Damage - 75/100 (depending on distance) •Cooldown - Instant (reload after 2 shots) • Cost - Cannot be bought in the game store. •Ammo - Two Slug Magazine, 24 Slug amo boxes, $15 in the store. •One-shot kill to the head. Perfect for enemy hordes.
Rifle
•Damage - 75(body)/95(head) •Cooldown - 2.5 Seconds •Cost - $75 •Ammo - Six Bullet Magazine, 24 bullet amo boxes, $20 in the store •100% Accuracy, no bullet drop, perfect for long-range combat and sniping.
Shotgun
•Damage - 25/50 (depending on distance) •Cooldown - 2 Second •Cost - $50 •Ammo - Six Slug Magazine, 24 slug amo boxes, $15 in the store. •Great for enemies close to you.
Revolver
•Damage - 25(body)/50(head) •Cooldown - 1 Second •Cost - $35 •Ammo - Six Bullet Magazine, 24 bullet amo boxes, $15 in the store.
Melee Weapons (Starting)
•Damage - 20 •Cooldown - 2 Seconds •Cost - Free (starting weapon) •Chance to stun enemies. Stunned enemies can still attack if you are in range.
Where Do I Find Weapons in Dead Rails?
Most weapons in Dead Rails can be found in the starting town, where they can be bought for money, but some weapons have to be found in the wasteland and have a small chance of spawning. Here is a list of weapon locations:
Vampire Knife: Low chance of spawning in a big city in the wasteland.
Mauser C96: Spawns in buildings in the wasteland.
Maxim Machine Gun: You can find and buy this weapon in the Gunsmith store for $125. Also spawns in buildings.
Sawed-Off Shotgun: Chance to spawn in buildings in the wasteland. You can also but it with Robux.
Rifle: You can find and buy this weapon in the Gunsmith store for $75. Also spawns in buildings.
Shotgun: You can find and buy this weapon in the Gunsmith store for $50. Also spawns in buildings.
Revolver: You can find and buy this weapon in the Gunsmith store for $35. Also spawns in buildings.
Axe, Shovel, Hammer, Pickaxe: You receive one of these at random as a starting weapon.
As some weapons are harder to get than others, you should tailor your strategy and playstyle around commonly available weapons that you have access to. Buying higher cost weapons is easier with friends, so change up your strategy accordingly when not alone.
That sums up our Dead Rails Weapons Guide and Tier List. If you are interested in more shooting games, check out our Skibidi Toilet Battle codes.
The Ashfall region is now available in Fisch, and it introduces a new bestiary with nine fresh species to catch.
This is the final minor update we will get prior to the Mariana's Viel update, which is coming soon. Unlike last week, we have new fish to catch this time around, and to do so, you'll have to travel to Ashfall. This location can be found near the Roslit Bay area, and let's take a look at which new creatures can be caught.
Complete Ashfall Bestiary in Fisch
Here's the full list of all nine new fish that have been added as part of the new Bestiary. Let's take a look at what time, season, and bait is preferable to catch them from the Ashfall region. The region is relatively easy to reach and find, and it gets simpler if you have the GPS device.
Fish name
Type
Season
Time
Weather
Preferred Bait
Ashcloud Archerfish
Limited
None
None
Foggy
Coal
Burnt Betta
Limted
None
None
Windy
Squid
Blistered Eel
Limited
None
None
Windy
Worm
Cinder Carp
Limited
None
None
Clear
Minnow
Lava Lamprey
Limited
None
None
Rain
Insect
Molten Minnow
Limited
None
None
Clear
Flakes
Pyro Catfish
Limited
None
None
Clear
Bagel
Pyro Pike
Limited
None
None
Rain
Shrimp
Scooty Salmon
Limited
None
None
Windy
Seaweed
Ashfall location in Fisch
If you have a GPS, go to the coordinates (XYZ: -1435, 125, 460). This location actually falls under Roslit Bay, right at the point where the ocean breaks into the volcano. To catch the new creatures, you can choose any spot that's situated in the Ashfall region.
If you are looking to complete other bestiaries in Fisch, make sure to check out our full list for the Atlantis update that happened earlier in January 2025. It's also going to be interesting to find out how many new creatures are released during the next core update.
It's one of the worst things in an RPG, having a piece of equipment with great stats, but that just looks wrong on your character. Luckily, it is not a big problem in Avowed. Let's find out how to change character outfit appearance in the new Xbox Studios RPG!
How to change your character outfit appearance in Avowed
To change the look of your items, you can use your transmogrify ability on both armor and clothing. But what is transmogrification? It is quite the common term in many RPGs, but if you're new to the genre, it means that you can change your outfit by equipping the item that looks the best for you while also retaining all of its original stats.
Image via Destructoid
This way you are free to wear whatever you think looks best on your character, without having to worry about using unique or rare abilities or enchantments. Keep in mind that transmogrify will only involve the items you can equip on your character. It is not possible to change the look of a weapon, at least not at this time, or, more importantly, how your character looks.
While the game gives you a clear indication of this when you're done using the character creation at the beginning, it might still be useful to keep it in mind.
How to use transmogrify to change your outfit in Avowed
In order to modify how an item looks in Avowed, first, you have to equip it. While other games will allow you to simply select it to modify how it looks, this RPG does things a little differently. Open your inventory and equip the armor or clothing you wish to modify. Now, select the item with the desired appearance and choose "Transmogrify."
Now highlight the item you have equipped and press action (which is usually LT on your controller or the right mouse button if you are playing on PC). Doing so will switch the original appearance of your equipped clothing or armor item to the appearance of the selected item.
It might be good to know that this works on all items, so you are not restricted from using transmogrify also on Unique or rare weapons or armor. You are free to let your creativity flow and always prioritize your looks.
How to change your companions' outfits
If you are looking, instead, to change what your companions are wearing, then the transmogrify system will not help. Instead, you will have to set up a camp first or, if you have already done so, then use one. Now, by accessing the main tent, you can select which of your party members you want to modify.
Now select the best outfit for them, and you are set. Once you leave the camp, they will be wearing the new shiny outfits you have selected for them. Naturally, at the start of the game, you will not have unlocked a lot of outfits, a few of them come with the Premium version of the game, but otherwise, you will have to play a bit and complete quests to unlock more.
After weeks of waiting, it finally happened. The Roslit Bay volcano erupted, and lava poured all over the island. Don't worry, everyone is fine. In fact, things are better than fine because there's a new limited event called "Ashfall", and there are new things to do in Fisch. In this guide, we'll tell you everything you need to know about the Ashfall Event in Fisch.
New Limited Fish
Screenshot by Destructoid
There are nine new fish during the Ashfall event. You can catch all of these around Roslit Bay. Anywhere will do as long as the water is glowing (like lava). Simply cast your line and reel them in. Most of the new limited fish are easy to catch except for the Ashcloud Archerfish (which has a - 90% while being reeled in). Try using a lure that boosts your Resilience, and you should be good. It took us around 30 minutes to catch all the limited fish (with a Sunken Rod), and we don't expect it will take you much longer.
Ashfall Quest
Screenshot by Destructoid
Screenshot by Destructoid
While you are catching the Fish at Roslit Bay, keep an eye out for Dr. Finneus. He's an NPC inside and industrial boat / raft with a claw-crane. Talk to him, and he will ask you to complete the Ashfall Beastiary. Once you catch all the fish, talk to him again, and you'll get his claw-crane boat. It has a 135 s/ps, with 45 degrees steering and 0.3 S/ps acceleration. It's definitely not the coolest-looking ship, but it's easy to get, so you may as well go for it.
Premium Bundle and Skins
Screenshot by Destructoid
Screenshot by Destructoid
It wouldn't be a Fisch event without a Premium Bundle, and this one is no different.
Volcanic Bundle (799 Robux) - A sick, Magma-coated Molten Jetski, Molten Lantern, and 32x Server Luck for 1 hour
Naturally, there is more to buy. A hot new Speedboat, and three new Rod skins.
Volcanic Speedboat (2,999 Robux) - A Magma-coated Volcanic Speedboat
Bombastic Carbon (299 Robux) - A Carbon Rod skin
Tundra Strike (799 Robux) - Arctic Rod skin
Forgotten Doomspire (1,299 Robux) - Only 8,000 available, Rod of the Forgotten Fang skin
As always, we'll let you be the judge of whether or not these items are worth getting.
And there you have it. A hot new limited event with a few cool new items and a bunch of smoking-hot fish. Have fun filling the Ashfall Beastiary and don't forget to grab a boost, if you haven't already, using our Fisch codes.
Robot Entertainment's newest release, Orcs Must Die! Deathtrap offers a lot of choices to the player up front. They're all centered around spending Skulls that you collect as rewards from missions. If you're not sure what you should spend them on first, we'll help you out.
What's available to spend your Skulls on?
There are three main places to dump your Skulls into, and they're all important. That's what makes it an interesting, albeit paralyzing, choice. There's a lot of appetizing options, and none of them are technically wrong. Any progress is still progress, after all.
Screenshot by Robot Entertainment
The first category is Trap Upgrades. Spending your Skulls with the merchant Hugo will allow you to improve your Traps. Each Trap will have three categories you can improve, usually revolving around cost, damage dealt, or recharge times. Each upgrade you purchase gets more expensive, regardless of where you put the point. So, if you feel like you want a trap to have a certain benefit, max out that category before leveling up others to get the best discount.
As a side note, whenever you finish a mission, you'll obtain a special Gold Skull that you can take to Hugo's brother Gus to purchase new traps from. Once you've purchased all the traps, you won't get any new Gold Skulls. You also won't need to talk to Gus much afterward.
The second category available for you involves character improvements. There's a Skill Tree you can view by talking with Gabriella. The massive tree applies to you as a player. Buffs purchased through it apply to each character. Each time you purchase a node on the tree, the next one gets more expensive, regardless of direction. There's a few specific nodes that have a fixed price due to them being special upgrades. We'll talk more about those later. Each character also has their own tree on the left, allowing you to power up your favorites.
Finally, you can also purchase additional Threads. After each wave, you'll get a choice between 3 Threads to power up your character for the rest of the run. Threads you purchase get added to the pool of ones you can draw from. If you find yourself gravitating towards a particular character, think about getting their Threads first.
Personal Growth
With all these delightful options to augment your orc-smashing, is there really an optimal way to advance? We think there is, and it starts with the main characters. You should start dropping skulls into the skill tree first and foremost. Feel free to drop a couple of upgrades into traps while you're at it. Don't go too heavy, because you won't know what traps fit your playstyle right away.
Screenshot by Destructoid
In fact, you likely won't know which character you want to play. With six from the outset and a seventh unlockable, it'll take a few rounds to figure out who jives with you the most. While you're figuring that out and collecting some skulls in the process, make sure to keep upgrading the general hero tree. The upgrades you purchase will apply to all heroes, which is what makes it the best place to start. No matter what you purchase, everyone benefits.
When it comes to the skill tree, I recommend you build towards two specific points. First, go for the Anti-Boss perk at the top, a little to the left. This will be instrumental in you making progress. You might be able to make it past the first boss before getting this upgrade, but it will be essential for bosses beyond. After that, move towards the Utility Belt in the upper right-hand corner. That gives you an extra slot to your Loadouts, allowing you to take one more trap into battle. How you get there is up to you, but you should absolutely make a straight run for these skills first. While most of the skills on the tree get more expensive as you buy points, these two key abilities cost 2,000 skulls, no matter what. Keep that in mind while you're saving up.
Once you start to get a feel for the different characters, I recommend you also spend time upgrading their abilities. Each character requires their own upgrades, though the prices are the same for everyone. Who you want to play really depends on your personal play style, as well as whether you have a team. Ultimately, everyone is pretty viable, so give them all a try before you start powering up your favorites. If you're stuck on choosing, I recommend Harlow. She has a great close-range weapon, her sidekick Henry for extra damage, and her Pretty Lights ability rocks. It creates a zone that does damage over time where the grenade lands.
Traps, Traps, Traps!
Once you've obtained the key skills mentioned above and leveled up your character, it's time to get serious about your trap selection. By now, you should have had time to experiment with each of them. so you should know what you really want to invest in.
Screenshot by Destructoid
If you're not sure what traps to load up with and need a couple of suggestions, I've got you. You can't go wrong with the new Rift Barricade. While it wasn't available at launch, it's absolutely a must-use now. Aside from being an additional barricade, you can purchase with Rune Coins during a run; it also empowers adjacent traps.
There's also the Bramble. Place it next to a Rift Barricade in a choke-point and watch the orcs turn one patch into a whole field of destruction. It helps to carry a poison trap like the Poison Gas Emitter or the Poison Flower to combine with the Bramble with the correct Thread.
Finally, try out the wall blades. They're great for tearing up orcs around tight corners or in narrow paths. Plus, they're light on the wallet and aren't very big. This allows you to put them in sneakier places to dice your enemies into orc-amole.
Tie it all together with Threads
Screenshot by Destructoid
Lastly, there's Threads you can purchase from the Weaver of Will. I consider these to be the least important upgrade due to a couple of factors. Primarily, it's because they're expensive. But, there's also a lot that is specific to individual characters. You won't likely know who you're into using right away, so it's not worth just buying these early on. Plus, you'll unlock other Threads by completing challenges with one of the other Fate Weavers, so you'll still be getting plenty of upgrades for the system.
Once you've got a decent set of traps powered up, as well as your characters, you'll probably know exactly what Threads to get. The ones that correspond to your favorite characters and traps should be first, as well as the ones that help everything. Blunt the Knives, for example, is a strong one because Hunters will be a problem for a while. Getting this makes them much easier to deal with, but 500 skulls is a lot early on.
Delightful looking life sim Fantasy Life i: The Girl Who Steals Time was previously delayed to April 2025, and while it won't quite make those plans either, we now have a date. Level-5 will launch the latest entry in the series across all platforms on May 21.
The previous delay was announced back in September of last year, putting a hold on its initial October 2024 launch plans. When it arrives this May, it will be available on PlayStation 4, PlayStation 5, Xbox Series X|S, Nintendo Switch, and Steam, with cross-play and cross-save letting players live the same slow life from one platform to another. This marks the first time that the PlayStation, Xbox, and PC versions have been announced.
While Japan is getting physical releases of the PlayStation 5 and Switch versions, all platforms will be digital-only in the west. Level-5 detailed all the digital options, including the $69.99 Digital Deluxe Edition that packs the base game with a bunch of in-game items and accessories. Chief among them are the Mini Napdragon mount, an assortment of Napdragon weapons, and the "Iconic Outfit" pack.
Folks who pre-order from now until launch will also get the New Adventurer's Pack as a pre-order bonus. Here's a look at what you get for the early purchase:
Image via Level-5
Flutter Charm (increases experience earned)
HP Potion x 10 (heals)
SP Potion x 10 (recovers SP)
Power Aid x 10 (boosts attack temporarily)
Resistance Aid x 10 (boosts defense temporarily)
Life Cure x 5 (revives and heals)
Great Bomb x 5 (deals massive area damage)
Fireworks x 5 (sets off regular fireworks)
Courtship Fireworks x 5 (sets off heart-shaped fireworks)
Celestia's Gift x 100 (revert a Strangeling back to original form)
Are bombs cozy now? We'll find out in May, I suppose!
Pokémon Home regularly allows trainers to get their hands on rare Shiny Pokémon. The app's latest update has given users a brief window to add a Shiny Keldeo and a Shiny Meltan, two hard-to-get Pokémon, to their collection. However, it isn't handing them out for free.
If you want to get these two Shinies, you'd best be ready to hop back into some old Pokémon games to complete a few of Pokémon Home's Pokédexes. It won't be easy, but catching Shinies never is. Here's how to get Pokémon Home's Shiny Keldeo and Shiny Meltan.
How to get Pokémon Home's Shiny Keldeo
Image via Destructoid
Keldeo, the Colt Pokémon, is the adoptive ward of the Swords of Justice, a trio of Legendary Pokémon introduced in Pokémon: Black and White. As a Mythical Pokémon, Keldeo is usually only catchable during limited-time giveaway events (although there is an obscure way to catch it Pokémon: Sword and Shield's Crown Tundra DLC). This is the first time its Shiny variant has been available, making it an irresistible prize for Shiny hunters.
Here's how to get the Shiny Keldeo from Pokémon Home.
Download the Nintendo Switch version of Pokémon Home.
Complete the Galar, Isle of Armor, and Crown Tundra Pokédexes for Pokémon: Sword and Shield and its Isle of Armor and Crown Tundra DLCs
Transfer the required Pokémon from Pokémon: Sword and Shield into Pokémon Home through your Switch to register them on the app's Galar, Isle of Armor, and Crown Tundra Pokédexes.
Download the Pokémon Home app on iOS or Android and link your mobile Home account to your Switch Home account.
Use the Mystery Gifts feature in your Pokémon Home mobile app to receive your free Pokémon.
How to get Pokémon Home's Shiny Meltan
Image via Destructoid
Meltan, the Lugnut Pokémon, is one of my all-time favorite Pocket Monsters. How can you not love this little guy? Look at his little wheel nut head! Unfortunately, you can only catch Meltan in Pokémon Go, the only game where it can evolve into its second form, the roided out Melmetal.
Here's how to get the Shiny Meltan from Pokémon Home.
Download the Nintendo Switch version of Pokémon Home.
Complete the Kanto Pokédexes for Pokémon: Let's Go Pikachu or Pokémon: Let's Go Pikachu.
Transfer the required Pokémon from Pokémon: Let's Go Pikachu or Pokémon: Let's Go Pikachu into Pokémon Home through your Switch to register them on the app's Kanto Pokédex.
Download the Pokémon Home app on iOS or Android and link your mobile Home account to your Switch Home account.
Use the Mystery Gifts feature in your Pokémon Home mobile app to receive your free Pokémon.
Before making room in your menagerie for Shiny Keldo and Shiny Meltan, don't start thinking you can trick the system. Pokémon Home can tell which game you got the Pokémon you're transferring in from, and it won't count any Pokémon that weren't caught in the games I listed above. There are no shortcuts here; if you want these Pocket Monsters, you've got to put in the work and fill in those Pokédexes the old-fashioned way.
If you know how to play Hackclaw effectively in the Delta Force Operations mode, you will always be an asset to your team. She's also fantastic for solo play, ensuring you almost always know where your enemies are and often denying them the same information. Playing her well makes you an absolute terror, and in this guide, we'll go over tips about her entire kit and some advanced play strategies, as well.
Tips for Playing Hackclaw: The Basics
Screenshot by Destructoid
Hackclaw is a master of stealth, intelligence, and enemy disruption. No other operator in Delta Force can disable their enemies' abilities like she can, and only Luna's Detection Arrow rivals Hackclaw's detection capabilities. However, Hackclaw is more consistent, combat-effective, and easier to play between the two.
Beyond the most basic level, Hackclaw doesn't play like other operators. Sure, she can carry up to two guns and a sidearm, her sprint speed is the same, and she has the same amount of health. However, her stealth speed while walking or crouching is increased, and her footsteps make less noise while using stealth. That means Hackclaw can reach advantageous positions far easier than any other operator without giving away her location.
As part of a team, a confident Hackclaw can split off from the group and flank without giving away the game. She can sneak up on even the best-equipped, highest-ranked players as a solo, taking even Mandelbricks right from under their noses. I've managed it once, and it was satisfying.
Hackclaw's abilities are also unique in that they're simultaneously offensive and defensive. Her Data Knife deals solid damage, and its disabling burst reveals threats via a hitmarker, even through walls. Her Signal Decoder tracks up to six enemies in real-time, making it invaluable when preparing for a fight or defending a position and rare loot. Even her Flash Drones can be used preventatively. Send them out early to check for enemies hiding in corners. Use them mid-fight for an instant advantage.
We'll go over her kit in detail below.
Tips for Using Hackclaw's Signal Decoder
Screenshot by Destructoid
Hackclaw's Gadget, the Signal Decoder, is the heart and soul of her kit. Its function is as simple as it is borderline overpowered. Usable every three minutes or so, once active, the Decoder paints a line on your HUD leading toward up to six enemies within 60 meters. The line marking the closest enemy is red; these lines update in real time as your enemies move around.
The Decoder's effects go through walls and around corners. Even if it can't draw a direct line to them because of verticality or some other obstruction, the Decoder display will let you know how many enemy operators are within its detection radius.
There are two main times to use the Signal Decoder: when entering a high-risk area or in the middle of a fight when you need to know where the next threat's coming from.
Using the Decoder as an early warning system is its most versatile use case. Are you on Zero Dam about to enter the administration building? Scan for enemies. About to reach a dangerous extract on Space City or Brakkesh? Decoder time. You'd also do well to use it in transition between high-traffic areas, particularly if you just looted a safe or other priority loot spawn.
Detecting enemy locations mid-combat also serves several purposes. First, it ensures you have a bead on where your foe's hiding, as there's no way to block the Decoder signal. Enemies have a glitch effect on their screen that increases in intensity the closer an active Decoder is, so you can use that to your advantage. Pushing your enemies with your Decoder active can force a mistake, giving you even more of an advantage.
How and when you activate the Signal Decoder also won't change much, whether solo or on a team. If you or a teammate hear footsteps near somewhere you want to, quickly checking with the Signal Decoder will give you the go-ahead or prompt you to pump the brakes. And if no signals appear, you'll know the footsteps belonged to an NPC, removing any tension from the encounter.
Tips for Using Hackclaw's Data Knife
Screenshot by Destructoid
If the Signal Decoder is the most powerful part of Hackclaw's kit, the Data Knife is the most versatile. It's at once a weapon, a detection system, and a crowd control and anti-operator tool. Here's a short list of all the ways you're likely to use the Data Knife in a raid:
To kill basic AI soldiers in one shot silently (without shooting any bullets).
To check for enemy players by throwing the Knife at a wall and waiting for a hit marker to appear.
To finish knocked down enemy operators without needing to waste any more bullets.
To temporarily disable enemy operator abilities at the start or in the middle of a fight.
To temporarily disable enemy operator abilities to dissuade them from chasing you.
To deal extra damage to an operator during a fight or if they catch you by surprise.
I've made it a point of order to throw a Data Knife into nearby walls whenever I'm about to enter a point of interest, especially if there's a safe there. Doing so only costs the thirty-second cooldown on that Knife, but could save a Signal Decoder use for when I need it more.
The short version: use the Data Knifeliberally, as it can save you tons of headaches and keep away unwanted attention.
Tips for Using Hackclaws's Flash Drone
Screenshot by Destructoid
Adding to Hackclaw's top-of-her-class utility is the Flash Drone. While it is a more offensive option in her kit, it can be almost as valuable as the Data Knife if used properly. You'll mainly use the Drone during fights, especially in enclosed spaces like Admin on Zero Dam or any high-threat areas on Brakkesh or Space City. However, because you get a hitmaker whenever the Drone successfully flashes an enemy, you can use it in many of the same ways as the Data Knife.
Flash Drones bounce off walls, so you can send one out at an angle to clear a room without needing to expose yourself to a threat. The same applies to higher-threat sightlines near an extract or down a long hallway, for instance. If your Data Knife is on cooldown, sending a drone out is a good way to check for threats or at least dissuade an enemy operator from taking a particular angle.
You'll want to be a bit more judicious about using your Flash Drones compared to the Data Knife. The flash doesn't work through walls or around corners and does nothing to stop enemies from countering your abilities with theirs. The flash doesn't completely white out an enemy screen either, meaning if you overpeek a blinded opponent, they might still hit you with a lucky spray.
In short, the Flash Drone is a more offensive-focused tool than the Data Knife or Signal Decoder, but it also has defensive, detection, and disabling uses. Combine a Flash Drone and a Data Knife for one of the most effective counter-play options in Delta Force. The more you use them, the better you'll be at playing Hackclaw and the bigger menace you'll be on the battlefield.
While you can slay the runway at any rank in the wildly popular Dress to Impress on Roblox, part of the fun of the game is making progress and working your way up to enough stars to join the pro servers. Not only do you get access to these servers, but you also unlock exclusive items as you work your way up.
However, it's not a simple task to make it all the way to Fashion Goddess. What are all the ranks before reaching the top? We're here to tell you everything you need to know.
Every rank in Dress to Impress
Screenshot by Destructoid
There are currently 14 ranks to earn to Dress to Impress, with five rewards to unlock at various star amounts:
Rank Title
Stars
Reward
New Model
0-49
No reward
Rising Star
50-199
No reward
Aspiring Model
200-499
No reward
Fashionista
500-999
No reward
Glamourista
1,000-1,499
No reward
Fashion Maven
1,500-2,999
No reward
Runway Queen
3,000-5,999
Pro server unlocked Dior Handbag
Trend Setter
6,000-14,999
Trendsetter Skirt
Runway Diva
15,000-24,999
Runway Diva Crown
Top Model
25,000-50,000
Silk Robe
Glamour Elite
50,000-75,000
No reward
Fashion Mogul
75,000-100,000
No reward
Supernova
100,000-150,000
Supernova Crown
Fashion Goddess
150,000+
No reward
You can see each player's rank above their avatar, below their name, and whether they are VIP or not.
As you can see, the range of stars for each rank grows as you get higher in the ranks. Once you reach the Supernova rank, you'll need to earn 50,000 more stars just to reach the next. Meanwhile, the first few ranks only require you to earn 50.
Once you earn enough stars to unlock the next rank, you'll be able to find the unlocked item in the closet under the trophy section. Currently, there are only five rewards for ranks in total, plus unlocking the pro servers. More are planned to be added in future updates.
How to rank up fast in Dress to Impress
The only way to truly rank up is to earn more stars, which you get from your ratings during fashion shows. For example, if you get first place in a round by being given 20 stars by your server for your fit, you add those 20 stars to your rank.
The best way to win rounds and earn more stars per theme is by following the theme's instructions. You can click on the question mark button below the theme if you're having trouble understanding it, which will give you a brief description of the style.
Some servers will become a farming server, in which players all rank each other five stars regardless of their outfit. You can ask the players in your server to start a farming server or hop on Discord to find an already active one. Be aware that farming isn't very popular since many players see it as cheating.
There's really no way to shortcut earning ranks in Dress to Impress — you'll need to put in the effort with each round and think creatively with your fits. Be prepared to spend a lot of time grinding rounds if you're interested in working all the way up to Fashion Goddess.
Luckily, beyond unlocking the pro servers, the items aren't necessary to enjoy the game. While the ranks are a great way to see progress, you don't need to be a high rank to get the most out of playing.
Fast traveling is an important feature in Kingdom Come: Deliverance 2 as it allows you to save a lot of real-world time and helps you to complete quests quicker.
The game has a pretty standard fast-travel system implemented, which requires you to find a location for the first time. Once you have found it, you'll be able to quickly travel to it as many times as you wish. Fast travel feature is available at both Trosky and Kuttenberg, so let's take a look at all the fast travel locations you can find.
All Kingdom Come: Deliverance 2 fast travel locations in Trosky
Trosky is one of the two regions you'll come across inside the game, and there are 14 fast travel locations on the map.
Image via Destructoid/MapGenie
Location point
Location Region
1
Vidlak Pond
2
Tachov
3
Trosky Castle
4
Zhelejov Wagoner's Inn
5
Zhelejov
6
Troskowitz
7
Apollonia
8
Rocktower Pond
9
Nomad's Camp
10
Lower Semine Mill
11
Semine
12
Nebakov Fortress
13
Nebakov Mill
14
Schdiar: West Farm
All Kingdom Come: Deliverance 2 fast travel locations in Kuttenberg
The Kuttenberg regions has significantly higher number of fast travel locations spread across the region. You'll find 20 different points while you traverse the vast areas of the map.
Image via Destructoid/MapGenie
Location point
Location Region
1
Devil's Den
2
Horschan
3
Grund
4
Bohunowitz
5
Opatowitz
6
Raborsch
7
Suchdol
8
Wysoka
9
Miskowitz
10
Pschitoky
11
Bylany
12
Old Lhota
13
Maleshov
14
Danemark
15
Old Kutna
16
Kolin Gate
17
Kourimska Gate
18
Kuttenberg Town Hall
19
Caslavska Gate
20
Sedletz Monastery
All the fast travel locations not only allow you to travel quickly, but you also get to access different points of interest. Most of them have inns or bathhouses that allow you to rest and clean yourself up. You'll also find characters like Radovan and Kreyzl at such locations.
A few locations like Maleshov are extremely important parts of the campaign, as your decision can even end up destroying the place.
Island Visitors are a familiar sight in Hello Kitty Island Adventure. As soon as you repair your first Visitor Cabin, you'll be inundated with new characters who want to visit as long as you meet their very specific requirements.
Included in the pool of potential visitors are various family members. Brothers, sisters, parents, and grandparents of the more familiar Sanrio characters who call Friendship Island home. These family visitors are less common than most others, but they don't come with the most difficult requirements to fulfil.
Pompompurin's parents are one such pair of related visitors. If you want to know when they'll be available to visit or how to get them, keep reading.
Pompompurin's parents' visit schedule for 2025
Image by Destructoid
All visitors in Island Adventure adhere to the same fixed schedule, and Pompompurin's parents have a fixed schedule that sees them as possible visitors for four days every four weeks. Their visit always comes exactly one week after My Melody's grandparents.
Here's when you can expect these two golden retrievers to pay a visit in 2025:
February 20 - February 24
March 20 - March 24
April 17 - April 21
May 15 - May 19
June 12 - June 16
July 10 - July 14
August 7 - August 11
September 4 - September 8
October 2 - October 6
October 30 - November 3
November 27 - December 1
December 25 - December 29
Now that you know when they're going to be available as potential visitors, you can prepare their Cabins to attract them.
How to get Pompompurin's Mama to visit in Hello Kitty Island Adventure
Image by Destructoid
Pompompurin's Mama is a loving lady who you'll need to unlock as a 5-star resident if you want to unlock the "The Case of the Missing Pudding" quest. She's also useful to have around, as she will reward you with Mama's Pudding each time you talk to her, which just so happens to be Pompompurin's 3-heart gift.
Here's how you'll need to kit out a Cabin if you want Pompompurin's Mama to visit:
Must be on Gemstone Mountain to be close to Pompompurin
Must have five pieces of furniture with the tag "Home Essentials"
Must have at least one Mama's Pudding
Once you've lured her in, Pompompurin's Mama will have five Daily Quests for you to complete before she becomes a 5-star permanent resident:
Level
Quest
How to complete
1
"Photo Buddies"
Take a selfie with Pompompurin
2
"Pizza Party"
Give Pompompurin an Alfredo Pizza
3
"Double Time"
Brew a Speedy Swimming Potion at the Cauldron
5
"You Time"
Take a selfie at the Hot Springs on Mount Hothead
5
"Mama's Secret Recipe"
Cook a Mama's Pudding
How to get Pompompurin's Papa to visit in Hello Kitty Island Adventure
Image by Destructoid
As with Pompompurin's Mama, you'll need to unlock Pompompurin's Papa as a 5-star permanent resident if you want to unlock the "The Case of the Missing Pudding" quest. The reward for talking to Pompompurin's Papa during his visits, Pudding, is useful for befriending Pompompurin himself, as it's one of his 2-heart gifts.
Here's how to decorate a Cabin to attract Pompompurin's Papa to Friendship Island:
Must be on Gemstone Mountain to be close to Pompompurin
Must have three pieces of furniture with the tag "Antique"
Must have at least one Magma Pudding
Must have at least one Pumpkin Pudding
Must have at least one Purple Pudding
To unlock Pompompurin's Papa as a 5-star permanent resident, you'll need to complete all of the following quests:
Towards the end of the story events in Emerald Stair, you have to make a choice regarding the citizens of Fior mes Iverno in Avowed during the quest Ancient Soil. After the siege of the Steel Garrote, Fior mes Iverno is reeling from the fallout and wants to relocate to either Thirdborn or Paradis.
Surprisingly, the governor of the city allows you to make the decision. So, is it better to move to Thirdborn or Paradis in Avowed?
Choosing Thirdborn in Avowed
Quilicci is the main person pushing for Fior mes Iverno to relocate to Thirdborn. His argument is they can still freely study animancy there, allowing them to continue their research into the Dreamscourge and other projects. It's also much farther away from the Steel Garrote, who might want to finish the job against them after failing to crack the defenses of Fior.
Making the choice between Thirdborn and Paradis. Screenshot by Destructoid
However, the governor is opposed to this idea, as he wants to relocate to Paradis and keep a closer eye on the Steel Garrote. Perhaps if the citizens of Fior stay right under the nose of the Aedyran military force, they can gain an upper hand and learn their strategy.
If you choose to send the citizens of Fior to Thirdborn, you're moving them to the next map over in Shatterscarp. Things are much worse in this region, as the Dreamscourge has completely taken over the lands and turned a majority of its citizens into Dreamthralls. The residents of Fior will take refuge in the hub city of Thirdborn, but they won't stay there long.
Events soon start to unfold in other parts of the region that play an integral role in the story. I won't give too much away about what happens in Shatterscarp, but if you move the Fior citizens to Thirdborn, you have to make another decision regarding their fate fairly soon. This decision has major ramifications, as some Fior citizens will die as a result of the choice you make. The choice comes during the Shadows of the Past main quest in Avowed.
While you can also save Fior citizens, this has implications for how the story unfolds later on in the game.
Choosing Paradis in Avowed
On the flip side of the coin, you can side with the governor in his argument with Quilicci and send the citizens of Fior to Paradis. This is, naturally, the riskier option on the surface, as Fior is moving closer to the opposition that just tried to burn their city to the ground.
However, this is arguably the best choice for Fior, as they're moving to the relative safety of Dawnshore compared to the dangerous wilds in Shatterscarp. While they will be closer to the Steel Garrote, you can save them from the story events that unfold while you're in Shatterscarp, which in turn can save the lives of some citizens. The story events in Shatterscarp won't involve the Fior citizens whatsoever and could make your decision in the Shadows of the Past quest easier when the time comes.
If you do decide to send Fior to Paradis, they will relocate near the gates of the city. You can return there and talk to the governor to receive 500 gold and some extra dialogue. You'll learn that the citizens of Fior are doing fairly well under the circumstances, as the Steel Garrote has no idea they're right under their noses.
Ultimately, though, it's up to you where to send Fior mes Iverno. If you want some gravity to your decisions later on in Avowed, send them to Thirdborn. However, if your priority is their overall well-being, have them go to Paradis.
After saving Pavlena and getting her home safely during Bad Blood, Kingdom Come Deliverance 2 players are tasked with finally ending the feud between Jakesh and Bozhena.
But although shedding more blood might be easier, putting an end to the conflict peacefully is by far the best path. Here's how to stop the Bad Blood feud between Jakesh and Bozhena in Kingdom Come Deliverance 2.
How to end the Bad Blood feud between Jakesh and Bozhena in Kingdom Come Deliverance 2
There are a few ways to end the Bad Blood feud, as you can either kill Jakesh for Bozhena or have them patch things up peacefully. If you choose the latter, you can stop the Bad Blood feud between Jakesh and Bozhena in Kingdom Come Deliverance 2 by first talking to the former in Troskowitz. Although his location will vary, I was able to find him praying by his son's grave in the spot highlighted in the image below:
Image by Destructoid.
During the conversation, you must then select the following dialogue options to convince him to patch things up:
You have to make up with Bozhena.
Pavlena is pregnant. (This option will only become available if you learned of the fact from Dushko before discovering Roman's body)
If you failed to learn about the pregnancy, you can get Jakesh to abandon the feud by picking either "Indirect guilt is still guilty" (Persuasion), 'Revenge never ends well" (Charisma), or "If you don't make amends I will kill you" (Intimidation) and passing a stat check. Among the checks, the Persuasion and Charisma ones are by far the easiest to pass.
After the talk, Jakesh will give Henry a small compensation for Bozhena. Now, return to her hut and talk to her to complete Bad Blood. Later, you can also return to Jakesh and select "Bozhena agreed to make peace" to end the feud once and for all.
Image by Destructoid
If you want to get the best result for the Bad Blood quest as soon as possible but cannot succeed in any of the dialogue checks, I recommend making use of perks. For example, while Good Natured will boost your Speech by 3, the Charming Companion Houndmaster skill will give you +3 in Charisma when accompanied by Mutt. Make sure to also equip the right clothing and equipment for the job.
When talking to Bozhena, you can also pay her back for her help early in the story. Doing so will unlock the A Knight's Word trophy/achievement. Doing that after completing Back in the Saddle might be best, however, as Hans will give you the funds needed to do it during it.
While exploring medieval Bohemia, you may have heard the tale of a mad old stonemason hunting for a small cache of lost coin. It's not an insignificant amount, either. Here's how you can find the Mad Stonemason's treasure in Kingdom Come: Deliverance 2.
Travel to Trosky Castle in the Trosky region to first hear about the treasure. Look around the archery range in the old quarry just south of the castle and start a conversation with Bohumir, who runs an archery competition there.
Pick the dialogue option "This used to be a quarry?" Bohumir will briefly (and rudely) explain the area's history before mentioning something about an "old loony."
Screenshot by Destructoid
Ask him about the loony and he'll talk about the mad stonemason who lives in those parts. According to Bohumir, the stonemason is hunting for a hidden cache of groschen once owned by him and his friend at the quarry. The problem is that the man's friend is the only one of the two who knew where it's hidden, but he died in an accident, taking the location of the prize to the grave. Since then, the stonemason has been living in a dilapidated cottage nearby, leaving only to search the quarry for the goods.
How to find the Mad Stonemason's treasure in Kingdom Come 2
You can visit the stonemason if you'd like. He's either at the Vagrant's hut location where he lives or is searching through the rocks at the quarry. You can give him a sum of cash and lie about it being the treasure. But let's just find the actual treasure instead, eh?
Screenshot by Destructoid
To find the treasure, look for a rocky incline left of the archery targets — it leads to a ladder. Take the ladder up and climb the second ladder to the cliff edge.
Screenshot by Destructoid
Turn left as you arrive at the top and walk south along the cliff's edge to a small grassy clearing where several thin trees stand, clearly preparing to force a watermelon to walk the plank.
Screenshot by Destructoid
Look at the base of the trees for a pile of stones. Press the button or key to "Examine the stones."
Screenshot by Destructoid
Doing so reveals the location of the mad stonemason's treasure: a whopping 549 Groschen.
Screenshot by Destructoid
You can return the treasure to the stonemason or keep it. Returning the coins to him doesn't offer much in reward. The stonemason will thank you, and you'll unlock a codex entry for "Stonemason." That's about it.
Screenshot by Destructoid
For the most part, getting the treasure is a good way to build a healthy sum of pocket change early in the game. Otherwise, learning about stonemasons may not be the best reward on offer.
Henry spends most of his time covered in blood, dirt, or both, so you may be surprised that he's a bit of a ladies' man. One of the characters in Kingdom Come: Deliverance 2 you can romance is Klara, a young healer who takes an interest in our handsome hero.
You can romance Klara during the story mission Back in the Saddle, where you and Hans Capon travel south from Trosky Castle to visit Nebakov Fortress. The fortress is typically closed to visitors before this mission.
How to meet Klara
At Nebakov, Hans speaks with the fortress' lord while Henry is left to chew the fat with Adjutant Michael. Talk with the adjutant for a while until he suggests a friendly duel. Agree, and follow him to the arena where he gives Henry a right thrashing. He suggests visiting Klara, their healer, to get patched up.
Screenshot by Destructoid
You can find Klara typically outside a small building near the blacksmith, sitting on a bench. Chat with Klara until she asks Henry to join her in a hunt for some herbs. Pick the dialogue option "I can't say no to a comely maid," which earns you reputation points from Klara, who appreciates the compliment.
Screenshot by Destructoid
You can meet Klara before the duel. The conversation doesn't change, so you can take this route if you don't feel like getting hit in the face right away.
Follow Klara to the field where she picks her herbs. It doesn't matter which option you choose in the conversation. She just wants to hear of Henry's journey.
Find the herbs for Klara
When you get to the field, Klara asks for Henry's help picking herbs. Pick the dialogue option "Sure, I'll be glad to help" to get started. If your Survival skill is high enough, you can reply with "I know quite a bit about herbs."
Screenshot by Destructoid
Klara needs eight marigolds, four sage, and one poppy for her medicine. Take a look around the area for the plants: marigold is the orange flower; poppies are the red flowers; sage is the taller purple flower that grows around the tall grass and rocks.
Gather what's required and return with the herbs to Klara. She'll ask you to follow her so she can "show you something."
How to solve Klara's riddle in Kingdom Come 2
Klara leads Henry to a secluded spot in the trees. Talk with her again, and she'll ask you to solve a riddle. Answer with "I think she's called Klara."
Screenshot by Destructoid
One spicey cutscene later, Henry returns with Klara to the fortress.
For more help with medieval courtship, check out our guide on how to romance Doubravka in Kingdom Come 2.
Updated February 15, 2025: We added new codes! Roblox, but make it fashion—Tyra is probably feeling super proud somewhere. However, if you want to channel your inner Naomi and win in every style-off, you may need some extra help. To gain an edge over the other wannabe fashionistas, you will need Dress To Impress codes. All Dress To Impress codes list Active Dress To Impress codes SWEETHEART — Sweetheart Dress, Pants and a Shirt (New) ELLA — Skirt (New) CUPIDSCLOUD — Cloud Item (New) HAPPYNEWYEAR — Dress (New) YEAROFTHESNAKE — Dress and Accessories LNY2025 — Dress and a Suit NY2025 — New Year's Hat and Balloons 1CON1CF4TMA — Dress WINTERUPDATE — Clothing items MEGANPLAYSBOOTS — Boots B3APL4YS_D0L1E — Dollie 4BILLION — Clothing items CH00P1E_1S_B4CK — Jacket, Skirt and Shoes D1ORST4R — Bag S3M_0W3N_Y4Y — Axe UMOYAE — Dress BELALASLAY — Jacket KITTYUUHH — Kitten M0T0...
PC Invasion - FeedDDD Saturday, February 15, 2025 11:52 AM
Updated February 15, 2025: We added new codes. The battle between good and evil rages on the horizon. Do you want to fight on the side of humanity, or have you developed a taste for human flesh? One thing is certain—no matter where your destiny leads you, Weak Legacy 2 codes will be by your side. All Weak Legacy 2 codes list Active Weak Legacy 2 codes UPDATE3RESETBREATHINGORART — Breathing Art Reset (New) 25SPINSUPDATE — 25 Spins (New) UPDATE3RESETRACE — 2 Race Resets (New) 25SPINSPATCH2UPDATE — 25 Spins 25SPINS5KFOLLOWERS — 25 Spins 50SPINSUPDATE1.5 — 50 Spins 45KLIKESRESETBREATHINGORART — Breathing Art Reset 50SPINSUPDATE1.5 — 50 Spins UPDATE1.5RESETRACE — Race Reset Expired Weak Legacy 2 codes UPDATE1.5RESETBREATHINGORART 40KLIKESRESETBREATHINGORART 10KLIKESRESETRACE 5KLIKESRESETBREATHINGORART 35KFAVORITESRESETRACE 35KLIKES25SPINS 5KLIKESRESETBREATHINGORART 1MVISITS50...
PC Invasion - FeedDDD Saturday, February 15, 2025 11:21 AM
Updated February 15, 2025: We added new codes. You can run, but you can't keep hiding forever, or else you'll get caught. Your only salvation from demise is to make a group effort and fix those lousy generators before the killer finds you. Winning is rewarding, but it's also fantastic to get freebies with Dead by Daylight codes. All Dead by Daylight codes list Active Dead by Daylight codes HOOKEDONU — Special Badge (New) LUCKYBP2025 — 168,888 Bloodpoints (New) ROLLD20 — Dungeons & Dragons Charm MAKEITREINDEER — 250k Bloodpoints IFLOOKSCOULDCHILL — Frosty Eye Cosmetics DBDDAY2024 — 300k Bloodpoints and 500 Iridescent Shards DBDDMAYOKE — Silk Omamori and DbDDay Celebration Coin Charms NOVASCASAS — 250k Bloodpoints BLOODPINT — 500k Bloodpoints DROPCT — Clock Tower banner (Nintendo Switch only) DROPDA — Dominus Anger Badge (Nintendo Switch only) the dark lord — Wax Candle Badge and Dusty Secr...
PC Invasion - FeedDDD Saturday, February 15, 2025 11:11 AM
Updated February 15, 2024: We looked for more codes. WWE 2K24 locker codes provide awesome freebies such as VC Points as well as cards and packs, giving you the opportunity to get your favorite stars. Redeem these codes while they're still active, choose your wrestler, and wipe off your opponents hassle-free! All WWE 2K24 locker codes list Working WWE 2K24 locker codes CASHINGITIN — 15k VC (New) Expired WWE 2K24 locker codes GAMEAWARDS24 WARGAMES CROWNJEWEL HALLOWEEN2K24 SINGLTSTYL2K24 LAMASCARA2K24 INYOURHOUSE BEASTLY2K24 BASHINBERLIN WWEDRAFT2K24 YOURSTORY2K24 ODDSANDENDS WWE2KATSMMRSLM HEADOFTHETABLE MONFACTION SUMMERWWE2K24 CANYOUSMELL SECURETHEBAG MITBBRIEFCASE GOINGGLOBAL WRESTLEMANIAXL HESEESYOU2K24 PATSMMERGIFT24 WWE2KATIGNLIVE SUPERCARD2K24 ECWCHAMPS KINGANDQUEEN Related: NBA 2K Mobile codes and Mech Arena codes How to redeem locker codes in WWE 2K24 Read...
PC Invasion - FeedDDD Saturday, February 15, 2025 10:24 AM
Updated February 15, 2025: We added new codes! If anyone ever tells you that anime and football can't go hand-in-hand, this game should make them quiet. Create unique players, customize your team, and give it your all on the field as you test your skills against other players. If things go awry, use Roblox LOCKED codes! All Roblox LOCKED codes list Active Roblox LOCKED codes VALENTINESDAY — Yen (New) MEDALXLOCKED — Yen (New) 10KSUBS — Yen 110MILVISITS — Yen 115KFAVOURITE — Yen 150KMEMBERS — Yen LOCKEDMAS2 — Yen STRAIGHTRIPTIDE — Yen DRAGONHEADER — Yen 100MILVISITS — Yen 60KLIKES — Yen SORRYFORSERVERCRASHES — Yen 90MILVISITS — Yen 100KFAVOURITE — Yen TWINGUNS — Yen FALLARTCONTEST — Yen LOCKEDWEEN — Yen 80MILVISITS — Yen ACEEATER — Yen 90KFAVOURITE — Yen 50KLIKES — Yen SEASON3PROLEAGUE — 125k Yen MOSTVISITEDBLGAME — 125k Yen 60MILVISITS �...
Publishers Cook and Becker and Lost in Cult are teaming up with Crystal Dynamics to bring an official Legacy of Kain encyclopedia and tabletop game. This comes after the Soul Reaver 1&2 re-releases and my feature on the original Blood Omen: Legacy of Kain's 30 year secret. The official encyclopedia and TTRPG set is currently […]
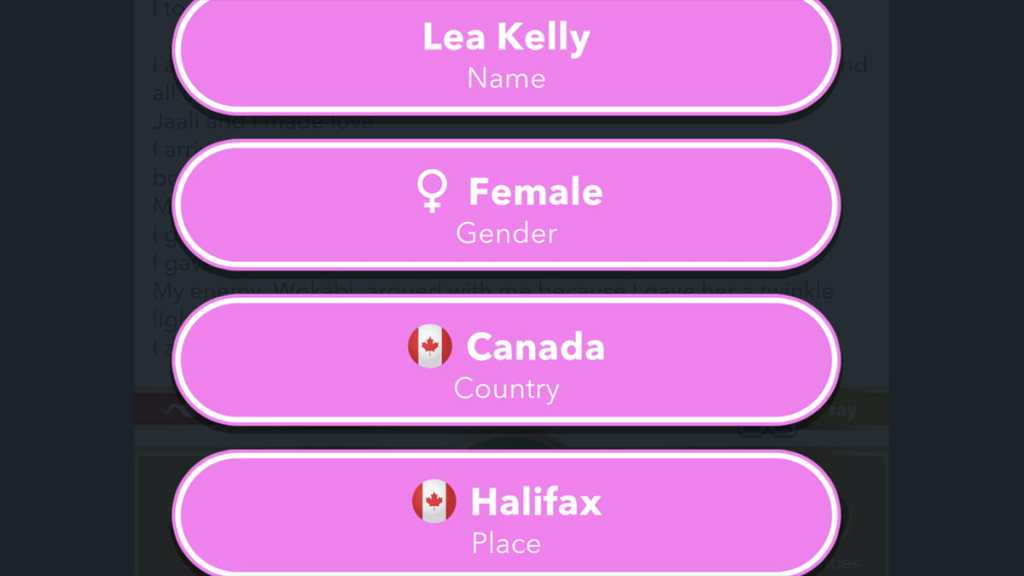
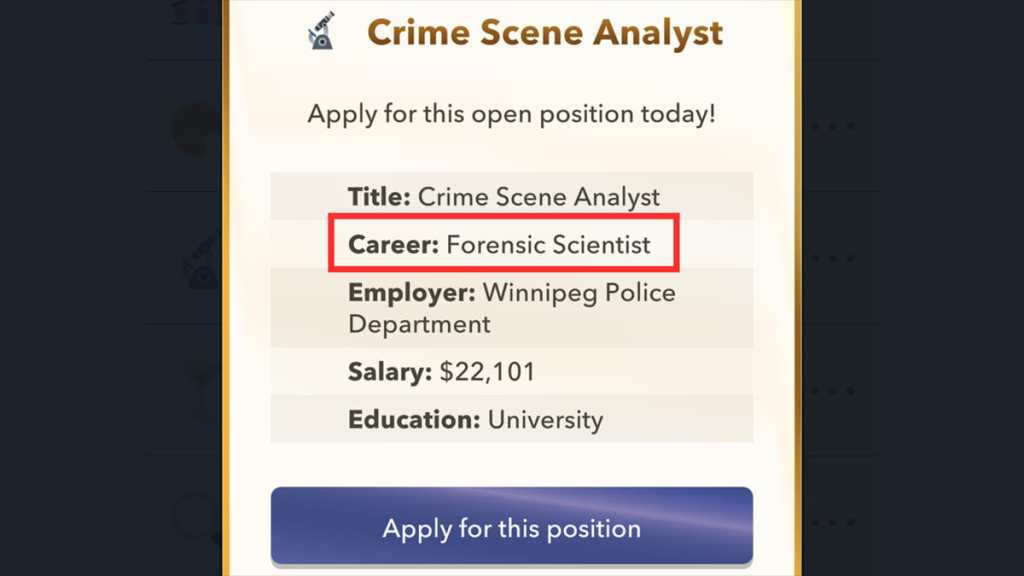
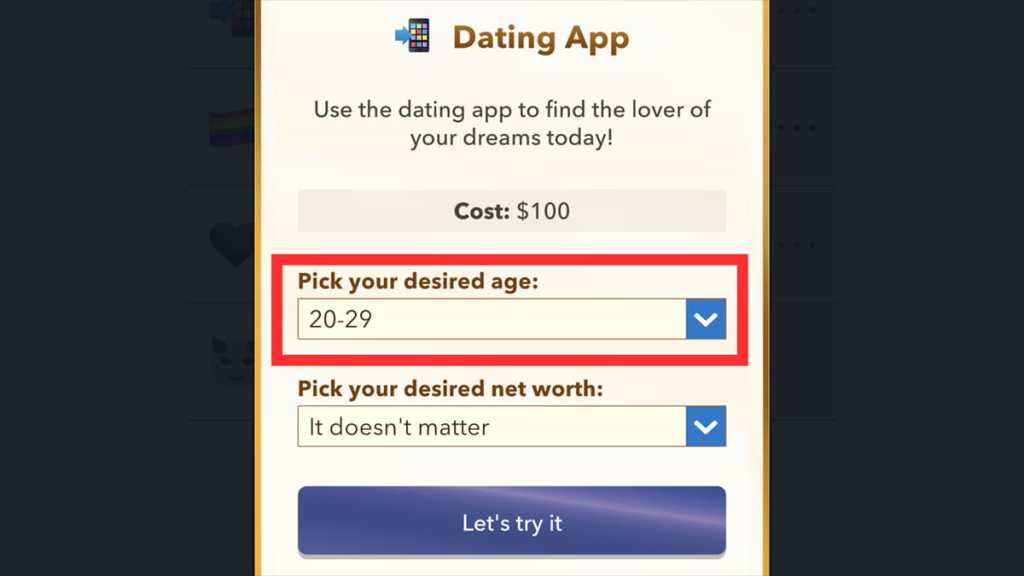
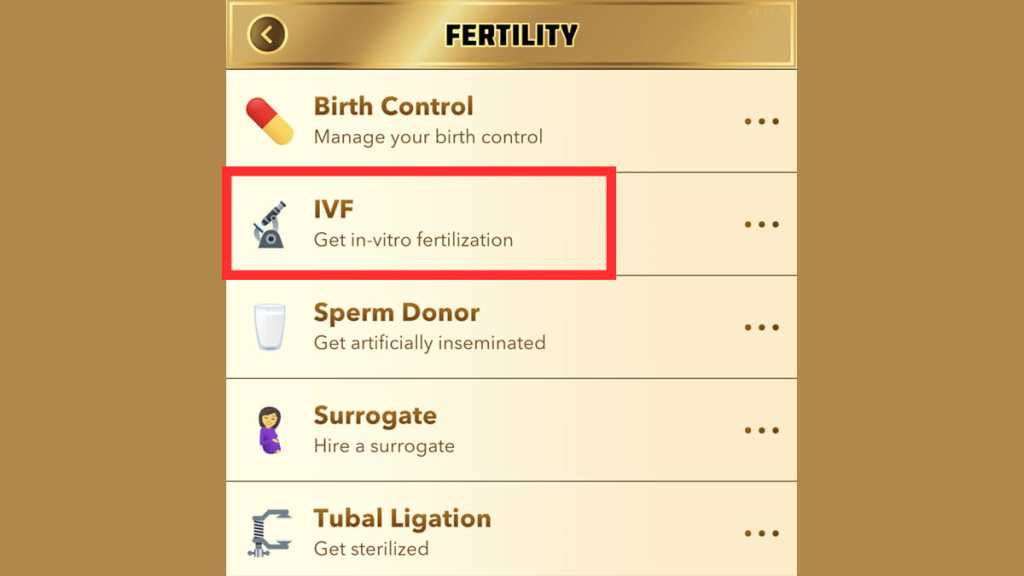


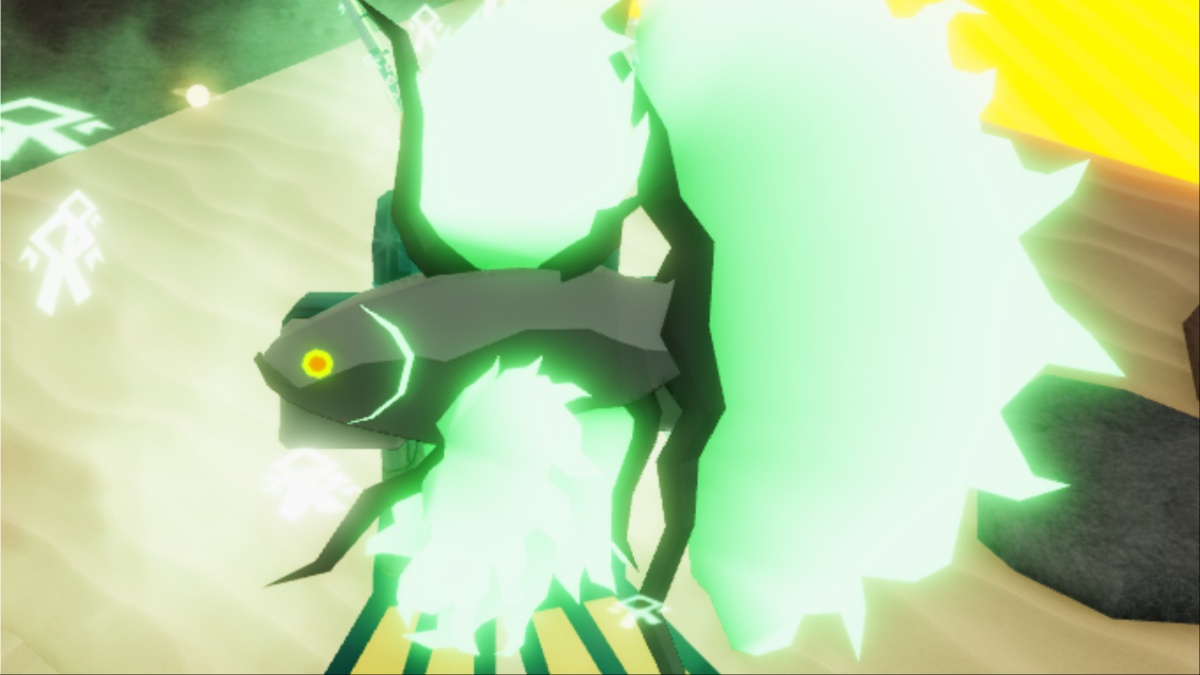


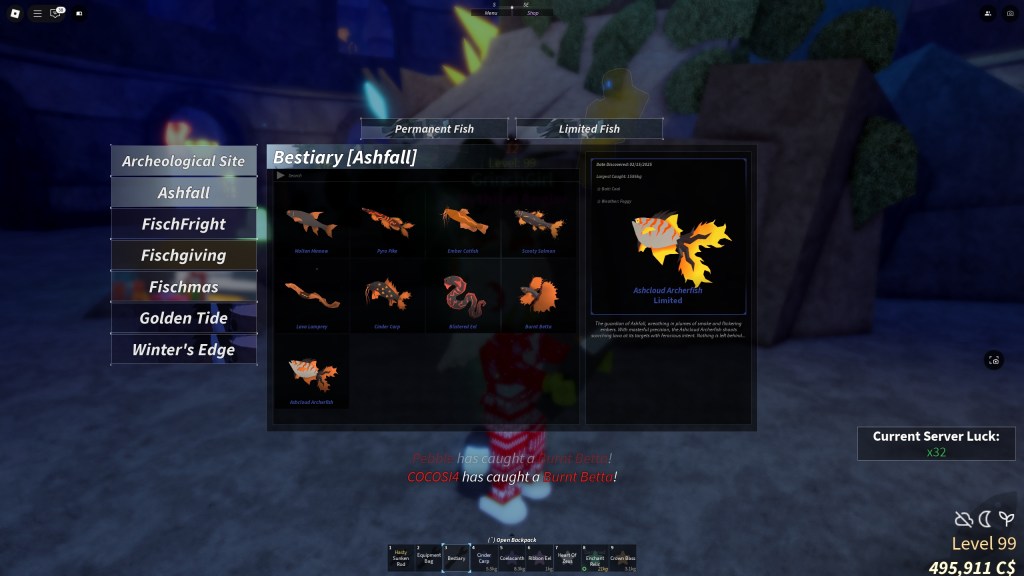


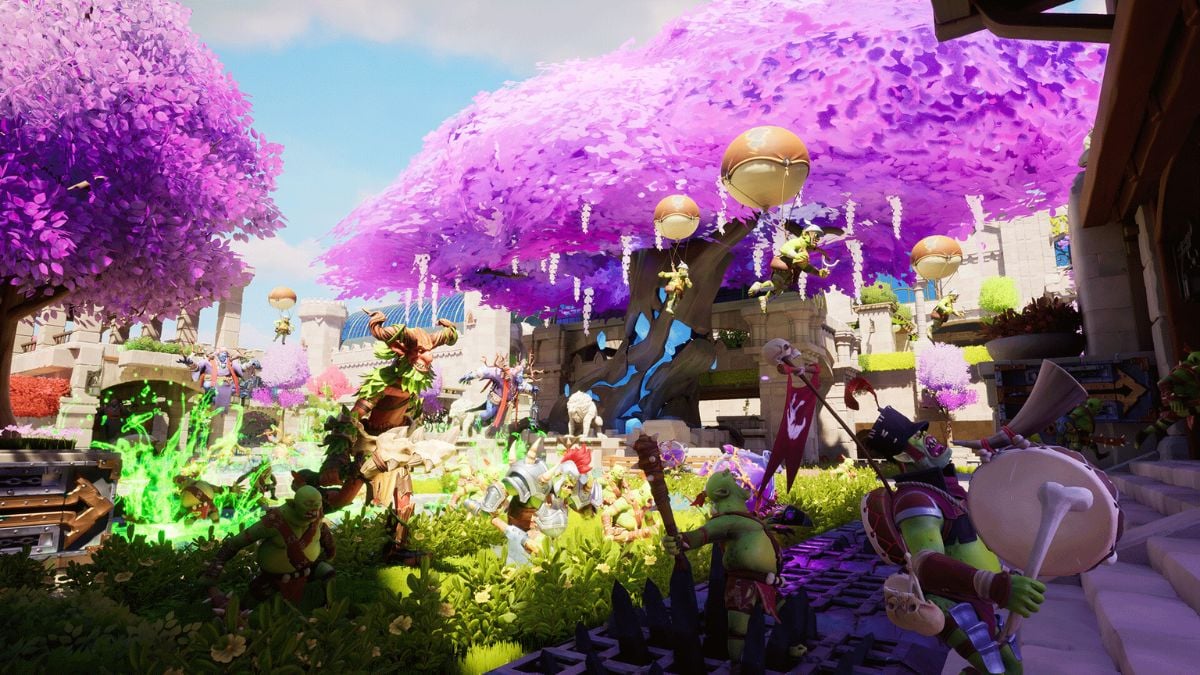
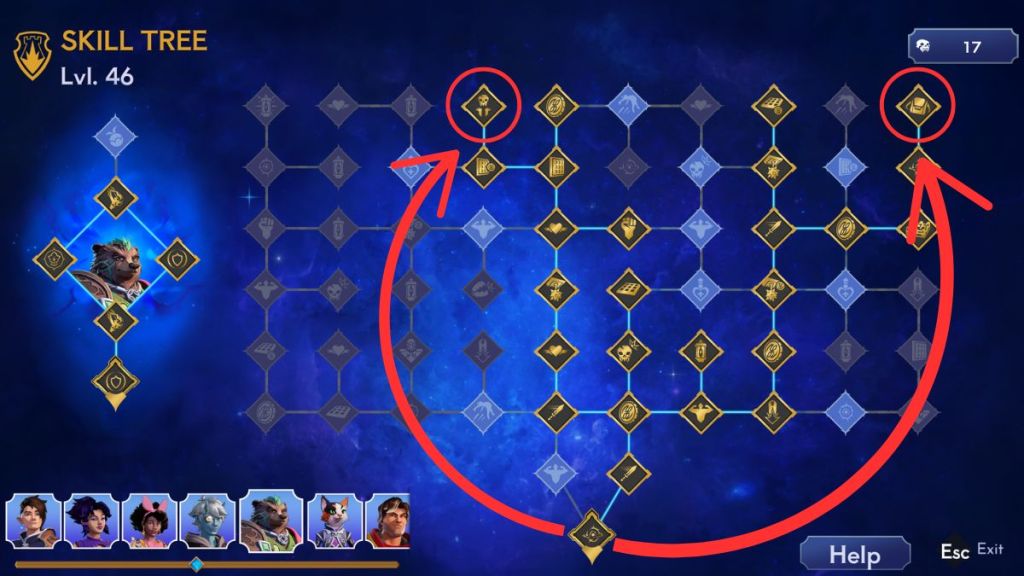
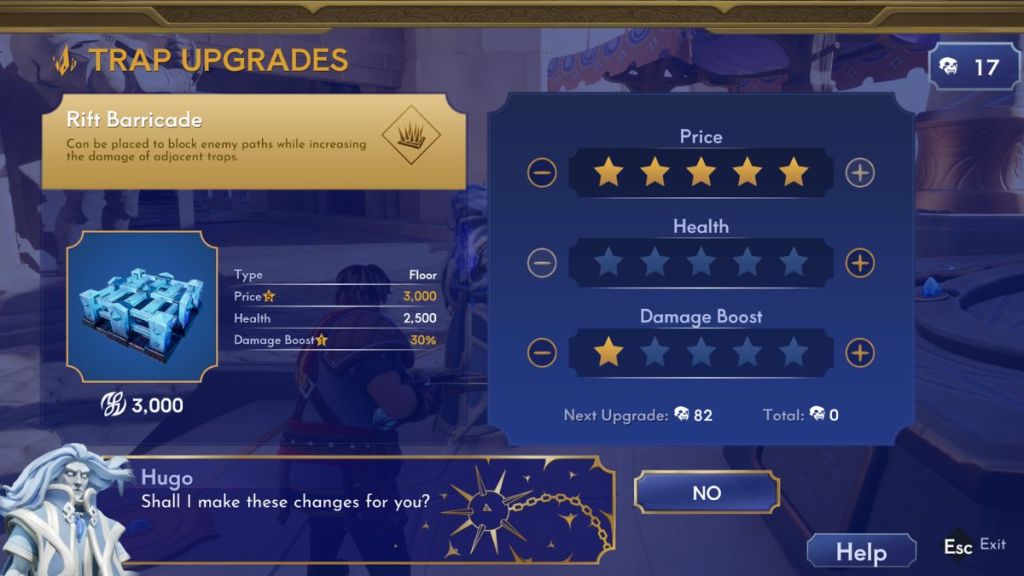

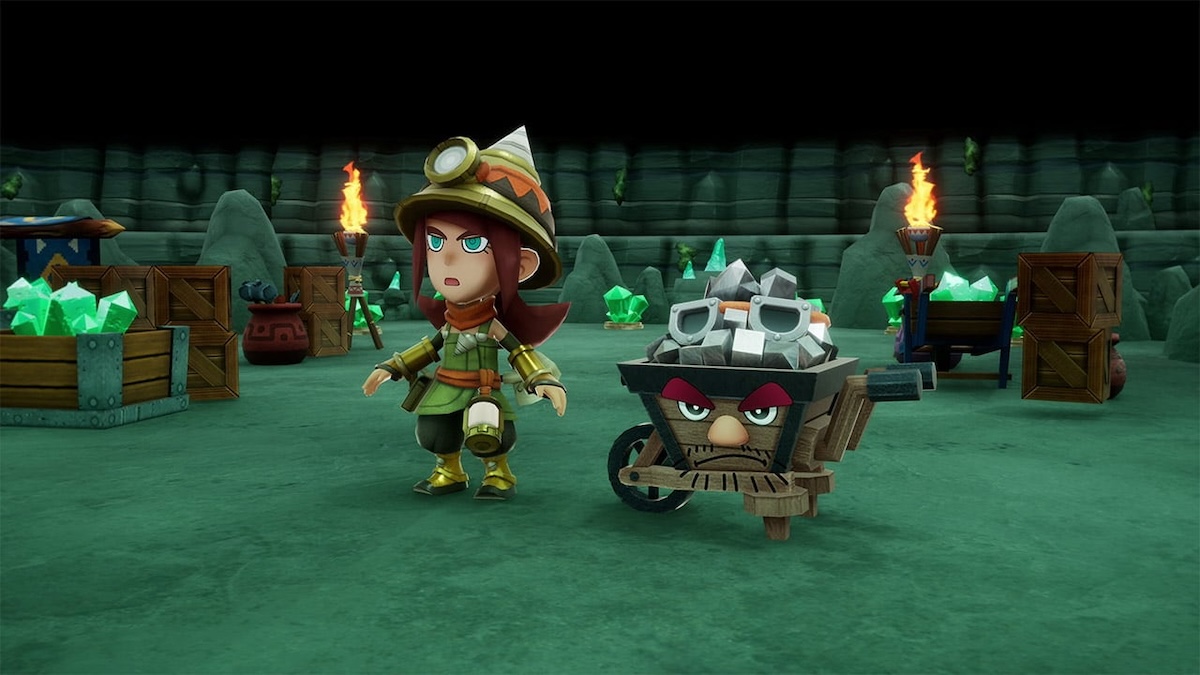
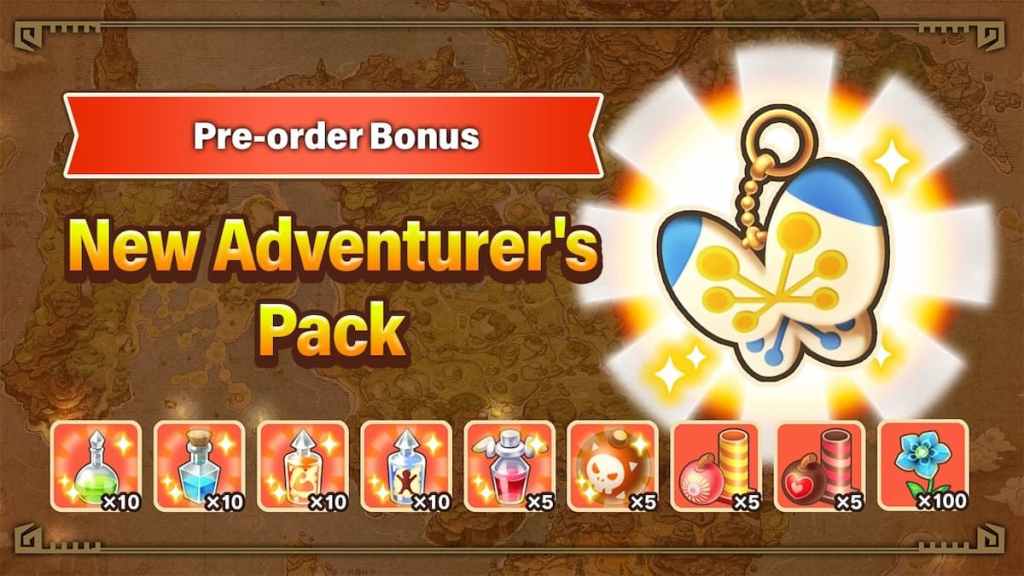


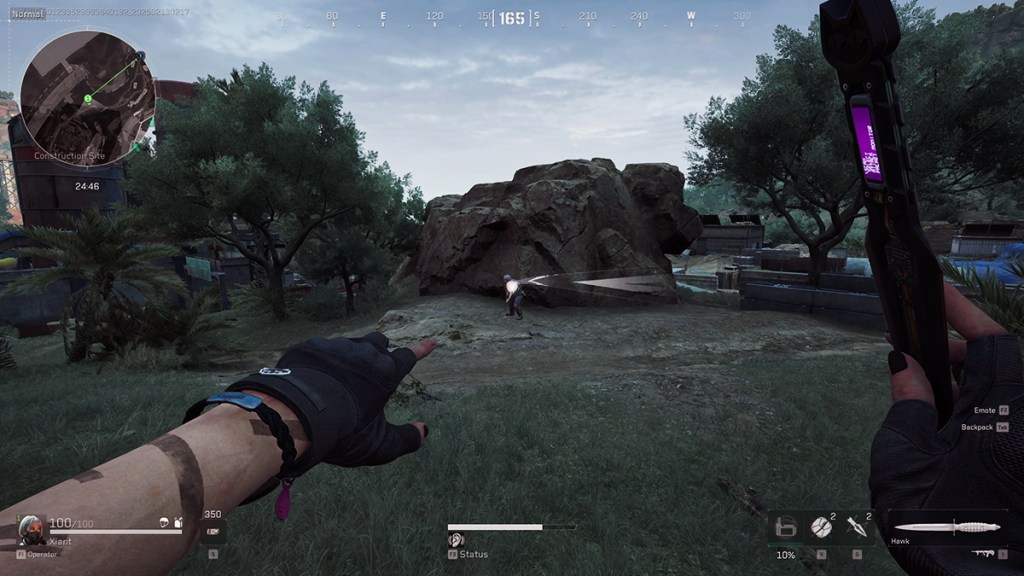


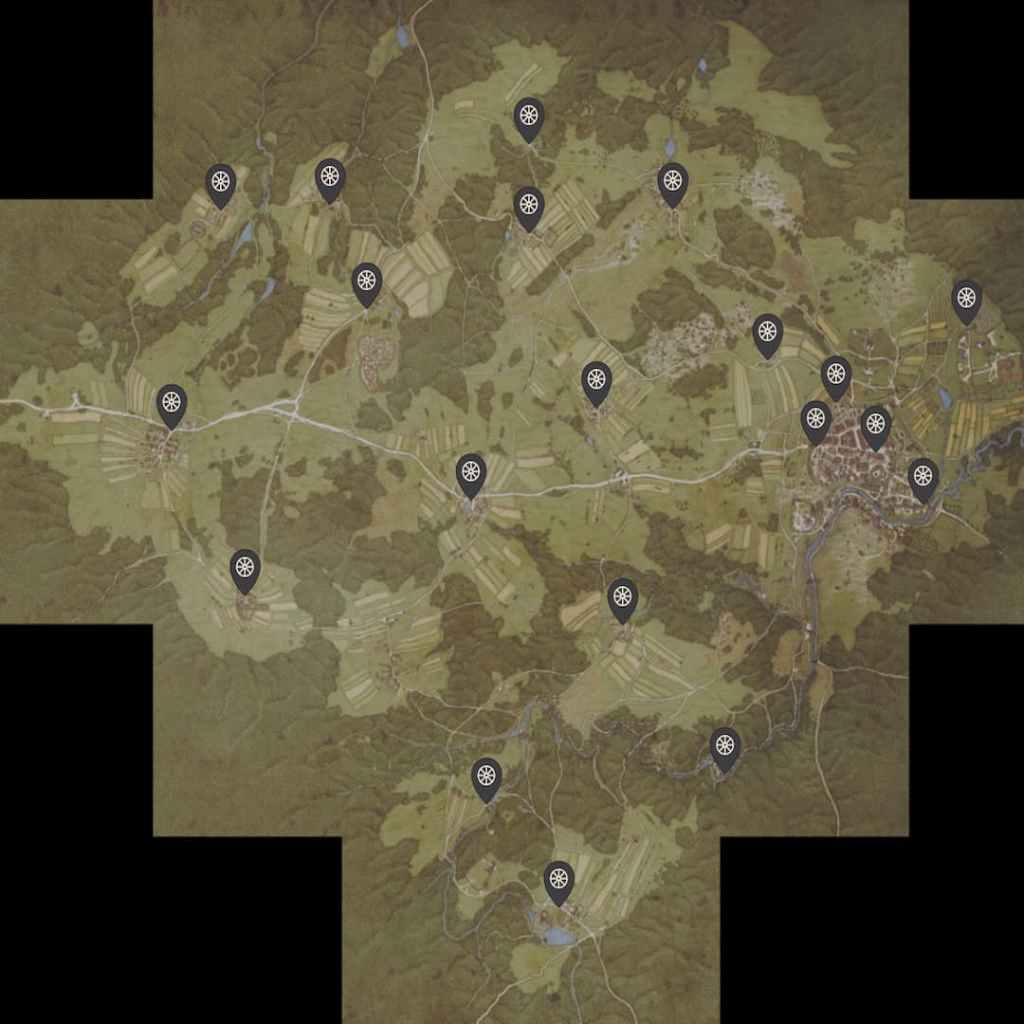


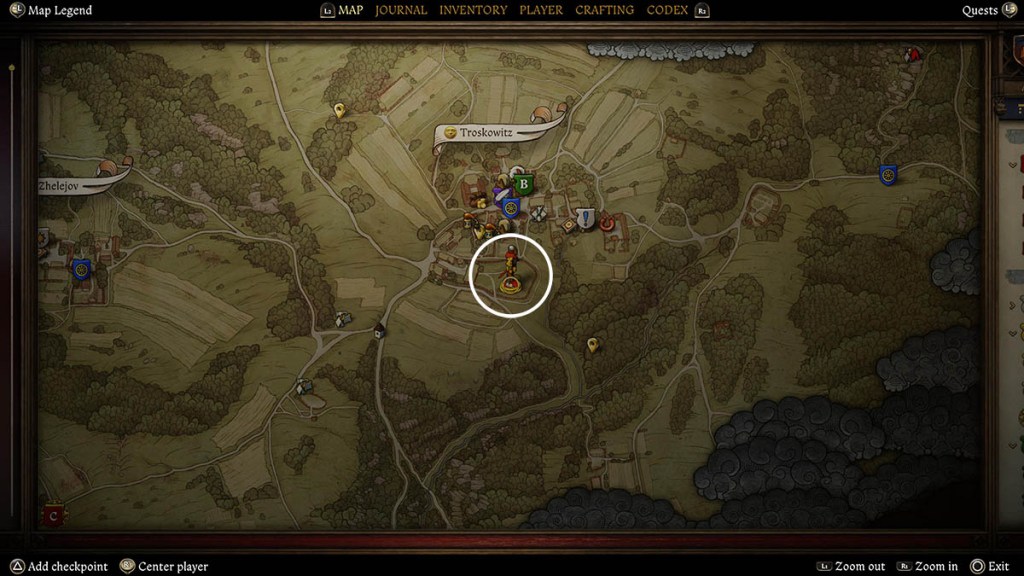

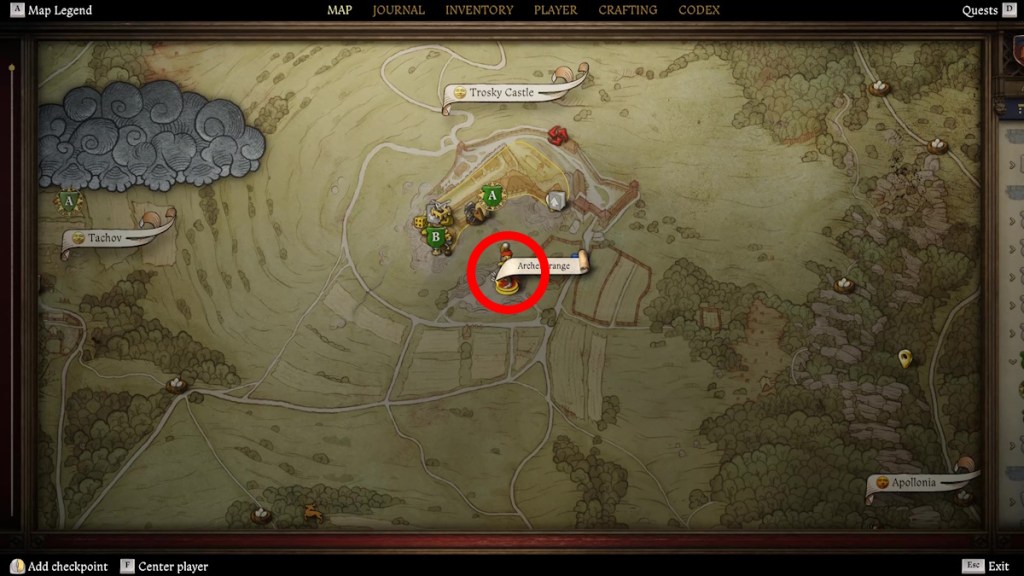


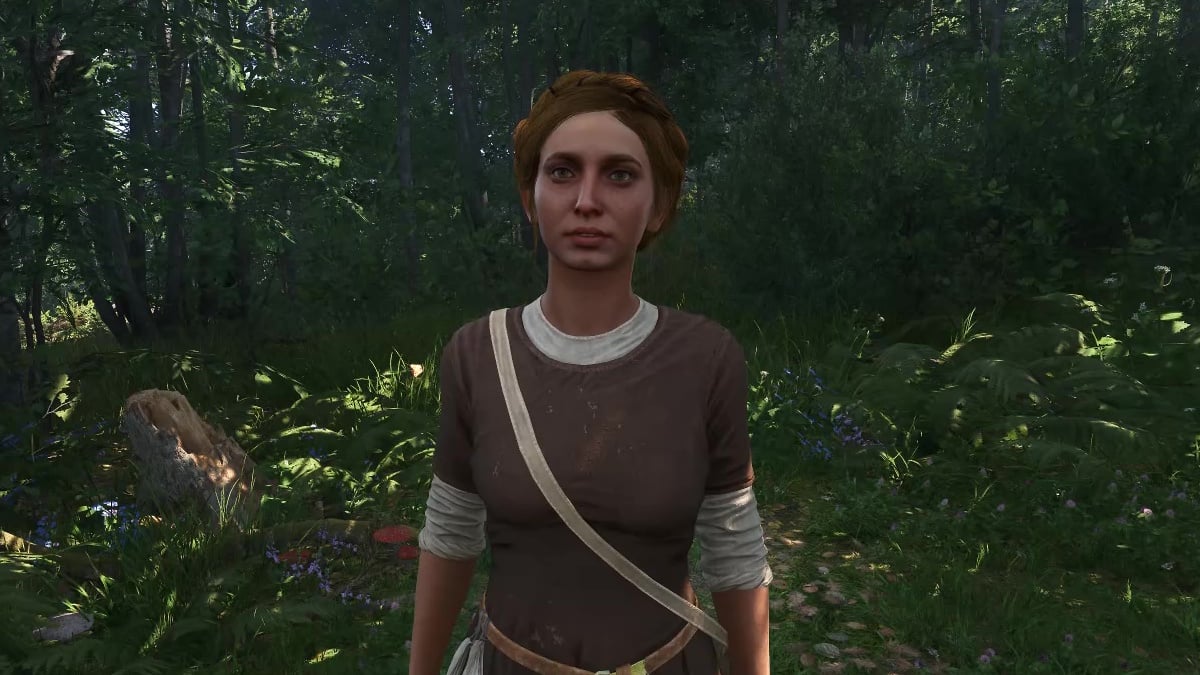


 Updated February 15, 2025: We added new codes! Roblox, but make it fashion—Tyra is probably feeling super proud somewhere. However, if you want to channel your inner Naomi and win in every style-off, you may need some extra help. To gain an edge over the other wannabe fashionistas, you will need Dress To Impress codes. All Dress To Impress codes list Active Dress To Impress codes SWEETHEART — Sweetheart Dress, Pants and a Shirt (New) ELLA — Skirt (New) CUPIDSCLOUD — Cloud Item (New) HAPPYNEWYEAR — Dress (New) YEAROFTHESNAKE — Dress and Accessories LNY2025 — Dress and a Suit NY2025 — New Year's Hat and Balloons 1CON1CF4TMA — Dress WINTERUPDATE — Clothing items MEGANPLAYSBOOTS — Boots B3APL4YS_D0L1E — Dollie 4BILLION — Clothing items CH00P1E_1S_B4CK — Jacket, Skirt and Shoes D1ORST4R — Bag S3M_0W3N_Y4Y — Axe UMOYAE — Dress BELALASLAY — Jacket KITTYUUHH — Kitten M0T0...
  Updated February 15, 2025: We added new codes. The battle between good and evil rages on the horizon. Do you want to fight on the side of humanity, or have you developed a taste for human flesh? One thing is certain—no matter where your destiny leads you, Weak Legacy 2 codes will be by your side. All Weak Legacy 2 codes list Active Weak Legacy 2 codes UPDATE3RESETBREATHINGORART — Breathing Art Reset (New) 25SPINSUPDATE — 25 Spins (New) UPDATE3RESETRACE — 2 Race Resets (New) 25SPINSPATCH2UPDATE — 25 Spins 25SPINS5KFOLLOWERS — 25 Spins 50SPINSUPDATE1.5 — 50 Spins 45KLIKESRESETBREATHINGORART — Breathing Art Reset 50SPINSUPDATE1.5 — 50 Spins UPDATE1.5RESETRACE — Race Reset Expired Weak Legacy 2 codes UPDATE1.5RESETBREATHINGORART 40KLIKESRESETBREATHINGORART 10KLIKESRESETRACE 5KLIKESRESETBREATHINGORART 35KFAVORITESRESETRACE 35KLIKES25SPINS 5KLIKESRESETBREATHINGORART 1MVISITS50...
  Updated February 15, 2025: We added new codes. You can run, but you can't keep hiding forever, or else you'll get caught. Your only salvation from demise is to make a group effort and fix those lousy generators before the killer finds you. Winning is rewarding, but it's also fantastic to get freebies with Dead by Daylight codes. All Dead by Daylight codes list Active Dead by Daylight codes HOOKEDONU — Special Badge (New) LUCKYBP2025 — 168,888 Bloodpoints (New) ROLLD20 — Dungeons & Dragons Charm MAKEITREINDEER — 250k Bloodpoints IFLOOKSCOULDCHILL — Frosty Eye Cosmetics DBDDAY2024 — 300k Bloodpoints and 500 Iridescent Shards DBDDMAYOKE — Silk Omamori and DbDDay Celebration Coin Charms NOVASCASAS — 250k Bloodpoints BLOODPINT — 500k Bloodpoints DROPCT — Clock Tower banner (Nintendo Switch only) DROPDA — Dominus Anger Badge (Nintendo Switch only) the dark lord — Wax Candle Badge and Dusty Secr...
  Updated February 15, 2024: We looked for more codes. WWE 2K24 locker codes provide awesome freebies such as VC Points as well as cards and packs, giving you the opportunity to get your favorite stars. Redeem these codes while they're still active, choose your wrestler, and wipe off your opponents hassle-free! All WWE 2K24 locker codes list Working WWE 2K24 locker codes CASHINGITIN — 15k VC (New) Expired WWE 2K24 locker codes GAMEAWARDS24 WARGAMES CROWNJEWEL HALLOWEEN2K24 SINGLTSTYL2K24 LAMASCARA2K24 INYOURHOUSE BEASTLY2K24 BASHINBERLIN WWEDRAFT2K24 YOURSTORY2K24 ODDSANDENDS WWE2KATSMMRSLM HEADOFTHETABLE MONFACTION SUMMERWWE2K24 CANYOUSMELL SECURETHEBAG MITBBRIEFCASE GOINGGLOBAL WRESTLEMANIAXL HESEESYOU2K24 PATSMMERGIFT24 WWE2KATIGNLIVE SUPERCARD2K24 ECWCHAMPS KINGANDQUEEN Related: NBA 2K Mobile codes and Mech Arena codes How to redeem locker codes in WWE 2K24 Read...
  Updated February 15, 2025: We added new codes! If anyone ever tells you that anime and football can't go hand-in-hand, this game should make them quiet. Create unique players, customize your team, and give it your all on the field as you test your skills against other players. If things go awry, use Roblox LOCKED codes! All Roblox LOCKED codes list Active Roblox LOCKED codes VALENTINESDAY — Yen (New) MEDALXLOCKED — Yen (New) 10KSUBS — Yen 110MILVISITS — Yen 115KFAVOURITE — Yen 150KMEMBERS — Yen LOCKEDMAS2 — Yen STRAIGHTRIPTIDE — Yen DRAGONHEADER — Yen 100MILVISITS — Yen 60KLIKES — Yen SORRYFORSERVERCRASHES — Yen 90MILVISITS — Yen 100KFAVOURITE — Yen TWINGUNS — Yen FALLARTCONTEST — Yen LOCKEDWEEN — Yen 80MILVISITS — Yen ACEEATER — Yen 90KFAVOURITE — Yen 50KLIKES — Yen SEASON3PROLEAGUE — 125k Yen MOSTVISITEDBLGAME — 125k Yen 60MILVISITS �...