Kotaku Sunday, March 9, 2025 2:35 PM  Mobile World Congress ended on Thursday, and the annual Barcelona trade show for the mobile communications industry was yet again host to a number of gadget debuts that generated online hype. |
PCGamesN Sunday, March 9, 2025 1:58 PM  Combining DnD-style dungeon crawling with a wide range of classes and a roll-based combat system in the vein of Dicey Dungeons, turn-based roguelike Dice and Fold has brought me a lot of joy. Developer Tinymice Entertainment has found that perfect sweet spot, creating a card-battling game that brings sufficient strategy to keep me hooked on the numbers while also staying light enough that it's an ideal accompaniment to watching something on your second monitor. Now, the fourth free content drop brings pirates to the table, with three new heroes entering the fray and an ocean of extra additions. MORE FROM PCGAMESN: Best roguelike games, Best strategy games, Best indie games |
PCGamesN Sunday, March 9, 2025 1:47 PM  March 9, 2025: We've added the latest Monopoly Go dice links for free dice rolls and tokens. How can I get Monopoly Go free dice links? The household favorite board game has been reimagined as a free-to-play app on smartphones, allowing everyone to experience the thrills of Monopoly on practically any device. Everything that makes the board game special is here in Monopoly Go, so you'll be collecting properties and building hotels as you go around the board, and there are a variety of multiplayer minigames to get through along the way. You're going to need to get your hands on Monopoly dice rolls, but they are difficult to come by no matter how far you are into the board game. There are ways to earn additional dice rolls, including logging into the game every day to collect daily bonuses, progressing further in the game, and inviting friends to try Monopoly Go. While you can also spend real money to unlock more dice rolls, you may want to give our list of Monopoly Go dice links a try instead, especially if you're waiting for the next Monopoly Go Golden Blitz event. Take a look at all the currently active Monopoly Go free dice links for today. Continue reading Free Monopoly Go dice links March 2025 MORE FROM PCGAMESN: Best board games, Monopoly Go events, Monopoly Go dice |
PCGamesN Sunday, March 9, 2025 1:46 PM  Diablo 2 Resurrected Season 10 is underway, and that should be cause for celebration. The iconic ARPG built on Blizzard's first outing and set the standard for basically every game that followed in its dungeon-crawling, loot-hauling footsteps. It might be a little clunky by modern standards, but there's a special sauce to its brand of Sanctuary that still tastes sweet to this day. Despite going to the trouble of a full remaster, however, Blizzard has let D2 fall silent since the launch of Diablo 4, and it feels like a tremendous wasted opportunity when viewed alongside the efforts of its closest rival, Path of Exile. MORE FROM PCGAMESN: Diablo 2: Resurrected review, The best RPG games, The best Diablo 2 Resurrected classes |
PCGamesN Sunday, March 9, 2025 1:44 PM  Echo Point Nova is easily one of the coolest FPS games I've ever played. Developed by Greylock Studio, who also brought us the excellent Severed Steel, it's an open-world movement shooter designed for co-op that also happens to feature a hoverboard and grapple hook. It has a profound sense of scale, incredible pace, and some of the slickest mobility the genre has ever seen. If you yearn for the Titanfall 3 that might never come, this is easily the next next thing. MORE FROM PCGAMESN: Best FPS games, Best co-op games, Best multiplayer games |
Twinfinite Sunday, March 9, 2025 12:55 PM  |
Destructoid Sunday, March 9, 2025 4:47 PM
Split Fiction has a pretty intuitive set of controls, and it varies slightly based on whether you're using a keyboard or controllers.
Being a co-op title, I believe that controllers are the best way to play this game. That said, this guide will include the full set of controls for both PC users (assuming you don't use a controller) and console users.
Full Split Fiction controls
The following table lists out the controls for keyboards, and both types of controllers (Xbox and PlayStation).
Can you change default controls in Split Fiction?
Whether you're using a keyboard or controller, Split Fiction allows you to fully rebind the controls. This privilege is available for both Mio and Zoe, and can be done from the in-game settings. The set of options are slightly more limited in case of a controller, but it's the better medium to use for sure.
On PC, you can use either an Xbox or a PlayStation controller for the best results. You won't have to depend on Steam Input, and you should find supportive prompts for either type of controller. Just plug in the controller you're trying to use, and run the game. You can also use a third-party controller as long as it's supported for PC.
The post Complete Split Fiction controls for PC and controllers appeared first on Destructoid. | ||||||||||||||||||||||||||||||||||||||||||||||||||||||||||||||||||||
Destructoid Sunday, March 9, 2025 3:19 PM
The FUT Birthday Challenge 2 SBC is now live in EA FC 25, and you can complete the challenge to earn a free pack.
Like all fodder challenges, the requirements are pretty simple. You should have most of the required cards already available in your club. There's the Ultimate Team market, in case you're short of fodder. Let's take a look at how to complete the challenge, along with the available rewards.
EA FC 25 FUT Birthday Challenge 2 SBC tasks
Here are the requirements for the solo task that is part of the challenge.
Task 1 - FUT Birthday Challenge 2 SBC
EA FC 25 FUT Birthday Challenge 2 SBC solutions
Here's a solution to complete the latest fodder challenge in Ultimate Team.
Task 1 - FUT Birthday Challenge 2 SBC
Completing the challenge will help you unlock a Prime Gold Players Pack. This pack offers 12 Gold Player items, with 6 of them guaranteed to be Rare and one guaranteed to be rated 82 or higher. It's a decent pack to open while the FUT Birthday promo is live, and it has a fair chance to include a Promo/Walkout item.
We have received plenty of special SBCs in recent days, some of which offer excellent items to unlock. Make sure to check out our guides to learn more about the cheapest solutions to complete them.
Cristiano Ronaldo Flashback SBC | Fridolina Rolfo Flashback SBC | Michael Essien FUT Birthday Icon SBC | Alex Scott FUT Birthday Hero SBC | Danny da Costa Flashback SBC |
The post EA FC 25 FUT Birthday Challenge 2 SBC solutions appeared first on Destructoid. | ||||||||||||||||||||||||||||||||||||||||||||||||||||||||||||||||||||
Destructoid Sunday, March 9, 2025 2:46 PM
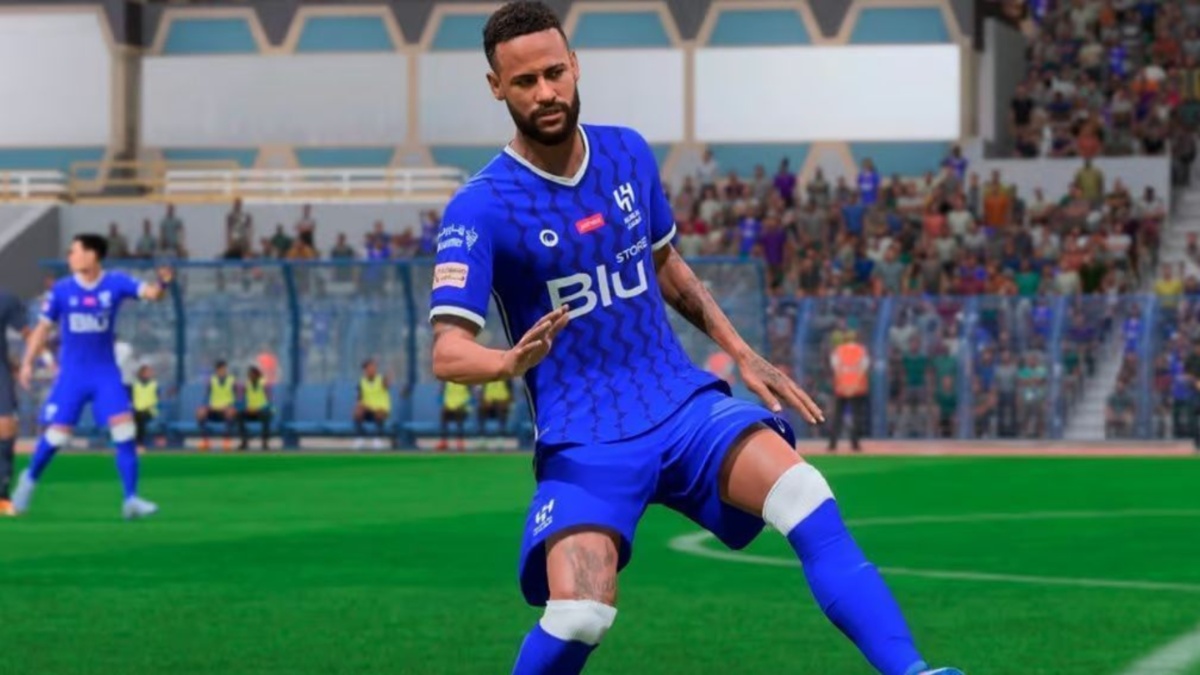
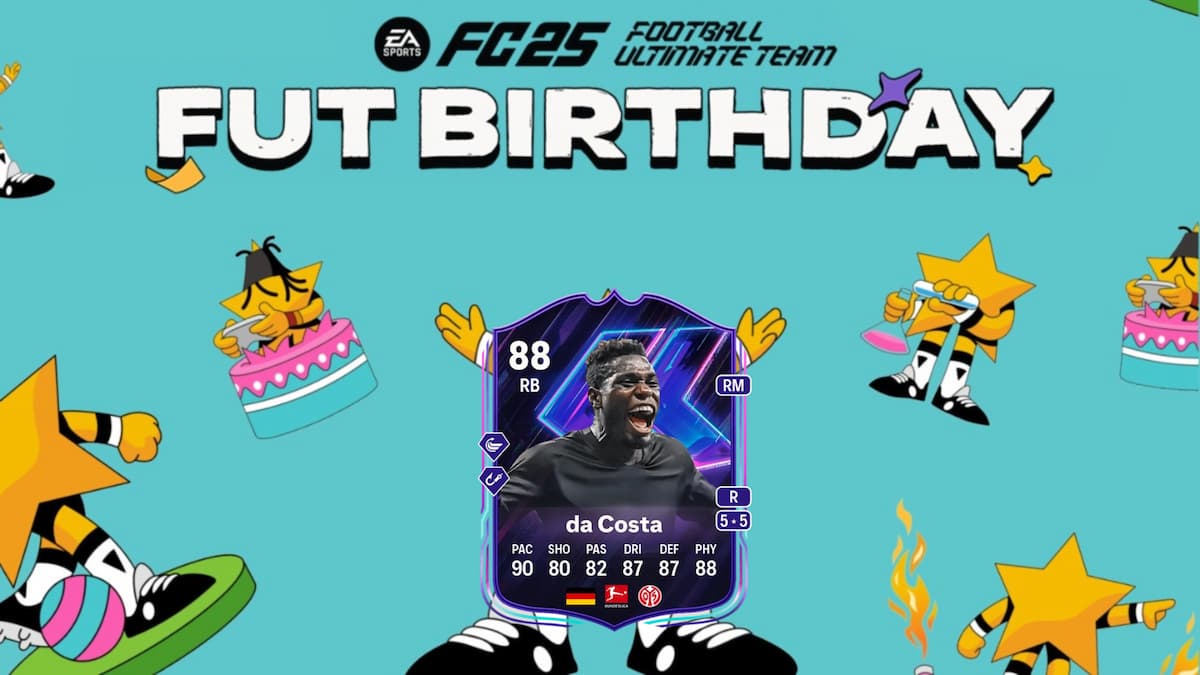
The Danny da Costa Flashback SBC is now live in EA FC 25, and you can unlock a new defensive item for your Ultimate Team squad.
This special card is a tribute to da Costa's inclusion in 2020's FUT Birthday promo. To unlock the card, you'll have to complete two tasks. Let's review all the requirements, followed by the cheapest solutions for the SBC.
EA FC 25 Danny da Costa Flashback SBC tasks
Here are the requirements for the two tasks.
Task 1 - Germany
Task 2 - Bundesliga
EA FC 25 Danny da Costa Flashback SBC solutions
Here's a set of solutions to complete the new Flashback challenge in Ultimate Team.
Task 1 - Germany
Task 2 - Bundesliga
While da Costa can play as an RM, he's best used as an RB. I would have loved him to have Fullback++, but he offers three other roles++. He also has a 5* Weak Foot, which is a massive advantage, along with some interesting playstyles.
Whipped Cross+ and Intercept+ are useful options on a wingback, but he lacks Anticipate. It's a cheap SBC to complete and offers a fun card. If you require a budget wingback, this can be a fun SBC. If you're looking for some alternate SBCs to complete, make sure to check out the following guides.
Cristiano Ronaldo Flashback SBC | Fridolina Rolfo Flashback SBC | Michael Essien FUT Birthday Icon SBC | Alex Scott FUT Birthday Hero SBC |
The post EA FC 25 Danny da Costa Flashback SBC solutions appeared first on Destructoid. | ||||||||||||||||||||||||||||||||||||||||||||||||||||||||||||||||||||
Destructoid Sunday, March 9, 2025 2:25 PM
The FUT Birthday Striker Glow-Up Evolution is now live in EA FC 25, and you can complete it to upgrade a silver item of your choice.
The evolution is available for 35,000 coins, and it can be your best chance to discover a hidden gem. Let's take a look at the upgrades and who might be the best players for the upgrades.
EA FC 25 FUT Birthday Striker Glow-Up Evolution requirements
Here are the requirements for FUT Birthday Striker Glow-Up Evolution in EA FC 25.
EA FC 25 FUT Birthday Striker Glow-Up Evolution upgrades
There are five levels of upgrades, and here are the required conditions.
Upgrade level 1
Upgrade level 2
Upgrade level 3
Upgrade level 4
Upgrade level 5
Upgrade level 1 requirements
Upgrade level 2 requirements
Upgrade level 3 requirements
Upgrade level 4 requirements
Upgrade level 5 requirements
Best players to use in EA FC 25 FUT Birthday Striker Glow-Up Evolution
Here are some of the best cards to consider for this evolution.
These items make the best choices and utilize this evolution well, and you won't even need to combine the cards with other upgrades.
The post EA FC 25 FUT Birthday Striker Glow-Up Evolution: Best players to use appeared first on Destructoid. | ||||||||||||||||||||||||||||||||||||||||||||||||||||||||||||||||||||
Destructoid Sunday, March 9, 2025 2:00 PM
If you want a better chance of reaching the endgame of Monster Hunter Wilds, you'll need a healthy collection of High Rank armor. The question is, should you choose the alpha or beta version? Both have their advantages and which you choose will depend on the needs of your building.
The difference between alpha and beta armor in Monster Hunter Wilds
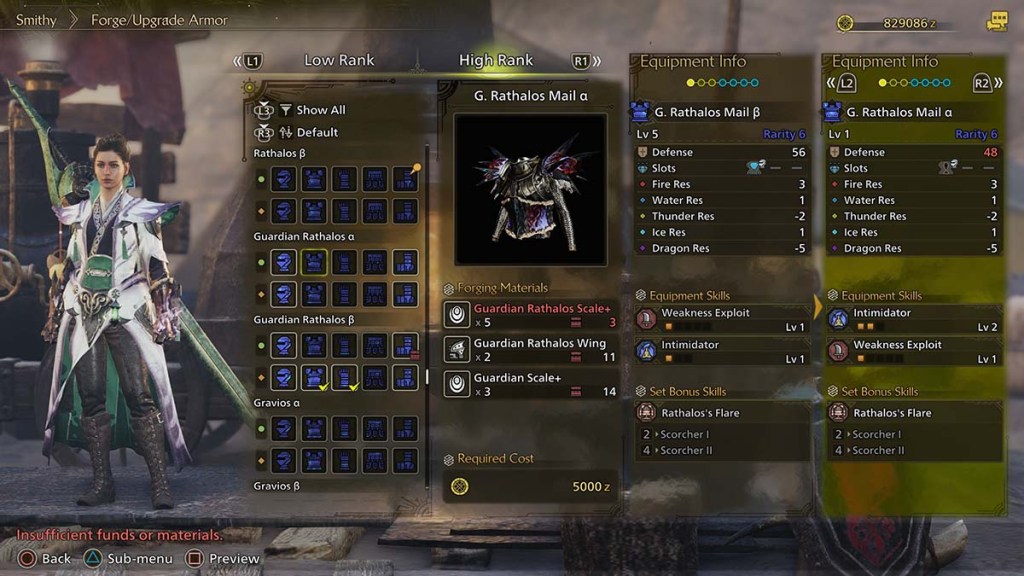
There are a few main differences between the alpha and beta armor types in Monster Hunter Wilds.
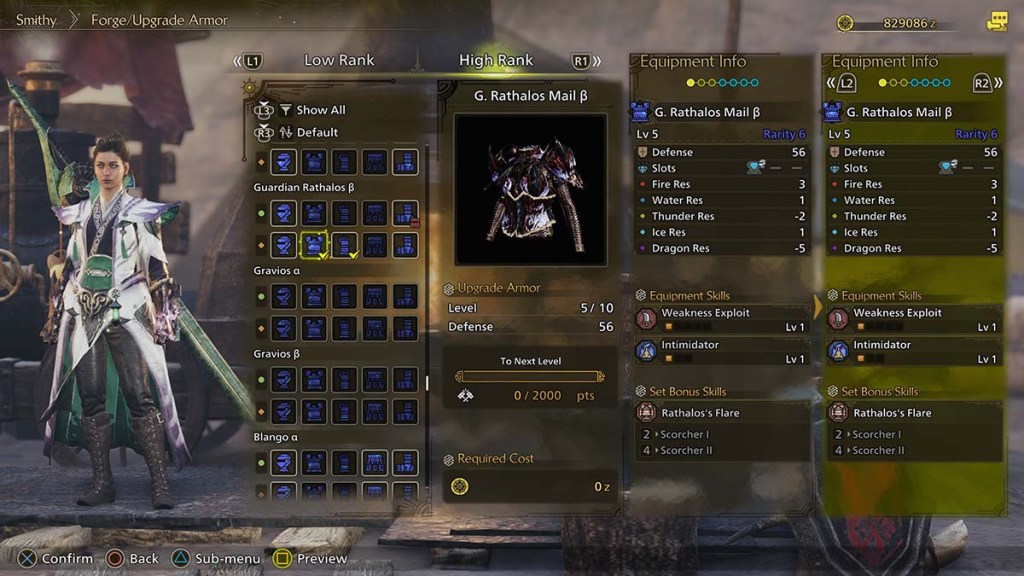
In previous Monster Hunter titles, beta armor was almost always the go-to, as access to the largest amount of decorations was key to buildcrafting. Wilds change that by tying specific decoration types to your weapons and armor. Armor decos now tend to modify your hunter's survivability and physical attributes, with damage decos relegated almost exclusively to your weapon slots.
As such, you won't put a Critical Eye or Weakness Exploit three-slot decoration on your chest piece. That makes alpha armor with damage perks more appetizing than they once were. So which should you choose?
Is alpha or beta armor better in Monster Hunter Wilds?

If you'd asked me to choose between alpha and beta armor in previous games, my answer would almost always be to use a full five-piece beta set. Now, the answer is a bit more nuanced. The short version is: it depends. There are still Skills you'll want to have on almost every build, but others are designed for specific weapons and playstyles. Think Critical Draw for Greatswords or Wide-Range and Free Meal for healing builds.
The hard and fast rules for choosing between alpha and beta armors, then, are:
There aren't too many ways outside of armor and decorations to add Skills to your build, especially if you don't want to endlessly gamble for the perfect Artian weapon. You do have Talismans and your weapon's intrinsic Skills, of course. However, when you choose your weapon based on the elemental weakness of the monster, sometimes those weapon Skills don't mesh as well, forcing you to switch up your armor and decoration choices.
The endgame of Monster Hunter Wilds is a game of build optimization for specific monsters and more general hunting. Knowing when to choose between alpha and beta armor for a particular build can vastly alter how effective it is in combat and how efficient you can make its decoration setup. If all you care about is fashion, the choice is a different matter entirely.
The post Should you choose alpha or beta High Rank armor in Monster Hunter Wilds appeared first on Destructoid. | ||||||||||||||||||||||||||||||||||||||||||||||||||||||||||||||||||||
Destructoid Sunday, March 9, 2025 1:30 PM
Every expansion pack for The Sims 4 adds a new world, including new NPCs to befriend and get to know. The Businesses and Hobbies expansion pack is no different, but EA has really outdone itself this time, giving us the best thing to happen to The Sims in the last decade, possibly ever.
Trashley Reelperson. Shady business entrepreneur, loiterer of alleyways, trash rummager. Whatever you want to call them, Trashley is absolutely my favorite NPC ever added to The Sims 4, and they are not only extremely lovable but also very useful.
Who (or what) is Trashley in The Sims 4?

To put it bluntly, Trashley is very clearly just three Raccoons in a trenchcoat with big business ideas. However, if you're not convinced, let's look at the evidence:
If you read the Mysterious Note inside the green trash can of the Shady Alley, it says the following:
"Trashley cannot get brick and mortar store so I run good business outside. Store always open and I am here after five pm except when busy. Make sure to visit Trashley and buy lots."
How to find Trashley in The Sims 4


You'll only be able to find Trashley if you own the Businesses and Hobbies expansion pack because he hangs out in a shady alleyway in Nordhaven. The easiest way to find him is by heading to the plot named "Inked Inlet" in Iverstad (left half of the Nordhaven map) and then heading to the alley in the distance (shown above; click to expand).
Trashley will only appear from 5 p.m. to 6 a.m. because Raccoons are nocturnal creatures. You'll often find him in the alley rummaging around in the bins. During this time, you'll be able to chat with them just as you would any other NPC, build your relationship with them (how far you can go with this has not yet been confirmed), and even access his shop to get items with discounts.

At 6 a.m., Trashley will sometimes leave behind Cotton Candy in varying flavors. You can eat this Cotton Candy (which is useful for the Rags to Businesses challenge), but you cannot put it into your inventory to take with you for later. However, you can pack it into a Sack Lunch and then put that into your inventory.
I know this is technically stealing from them and morally questionable at best. However, try not to feel too guilty. As a bunch of Raccoons, Trashley would probably be highly impressed by your scavenging.
Trashley's Wares in The Sims 4

To see what Trashley has for sale each day, click on him and then select "Ask to See Wares". Each day, Trashley will have a selection of items, including art (some of which will count towards the Trashley Certified Art Collection), Potions, and various collectibles. He also has a specific drink.
While his stock changes each day, some items are always available. These items include three types of mystery boxes that can contain anything from collectibles to expensive art pieces. More expensive boxes have a higher chance of returning high-value items. However, be warned that any of these boxes could also be empty, so it's a risk to purchase them.
Here's everything that Trashley sells permanently:
The post How to find Trashley in The Sims 4: Businesses and Hobbies appeared first on Destructoid. | ||||||||||||||||||||||||||||||||||||||||||||||||||||||||||||||||||||
Destructoid Sunday, March 9, 2025 1:00 PM
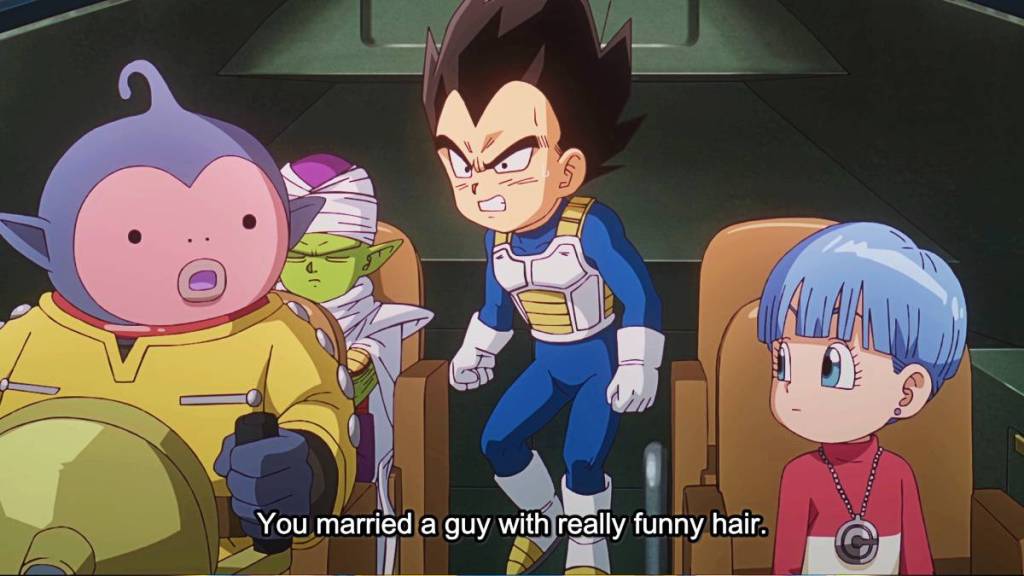
Dragon Ball DAIMA recently concluded, and it certainly lives up to the Dragon Ball name. Despite the franchise's signature action-packed battles, DAIMA isn't just a slugfest. It manages to mix in the original sense of adventure, witty humor, and even new character introductions.
There is rarely — if there's any at all — a dull moment throughout its 20-episode run. Even so, some moments certainly stood out among the others, and for different reasons. Here are 10 of my favorites.

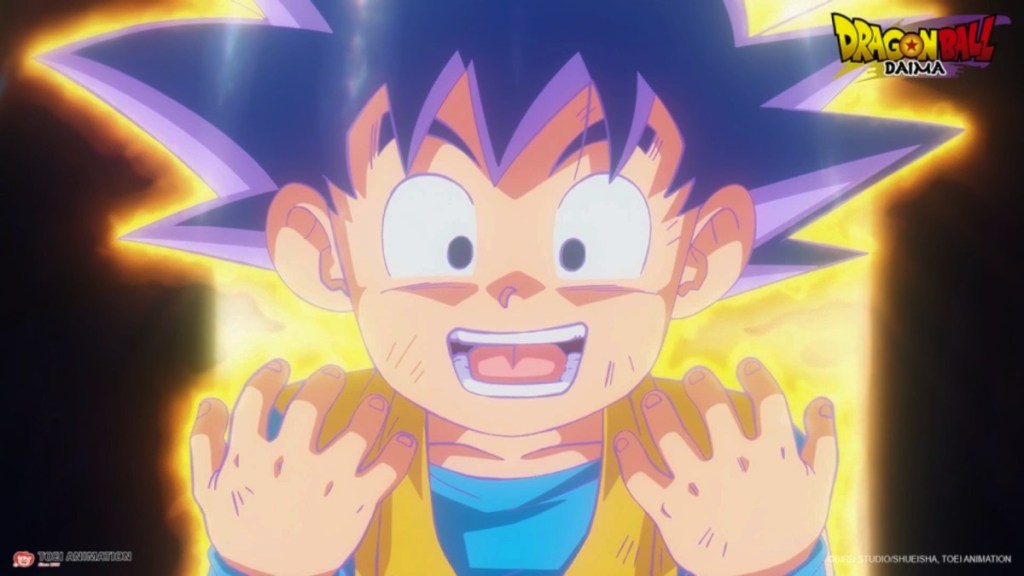
The kiddification of our heroes
Since Dragon Ball DAIMA occurred after the Majin Buu Saga, the Z Fighters are already quite formidable. Even though Goku has yet to master Ultra Instinct, most enemies certainly won't pose much of a challenge against him. And so, they need some kind of nerf.
DAIMA chose the cutest way to achieve this — turning the heroes into kids. Doing this effectively weakened our heroes while also making them a lot cuter. In addition, this also allowed the series to bring back Goku's iconic staff. As a cherry on top, we also got a very cute baby version of Dende.
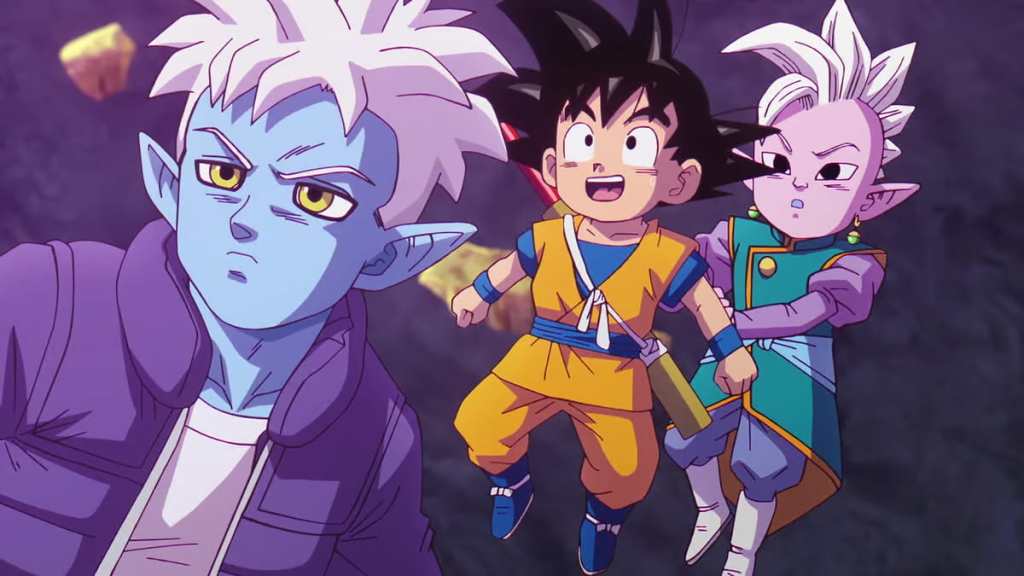
The trio's (mis)adventures
Since Earth's mightiest warriors — in the Dragon Ball verse — were too young for comfort, they had to go to the Demon Realm to rescue Dende and return to their original selves. Unfortunately, they couldn't all go at once. They could only send two people to accompany the mysterious Glorio, and they rightfully chose Goku and the Supreme Kai Shin.
During the anime's early episodes, the trio basically spend their time exploring the Demon Realm, much like the original Dragon Ball. It's more of an adventure than executing a big bad. During which, we also get a better idea of how the Demon Realm is different from the outside world.
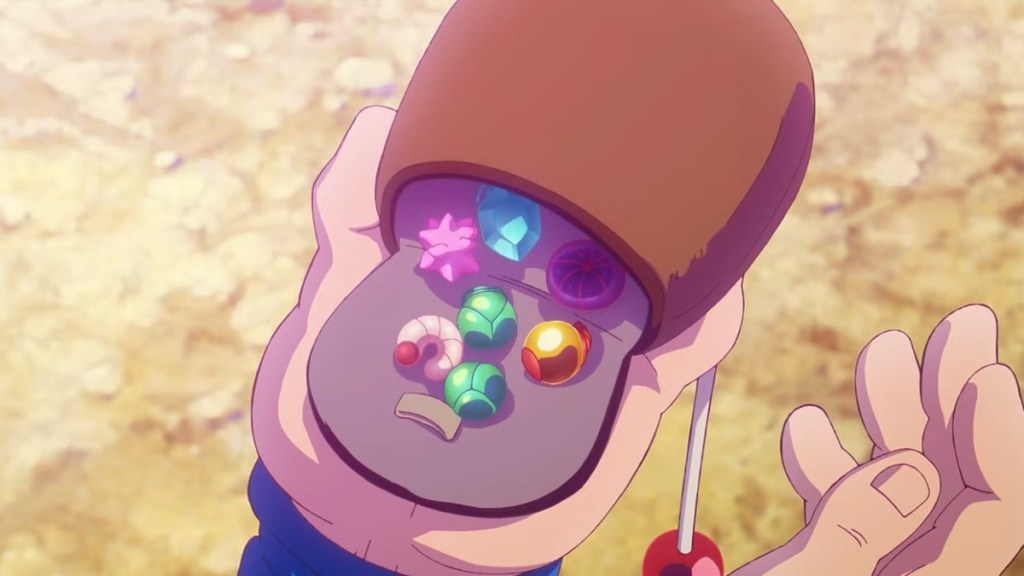
The introduction of the Medi Bugs
Medi Bugs are one of the newly-introduced items in DAIMA, though their functions aren't so new. Each one of these critters serves a specific function. Some notable ones are the Revive Bugs, the Beaut Bugs, and the Join Bugs. The Revive Bugs were the most utilized in the anime since they functioned just like the Senzu Beans.
However, the one that held the most potential was undeniably the Join Bugs. It's basically a new means to achieve Fusion, which meant the possible introduction of a slew of new characters. But for some reason, the Join Bugs just fell into oblivion. Nonetheless, the Medi Bugs' introduction was a really hype moment.
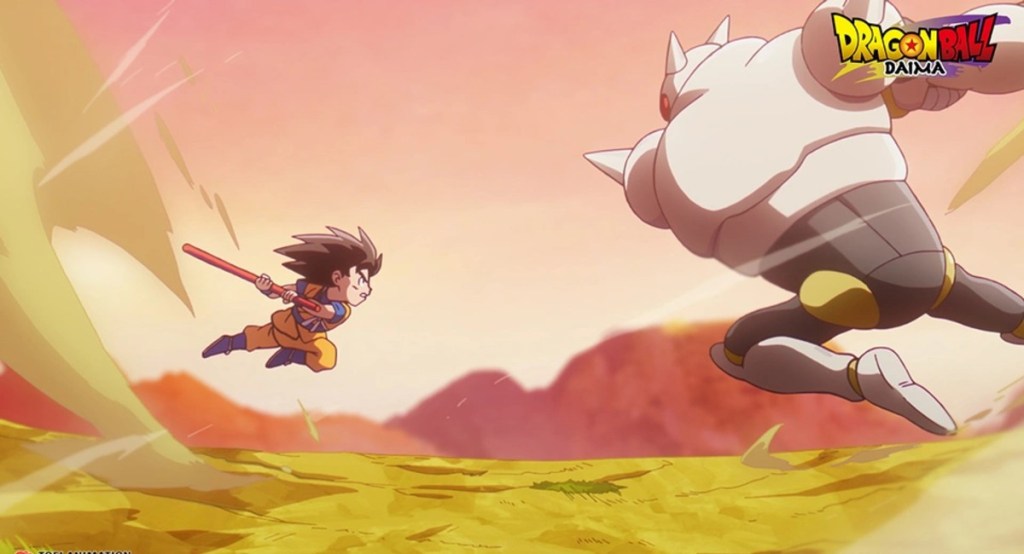
Goku versus the first Tamagami
The main reason Goku and the gang traveled to the Demon Realm was to utilize its Dragon Balls. Unlike Earth's Dragon Balls, however, the Demon Realm's Dragon Balls can only be obtained by defeating the three Tamagamis. Each one could be found in one of the three Demon Worlds.
Since Vegeta and the others were still far from catching up to Goku and Co., Goku faced off with the First Demon World's Tamagami. As expected, the battle was intense and action-packed. However, the best part was when the battle was over. Just as Goku thought defeating the Tamagami was enough to get the Dragon Ball, the Tamagami pulled out another test. It was a round of Cup Game, wherein Goku must track which cup held the mythical item. It was then that the anime pulled out a sly trick, a la Hunter x Hunter.
Majin Kuu and Majin Duu
Another interesting addition to DAIMA is its inclusion of numerous possible antagonists. There was the simple-minded Gomah, who thought strength was the key to ruling, and there was the cunning Arinsu, who had mysterious motives. With her sly personality, the latter had more than one trick up her sleeve.
If she couldn't become instantly stronger, she figured a good way to bolster her force was by getting powerful minions. And so, she went and created not one Majin but two! She utilized Buu's DNA and created Majin Kuu and Majin Duu. While they seemed vile and threatening during their debut, they turned out to be the most lovable characters in the anime.
Glorio's unexpected betrayal
Glorio might have been a big help to Goku and Nahare during the early episodes, but he had always been a sketchy character. He was clearly Arinsu's henchman, and he was always sneaking about. Such mysteriousness persisted even toward the latter part of the anime.
He ultimately turned out to be Arinsu's pawn. The Glind made him learn Namekian language to ultimately make a wish to Porunga. But at the critical moment, Glorio surprisingly betrayed Arinsu. Instead of making her an unparalleled force, he wished for the Z fighters to regain their original bodies instead. By doing so, he also made us look dumb for ever doubting him.
Vegeta's weaknesses
As a Saiyan prince, Vegeta has always been headstrong and haughty. He was constantly trying to pursue strength and show it off. However, underneath his strong man facade laid a rather soft man. Dragon Ball DAIMA showed this side of him on a number of occasions.
While Vegeta took down the mightiest of foes, who would have thought he would meet his match in Hybis. Hybis' casual flirting with Bulma got to Vegeta on more than one instance. Surprisingly, the prince would mostly end up losing the verbal battle.
The other moment was when the Z fighters were debating who would be fighting the transformed Gomah. Vegeta wouldn't back down. But when Bulma issued an ultimatum forbidding him from taking a bath with her should he continue to quarrel with Goku, Vegeta instantaneously backed down. What a sight that was.
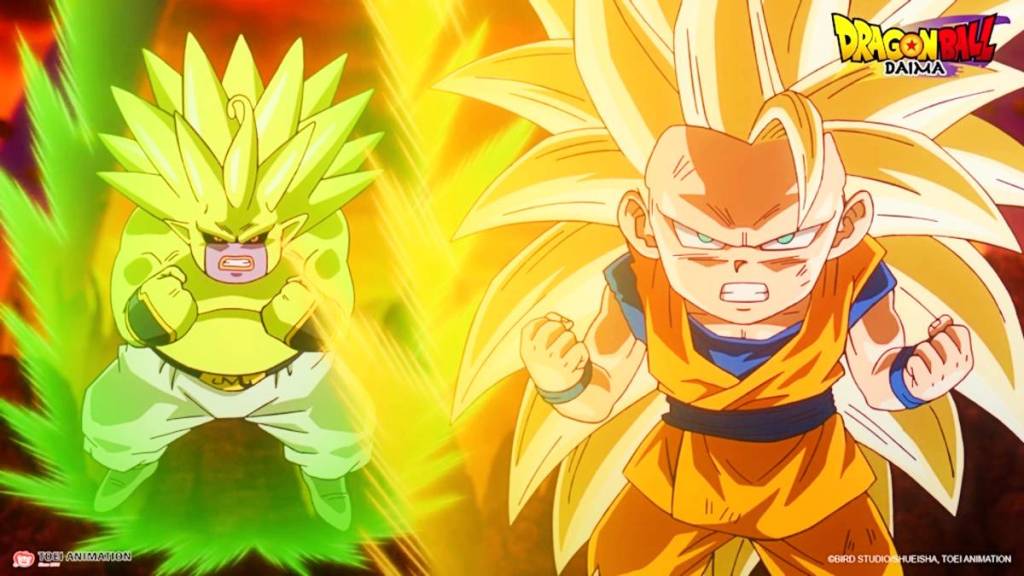
Majin Duu's Super Saiyan 3 imitation
Having been created using Buu's cells, Majin Duu inherited the former's quirks. He certainly possessed power greater than Buu, but he also inherited Buu's childlike innocence and love for chocolates. He even refused to fight without his ration of the sweet treat.
It was also this chaotic combination that gave birth to one of Dragon Ball DAIMA's funniest moments. During the battle against Gomah, Goku went Super Saiyan 3. Seeing his power skyrocket, Duu also powered up. Having been given a gigantic chocolate cookie helped fuel this boost. Imitating Goku, Duu unleashed his strength, even copying the elongation of hair. And so, we got this porcupine version of Duu.
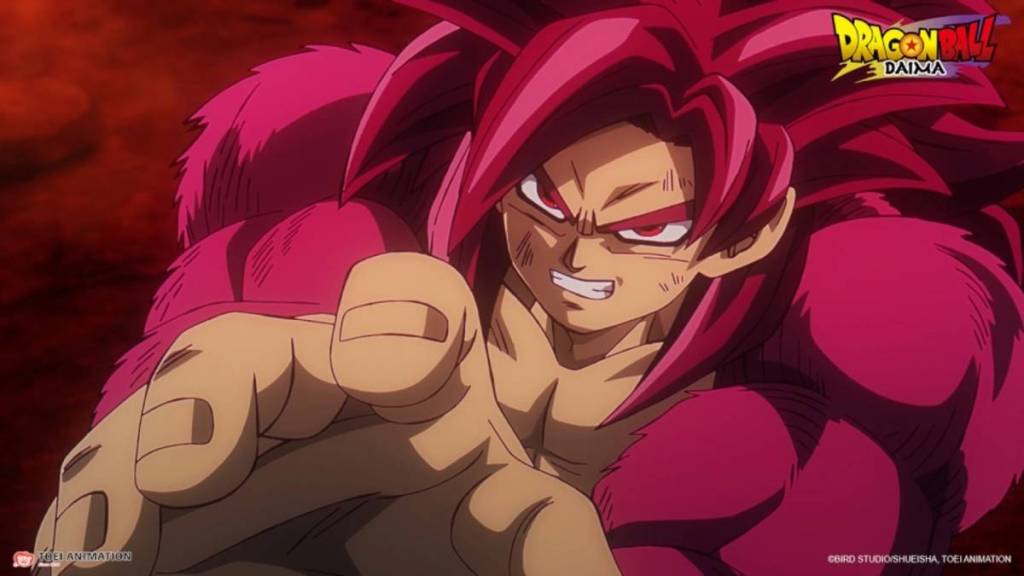
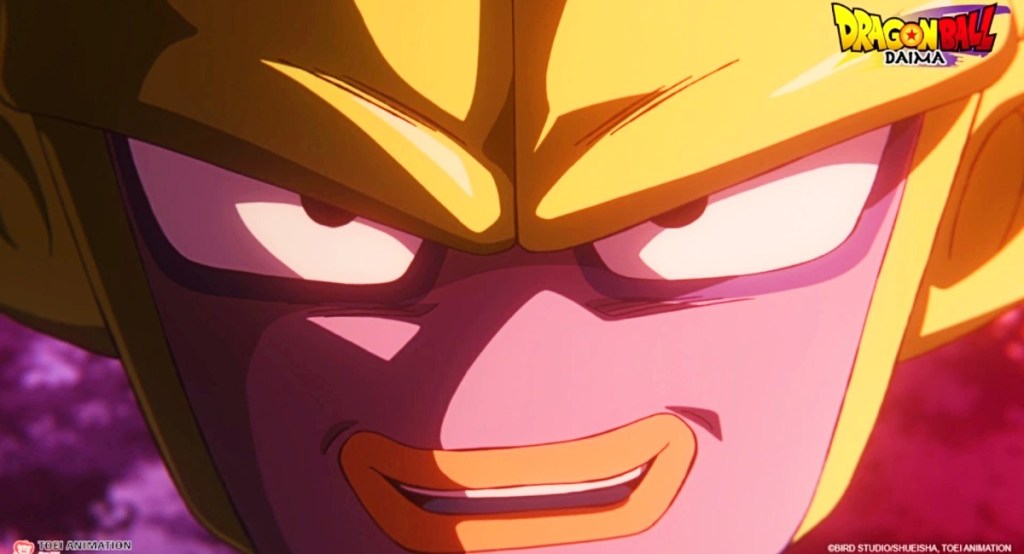
Super Saiyan 4 Goku
When it comes to transformation, Goku certainly couldn't be left out. Just moments after Duu's Super Saiyan 3 dupe, Goku entered Super Saiyan 4. This was really big as it finally made Super Saiyan 4 transformation canon
Naturally, the other Super Saiyan transformations were visual spectacles. But since these transformations weren't new, it drastically reduced their excitement factor. As such, only Super Saiyan 4 made the list.

Kuu becoming the Supreme Demon King
The entirety of Dragon Ball DAIMA occurred simply because of the empty Supreme Demon King position. Gomah, Degesu, and Arinsu all wanted the title. Interestingly, none of them had the last laugh. It was Majin Kuu who ultimately earned the title. But despite the seemingly comedic narrative decision, it's impossible to hate on him.
After all, Kuu was a rather easy character to love. He was a formidable fighter, and he wasn't as dumb as Buu or Duu. While he was loyal, he had a good eye for character. After all, he didn't even consider appointing Hybis to be a minister. To top it all off, he also turned out to have a knack for leading. So, as unpredictable as the turn of events was, it was a welcome unpredictability.
The post 10 best moments in Dragon Ball DAIMA appeared first on Destructoid. | ||||||||||||||||||||||||||||||||||||||||||||||||||||||||||||||||||||
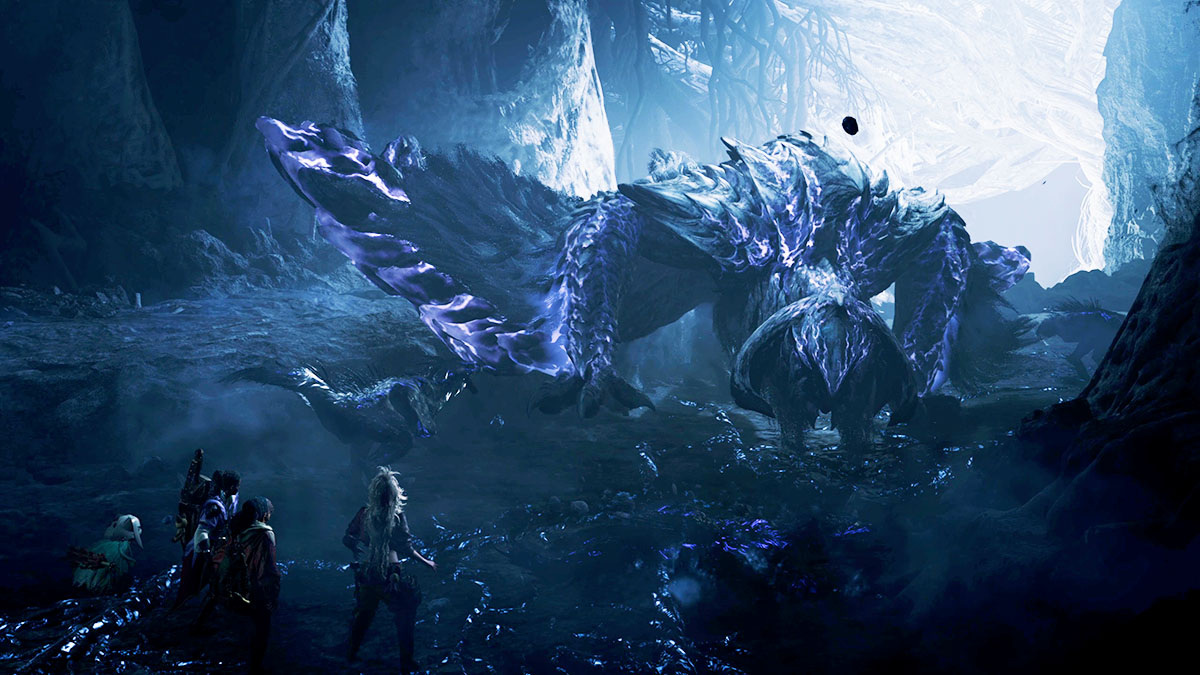
Destructoid Sunday, March 9, 2025 12:30 PM
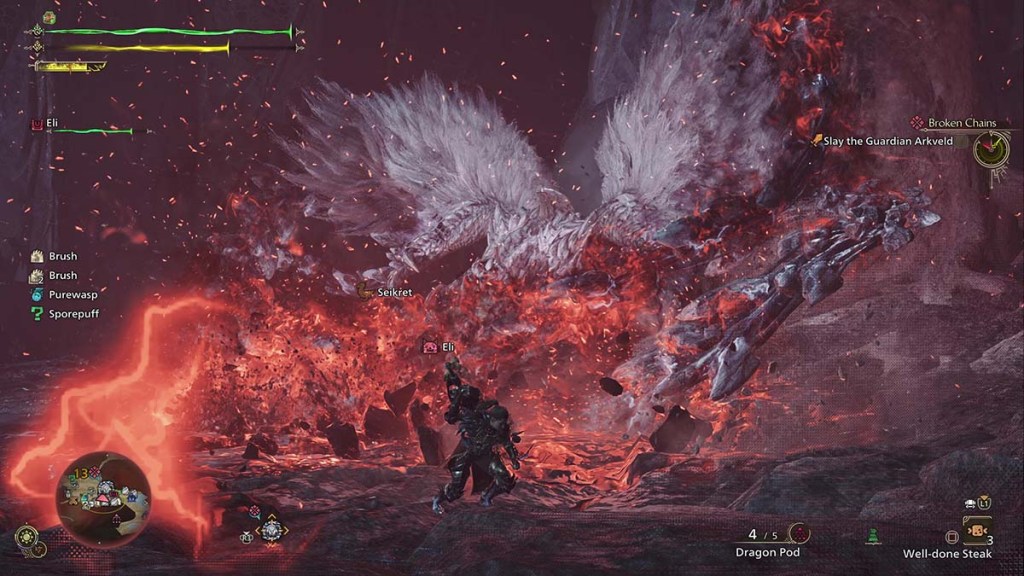
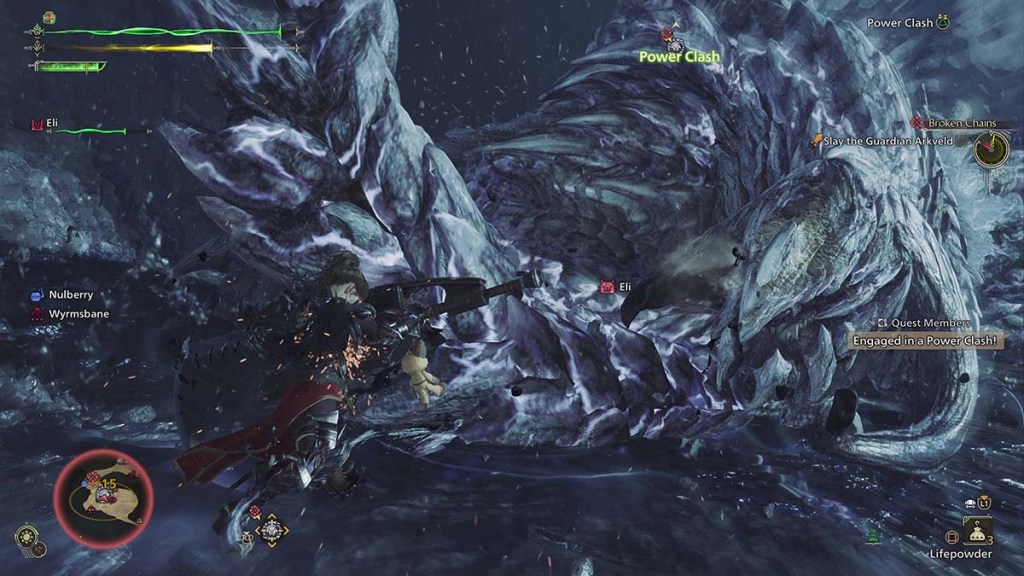
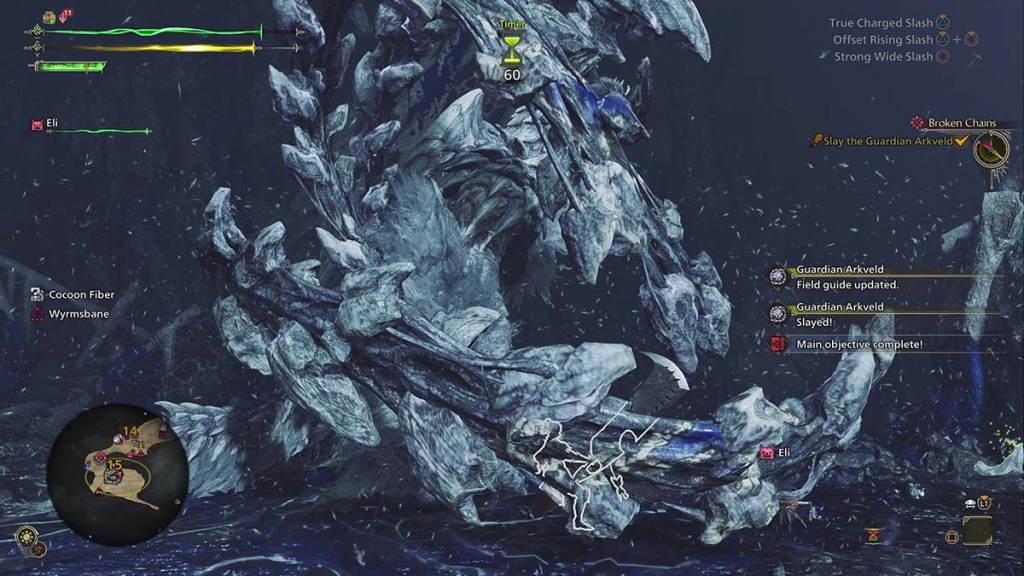
Known initially as the White Wraith, Guardian Arkveld is one of the flagship monsters in Monster Hunter Wilds. Knowing how to beat this maddened, ferocious beast will make reaching the Wilds endgame easier and ensure you can access some of the best Dragon element gear in the game.
How to slay Guardian Arkveld in Monster Hunter Wilds
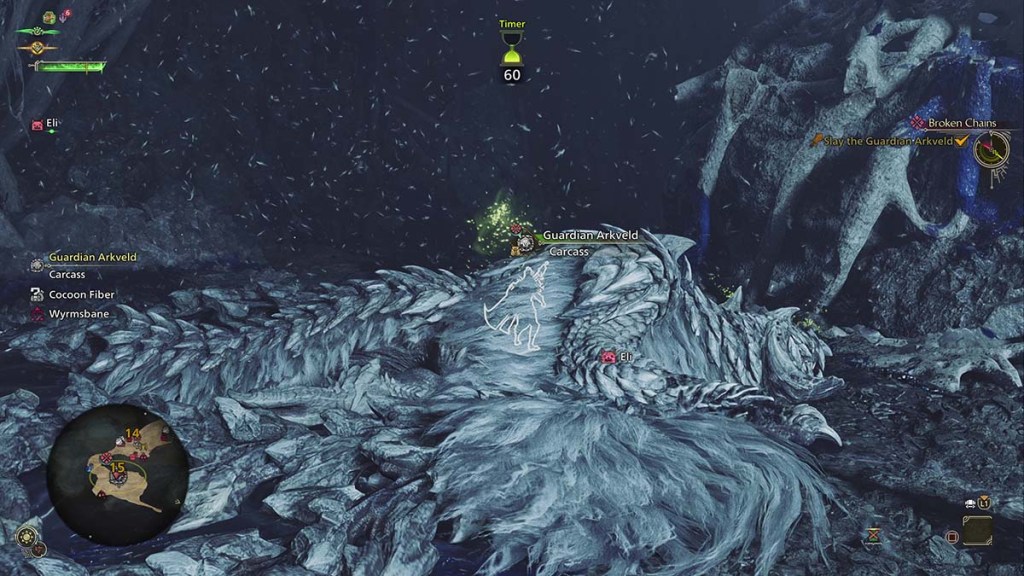
Successfully hunting Guardian Arkveld is a time-consuming prospect, especially the first time you face it. Beating it the first time took me well over 20 minutes during my Low Rank playthrough. I was solo using a Greatsword, so your time might vary depending on your familiarity with your weapon, your build, and how many co-op partners you have.
No matter how you fight it, the two main things you need to know to beat Arkveld are its weaknesses and attacks. We'll go over those two topics first, then discuss additional tips about beating it regardless of the weapon you use.
All Guardian Arkveld weaknesses
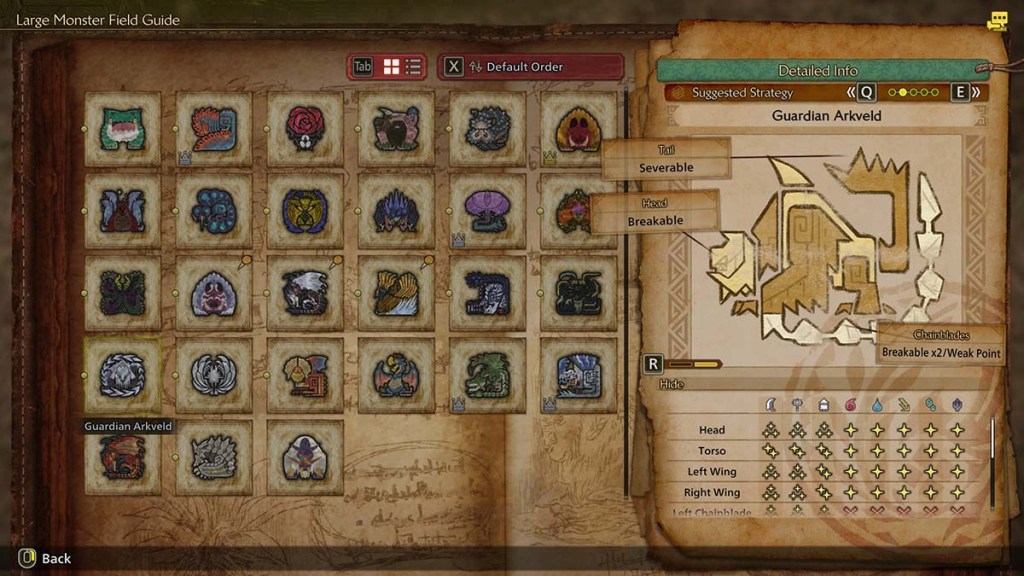
Arkveld is unique among the monsters in Monster Hunter Wilds, as it lacks any specific elemental weakness. The Large Monster Field Guide recommends the Dragon element, but in practice, you can use almost any weapon against the beast. That's true regardless of where you strike it, though its Chainblades, the long whip-like appendages that come off its arms, are completely unaffected by element damage.
The same is essentially true of the source of the damage you inflict. Both Slashing and Blunt damage are 100% effective against Arkveld's parts, save its Torso and left and right legs. Against those parts, attacks are moderately effective.
Of the three damage types available, projectiles are the worst to use against Arkveld. They're only fully effective against its head, chainblades, and tail. They're only moderately effective against everything else.
When fighting Arkveld, you'll want to focus your attacks on its head, tail, wings, and chainblades. The only place I could find where I got white damage numbers was Arkveld's back. In most cases, you can only hit that reliably when you mount the monster.
Lastly, as with any fight in Monster Hunter Wilds, you'll want to create and destroy as many Wounds as possible. Not only do Wounds take additional damage, but destroying them almost always yields additional monster parts you can take back to the smithy for crafting. Many weapons in Monster Hunter Wilds also have unique effects tied to destroying Wounds (among other attack types). That makes it a good idea to break them whenever possible.
All Guardian Arkveld attacks
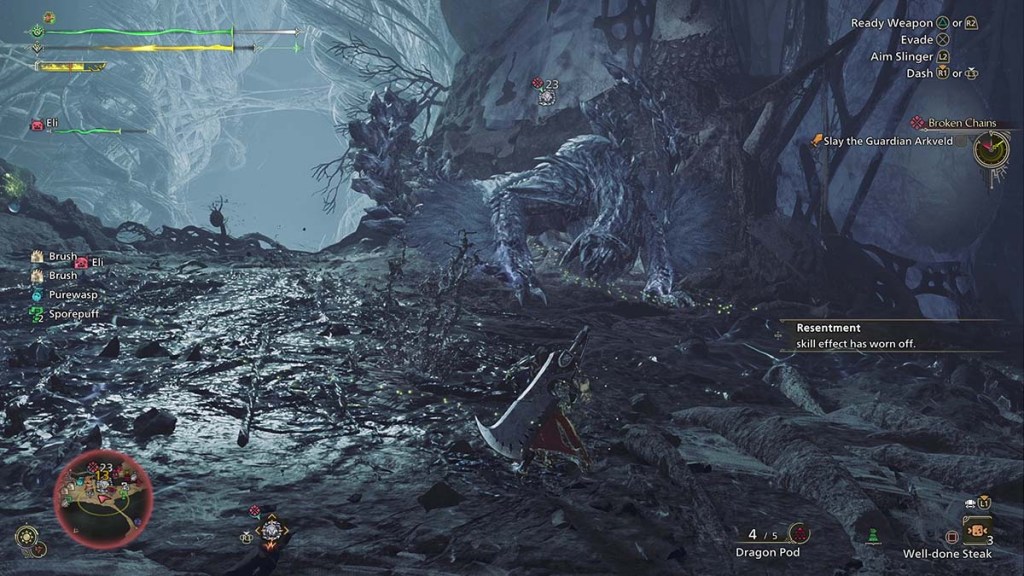
Flagship monsters in the Monster Hunter series tend to have additional phases beyond "enraged" and "exhausted." Arkveld is no different. It enters its second phase around half health, and you'll know you've reached that point when its chainblades begin to glow red and its attacks create red-hued explosions.
Arkveld phase one attacks
Single chain slam
Arkveld pulls back its left wing, then jumps toward you, slams down its chainblade, and foreclaw at you. The attack doesn't do much damage through a block, but you'll need to be well out of the way of the explosion if you plan to dodge it.
Double chain slam
For this attack, Arkveld winds up its right wing, then slams its right chainblade down, where the blade remains for about a second. It then does the same with its left chainblade. For the right-hand strike, dodge to the left and vice versa. If possible, use the time the chainblade's stuck in the ground for free damage.
Spinning grab
After rattling both its chainblades, Arkveld jumps and spins on its hindlegs. Arkveld will grab you if it hits you with the chainblade as it begins to spin. To break the grab, shoot Arkveld's face with something from your slinger or spam attack on the claw holding you. Failing to break the grab will result in massive damage.
Double chainblade explosion
After charging up its chainblades with white, misty energy, Arkveld rears up on its hind legs and slams the chains down in a line in front of it. An explosion follows shortly, along with the formation of Wylkcrystals. Blocking is your best bet against this attack, and if you don't have the ability, run directly to the side and dodge at the last second.
Small bite
Arkveld reaches with its mouth and bites lightly. This attack is quick, deals minor damage, and has no knockback. You can easily out space it by watching for Arkveld to retract its neck. Quickly back up when it does to avoid the bite.
Spinning tail slap
If you're behind Arkveld or otherwise near the base of its tail, it might briefly wind up, curl its tail, and spin. Being near the tail during the spin will send you flying, though you can dodge into and through the attack to avoid it.
Tail flick
Being directly behind Arkveld might cause it to retract its tail and then flick the tip of it at you. Unlike the slap, you'll need to dodge to either side to avoid the attack, but it's pretty easy to Offset or perfect block it with its long windup.
Charge
Arkveld draws its left wing and chainblade across its body, then slams the base of its wing into the ground to charge at you. If you move or dodge slightly to your right, you can slide underneath the flesh of its wing without taking damage or knockback.
Chainblade uppercut
Arkveld flourishes its chainblades, then jumps in the air. It flourishes a second time before dragging its left chain across the arena in an uppercut. This attack also deontates any Wyvern Milk Puddle you're standing on, leaving behind Wylkcrystals. You'll need to dodge at the last second or otherwise block the attack just as Arkveld begins dragging its chain across the ground to take no damage.
Chainblade drag
After drawing its left wing and chainblade across its body, Arkveld stabs the blade into the ground in front of itself, digs it into the ground, and drags it backward. It can do this attack while stationary or as part of a charge.
Enrage three-hit combo
Arkveld only uses this attack while enraged. It pulls its left chainblade across its body, then slashes it in arc in front of itself. It then a flying uppercut with its right-hand blade, finishing with the drag. You'll need to dodge or block all three attacks, as they have a lot of forward momentum, and avoiding one will only cause Arkveld to reorient.
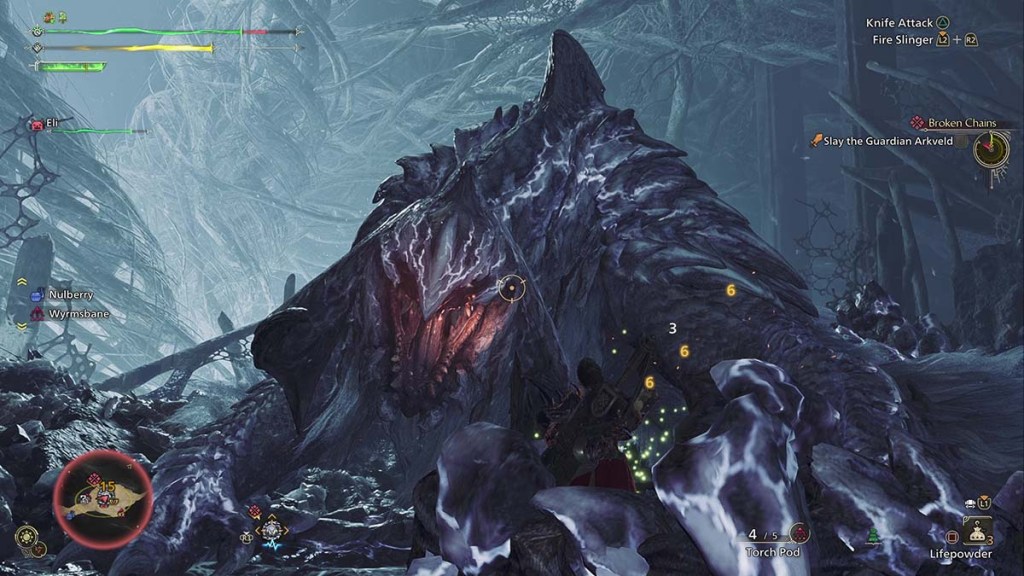
Arkveld phase two attacks
After reaching about 50% of its health, Arkveld will enter its second phase. If fought in the Ruins of Wyveria, it will seek out a cocoon to feast on. Otherwise, it will charge up its chainblades with red energy. It has access to all of its phase one attacks and the new ones.
Large chainblade explosion
Arkveld will rear back on its hind legs, flourish its chainblades, then charge them with the red energy before plunging their tips into the ground in front of it. This creates an energy wave underground that explodes three times as it moves away from Arkveld. You can dodge to the side of the wave and explosions if you're close enough to the monster or through them if you see the wave coming. You can also simply run far enough away that they don't reach you.
Single chain explosion
In this smaller attack, Arkveld stabs only one set of chainblades into the ground. Rather than a wave, it creates two small lines of red energy that explode. Moving to the left a little when you see the attack coming is enough to avoid it.
Uppercut into exploding slam
This attack starts the same way as the phase one uppercut. However, after Arkveld lands and turns around, it rears back on its hind legs and slams its chainblades down in a large explosion of red energy. If you manage to dodge the initial uppercut charge, you can then dodge to your right to avoid the chainblades.
Triple swipe into slam
Arkveld pulls its left chainblades across its body, swiping them in an arc from right to left. It then winds up for a left-to-right attack, then once more from right-to-left. The attack finishes as Arkveld jumps into the air, twirls, and slams the blades down in a line. If you plan to block this sequence, you'll need to keep your block up for the whole sequence. Perfect blocking all four hits requires even more precise timing. Dodging is ill-advised, thanks to the back-and-forth nature of the attack.
Chainblade fist slam
Arkveld extends its wings out to either side, almost like it's taunting you, then brings its chainblades together into a fist and slams them down in front of you. This attack can look like it's starting the slam that creates the energy waves, which is the point. In this case, getting too close to Arkveld will only get your head bonked.
Jumping energy slam
Arkveld starts this attack by planting its feet and charging red energy into its chainblades, then jumping at you and slamming down the ones on its left side.
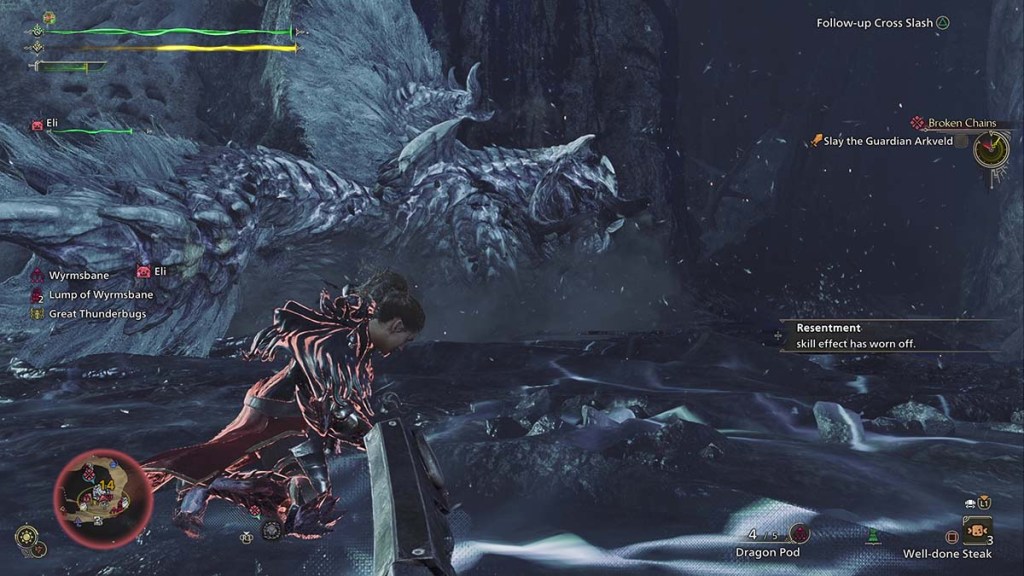
Tips for beating Guardian Arkveld
Strange as it may sound, my best tip for beating Arkveld is to stick close to it. A lot of its attacks rely on you being at medium range to be 100% effective, and there are some consistently safe spots in front and to the side of the monster you can take advantage of. Keep the following in mind as well:
Other than that, keep the damage coming, and Arkveld will go down eventually. You'll likely want to fight it more than once you reach High Rank for its Dragon element weapons and gear. Even if you don't want the armor stats, having the High Rank versions crafted opens them up for use as layered armor, which is more than worth the price of admission. Fashion is the ultimate endgame in Monster Hunter Wilds, after all.
The post How to beat Guardian Arkveld in Monster Hunter Wilds appeared first on Destructoid. |


WGB Sunday, March 9, 2025 6:37 PM After years of focusing on Sniper Elite, Rebellion are launching a new IP called Atomfall, often described as being Fallout in England. I got to ply 90 minutes of it before it launches this month, and came away impressed. |
Gaming Instincts – Next-Generation of Video Game Journalism Sunday, March 9, 2025 6:20 PM A release date trailer was also released. The post Death Stranding 2: On the Beach Release Date Announced appeared first on Gaming Instincts - Next-Generation of Video Game Journalism. |
Gaming Instincts – Next-Generation of Video Game Journalism Sunday, March 9, 2025 6:03 PM According to a recent Tweet. The post God of War 20th Anniversary Event Won't Feature Announcements appeared first on Gaming Instincts - Next-Generation of Video Game Journalism. |
Gaming Instincts – Next-Generation of Video Game Journalism Sunday, March 9, 2025 5:51 PM According to an FAQ. The post Forza Horizon 5 Will Require a Microsoft Account on PlayStation 5 appeared first on Gaming Instincts - Next-Generation of Video Game Journalism. |