GamersHeroes Friday, February 28, 2025 7:06 PM Trainers, get ready to embark on the path of Might and Mastery in Niantic's Pokémon GO when the new season begins March 4. The post Pokemon Go Might and Mastery Beginning March 4 appeared first on GamersHeroes. |
GamersHeroes Friday, February 28, 2025 6:28 PM Developer Coincidence, together with publisher Astra Logical have announced their new title Kaizen: A Factory Story: An open-ended puzzle automation game that will transport players to 1980s Japan. The post Puzzle Automation Title Kaizen: A Factory Story Announced at IGN Fan Fest appeared first on GamersHeroes. |
GamersHeroes Friday, February 28, 2025 5:54 PM Taking inspiration from Wild Arms, Trigun, and a fair bit of spaghetti (our favorite!), the 2024 Vidya Gaem Awards (/v/GAs) are slated to air March 15. The post 2024 Vidya Gaem Awards Airing March 15 appeared first on GamersHeroes. |
GamersHeroes Friday, February 28, 2025 4:52 PM The team at Digital Extremes announced that Warframe: 1999's follow-up update, Techrot Encore, is set to launch March 19 - for free! The post Warframe: 1999 Techrot Encore Launching March 19 appeared first on GamersHeroes. |
GamersHeroes Friday, February 28, 2025 3:39 PM Now available for PC and consoles, get ready to hit the links this weekend with the launch trailer for HB Studios and 2K Games' PGA Tour 2K25. The post PGA Tour 2K25 Launch Trailer Released appeared first on GamersHeroes. |
GamersHeroes Friday, February 28, 2025 2:57 PM The world of CyberConnect2 and Bandai Namco's Dragon Ball Z: Kakarot is getting that much bigger with the Daima: Adventure Through the Demon Realm DLC. The post Dragon Ball Z: Kakarot Daima: Adventure Through the Demon Realm DLC Announced appeared first on GamersHeroes. |
GamersHeroes Friday, February 28, 2025 2:09 PM Set to come to Rockstar Games' GTA Online March 4, players will be able to chart a new flight path for one's arms trafficking business in Oscar Guzman Flies Again. The post Oscar Guzman Flies Again GTA Online Update Coming March 4 appeared first on GamersHeroes. |
Kotaku Friday, February 28, 2025 6:00 PM  Nobody can lose their shit and start yelling quite like Gene Hackman. The actor, who was discovered dead in his home at the age of 95 this week (under bizarre-sounding circumstances), appeared in dozens of movies and won two Oscars. He did comedies, thrillers, and at least one kids movie. He was also the best Lex… |
Kotaku Friday, February 28, 2025 4:15 PM  Nintendo is doing something the company has never done before: Next month, it will remove a retro game from its the Nintendo Switch Online's classic catalog. |
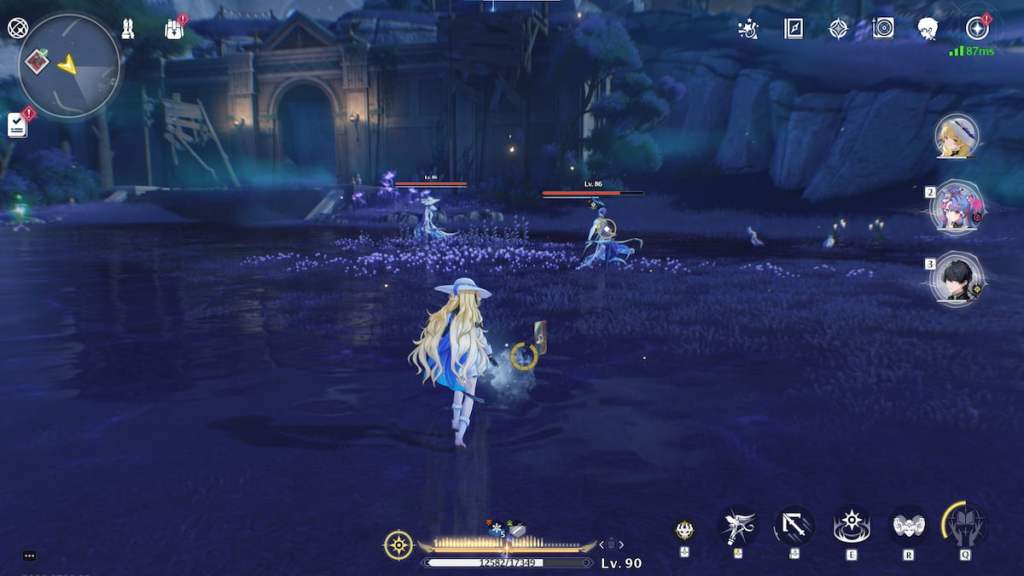
Kotaku Friday, February 28, 2025 4:14 PM  Monster Hunter Wilds can be a very pretty game, full of lush detail and deep colors. It can also look like greyscale goop. There are reasons for this, and ways to try and get around it. Here are the settings I recommend changing immediately, not just for a pretty Monster Hunter Wilds experience, but also a better one… |
Kotaku Friday, February 28, 2025 3:15 PM  Around the same time Elon Musk privately admitted to cheating at games like Diablo 4 and Path of Exile 2, he was apparently installing a gaming PC at his new office job running The Department of Government Efficiency (DOGE), because nothing says efficient and productive like using a power hog rig to blow up demons at… |
Kotaku Friday, February 28, 2025 2:15 PM  In a game like Civilization VII, the leader you choose makes as much of a difference as how you play and the type of win condition you seek. If you want to rule the world, a military leader will provide the manpower and firepower. But an economic-focused leader makes the most sense if you'd rather toss gold around… |
Kotaku Friday, February 28, 2025 1:50 PM  We've seen approximately five minutes of Pokémon Legends: Z-A in motion and fans are already asking a question that has plagued every Pokémon game since the series shifted to 3D graphics with X and Y: Is Pokémon Legends: Z-A ugly? The modern Pokémon games have been universally plagued by technical issues, but the… |
Kotaku Friday, February 28, 2025 1:40 PM  Assassin's Creed Shadows, the next mainline game in Ubisoft's long-running historical fiction franchise, is nearly here after a few delays, a leak, and a lot of online yelling. And if you were planning to play the game on Steam, well, I've got some good news and also, some bad news for Steam Deck owners. |
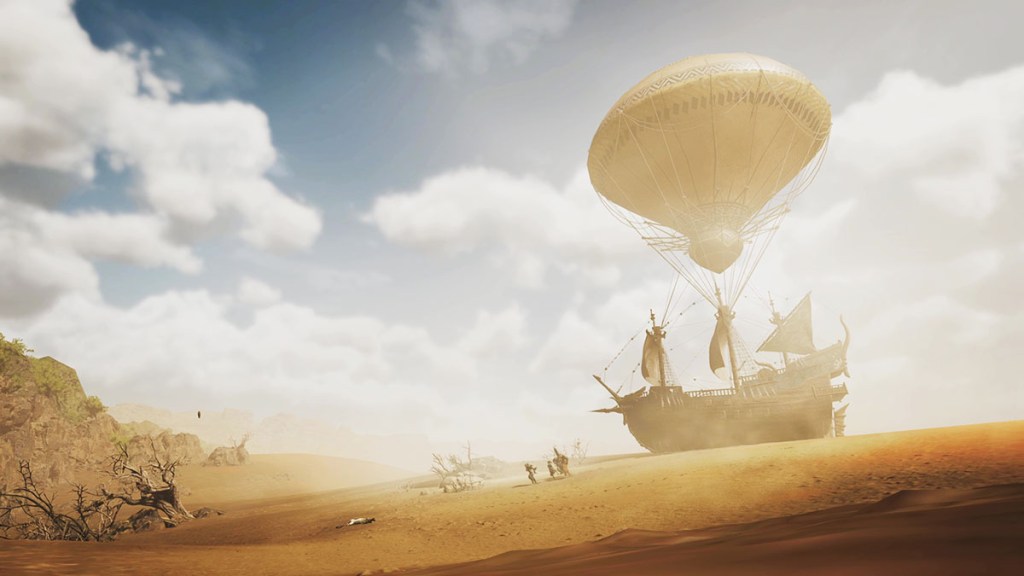
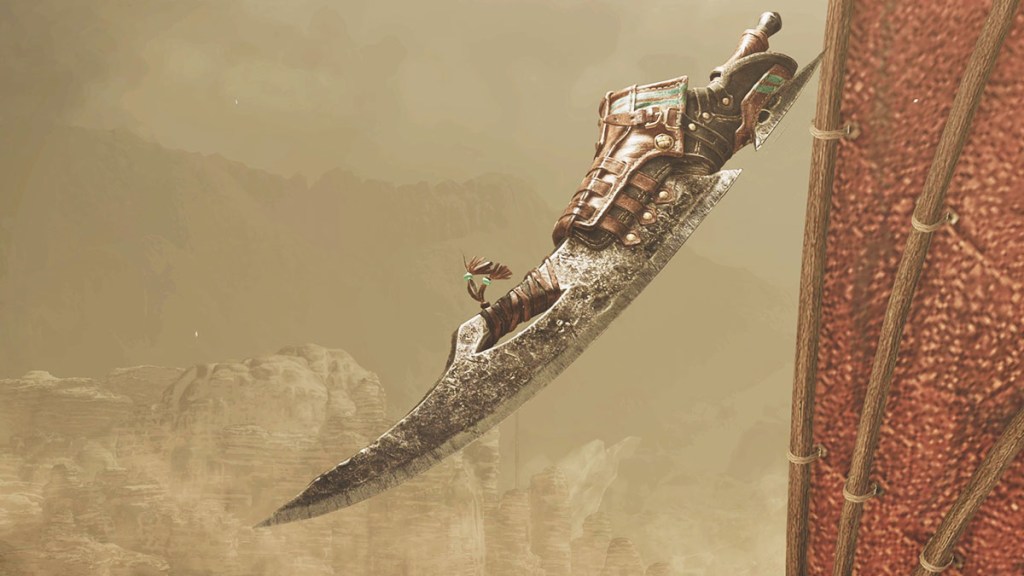
PCGamesN Friday, February 28, 2025 4:40 PM  There are a few settings that just work for me. I can go from a high fantasy adventure to a dark, dystopian future; I love gritty science fiction, but also the idea of heaven and hell. One of my favorite archtypes, however, is steampunk - the perfect blend of old and new with some magical flair to boot. It's what attracted me to games like Lies of P and New Arc Line, and it's what excites me about Sand, Hologrpyh's upcoming PvPvE shooter. Set on an Arrakis-style desert planet where huge, rideable mechs have become the bastions of humanity, it looks absolutely amazing - and it's coming soon. MORE FROM PCGAMESN: Best FPS games, Best multiplayer games, Best space games |
PCGamesN Friday, February 28, 2025 4:02 PM  Diablo 4's much-anticipated Season 8: Season of Witchcraft has been pushed back by two weeks, to add a little polish. The good news, if you're a long-time Diablo player, is that Blizzard is teasing the return of an 'old friend'. MORE FROM PCGAMESN: Diablo 4 builds, Diablo 4: Vessel of Hatred review, Diablo 4 classes |
PCGamesN Friday, February 28, 2025 3:02 PM  Want to craft your own little domain without the pressure of scrambling for resources? Then you'll be happy to hear that Islanders, one of the most chilled-out city builders of all time, is getting a sequel in the shape of Islanders: New Shores. Imagine Cities Skylines 2 or Manor Lords, but without the stress, the traffic, and feudal struggling. MORE FROM PCGAMESN: Best city builders, Best strategy games, Best indie games |
PCGamesN Friday, February 28, 2025 3:00 PM  February 28, 2025: A big new update means there's a new Car Dealership Tycoon code to use. What are the new Car Dealership Tycoon codes? Alongside the lobbies, murder mysteries, and shooters, Roblox is filled with every life simulator you could imagine, allowing you to live out your wildest dreams. If you've always wanted to run your own car dealership, test drive the fastest sports cars, and rake in that cash, then Foxzie's Car Dealership Tycoon is for you. As with any new business, you need money to get off the ground. Sure, Car Dealership Tycoon hands out easy money, as you can earn it by simply driving around the Roblox experience, but you'll be driving for a while before you can add that new floor to the showroom. If you're a little light on customers, why not take a break from running your business with Anime Champions Simulator codes, Southwest Florida codes, and Blox Fruits codes instead? Continue reading Car Dealership Tycoon codes February 2025 MORE FROM PCGAMESN: Best Roblox games, Roblox promo codes, Roblox music codes |
PCGamesN Friday, February 28, 2025 3:00 PM  Warframe 1999 is, for me, the coolest thing to come out of the game in years. Set in the Germanic-style world of Höllvania, the update added everything from a dating simulator to an infested boy band, and is the sole reason I chose to pick up my katana and dive on into the Origin System. But Arthur and the Hex's story isn't over yet, as Techrot Encore is bringing a lot of new 1999-themed content, continuing the saga and expanding out the game's already impressive roster. With the release date finally set in stone, we caught up with design director Pablo Alonso to talk all things Techrot and Temple. MORE FROM PCGAMESN: Warframe on Steam Deck, Warframe builds, Warframe codes |
PCGamesN Friday, February 28, 2025 3:26 PM  Frostpunk 2, sequel to the original post-apocalyptic city-builder, pitches you into a frozen world where your decisions can mean life or death for hundreds if not thousands of people. However, this follow-up hasn't been as well received as its predecessor, and developer 11 bit studios has revealed how it plans to build on this icy foundation. MORE FROM PCGAMESN: Best city-building games, Best survival games, Frostpunk 2 review |
PCGamesN Friday, February 28, 2025 2:58 PM  February 28, 2025: Kickstart the weekend with a trio of new SpongeBob Tower Defense codes. What are the new SpongeBob Tower Defense codes? Bikini Bottom is in danger and only the sub-aquatic city's goofiest goobers can protect it. From SpongeGar to double Krabby Pattied-up Squidward, there's a wild cast of characters that can be called upon to aid the defense effort. Of course, these iconic faces come at a cost, requiring you to cough up Gems and Magic Conches to partake in the Roblox game's gacha system. Fortunately, the SpongeBob Tower Defense codes often reward you with these precious materials, so load up Roblox, dive into Bikini Bottom, and use the following codes to keep it safe. Continue reading SpongeBob Tower Defense codes February 2025 MORE FROM PCGAMESN: Best Roblox games, Roblox promo codes, Roblox music codes |
PCGamesN Friday, February 28, 2025 2:31 PM  February 28, 2025: It's your last chance to use this new Greenville code. What are the new Greenville codes? While cruising around the idyllic town generating ideas for your next midwestern emo band, you'll probably find yourself eyeing up some of the fancier vehicles the Roblox game offers. Fresh wheels aren't cheap, and you'll need a few extra boosts to get you to the showroom quicker. Whether you're kicking it old school with the 1995 Volzhsky Rocket, or are looking for something with a little more sauce like the 2025 BKM Y60 W, Greenville codes will give you a helping hand in acquiring your dream car in the driving and life simulation game. Read on for the latest freebies available in the Roblox experience. Continue reading Greenville codes February 2025 MORE FROM PCGAMESN: Best Roblox games, Roblox promo codes, Roblox music codes |
PCGamesN Friday, February 28, 2025 2:09 PM  February 28, 2025: With a classic code now inactive once more, we send out the hive in search of new Bee Swarm Simulator codes. What are the active Bee Swarm Simulator codes? Whether you're in the market for some free items to help you get started farming honey, or you need that extra boost to your bee's effectiveness at collecting pollen, there's no quicker way to get your hive started than to redeem a whole bunch of codes. However, it's not always easy to know where to find ones that work. So, if you want to give your little pollinators a helping hand, we have many tried and tested active Bee Swarm Simulator codes to redeem that give you valuable free items and boosts. We also have freebies for other popular Roblox games, including Blade Ball codes, Blox Fruits codes, and Murder Mystery 2 codes to help you get ahead. Continue reading Bee Swarm Simulator codes February 2025 MORE FROM PCGAMESN: Best Roblox games, Roblox promo codes, Roblox music codes |
PCGamesN Friday, February 28, 2025 2:11 PM  February 28, 2025: With a version of the breaking free of Roblox, we're looking for new Blade Ball codes to celebrate. What are the new Blade Ball codes? Those who want to stand out while playing this dodgeball game can splash out on new weapons, skills, and even explosive effects. To get them, though, you need coins, and there are ways to instantly get a small amount of coins to roll the dice while getting a chance to open crates and maybe pull a rare sword skin. There are other similar games on the Roblox platform, so be sure to get all the latest Arm Wrestle Simulator codes to get yourself ripped or learn the secret of Berry Avenue codes if you'd rather live a calmer virtual life. Here are all the latest Blade Ball codes, how to enter them, and where to find more. Continue reading Blade Ball codes February 2025 MORE FROM PCGAMESN: Best Roblox games, Roblox promo codes, Roblox music codes |
PCGamesN Friday, February 28, 2025 2:08 PM  February 28, 2025: Go back in time with this week's new Berry Avenue code for a classic backpack. What are the new Berry Avenue codes? Rather than being a conventional Roblox game that uses tower defense, RPG, or shooting game-style mechanics, Berry Avenue is a playground where you can buy a house, work a job, or drive around without a care in the world looking fabulous. However, you may have noticed that everyone else looks much more stylish than most Roblox experiences. Is this because of the time they spent playing the roleplay sandbox game or perhaps linked to how much they paid in real-world money? While you're here, you should know that we also keep lists of Blox Fruits codes, King Legacy codes, and Anime Adventures codes to get you some free items and rolls for those games. Continue reading Berry Avenue codes February 2025 MORE FROM PCGAMESN: Best Roblox games, Roblox promo codes, Roblox music codes |
PCGamesN Friday, February 28, 2025 2:21 PM  February 28, 2025: We've had another good look around for new Demon Blade codes. What are the new Demon Blade codes? The popular Demon Slayer game sets you on your own path, allowing you to choose between being a titular demon slayer or an actual demon; getting free rewards in this Roblox adventure adds all the more fun to the experience. Although this isn't the only game based on the popular anime on Roblox, Demon Blade has been packed with past bonuses like Reset States and Race Spins. Similar to those you can earn using Peroxide codes or Fruit Battlegrounds codes, these will give you an edge as you play. Let's get into all of the active Demon Blade codes available to redeem right now. Continue reading Demon Blade codes February 2025 MORE FROM PCGAMESN: Best Roblox games, Roblox promo codes, Roblox music codes |
PCGamesN Friday, February 28, 2025 2:26 PM  February 28, 2025: We've found a pesky exclusive Anime Royale code in a YouTube video. What are the new Anime Royale codes? Throwing you into an anime world where you can summon your favorite heroes from multiple anime series into battle, Anime Royale adds a level of thrill to the Roblox tower defense experience. By having extra rewards at your disposal, you can get a head start by having access to more resources quicker as you prepare to conquer waves of enemies. Among the many anime titles on Roblox, you can also try the latest Special Anime Defense codes or YBA codes to get an additional edge. In the meantime, we've tested and confirmed all of the below active Anime Royale codes. Continue reading Anime Royale codes February 2025 MORE FROM PCGAMESN: Best Roblox games, Roblox promo codes, Roblox music codes |
PCGamesN Friday, February 28, 2025 2:13 PM  February 28, 2025: Initiate a shutdown with the new retro-themed new Brookhaven code for this week. What are the new Brookhaven codes? Brookhaven is one of the most popular sandbox games on the Roblox platform, allowing you to meet up with friends and explore the town's bustling streets and sleepy suburbs. Our Brookhaven codes can put a little pep in your step as you act out different scenarios with some free music for your portable speakers. Brookhaven offers a ton of freedom, so there are no pesky limitations to sidestep – you can snap up new houses and tear up the tarmac with various cars and bikes. Our Brookhaven codes grant you access to a whole playlist of popular tunes to serve as your soundtrack while you're at it. We've also got Doors codes, King Legacy codes, and Anime Adventures codes if you're searching for all the best goodies available across the Roblox platform. Continue reading Brookhaven codes February 2025 MORE FROM PCGAMESN: Best Roblox games, Roblox promo codes, Roblox music codes |
PCGamesN Friday, February 28, 2025 1:30 PM  Are you ready to hit the road with one of the most realistic and unforgiving driving games out there? Now's your chance to find out, because Expeditions: A MudRunner Game is free to play right now on Steam, and you owe it to yourself to test your motoring mettle. Continue reading Super realistic offroad sim Expeditions is suddenly free to play MORE FROM PCGAMESN: Best truck games, Best simulation games, Best racing games |
PCGamesN Friday, February 28, 2025 1:04 PM  What are the best Monster Hunter Wilds weapons? Whether you're a grizzled veteran or a complete beginner, choosing a weapon in Capcom's hunting RPG requires some forethought. The series is renowned for its steep learning curve, and Wilds is no different. Choosing a Monster Hunter Wilds weapon that's incompatible with your combat style can hamper your enjoyment in the RPG. That's where our weapons tier list comes in. We've outlined all the pros and cons for each weapon, including the best weapons overall, so you can take down the toughest MH Wilds monsters and have fun doing it. Continue reading Best Monster Hunter Wilds weapons tier list MORE FROM PCGAMESN: Monster Hunter Wilds armor, Monster Hunter Wilds weapons, Monster Hunter Wilds review |
Rock Paper Shotgun Latest Articles Feed Friday, February 28, 2025 3:45 PM 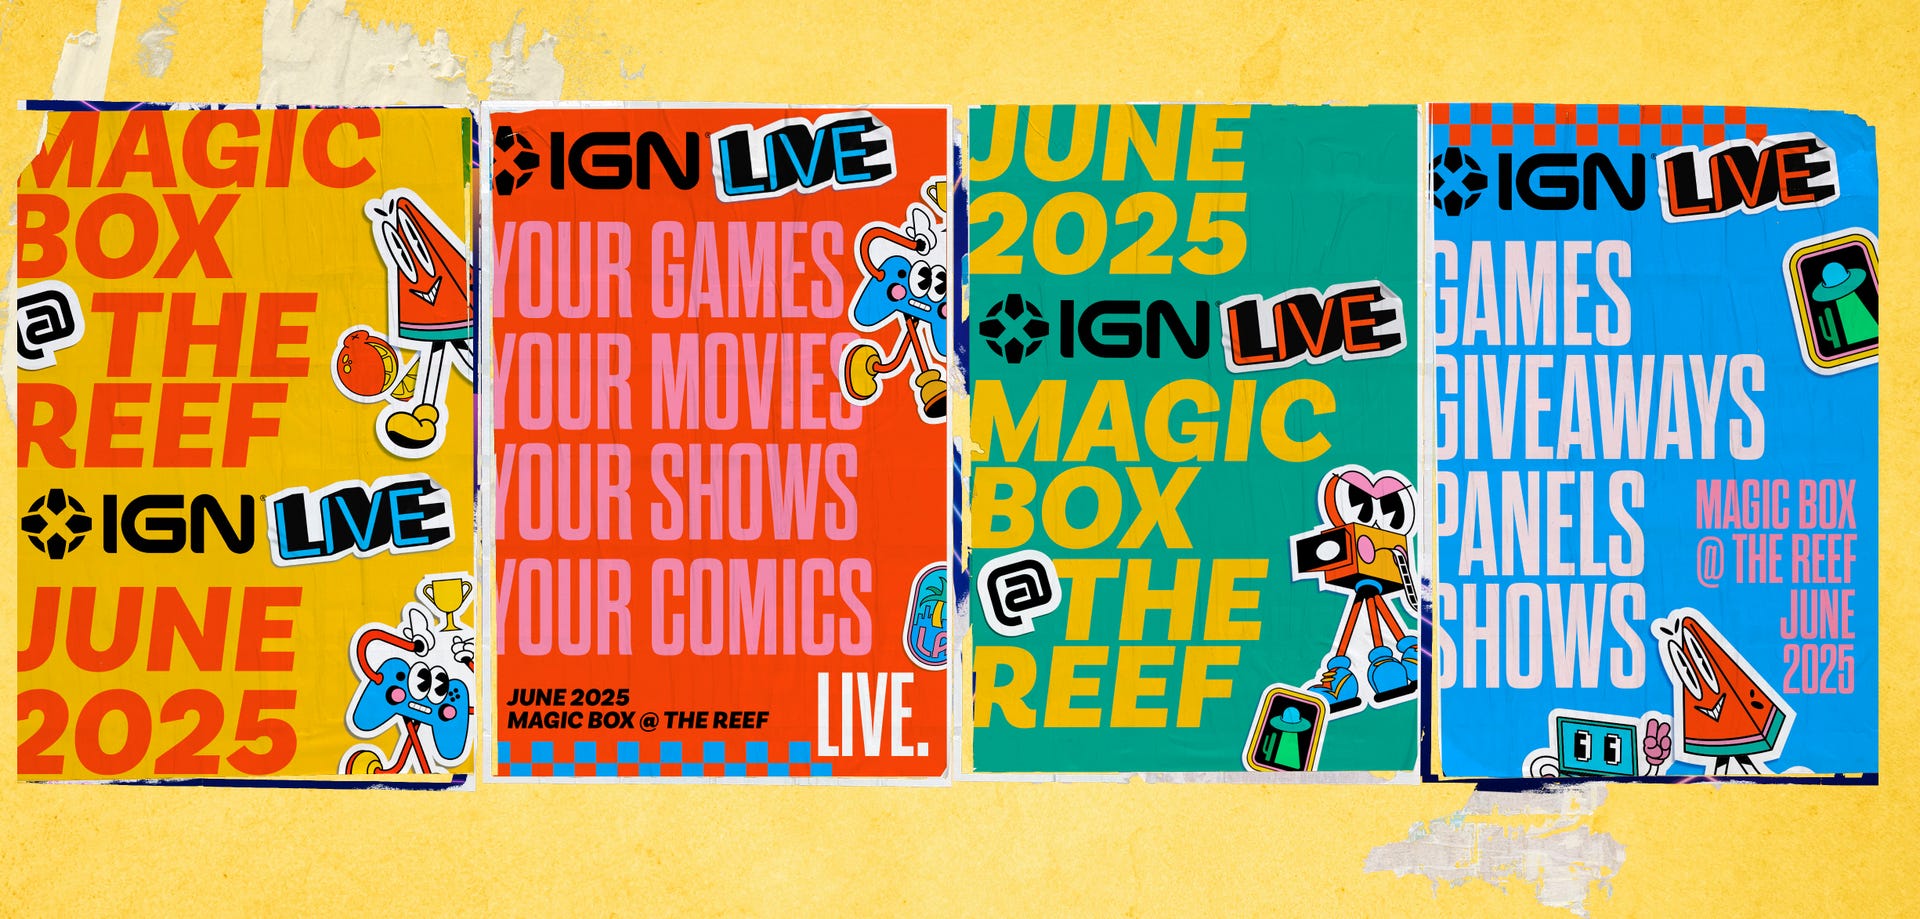 RPS's corporate daddy has announced that IGN Live is returning this June. The in-person event aims to fill the void left by E3, with playable demos in LA and livestreams of game reveals and panels for those who can't attend. |
Rock Paper Shotgun Latest Articles Feed Friday, February 28, 2025 3:00 PM  Coatsink have announced a sequel to Islanders, their pastelcore seaside town-arranger, which was the last game Alec Meer ever reviewed for RPS. Until he reviewed Kentucky Route Zero: Act V, a year or so later. If I didn't know better, I'd say Alec had planned that deliberately to screw me up. But I'll forgive him because the KRZ review is very good and thoughtful, and also because the first trailer for Islanders: New Shores is extremely calming. Here you go. |
Siliconera Friday, February 28, 2025 7:30 PM
Motoaki Tanigo, CEO of COVER Corp , the company that oversees Hololive and Holostars VTuber productions, made a statement on the possibility of AI VTubers. In a post on his LinkedIn profile, Tanigo outlined his thoughts on the matter stating that, he doesn't think AI will ever completely replace VTubers.
In the post, Tanigo, commonly referred to as Yagoo, asserts several points. The first point he hits is that the appeal of VTubers goes beyond the technology that animates them. He states that, "the true essence of VTubing is rooted in the human element, the personality, talent, and authenticity of the individual behind the avatar." In his statement, he emphasizes that the reason people are drawn to VTubers is the fact that there is someone real behind the avatar and that they can genuinely connect with and empathize with the person. He reiterated that "..it will never replace the passion, creativity, and humanity of the individuals behind the avatars... It's about bringing people together, and that is something only humans can truly achieve."
In the post, Tanigo states that VTubing is all about the breaking of boundaries and the ability for people to connect over their personalities and dreams. He also goes on to say that AI can only really be used as a tool. Tanigo believes it should not be used to replace the core human element at the heart of the Vtubing experience. He mentions using AI for doing things like assisting with ensuring that the shows are translated for audiences world wide.
COVER has been branching out recently in bringing the Hololive stars to bigger audiences. On February 21, 2025, COVER announced that the official Hololive card game would be getting an English release. In addition, Hololive stars Ninomae Ina'nis, Koseki Bijou, Gigi Murin, and Raora Panthera will be taking part in a special Monster Hunter Wilds stream to celebrate the game's launch on February 28, 2025 at 4:30pm PT/7:30pm ET.
The post Cover CEO Speaks on Possibility of AI Replacing Vtubers appeared first on Siliconera. |
Siliconera Friday, February 28, 2025 7:00 PM
Atlus offered new details about Metaphor: ReFantazio The Exhibition such as various visuals that will appear throughout the event, including photo spots, billboards, and original merchandise based on the JRPG. The event will be held in Tokyo, Japan between March 8-23, 2025.
Billboards available at the venue of the exhibition will feature a variety of emblematic scenes and locations from Metaphor: ReFantazio, as well as newly drawn illustrations specifically made for the event. One of the newly revealed attractions include a statue of the Seeker Archetype that was originally exhibited at Atlus Fes. The statue will be on display at the entrance of the venue, which also features its main visual depicting the Royal Capital Grand Trad.
A section of the venue will be designed after the Akademeia and include More's desk and new narration recorded for the exhibition. Near the Story section of the exhibition there will be a photo spot featuring a visual of the Regalith Grand Cathedral and the surfing sword for attendants to ride themselves. A section modeled after the briefing room of the protagonist's Gauntlet Runner will be available, and attendants will be able to sit on the round table.
The full list of Metaphor: ReFantazio merchandise available at the event is out now. Here are some of the goods available and their prices:
Here's how all those items will look:


Metaphor: ReFantazio The Exhibition will be held throughout March 8-23, 2025 and the venue is the B&C Hall of Warehouse Terrada in Tokyo.
The post New Metaphor: ReFantazio The Exhibition Details Shared appeared first on Siliconera. |
Siliconera Friday, February 28, 2025 6:45 PM
Pokémon TCG Pocket has just launched its sixth expansion pack Triumphant Light, featuring 75 new base cards, and 21 special illustration cards to collect. There are five new ex cards, a number of new full art cards, and a new battling mechanic. The set is based on Pokémon Legends: Arceus including Arceus and Arceus Ex, and decks made from this expansion will want to play at least one Arceus card.
Triumphant Light introduces Link Abilities. Magnezone, Crobat, Tyranitar, Rotom, Raichu, Abomasnow, Heatran, and Carnivine all have abilities that make them stronger when Arceus is in play. Irida is another interesting card in the deck as she can heal 40HP on any Pokémon with a Water Energy attached. This doesn't have to be a Water-type and could work in multiple decks.

Here is the full deck list for Pokémon TCG Pocket Triumphant Light expansion.
Pokémon TCG Pocket is available for free on iOS and Android.
The post Full Pokémon TCG Pocket Triumphant Light Expansion Deck List appeared first on Siliconera. |
Siliconera Friday, February 28, 2025 6:00 PM
Persona series composer Shoji Meguro announced that he produced and composed the latest song by Hololive Vtuber Mori Calliope, with the participation of Persona 3 vocalist Lotus Juice. The song is titled "Seeing Stars" and is out now on YouTube Music, Spotify, and other streaming services.
In the message shared by Meguro, the composer said about the song "It gives of a bit of a Persona 3 vibe, maybe?" The song is 3 minutes and 27 second long and performed in English by both artists. Additionally, a music video for the song is out now. While the video features Lotus Juice, a woman cosplaying as Mori Calliope appears as her stand-in.
You can check out the music video for "Seeing Stars (feat. Lotus Juice)" by Mori Calliope here:
For fans of the Vtuber, Holo Indie revealed a new game coming out on 2025 and starring Mori Calliope, titled Myriad Death. Additionally, Shoji Meguro is currently working on his own RPG titled Guns Undarkness. The game was revealed back in November 2021, and a demo is now available during the February 2025 Steam Next Fest.
The new Mori Calliope "Seeing Stars" song was composed by Persona composer Shoji Meguro, with backing vocals by vocalist Lotus Juice.
The post Persona Composer and Vocalist Worked on Mori Calliope Song appeared first on Siliconera. |
Siliconera Friday, February 28, 2025 5:30 PM
Good Smile Company has opened pre-orders for the Spy x Family Anya Nendoroid surprise figures. Pre-orders will remain open until April 9, 2025, with the figure set expected to ship in October 2025. It will cost 10,800 or around $71, and will include a total of six different Anya Nendoroid figures.
You can take a look at the Good Smile Company Spy x Family Anya Nendoroid Surprise figures below:


As mentioned previously, a total of six different figures will come in this collection. Each feature a different version of Anya, and comes with several accessories. It also comes with back attachments so consumers can pose the collection of Nendoroids however they would like.
And if consumers don't want to spend the 10,800 yen to purchase the entire collection, they can opt to purchase one figure for 1,800 yen, or $11. However, purchasing a figure through this method means you'll be taking a gamble as to what Anya figure you'll end up getting.
Consumers can pre-order the Spy x Family Anya Nendoroid Surprise figures until April 9, 2025. The figure collection will ship sometime in October 2025. The anime is streaming on Crunchyroll, while Viz Media handles the manga. Spy x Family Code: White is also available to stream on Crunchyroll.
The post Spy x Family Anya Nendoroid Surprise Figures Debut appeared first on Siliconera. |
Siliconera Friday, February 28, 2025 5:00 PM
A series of Easter themed Pokemon merchandise, which includes plush toys, will appear in March 2025. These items will be available to purchase from the Pokemon Center Online service in Japan. Consumers can purchase these items at Pokemon Center locations in Japan on March 22, 2025, with online purchases opening on March 21, 2025.
A total of seven Pokemon Botanical Easter plush toys will be available to purchase. These include Espeon, Sprigatito, Snubble, Wigglytuff, Sneasel, Whismur, and Pikachu. The Sprigatito, Espeon, and Pikachu plush toys are full sized, where as the Snubble, Wigglytuff, Sneasel and Whismur are smaller in size and can be used as keychains.
You can take a look at some of the Pokemon Botanical Easter merchandise items below:


The plushes vary in price, with the Pikachu plush costing 3,300 yen (or $21), the Espeon plush costing 3,740 yen ($24), and the Sprigatito plush costing 3,520 (or $23). Meanwhile, the smaller key-chain plushes cost 1,980 yen ($13) a piece. They cannot be purchased in a set.
Other items that are part of this collection include lanyards, lanyard holders, sweaters, a towel, and even socks. However, the website does state that the release of these items could be potentially pushed back. Either way, The Pokemon Company has provided a full list of merchandise for this exclusive line of merchandise on its official page.
The post Pokemon Botanical Easter Plush and Items Appear for 2025 appeared first on Siliconera. |
Siliconera Friday, February 28, 2025 4:45 PM
Pokémon Day promises more Pokémon news every year, and the headline for this year's Pokémon Presents was an extended look at Pokémon Legends: Z-A with a three-minute trailer. Previously fans only saw a teaser trailer, which showed outlines of things to come. In contrast to this, the latest Pokémon Legends: Z-A is jam packed with easter eggs, and other clues that tell us more about what to expect from the upcoming game.
Here are all the easter eggs we noticed in the latest Pokémon Legends: Z-A trailer.
Almost 100 Pokémon were featured in the Legends Z-A trailer

People were surprised to see that there would be two starters from Gold and Silver as part of the Legends: Z-A starter lineup. However, they were more surprised to see almost a hundred different Pokémon appear in just three minutes. Some were only on screen for a split second, others only appeared at the bottom as part of the player's party. But if you look closely you will be able to see all 98 of the Pokémon below in the Legends: Z-A trailer.
Legends: Z-A's evil team is returning to space

There are a number of hints that the new 'evil team' will be obsessed with space once more. Game Freak loves to make the bad guys part of a major company like Aether in Sun and Moon and Marco Cosmos in Sword and Shield. Quasartico will likely play the role of antagonists in Legends: Z-A, and the name of the company isn't the only hint that the company is trying to breach the final frontier.
Quasartico's logo bears more than a passing resemblance to Team Galactic's from Diamond and Pearl, and the design can be seen imprinted all over CEO Jett's suit. Jett's design is also very interesting. Her hair also mimics the Galactic logo and can also be compared to Colress' hair from Team Plasma. Jett also has crescent moon earrings, and the collar of her suit is similar to Lunala's wings. Her design is also reminiscent of Lusamine with her platinum blond hair, and shoe design.
Another link to Sun and Moon can be seen in Urbain and Taunie, who have a similar look to Ilima, Melemele island's trial captain. As for the admin Vinnie, people were quick to point out his mutton chops, similar to Lysandre's from X and Y. However, his dark skin and man bun are also reminiscent of kahuna Hala, who is also known for his odd sideburns. Vinnie's sunglasses could also be a stand in for how Hala doesn't open his eyes.
None of this is definitive, but there are more than a few threads that link the story of Legends: Z-A, not just to X and Y, but Sun and Moon among other titles in the series.
Catching and battling will see a huge mix up

Pokémon Legends: Arceus hugely mixed up the battle system by adding strong- and agile-style moves among other big changes. The new Legends: Z-A trailer showed fans how the new battle system will be different from both Legends Arceus and the mainline games. Each Pokémon's four attacks are mapped to the four face buttons, and the Pokémon can move freely around the battle arena helping them dodge attacks. This is a huge mix up for the series, changing genre from turn-based to action RPG. The new style is more similar to Pokken's than other mainline games.
It isn't just the battling that will change, but we saw a new style to catching in the latest Legends: Z-A trailer. At one point we see a Pokémon's HP bar drain completely before the trainer throws the ball. Previously, this resulted in a knockout, but it appears that battling before catching will be far less risky in the upcoming game.
Legends Z-A's trailer hints at link to Scarlet and Violet

The last scene in the Pokémon Legends: Z-A trailer is the most cryptic and confused fans. It shows the player waking up to a message from their phone that reads "This is a promotion match announcement" followed by the icon for Lumiose City. It's not much to go on, but we can infer that there is likely some link between Legends: Z-A, and Scarlet and Violet.
The Rotom phone changes design between games, and the design at the end of the trailer is the phone's design from Scarlet and Violet. It seems that there might be some challenges that cross over between the games.
The post Every Easter Egg in the latest Pokémon Legends: Z-A trailer appeared first on Siliconera. |
Siliconera Friday, February 28, 2025 4:30 PM
Sega and Insert Coin announced a new Sonic the Hedgehog clothing collection, including a jacket, hoodie, socks and pins. You can pre-order these clothing pieces through the official site. There is no confirmed date for when these items will be shipped, but it is expected to be around late March 2025 or early April 2025.
The Sonic the Hedgehog collection features seven pieces that are available to buy, and the Sega Genesis era has all clearly influenced them. This could this be a nod to the Chaos Emeralds, of which there are seven. What's more, everything in the collection is unisex, meaning anyone can wear it.
The varsity jacket appears to be the collection's centrepiece and costs $85.32. The outside of the jacket is a vibrant blue, mimicking the blue blur, but the lining has the classic green hill grid pattern. It also has a sleek, hidden pocket embroidery of Super Sonic and the Chaos Emeralds. On the other hand, the hoodie is reminiscent of the original Sonic and Knuckle's cartridge as it's black throughout. However, it also includes Sonic and Knuckles's iconic logo box art on the front and back. The Sonic and Knuckles hoodie costs $63.99.
Here is a closer look at the entire collection:


The Sonic the Hedgehog clothing collection by Sega and Insert Coin will arrive in March/April 2025. Sonic X Shadow Generations is available for the PS4, PS5, Xbox One, Xbox Series X/S, Nintendo Switch, and PC.
The post Insert Coin Open Preorders for Sonic the Hedgehog Clothing appeared first on Siliconera. |
Siliconera Friday, February 28, 2025 4:00 PM
Famitsu has announced Kadokawa will end support for the Famitsu App. Support will end on March 31, 2025. However, Famitsu has stated that information shared through the Famitsu App will appear on the website. That said, it did not specify what would or wouldn't make it to the website once support for the app ends.
The Famitsu App primarily featured information about various mobile titles available in Japan. This included game guides and other information. That said, Famitsu does host a Famitsu App website, which is where the information will be transferred. It just means that there won't be an ease of access via mobile devices.
Originally launched in April 2011, the Famitsu App, as previously mentioned, served as repository of information for various mobile games. This was primarily in the form of guides, but also included game version updates, merchandise, and even collaboration information for mobile games like Goddess of Victory: NIKKE.
That said, information on these mobile titles can be found on the Famitsu website, and the Famitsu App website. It will just take consumers a little longer to find what they're looking for, and not directly through the app. Kadokawa and Famitsu have not stated a reason as to why the app is being taken offline.
The Famitsu App is available on Android and iOS devices, with support to end on March 31, 2025.
The post Kadokawa Ends Famitsu App Support appeared first on Siliconera. |
Siliconera Friday, February 28, 2025 3:30 PM
The Pokemon Company has announced that the Japanese Pokemon Center Online service will undergo indefinite maintenance. All services provided by the Japanese Pokemon Center Online will be unavailable during this period. The Pokemon Company will share more information as to when the service will resume in the future.
There has been no specific reason as to why the service has been taken down, only that planned maintenance had occurred, and was intended to end on February 28, 2025 at 10AM JST. As mentioned previously, consumers cannot access the Japanese Pokemon Center Online while it is currently undergoing indefinite maintenance. This means consumers cannot purchase or even browse products.
As to when the service will resume, there is no specific time or date. But information will appear on the official Japanese Pokemon Center Online website once things have been sorted. This is also exclusive to the Japanese storefront, as the North American storefront is still active.
The Pokemon Center Online has allowed for consumers to purchase products from Pokemon Center locations online. This, of course, includes Pokemon themed merchandise, like plushes, cutlery, and even gardening tools.
While the Pokemon Center Online service is down, this doesn't mean that consumers can't purchase Pokemon merchandise through other means. For North American consumers, Build-a-Bear has restocked Vaporeon plushes to celebrate Pokemon Day 2025.
The post Japanese Pokemon Center Online Undergoing Indefinite Maintenance appeared first on Siliconera. |
Siliconera Friday, February 28, 2025 3:00 PM
The Yu-Gi-Oh! Early Days Collection brings back some of the oldest video game adaptations from the beloved card game's past with some impressive value. There are 14 different, distinct games available from the Game Boy and Game Boy Advance. While there are some filler games not worth playing much these days, there are a handful of incredible titles that still hold up well even now.
The true value comes from the sheer amount of content available here. It is a like a trip down memory lane or an interactive museum. You can see how the Yu-Gi-Oh! video game adaptations started and where they ended up as they began to build towards some similarities to more recent titles, at least in the gameplay and UI.

I had a blast going through every single game and playing them for a few minutes before hopping into the next one. Overall, I would say that this is not a collection where you will likely pour dozens of hours into each game. This is especially true with the earlier titles that are extremely simplistic and barebones.
That said, the first game that really stood out to me was the original Duel Monsters title. With the exception of one game, every title in the collection is now available in English, including this one. There is something so charming about this particular game with the various filters and graphical options that aren't as available in the others. The card gameplay is as straightforward as it gets, but there was something beautiful about the accessibility of it.
From there, it was a while in the collection before I found a game that really stuck with me. After all, most of the games boil down to the same formula of battle the same NPCs over and over to get new cards to then unlock more areas and fight more NPCs. There are far too many games like this and once you've played one, you've played them all.
The real standout games are the ones that take the Yu-Gi-Oh! card formula and translate it into a unique genre. For instance, there is the fascinating Monster Capsule title. This one is essentially a grid-based tactical RPG with a bit of exploration. You use your monsters to move around the grid and defeat others with just enough Fire Emblem-like strategy. The progression is fun and while the graphics leave something to be desired, it is a nice change of pace from the usual card battles.

In a similar fashion is Dungeon Dice Monsters, which was pure nostalgia for me. I played this game a ton back in the day on the GBA and while it doesn't hold up super well, the great designs of the dice monsters make it worth a look for a bit. The same goes for the board game-inspired Destiny Board Traveler. This one is a bit overwhelming in its complexity, but there is some great arcade fun to be had rolling dice, moving around the field, and using unique mechanics to get an edge over the competition.
With all of that said, though, there are three games that make the Yu-Gi-Oh! Early Days Collection worth it. Those titles are The Sacred Cards, Reshef of Destruction, and 7 Trials to Glory. I would say these three alone make this collection worth it. All three are essentially 2D JRPGs with the Yu-Gi-Oh! card battle mechanics.
There are some odd gimmicks here and there in the first two RPGs, but they work. For instance, there is an elemental system akin to Pokemon. If you use a certain elemental monster against one it is super effective against, it will win every time. This is quite different from the official rules, but it adds this extra level of strategy. It feels like it is possible to win almost every duel if played right.
I adore the ability to be able to explore the Yu-Gi-Oh! world in these games, talk to popular characters like Joey and Kaiba, battle against foes, and progress through a lengthy storyline. These games do get a bit grindy, but they are far more enjoyable than the other titles. It is a joy to have a starter deck that is weak and gradually get more cards for defeating each NPC. By the end of the game, you truly feel powerful with the Egyptian God cards and 4-star monsters that have 2000 attack or more.

In fact, I appreciated these three RPGs so much, even though this was my first time playing them, that I completed all three from start to finish. They hold up extremely well, and part of this comes from the enhancements. Every single game in the Yu-Gi-Oh! Early Days Collection has various enhancements that are basically cheats. You can put a copy of every card in your deck, unlock special bosses, get unlimited currency, and more.
These enhancements make the grind in some of these games less intrusive. It lets you focus on customizing however you like and enjoying the pure gameplay. In addition to that, there are save states, a rewind feature, and fast forward one. These all help to reduce the frustrations with these games. Some of the battles in some titles can be quite slow, so having a fast forward option helps.
In addition, the save states and rewind features, while completely optional, can make having to start over a duel because of a single card mistake obsolete. And then there is the instruction manual part. Every single game has an instruction manual that recreates what it originally looked like in gorgeous fashion. You can pour over each manual, and they are pretty helpful, too. In the aforementioned RPG The Sacred Cards, for instance, I constantly referenced it for the elemental chart. It is so smooth and easy to access.
Overall, the Yu-Gi-Oh! Early Days Collection is a brilliant example of how to present older titles to a newer audience or platform. Sure, most of the 14 titles on display here are only fun for a couple minutes and that's it. However, the five or so games that are well worth your time feel even better than they did back in the day. The RPGs, board games, and other neat riffs on the Yu-Gi-Oh! formula feel great to play even now because of the rampant enhancements, improvements, and quality-of-life features.
This is a collection that is lovingly crafted for fans of all levels and is well worth a look for a peek at the simpler, arguably more thrilling days of Yu-Gi-Oh! That said, it is missing some of the best games in the series like The Duelists of the Roses and the Nintendo DS World Championship titles, so here's hoping this collection is only the start.
Yu-Gi-Oh! Early Days Collection releases for Nintendo Switch and PC on February 27, 2025.
The post Review: Yu-Gi-Oh! Early Days Collection Brings Back Classic Titles appeared first on Siliconera. |
Siliconera Friday, February 28, 2025 2:30 PM
The next major Fields of Mistria patch arrives on March 10, 2025, and NPC Studio shared a teaser trailer of the Lava Caves biome added to the mines and dungeon as part of the update. The footage on social media offers a peek at some of the monsters there, as well as shows how you can use tools to get around.
Prior to the Lava Caves biome of the Fields of Mistria mines, the only pieces of equipment we'd really need to use were the pickaxe and sword. Once you get into this region after breaking the seal to continue into the dungeon depths, you'll also need to use your watering can. This is because there will be large expanses of lava that farmers can't just jump over. To cross, you'll need to use a watering can to create bridges between landmasses.
The trailer shows how an upgraded watering can in Fields of Mistria can make it possible to cross safely. It also shows some of the types of slime monsters, ore outcrops, and bugs present along the way.
Here's the new footage:
NPC Studio constantly shares video clips online highlighting new and old features in the farming sim. One of the last ones appeared earlier this week. It focused on the new Water Sprite Statue. This functions similar to a sprinkler in the Stardew Valley series, though you need to use an Essence Stone to water plants in a grid around the new item.
Fields of Mistria is currently in early access on PCs, and the new patch arrives on March 10, 2025.
The post See the Fields of Mistria Mines and Dungeon Lava Caves Biome appeared first on Siliconera. |
Siliconera Friday, February 28, 2025 2:00 PM
Build-a-Bear and Sanrio announced a number of new Cinnamoroll Cafe collection stuffed animals, with the two new plush being his friends Mocha and Milk. There are $64.50 bundles with either Mocha and Milk or Cinnamoroll and Milk. Both can be purchased separately. There is also a new suit for Cinnamoroll for $13.50, which can be purchased separately or in a $56 bundle with the toy. This follows the Giant Cinnamoroll release in January 2025.
In addition to the bundles, Mocha and Milk can be purchased separately or in other bundles at Build-a-Bear. Like Cinnamoroll, his friend Mocha can be found in a $56 bundle that includes an outfit and the plush coffee cup. She can arrive stuffed or unstuffed, as well as dressed or undressed. She can also be picked up at a workshop, as these new items are in-store and online. Her outfit is also sold separately for $13.50, or you could get the plush alone for $36.
As for Milk, you can pick up that little plush for $15 alone. As it is pre-stuffed, you can't have one stuffed for you at a store or arrive unstuffed. It's also too teeny for clothing.
Here's how all of the new Cinnamoroll, Mocha, and Milk plush look, with some of the official Build-a-Bear photos showing the Sanrio stuffed animals in and out of outfits.


The Cinnamoroll, Mocha, and Milk Sanrio plush are now available at the Build-a-Bear online storefront and retail stores.
The post Cinnamoroll's Friends Mocha and Milk Appear at Build-a-Bear appeared first on Siliconera. |
Siliconera Friday, February 28, 2025 1:30 PM
The 1.6 Zenless Zone Zero Special Program not only teased insight into the background of Cunning Hares member Anby, but also flat out went into her lore ahead of her S-rank Agent version debut. She will appear alongside a new story, other characters, and new location. It will launch on March 12, 2025.
Anby is something of a mascot character for Zenless Zone Zero, and she's the first A-rank Agent to get an S-rank version with Silver Soldier 0 - Anby. Her name also signifies her tie to Soldier 11, which seemed hinted at in-game prior to this point. Trigger is the other new S-rank unit, while Pulchra is an A-rank one. S-rank characters Burnice and Zhuyuan will also return on rerun banners.
Here's how all three of the new characters look:


As for the story, it will send us into what seems like could be a more dramatic moment. Phaethon are at an auction for a relic, as are mysterious new Zenless Zone Zero characters Hugo and Vivian. This also marks the debut of a Mockingbird faction as people attempt to get a Sacrifice artifact. We'll also end up fighting a new boss named Geppetto.
Some quality of life adjustments will come as well. Battlefield Purge will include Difficulty VI as an option. We will need to unlock that, however. HoYoVerse also stated "character progression mechanics" will be updated.
Here's the full 1.6 Zenless Zone Zero Special Program that covers everything coming in the update on March 12, 2025.
Zenless Zone Zero is available on the PS5, PC, and mobile devices, and the 1.6 update arrives on March 12, 2025.
The post 1.6 Zenless Zone Zero Update Details Anby's History appeared first on Siliconera. |


Destructoid Friday, February 28, 2025 7:10 PM
I'm a huge fan of legendary indie horror game dev Steelkrill. They are an extremely creative developer that has made some of the most fun horror games I've played in recent years. Unfortunately, it appears as though a fraudulent company has ripped their entire latest release and is attempting to sell it as their own.
One of Steelkrill's first titles was The Backrooms 1998, released into Early Access in 2022 as a first-person found footage psychological horror game that tells the story of a young teen who fell into the depths of the Backrooms from popular internet creepypasta culture. After a few years of development, Steelkrill is ready to take The Backrooms 1998 out of Early Access and into full release with a new version including improved enemy AI, bug fixes, more jump scares, and more.
Alongside the full launch PC release, Steelkrill also intended to release The Backrooms 1998 on consoles. However, when they went to do so, they discovered that a fake company had literally managed to rip all of The Backrooms 1998 and upload it to PlayStation, Xbox, and Nintendo Switch as if it were their own game titled Backrooms Horror Escape.

Comparing the real game, The Backrooms 1998, to the fake scam game, Backrooms Horror Escape, it's very obvious they blatantly ripped the assets, UI, and everything, and simply added a filter or changed various post processing effects to make it look slightly different.
Since discovering the scam, Steelkrill issued a DMCA for the stolen assets and game to all the platforms on which it was listed. It's since been taken down from PlayStation and Xbox, but at the time of publishing this article, it's still up on the Nintendo eShop. According to Steelkrill, Nintendo followed up on the DMCA request asking for clarification as to why they think the fake company stole their game. Steelkrill was quick to point out that not only are the stolen assets a dead giveaway, but the source code itself for the fake game shows all the same properly named assets from The Backrooms 1998, and even includes a VHS home video from when they were younger that plays at the start of the game.
After doing a little digging, it appears this isn't the first time this fake company has done this. Under the name 'COOL DEVS S.R.L.', whoever is behind the scam has also fake ripped game versions of Chained Together under the title Chained Towards Heaven, and TCG Card Shop Simulator under the title TCG Empire: Card Shop Simulator. I even found a couple titles currently listed on Steam that are blatant rip offs of existing games on the platform. For example, a ripped version of Supermarket Simulator called Supermarket Simulator Holidays 2025 that just has it randomly snowing with brighter assets, and another ripped version of TGC Card Shop Simulator also simply with brighter assets called Trade 'Em Up! TCG Empire Shop.
Reading over some responses to what's going on, it seems as though whoever isn't behind this isn't only ripping off developers' hard work, the stolen games aren't even in a playable state. Several players have admitted they were duped only to find the game they brought to be broken and unplayable.
It's really a shame to see this happen to such an amazing developer like Steelkrill. They have an especially unique ability to create horror games that incorporate the latest gaming trends—such as The Stairway 7, an anomaly loop game like Exit 8—or try something completely different and new like Rotten Flesh, a cosmic horror game in which you must search for your run away dog in some creepy sewers while calling for him using your microphone. I've enjoyed all of their releases and am anxiously awaiting the upcoming release of The 18th Attic.
Steelkrill wants players to keep an eye out and be careful to check the games they are purchasing to make sure they are legitimate, as well as the developer accounts of those selling them. For developers, Steelkrill says they should make sure to use IL2CPP in their code, which can help obfuscate the code and make it harder to steal.
The post A fake company has stolen indie horror dev Steelkrill's newest release and sold it as their own appeared first on Destructoid. | |||||||||||||||||||||||||||||||||||||||||||||||||||||||||||||||||||||||||||||||||||||||||||||||||||||||||||||||||||||||||||||||||||
Destructoid Friday, February 28, 2025 6:10 PM
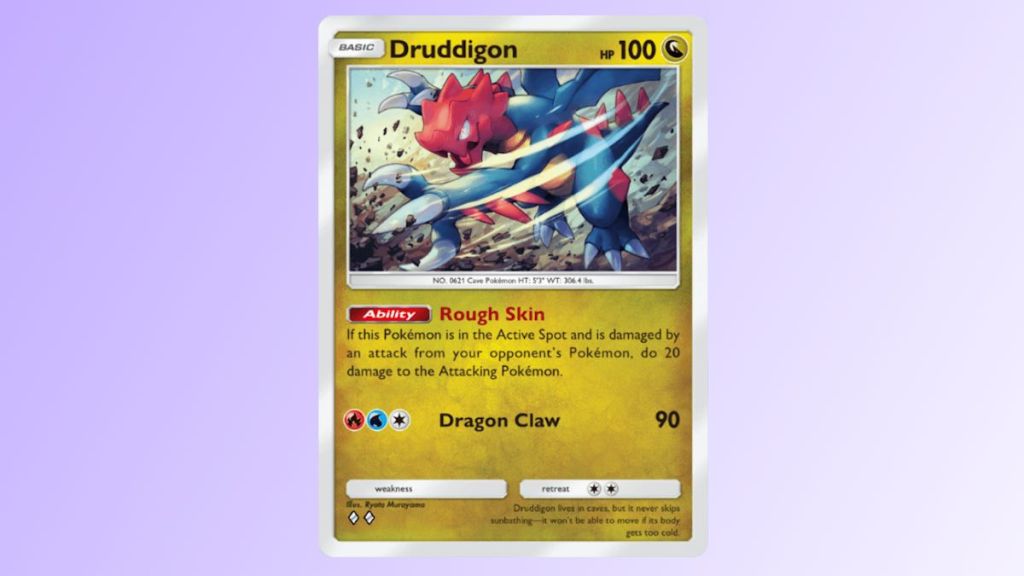
Arceus EX is now a card in Pokémon Trading Card Game (TCG) Pocket, so if you're looking for a solid build to use for PvP, check what we have.
Best Arceus EX deck in Pokémon TCG Pocket
The following deck build will use Arceus EX as the premier attacker. It'll be similar to Pidgeot EX builds with some favorable tradeoffs.
The choice of the Pokémon here is to hopefully open with Druddigon as your stall wall for recoil or preventing your opponent from attacking. While stalling, you will need to use item cards (Professor's Research, Poké Ball) or have luck to draw your Arceus EXs so you can start feeding them energy to be the late or mid-game attackers.
Shaymin will also be used in this deck only for its ability, Flagrant Flower Garden, to provide team heals every turn. You do not need to feed it energy unless it is forcefully drawn by your opponent to retreat.
While feeding your Arceus(s) energy, you'll want to keep these in hand for when you have them ready for attacking or to switch your active Pokémon out before a KO.
All of these are standard Trainer cards that are the staple for most other builds in Pokémon TCG Pocket.
Arceus EX attacker deck playstyle
Ideally, you'd want to fill your entire play field with Arceus EX as your attacker with another in your bench as a backup. With the other two bench slots, you would have ideally switched your Druddigon(s) to prevent early KO's along with a Shaymin for healing every turn.
Since Arceus EX's primary attack does 20 more damage for each of your Benched Pokémon, you'll be dealing 130 damage per attack (140 with Giovanni equipped). It's a powerful setup.
Pair this with the fact that it also has the Fabled Luster ability, being immune to Special Conditions like Sleep, Confusion, Paralysis, or anything else like them.
Arceus EX weaknesses
Arceus EX is a bit weaker in terms of numbers compared to Pidgeot EX. It has 30 less HP and deals 10 less damage for its attack. What it does make up for is its Ability to nullify Special Conditions.
It's weak against Fighting-types, so there is a type disadvantage against Golem, Gallade EX, Garchomp (EX), and Rhyperior decks.
The best way to deal with heavy damage output from these decks is to build up quick or foil your opponent's plans by using Sabrina while you can deal any damage.
The post Best Arceus EX deck and card list for Pokémon Trading Card Pocket appeared first on Destructoid. | |||||||||||||||||||||||||||||||||||||||||||||||||||||||||||||||||||||||||||||||||||||||||||||||||||||||||||||||||||||||||||||||||||
Destructoid Friday, February 28, 2025 5:20 PM
Dareel's Research Report quest takes a turn as it continues into the endgame of Monster Hunter Wilds. This time, you must capture Ember Rufflizard, an Oilwell Basin Endemic Life creature. We'll go over this monster's distinct location and the rewards provided in this mission.
Where to find Ember Rufflizards in MH Wilds
During Chapter 4-2, you'll unlock Dareel's Research Report Cont. side quest in Windward Plains. Talk to Dareel, and he'll send you to Oilwell Basin to discover the Ember Ruffilizard. You'll find these creatures at Oilwell Basin's Zone 15, where you fought the Black Flame previously.
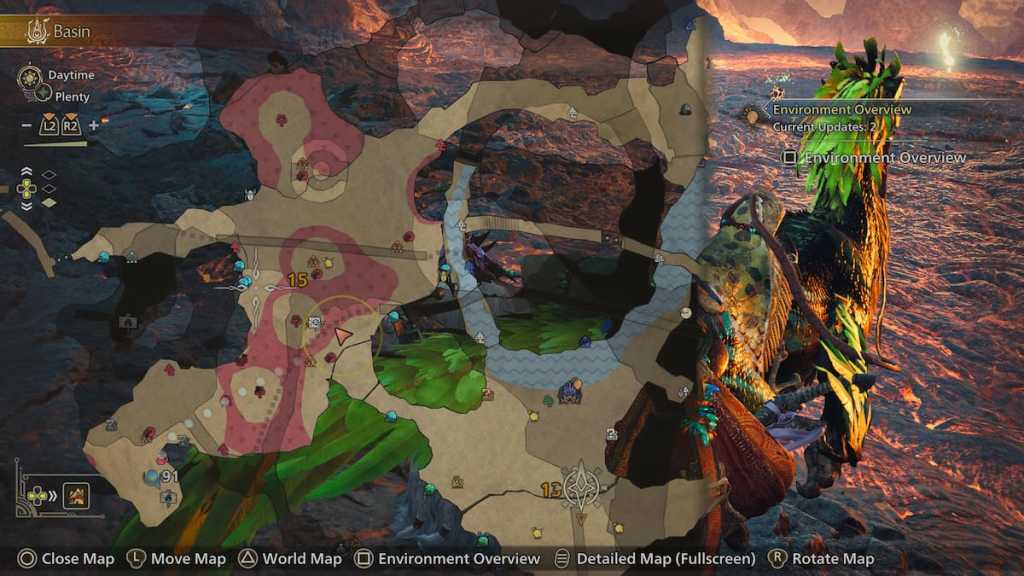
Since Ember Ruffilizards linger around volcanic areas, you must head towards Basin's most heated environment. If it gets too hot, ensure to use Cold Drinks to keep your health intact. You can spot the lizards through their distinct light green glow.

Fortunately, you don't have to worry about scaring them off with any sudden movement, differing from a Sandstar. Simply whip out your Capture Net and use it to get the Ember Rufflizard. They typically travel in groups, so you can catch more of them for additional Guild Points.
Return to Dareel to complete his latest Research Report quest. Soon after, you'll also trigger Samin's quest involving the Iceshard Cliff's Rime Beetle. There will still be a few more Endemic Life missions to complete, so do your best to raise your Hunter Rank to unlock more.
All Dareel's Research Report Cont. rewards
Dareel will reward you with 10 Might Seeds and five Honey. Might Seeds increase your attack strength temporarily, while Honey is perfect for healing potions. I suggest carrying Honey with you at all times, just in case you need to craft a potion. Plus, you can utilize it for the First Aid Med, an item that only unlocks during Monster Hunter Wilds quests.
The post How to capture Ember Rufflizard in Monster Hunter Wilds (Dareel's Research Report Cont.) appeared first on Destructoid. | |||||||||||||||||||||||||||||||||||||||||||||||||||||||||||||||||||||||||||||||||||||||||||||||||||||||||||||||||||||||||||||||||||
Destructoid Friday, February 28, 2025 5:04 PM
Looking for all Totem of Defiance locations in Avowed? The Totem of Defiance is split into seven pieces that you'll need to collect around the Emerald Stair region of Avowed. This totem is ideal for a ranger build as it provides extra Constitution, Dexterity and critical hit damage. For all Totem of Defiance locations, see below.
In this guide:
How to complete the Totem of Defiance quest in Avowed
To activate the Totem of Defiance quest in Avowed, you can either pick up one of the Totem pieces right away or purchase the 'Fragments of the Offering' quest item from Lluisa Melcer at the Farmers' Market, south of Fior mes Iverno. Alternatively, follow our guide for every Totem of Defiance piece location.
The Schemer's Offering location


The Schemer's Offering is the base of the idol and is located at the Shrine to Skaen (west beyond The Wildwoods). To find it, follow these steps:
Obsidian Prayer Beads location


Whilst you're in the area after obtaining the Schemer's Offering, you can also collect the next Totem piece from The Delemgan Glade. You will enter this area during the main quest 'The Animancy Method,' so you may wish to wait until then to get this Totem piece. I found that if I went straight to the heart of the area and spoke to the main NPC there, all of the enemies became pacified afterward, making traversal much easier. Follow these steps for the Obsidian Prayer Beads:
Idol of Covert Plots location


The Idol of Covert Plots is located within the sealed chapel to the east of the Infested Camp. Follow these steps to get it:
Idol of Secret Hatred location


The Idol of Secret Hatred is located within the Ancient Grotto, south of The Wildwoods. To grab this Totem piece for yourself, follow these steps:
Effigy Necklace location


The Effigy Necklace is located a short distance away from the previous Totem piece, within Naku Tedek. However, you must play through the main questline to obtain this one, as its location is only accessible via the 'Ancient Soil' main quest. If you have progressed this far, follow these steps to retrieve the necklace:
Sacrificial Dagger location


The Sacrificial Dagger is located in the Abandoned Farms, directly north of Fior mes Iverno. Follow these steps to pick it up:
Idol of Violent Rebellion location


The Idol of Violent Rebellion is located at the top of the Ranger Headquarters. To retrieve it, follow these steps:
How to use the Totem of Defiance in Avowed
Once you have all seven pieces of the Totem of Defiance, travel to a party camp and interact with your totem statue base to unite the pieces and activate it. The base is a cluster of rocks, usually to the left of where Kai stands.
You can only have one Totem active at a time, so choose wisely. This Totem provides buffs that best support a Ranger build.
All Totem of Defiance buffs
Like other Totems in the game, the Totem of Defiance offers six buffs. These are:
That rounds up our guide to all Totem of Defiance locations and buffs in Avowed. If you want to find the other Totems, see our guide to all Totem of Rightful Rulership locations or our Totem of Revelations rundown.
The post All Totem of Defiance locations and buffs in Avowed appeared first on Destructoid. | |||||||||||||||||||||||||||||||||||||||||||||||||||||||||||||||||||||||||||||||||||||||||||||||||||||||||||||||||||||||||||||||||||
Destructoid Friday, February 28, 2025 4:51 PM
If you love the ability to upgrade players in EA FC 25's Ultimate Team mode, the Training Camp Evolutions will surely delight you.
For the first time, EA Sports has introduced a type of evolution that works passively. In simpler words, evolution will be completed over time on its own. This is very different from how the whole system of evolutions has worked until now, and this guide will help you understand all about the basics.
How will Training Camp Evolutions work in EA FC 25
Regular evolutions have to be completed by playing the game. Each has specific conditions that require you to play the game. In the case of Training Camp Evolutions, you select a player from the console and web app. Then, the evolution begins automatically for your chosen card.
Once the evolution has started, it will show a timer. This timer marks the time required for the level/evolution to complete. Until the timer is active, you can't use the card in any squad or game mode in Ultimate Team. Once you lock the card, it can't be touched inside the game.
You can continue all other game modes with the rest of your available items. Only the card being used in the evolution can't be used. The card will be available once the timer has finished, indicating that your card is ready to be used again.
That's pretty much how Training Camp Evolutions will work in Ultimate Team. They have a separate tab in the evolutions tab, making it easier for players to differentiate. Just like normal ones, Training Camp Evolutions will have free and paid options, offering different kinds of boosts to your players.
While EA Sports has released two Training Camp Evolutions for starters, you can also complete the Bench Boost Evolution in Ultimate Team. It's a free upgrade that allows you to boost a card of your choice with stat upgrades and SM/WF boosts.
,
The post EA FC 25 Training Camp Evolutions explained appeared first on Destructoid. | |||||||||||||||||||||||||||||||||||||||||||||||||||||||||||||||||||||||||||||||||||||||||||||||||||||||||||||||||||||||||||||||||||
Destructoid Friday, February 28, 2025 4:32 PM
Out of all the Endemic Life creatures, the Sandstar is the trickiest to spot due to its rare spawns. You must be at the right place and time to collect it, earning you the I Caught a Shooting Star! trophy. Here's how to catch a Sandstar in Monster Hunter Wilds.
Where to find Sandstar in MH Wilds
The Sandstar can be found in the Windward Plains Zones 11 and 13 at nighttime. If you're just starting in Monster Hunter Wilds, you must wait for the day to progress until the map displays 'Nighttime' and 'Plenty' in the top-left corner. Those who have reached the endgame can change the time by resting at the Base Camp or Portable BBQ Grill. Select the 'Plenty' on the Environment tab and set it to 'Nighttime' using 300 Guild Points.

Unlike most Endemic Life monsters, you can scare off Sandstars. You must use a Screampod from a Baunos to make them immobile for the capture. Once you've collected this device, travel to Zone 11 or Zone 13 (you can switch between the two if one proves luckier than the other).
When you get close to the zones, I recommend jumping off your Seikret since the sudden movements can deter the Sandstar away. You're looking for a tiny blue-colored creature in the sandy dunes. Crouch down immediately when you spot it and slowly move towards it.

Shoot your Screampod to stun it, equip your Capture Net, and then run towards the Sandstar to capture it. You'll earn the I Caught a Shooting Star! achievement for the Monster Hunter Wilds trophy collection. Additionally, if you progressed to Chapter 5-1, you can complete Samin's Special Research quest for bonus rewards. You can start Samin's questline by finding Dapperwings for him around Chapter 1-5.
How to get Screamer Pods in Monster Hunter Wilds
If you aren't sure where to find the Baunos, search around these areas in Windward Plains:
Look up to the skies to spot the Baunos flying around, and use your Hook Slinger to gather the Echo Feather.

The Echo Feather turns into the Screamer Pod, a Slinger Ammo that emits high-frequency to stun specific monsters. You can only hold three in your Item Pouch, so you may need to collect more for additional Sandstars.
The post How to catch a Sandstar in Monster Hunter Wilds (I Caught a Shooting Star! hidden achievement) appeared first on Destructoid. | |||||||||||||||||||||||||||||||||||||||||||||||||||||||||||||||||||||||||||||||||||||||||||||||||||||||||||||||||||||||||||||||||||
Destructoid Friday, February 28, 2025 4:22 PM
Have you ever had a massive list of items you wanted to craft or upgrade in a game, only to forget half of them later? Normally, it'd be very easy to do this in Monster Hunter Wilds, but a special feature can help you remember everything: the forge's wishlist.
The wishlist behaves like a to-do list for any weapons and armor you wish to upgrade or create in the future. That way, if you're just a few resources away from your next upgrade and don't want to forget anything, you'll have your planned upgrades in one convenient spot.
How to wishlist weapons and armor in MHW
Wishlisting your weapons and armor in Monster Hunter Wilds requires visiting Gemma's Smithy in your base camp, selecting any unowned equipment items, and opening your sub-menu. Here, you'll find an "Add to Wishlist" option to plan your next upgrade. If you need to remove an item from the list, head into the same menu and select "Remove from Wishlist."
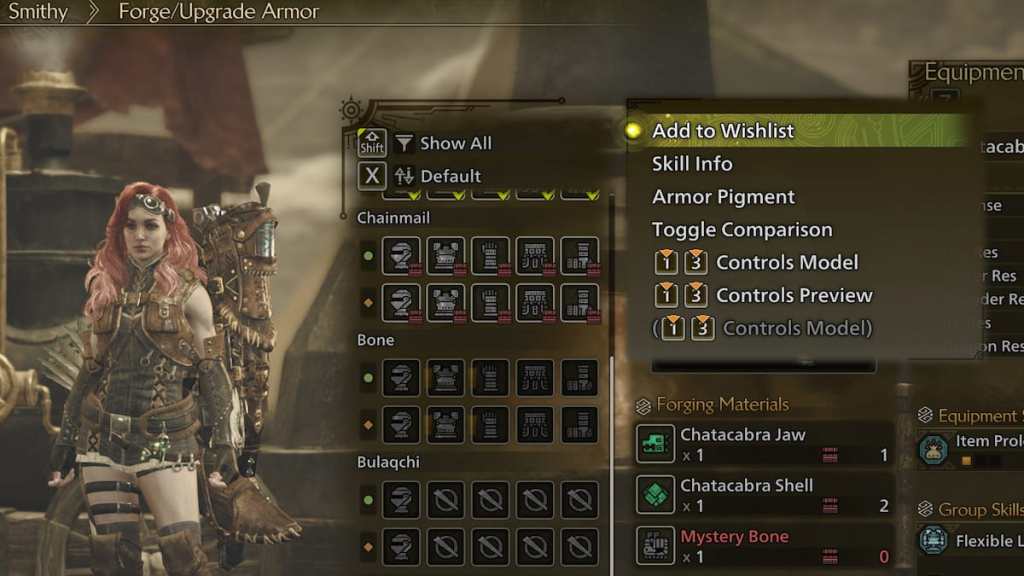
Although some early-game equipment pieces will have a grayed-out button in their sub-menu list, most that require forging materials will be available on the wishlist. Even if you already have every upgrade material for your chosen weapon or armor piece, you can still add it to your wishlist to prioritize another item but keep options on the back burner for the future.
Where to find your wishlist in MHW
Once you add a few weapons and armor pieces to your wishlist, head back to the main Smithy menu and select "Forge/Upgrade from Wishlist" to access your wishlist. Here, you'll see every item you've added, their required resources, and a breakdown of the equipment's stats.
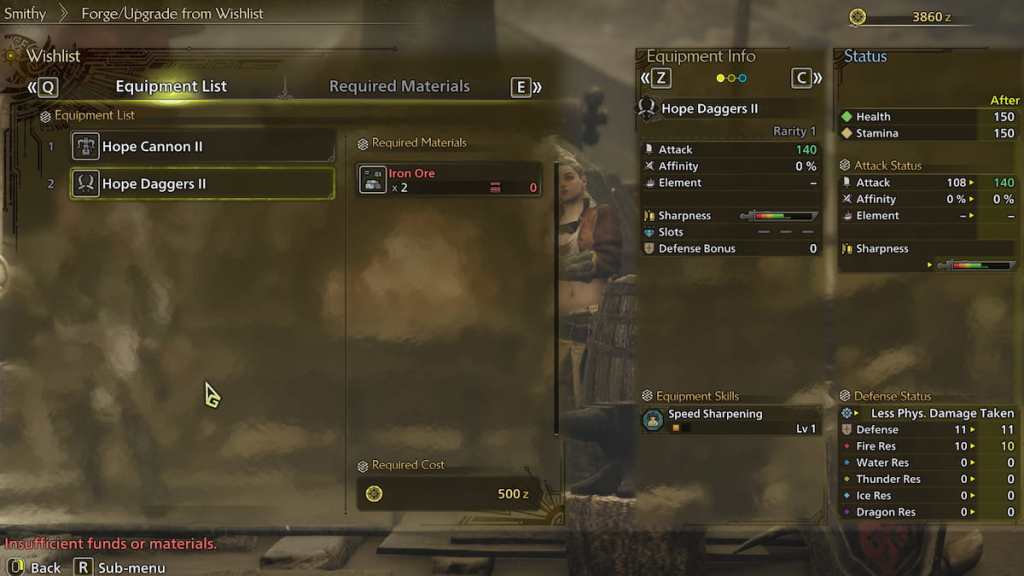
You can swap between each option by hovering over their names, letting you compare stats and material costs to determine what to prioritize first. You'll also find a colored checkmark next to the weapon or armor piece's name when you have all its required materials, making it slightly easier to organize your upgrades and determine how much more you have to farm. Going for MHW's best weapons and armor first is a good call, but it's mostly up to your playstyle and progression in the game.
The post How to use your Wishlist in Monster Hunter Wilds appeared first on Destructoid. | |||||||||||||||||||||||||||||||||||||||||||||||||||||||||||||||||||||||||||||||||||||||||||||||||||||||||||||||||||||||||||||||||||
Destructoid Friday, February 28, 2025 4:22 PM
Phoebe, the latest 5-star character in Wuthering Waves Version 2.1, relies heavily on the Spectro Frazzle debuff, making her unviable without it. This design flaw limits teambuilding options, threatening the game's long-term character design philosophy, and it must be addressed before it's too late.
The Spectro Frazzle dilemma
Phoebe's kit revolves entirely around Spectro Frazzle, to the point of absurdity. It is a debuff that must be applied to enemies for her to function effectively. Only Spectro Rover, one specific character, can apply this debuff consistently. Without it, Phoebe becomes dramatically weaker, bordering on useless. This rigid dependency forces players into a narrow, restrictive team composition.
But let's break this down even further. Most characters in Wuthering Waves have a level of flexibility built into their kits. They can function decently on their own but shine when placed in the right team composition or with the proper set of buffs. Phoebe, however, is an entirely different story. If the enemy does not have Spectro Frazzle applied, her abilities may as well not exist. She can't deal damage, she can't contribute meaningfully, and she becomes dead weight in a fight. This is the kind of design that kills excitement for a new character. No one wants to pull for a five-star unit only to realize they need to have another very specific character to make them work at all.
Creating the problem, selling the solution
This feeds into a troubling monetization strategy often seen in live service and gacha games: "Create the problem, sell the solution."
By introducing a character almost entirely dependent on a single mechanic, developers create artificial demand for future units that will "fix" the issue. If a future 5-star character is released with Spectro Frazzle application built into their kit, it would be easy to see how this was a deliberate move rather than an accidental oversight.
This is a slippery slope. If every future limited-time character is shackled to a single mechanic or unit, it will stifle the game's diversity and alienate players who enjoy flexibility in their gameplay experience. The beauty of Wuthering Waves has always been its mix-and-match potential. Phoebe's design works directly against that. To be clear, all players get Spectro Rover for free, and they apply Spectro Frazzle for Phoebe, but this isn't about that fact. This is about what this sort of design represents.
How to fix Phoebe (because she needs it)
Two clear solutions can fix Phoebe's overreliance on Specto Frazzle:
If Phoebe could switch between her Absolution and Confession stances much faster than the 24-second cooldown she currently has built into her kit, this issue would practically disappear. By letting her apply her own Spectro Frazzle more frequently, she would no longer be forced to rely on specific teammates just to function, while maintaining the team aspect of having a teammate apply it for her if desired (reducing her need to stance swap). Instead, she could generate her own opportunities and actually feel like a self-sufficient character. This would make her gameplay loop far more enjoyable while preserving the unique mechanics of her kit.

Right now, her long cooldown locks her into a frustrating and clunky playstyle where she spends more time waiting than actually doing anything meaningful. Lowering that cooldown would allow her to shine without breaking the game, keeping her fun while avoiding the pitfall of restrictive team compositions.
If adjusting her cooldown isn't an option, another way to fix Phoebe is by making her entirely less reliant on Spectro Frazzle. Right now, the damage difference between hitting a target with or without it being applied is astronomical. Without it, she deals negligible damage, effectively making her unplayable without Spectro Rover.

She should still gain a bonus against Spectro Frazzled enemies, but not to the extent that she is completely worthless without it. By shrinking this damage spectrum, Phoebe could remain functional even when Spectro Frazzle is not present, allowing her to work in more team compositions without being utterly dependent on a single debuff.
Why this cannot become the norm
Phoebe's release represents a dangerous shift in character design philosophy that should not be allowed to continue. If future characters are designed with such rigid, singular dependencies, Wuthering Waves will suffer long-term. Players will feel boxed in and forced into specific, restrictive team compositions to make a character viable. That kind of game design is the opposite of fun.

Fortunately, Kuro Games has a reputation for listening to its player base. By raising awareness of this issue now, the community can voice concerns before this becomes an accepted norm.
A hard no to future Phoebes
Phoebe is fun, but her design philosophy is flawed. This isn't about minor balancing issues; it is about maintaining the integrity of Wuthering Waves and ensuring that future characters are built on a foundation of strong, independent design. Kuro Games listens, but only if we, the players, make ourselves heard.

This absolutely cannot become the standard. If you care about team-building flexibility, character versatility, and fair design, now is the time to make your voice heard. When future surveys come out, take the time to fill them out and decry this design flaw. Make it crystal clear that this type of deliberately negative character-balancing is unacceptable. If you stay silent, you risk letting this issue fester and spread into future banners. This is the time to push back before the problem infests and infects.
Kuro Games can do better. And we should expect better. Speak up, take the surveys, and make sure this problem starts and stops with Phoebe.
The post The last thing Wuthering Waves needs is another Phoebe appeared first on Destructoid. | |||||||||||||||||||||||||||||||||||||||||||||||||||||||||||||||||||||||||||||||||||||||||||||||||||||||||||||||||||||||||||||||||||
Destructoid Friday, February 28, 2025 4:14 PM
Almost no AAA game releases on PC these days without at least a few issues. Monster Hunter Wilds is no exception, and one of the most frustrating problems you can get is a so-called "anti-tamper error" caused by the game's anti-cheat. Here are all the ways to fix it.
Fixes to the Monster Hunter Wilds anti-tamper error
First, you should know that the fixes we're presenting here are band-aids on an issue Capcom and its anti-cheat vendor will need to address. A fix that works for you might not work for someone else, and so on.
Anti-tamper error fix #1: Disable in-game overlays
One of the earliest solutions that gave me relief from the anti-tamper error was to turn off any in-game overlays I had running. It was specifically the Discord overlay for me, but if you have the Nvidia App overlay or others active when you try to run Monster Hunter Wilds, try turning them off.
Note that the Steam overlay did not give me issues, but that doesn't mean it won't be for you. The same goes for Discord, Nvidia, and any other overlay you have running. Turn them all off, and if you want to access their features, try turning them on one at a time to see which one is giving you trouble.
Anti-tamper error fix #2: Restart your PC and Steam
Some of my friends trying to get into Wilds shortly after launch had some luck getting past the anti-tamper error by brute-forcing the issue, attempting to open the game repeatedly until it just worked. A simpler, less frustrating solution is likely to restart Steam and, if that doesn't work, your PC as well. It's not foolproof, but it's non-invasive and doesn't take too long.
Anti-tamper error fix #3: Verify your game files
Another potential fix to the anti-tamper issue is to repair your game Monster Hunter Wilds game files.
Verifying your game files will force Steam to reacquire any necessary files Wilds needs to keep running and replace files that have been corrupted for whatever reason. Like restarting Steam, this solution is far from foolproof, but it only takes a few minutes of your time.
Anti-tamper error fix #4: Add Monster Hunter Wilds as an exception to your antivirus
Antivirus software sometimes has the potential to flag games as malicious, or it can be invasive enough on your system to be flagged by anti-cheat software as a potential issue. Add MonsterHunterWilds.exe as an exception, which you can find in the main game folder, located here by default:
If you have the game installed on a separate drive, replace the C: drive with where Wilds is located.
Anti-tamper error fix #5: Run Monster Hunter Wilds as administrator
We're getting a little more technical now. Running the game as administrator requires you to make a minor change to the settings of the .exe file, but nothing major. Find MonsterHunterWilds.exe and give it admin privileges by:
Try running Wilds through Steam to see if your problem's fixed.
Anti-tamper error fix #6: Delete crash log files
Another fix to the anti-tamper error that's come to light since the launch of Monster Hunter Wilds is to delete your crash log files. There can be some odd interactions between those files, the Denuvo anti-tamper software, and the ability to launch the game. Here's how to reach the files you need to delete. Be sure to back them up first:
I'd recommend trying these six fixes for the Monster Hunter Wilds anti-tamper error in the order presented. The most straightforward solutions are always best to try first, as there's a much lower chance of something else breaking. They're also the easiest to rule out as failed experiments because there are fewer moving parts to account for.
Hopefully, you get some relief from this error and can actually get into Monster Hunter Wilds to experience the Forbidden Lands.
The post How to fix the anti-tamper error in Monster Hunter Wilds on PC appeared first on Destructoid. | |||||||||||||||||||||||||||||||||||||||||||||||||||||||||||||||||||||||||||||||||||||||||||||||||||||||||||||||||||||||||||||||||||
Destructoid Friday, February 28, 2025 2:55 PM
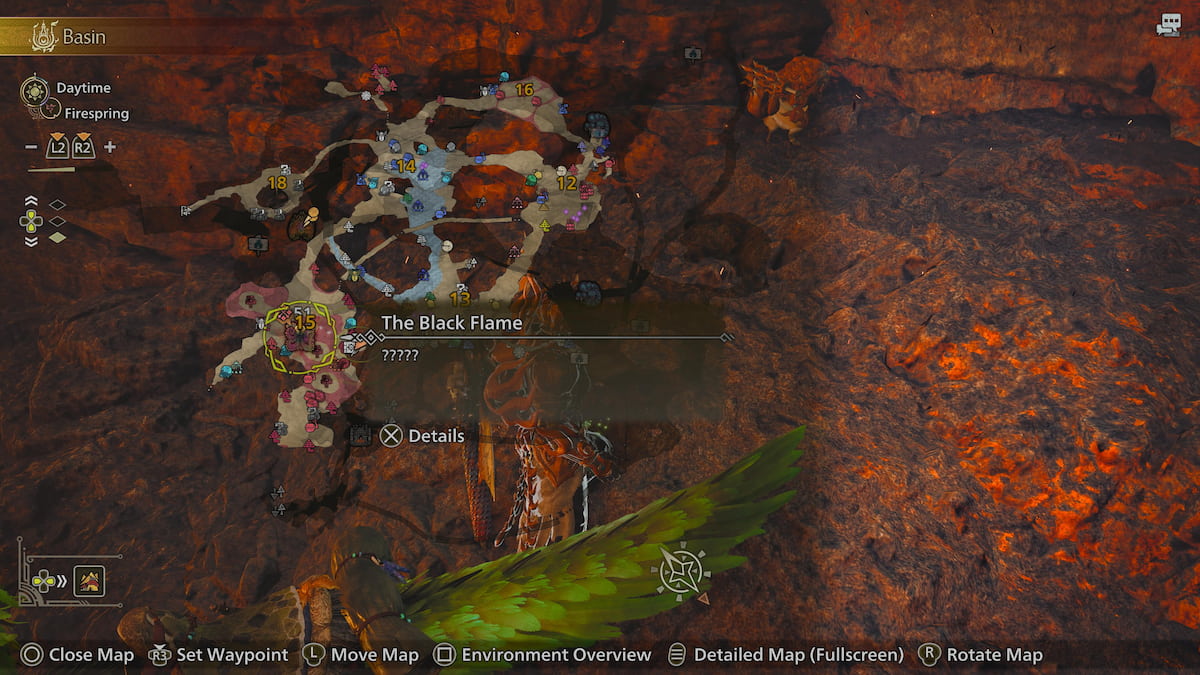
During Chapter 2-4 Long-forgotten Flame, you'll go on a quest to find the enigmatic Black Flame. It'll be pretty tricky to find, especially with the scorching heat of Oilwell Basin. We're here to quicken the search by showing you the Black Flame's location in Monster Hunter Wilds.
Table of contents
How to search for the Black Flame in MH Wilds Long-forgotten Flame Chapter
The Black Flame, also known as the Nu Udra, is found in Oilwell Basin's Zone 15. It'll be right below the Base Camp, so you must head to lower ground. But, before traveling, be sure to eat a meal and bring a few Cold Drinks to withstand the heat. Starting from the Base Camp, go to Zone 4 to reach Zone 9.
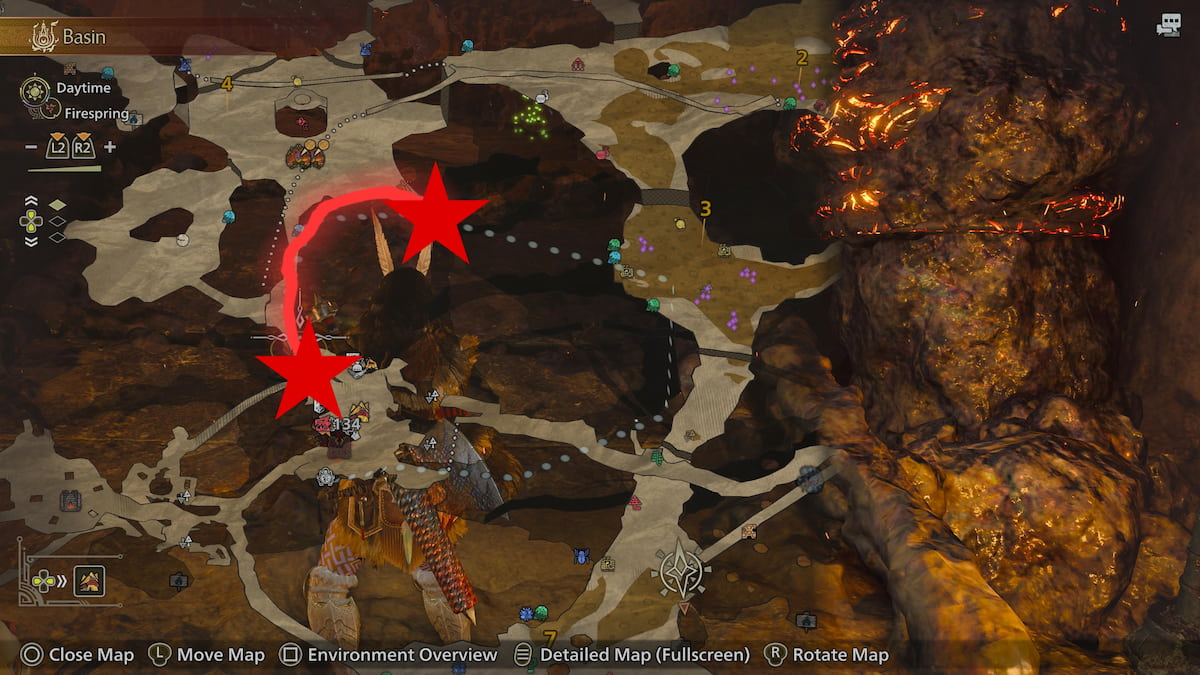
While at Zone 4, take a right to locate a molting crater, where you can use Zone 9's Pit Elevator.
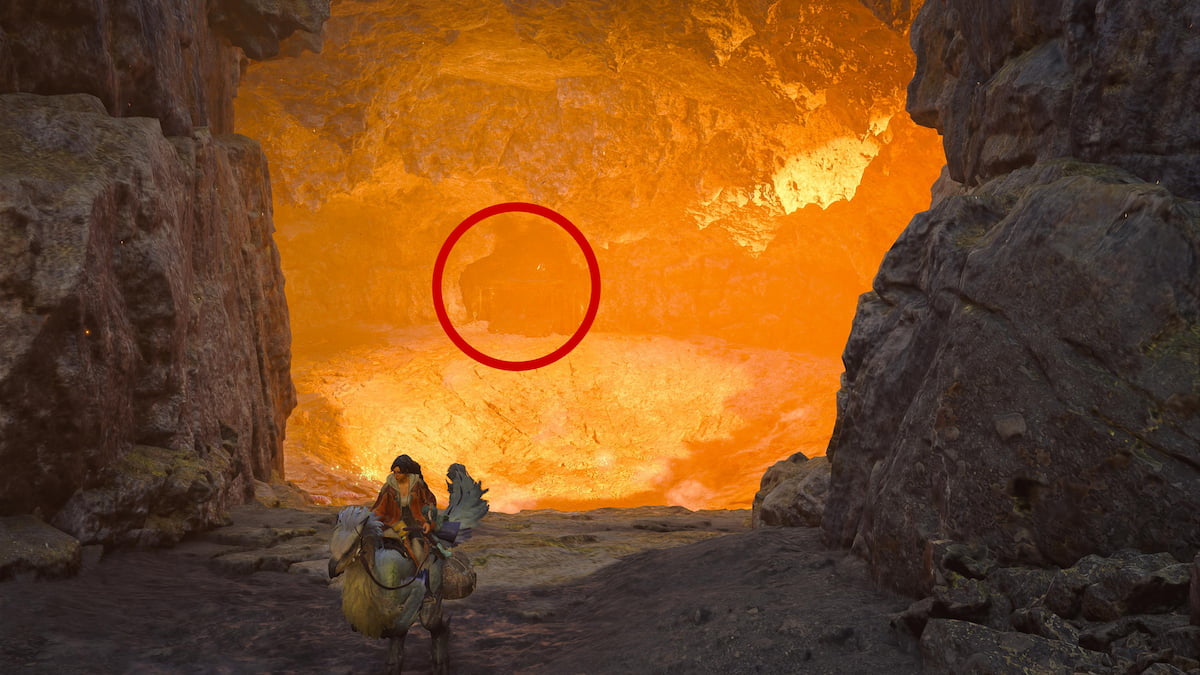
Now, you'll have a straight shot into Zone 15 to go against the Black Flame in Monster Hunter Wilds.
How to defeat Black Flame in MH Wilds
To prepare for the Black Flame fight, take advantage of these weaknesses:
For the most damage, try to attack its mouth with a water-based weapon (you can still utilize the other types if you don't have any). It may be difficult to pinpoint its mouth, so you can opt for its arms for a better shot. You'll have more than enough to work with, as it has six breakable arms.
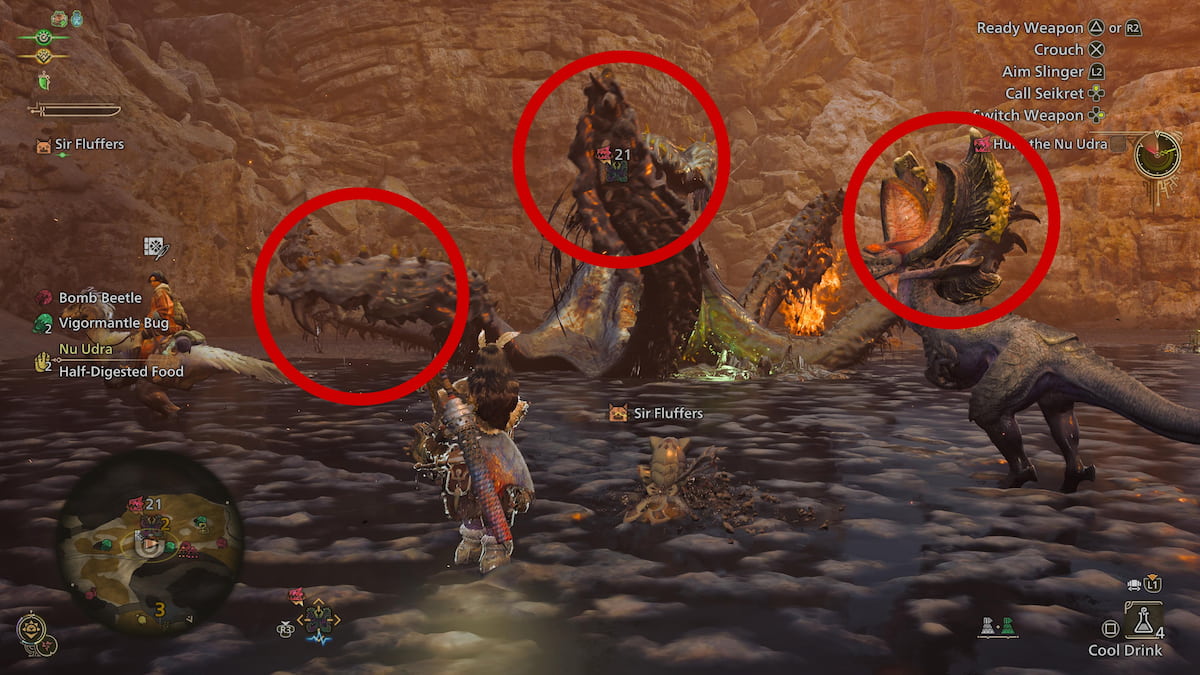
I recommend focusing on the arms first and then attacking the mouth when it's knocked down temporarily. You can also use a Shock Trap to immobilize it for more damage.
All Black Flame movesets
You must watch out for these three moves when going against the Black Flame:
When the Black Flame enters its fiery state, use the Cool Drink to negate its Status Effect. If you don't, your health will start to drop, similar to what happens in Iceshard Cliff's cold environment.
How to collect all Nu Udra parts in MH Wilds
You can sever Nu Udra's six arms and break its head. Target these points and defeat the monster to gather these rewards:
Use the Black Flame's pieces to craft the complete Nu Udra Armor Set. It'll provide you with 26 Defense, the Speed Eating skill, and Resentment skill.

If you need to farm more Nu Udra materials, speak to Alma to participate in the Creeping Flame Optional Quest.
The post How to find The Black Flame in Monster Hunter Wilds appeared first on Destructoid. | |||||||||||||||||||||||||||||||||||||||||||||||||||||||||||||||||||||||||||||||||||||||||||||||||||||||||||||||||||||||||||||||||||
Destructoid Friday, February 28, 2025 2:42 PM
The Naomie Feller Fantasy FC Objective is now live in EA FC 25, and you can complete the tasks to obtain a free promo card.
Like every objective set, this one also has multiple tasks. Every task has a certain condition that you'll need to fulfil in order to complete them. Let's take a look at all the available rewards to unlock as part of the objective set.
EA FC 25 Naomie Feller Fantasy FC objective tasks and rewards
The Naomie Feller Fantasy FC objective has six tasks, and here are their requirements.
To complete the full set, you'll have to play matches in different modes, which can be slightly irritating. However, it's a great card to get for absolutely free of cost. A future evolution should improve the card further, so make sure to complete the objective before it gets removed from Ultimate Team.
The post EA FC 25 Naomie Feller Fantasy FC Objective guide appeared first on Destructoid. | |||||||||||||||||||||||||||||||||||||||||||||||||||||||||||||||||||||||||||||||||||||||||||||||||||||||||||||||||||||||||||||||||||
Destructoid Friday, February 28, 2025 2:14 PM
Part of Fortnite's fun is hopping into any match and jamming out using your favorite instruments. If you like playing the drums, there are jam tracks that'll match the vibe. If you're a guitarist, there are options there, too. Let's find out how to jam at a Named Location.
Table of contents
How to jam at a Named Location in Fortnite
Jamming out at a named location requires visiting any spot on your Fortnite map that has a name before opening your emote wheel and scrolling through your options until you find your jam loops. Pick any you have unlocked and choose an instrument to play your chosen song.
Jam objectives in Fortnite vary depending on the week, season, and event. For example, during Fortnite's Cowboy Bebop collaborative event, you have to jam out for five seconds at any named location. It doesn't matter if you go to Seaport City, Flooded Frogs, or Outlaw Oasis, as long as it's a named POI.
However, this isn't always the case, especially if the task asks you to visit a particular spot. Previous weekly quests have asked you to visit specific locations, as we saw during Fortnite Chapter 5, Season 2's weekly missions. During this, you had to jam out at Restored Reels and Slumberyard's dance floor, two locations that are no longer available. Even though these spots aren't in the game anymore, the ones that do currently exist may appear as a jam task in the future.
How to emote in Fortnite
You can open your emote menu and play jam tracks by pressing B on the keyboard, Down Arrow on consoles, or the Emote button on mobile. From here, you can cycle through the menus until you reach Jam Tracks, giving you a list of every track you've unlocked so far. The songs you use are entirely up to you unless your current quest asks for a specific one.
How to unlock more Jam Tracks in Fortnite
The easiest way to unlock more jam tracks in Fortnite is to purchase the game's Music Pass, Battle Pass, or the Item Shop's Music Moments options. These all require V-Bucks or real money to obtain, but at least you'll have a bunch to use during your matches.
Alternatively, you can get free jam tracks by progressing in limited-time events and collecting their rewards. Although not every event has jam tracks as rewards, you'll occasionally spot them as options alongside loading screen images, pickaxes, gliders, and other items.
The post How to jam for five seconds at a Named Location in Fortnite appeared first on Destructoid. | |||||||||||||||||||||||||||||||||||||||||||||||||||||||||||||||||||||||||||||||||||||||||||||||||||||||||||||||||||||||||||||||||||
Destructoid Friday, February 28, 2025 2:11 PM
The Randal Kolo Muani Fantasy FC SBC is now live in EA FC 25, and you can complete the challenge to unlock a special card.
There are eight tasks to complete if you want to play with this card. Let's take a look at how to complete the challenge without breaking the bank.
EA FC 25 Randal Kolo Muani Fantasy FC SBC tasks
The Randal Kolo Muani Fantasy FC SBC has eight tasks, and here are the requirements.
Task 1 - France
Task 2 - Top Form
Task 3 - Serie A
Task 4 - 87-Rated Squad
Task 5 - 87-Rated Squad
Task 6 - 88-Rated Squad
Task 7 - 88-Rated Squad
Task 8 - 89-Rated Squad
EA FC 25 Randal Kolo Muani Fantasy FC SBC solutions
Here's a set of solutions to complete the latest Fantasy FC SBC in Ultimate Team.
Task 1 - France
Task 2 - Top Form
Task 3 - Serie A
Task 4 - 87-Rated Squad
Task 5 - 87-Rated Squad
Task 6 - 88-Rated Squad
Task 7 - 88-Rated Squad
Task 8 - 89-Rated Squad
If you're someone who relies heavily on speed boost, this card will feel like a dream. The combination of Quick Step+ and First Touch+ can be absolutely broken in the right hands. He also offers 5* Weak Foot, amazing Pace (95) and Shooting (91). He could also receive a fair few set of upgrades in the near future if Juventus performs well in the Serie A, which will certainly make the card better.
This could be another underrated SBC in the long run, just like the Raphinha World Tour SBC which is also available in Ultimate Team.
The post EA FC 25 Randal Kolo Muani Fantasy FC SBC solutions appeared first on Destructoid. | |||||||||||||||||||||||||||||||||||||||||||||||||||||||||||||||||||||||||||||||||||||||||||||||||||||||||||||||||||||||||||||||||||
Destructoid Friday, February 28, 2025 1:44 PM
The Raphinha World Tour SBC is now live in EA FC 25, and you can unlock a special card of the Brazilian attacker in Ultimate Team.
You'll need to complete all the SBC tasks to unlock the card.
EA FC 25 Raphinha World Tour SBC tasks
The Raphinha World Tour SBC has seven tasks, and here are the requirements.
Task 1 - FC Barcelona
Task 2 - Brazil
Task 3 - LaLiga
Task 4 - 87-Rated Squad
Task 5 - Top Form
Task 6 - 88-Rated Squad
Task 7 - 88-Rated Squad
EA FC 25 Raphinha World Tour SBC solutions
Here's a set of solutions to complete the Raphinha World Tour SBC in Ultimate Team.
Task 1 - FC Barcelona
Task 2 - Brazil
Task 3 - LaLiga
Task 4 - 87-Rated Squad
Task 5 - Top Form
Task 6 - 88-Rated Squad
Task 7 - 88-Rated Squad
This well-valued SBC offers a 90-rated item that can play in three different positions. It has 96 Pace, 5* Skills, Rapid+, and Tiki Taka+. He also offers three different roles++, along with excellent Dribbling stats (93). While the Shooting could use a bit of boost, the card looks perfect for the current meta.
If you have a similar budget but want a creative playmaker, the Guti Fantasy Hero SBC offers a fantastic item to unlock.
The post EA FC 25 Raphinha World Tour SBC solutions appeared first on Destructoid. | |||||||||||||||||||||||||||||||||||||||||||||||||||||||||||||||||||||||||||||||||||||||||||||||||||||||||||||||||||||||||||||||||||
Destructoid Friday, February 28, 2025 1:30 PM
Running a business is difficult, but overseeing the operation of a factory on a treacherous alien planet is nearly impossible.
Satisfactory is a first-person base-builder, where your task is to research and develop alien planet Massage-2(AB)b for FICSIT Inc. as a part of Project Assembly. The bases you build in the game are factories that allow you to mine the planet's resources, refine them, and send them back to FICSIT through the space elevator.
Explore the game's open-world map for mining locations guarded by local wildlife and power your machinery with a biomass generator using the planet's flora. Upgrade from a small factory operation into a massive, sprawling plant that expands through Satisfactory's four unique biomes.
While Satisfactory's base gameplay loop provides a nearly limitless experience for its players, there's an option that gives you greater control over the game if you desire. Through console commands, players can alter in-game settings and become privy to information they couldn't know otherwise.
How to use console commands in Satisfactory 1.0
Here's the complete list of all the console commands in Satisfactory's 1.0 build.
Non-debug commands
Non-debug commands are used to change Satisfactory's graphical and aesthetic settings.
Debug Commands
Debug commands allow players to access more advanced information about game mechanics and elements.
The post Satisfactory 1.0: complete console commands and cheats list appeared first on Destructoid. | |||||||||||||||||||||||||||||||||||||||||||||||||||||||||||||||||||||||||||||||||||||||||||||||||||||||||||||||||||||||||||||||||||
Destructoid Friday, February 28, 2025 1:22 PM
The Bench Boost Evolution is now live in EA FC 25, and you can upgrade one of your lower-rated items with this free option.
For a free evolution, the latest release is pretty nice. It offers a good set of stat boosts for you to utilize, along with Skill Moves and Weak Foot upgrades. Let's take a look at all the requirements, followed by the best players to use in it.
EA FC 25 Bench Boost Evolution requirements
Here are the requirements of the Bench Boost Evolution in EA FC 25.
EA FC 25 Bench Boost Evolution upgrades
There are two levels of upgrades, and here are the required conditions.
Upgrade level 1
Upgrade level 2
Upgrade level 1 requirements
Upgrade level 2 requirements
Best players to use in EA FC 25 Bench Boost Evolution
There are over 10,000 available options, and here are some cards you can consider.
These are some of the best cards you can use to complete this evolution.
The post EA FC 25 Bench Boost Evolution: Best players to use appeared first on Destructoid. | |||||||||||||||||||||||||||||||||||||||||||||||||||||||||||||||||||||||||||||||||||||||||||||||||||||||||||||||||||||||||||||||||||
Destructoid Friday, February 28, 2025 1:10 PM
The Aqua Sac is a crucial resource in Monster Hunter Wilds, serving as a gateway to much-needed upgrades. Since there are a couple of ways to get this material, we'll explain how it works.
Table of contents
Best Aqua Sac farming methods in MH Wilds
To get Aqua Sacs in Monster Hunter Wilds, you must complete specific quests or eliminate monsters in the wilds. Unfortunately, there isn't a way to gather them through exploration, which differs from Crafting Materials. You'll have to participate in a monster battle no matter what since it is the only way to get them. If you're curious to see which ones drop Aqua Sacs, here's what you need to look for.

All MH Wilds quests with Aqua Sac rewards
During the beginning stages of the game, you'll have plenty of opportunities to farm Aqua Sacs. You'll encounter them initially through the main campaign's Assignments, which can only be played once. However, you can play the Optional Quests version of it to play them as often as you want.
All Monsters that drop Aqua Sacs
As you may have guessed from the Aqua Sac compatible quests, the Balahara and Uth Duna are the two monsters that drop this particular material. While the Balahara lingers in the Windward Plains, the Uth Duna can be found in Scarlet Forest. Check your map to see if one of the monsters has spawned into their habitat.

If you need some help with these monster showdowns, let's dive into the Balahara and Uth Duna's weaknesses:
Luckily, both monsters have the same weakness to the thunder element, so use any weapons with this buff to eliminate them quickly.
How to use Aqua Sacs in Monster Hunter Wilds
Use the Aqua Sac with the following weapon and armor upgrades:
If you want to obtain the most powerful tools in the Balahara Weapon Tree, you must unlock the first tier. For example, those who combine the Balahara Scale, Balahara Skull, and Aqua Sac can acquire the Balahara Horn I. Other weapons use a similar approach, but a few don't have this specific Weapon Tree.

Besides the weaponry, the Aqua Sac is a significant resource for the Balahara outfit, one of the best starting armor sets. Though, you may need to take down the Balahara a few times to gather all the materials for this robust Monster Hunter Wilds Hunter armor.
The post How to find and farm Aqua Sac in Monster Hunter Wilds appeared first on Destructoid. | |||||||||||||||||||||||||||||||||||||||||||||||||||||||||||||||||||||||||||||||||||||||||||||||||||||||||||||||||||||||||||||||||||
Destructoid Friday, February 28, 2025 1:01 PM
The Monster Hunter series has been running since 2004, with six main series games and 21 spinoffs or derivations.
All main series Monster Hunter games are action RPGs that follow the same core formula: slay monsters, gather materials, forge stronger gear, hunt even tougher monsters, and repeat. If you've played a Monster Hunter game before, you know the drill.
Here's a complete list of every Monster Hunter game ever released, sorted by release date.
Monster Hunter games: Complete release timeline
The table below includes every Monster Hunter title listed in chronological order.
All main series Monster Hunter games' review scores
Here's how each Monster Hunter main series title was reviewed when it released, according to Metacritic. Main series titles feature the core Monster Hunter original gameplay while being a complete game with new mechanics, challenges, and features.
The post All Monster Hunter games in order of release appeared first on Destructoid. |

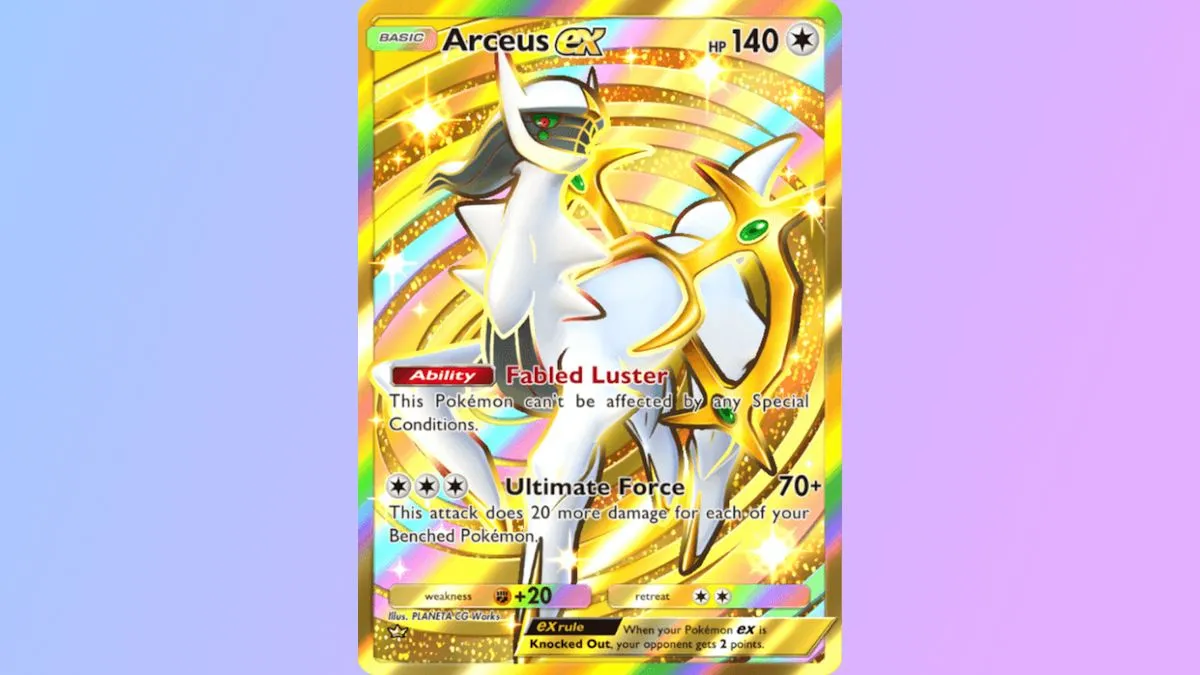
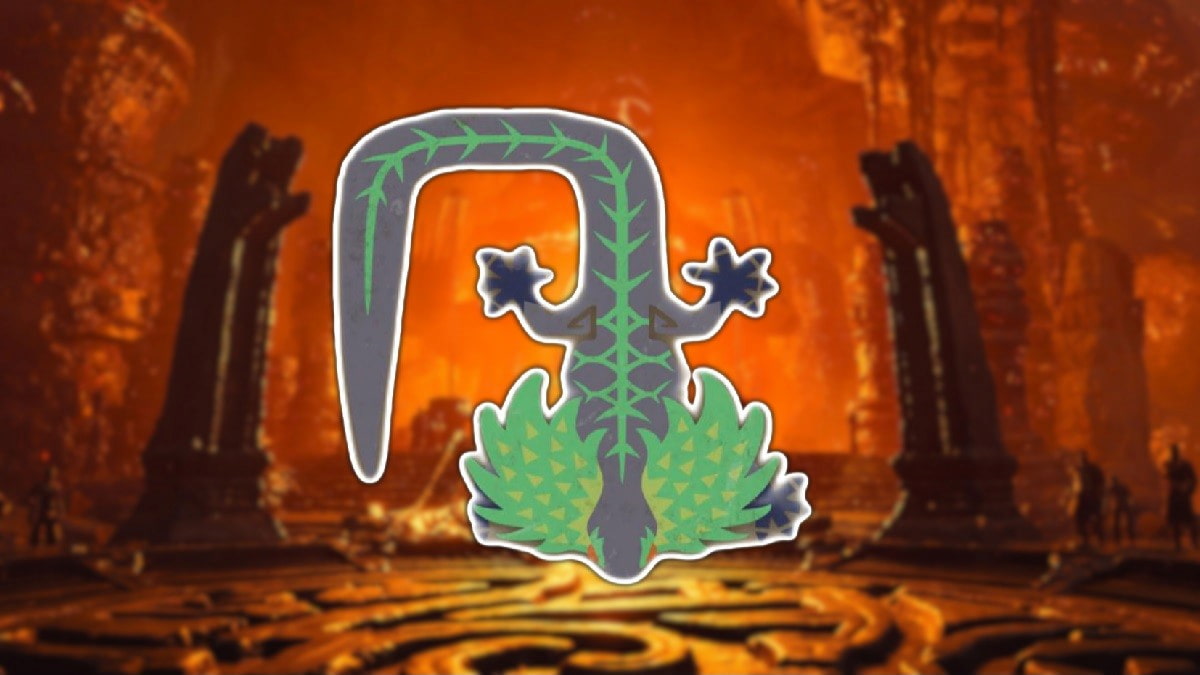
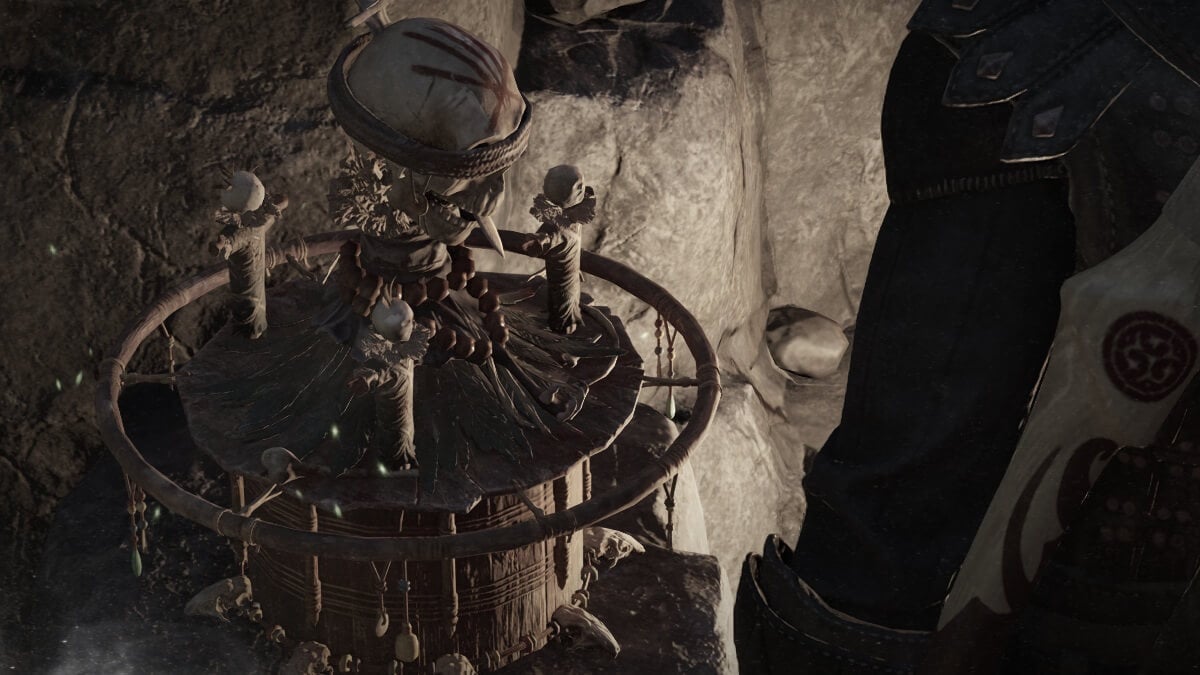

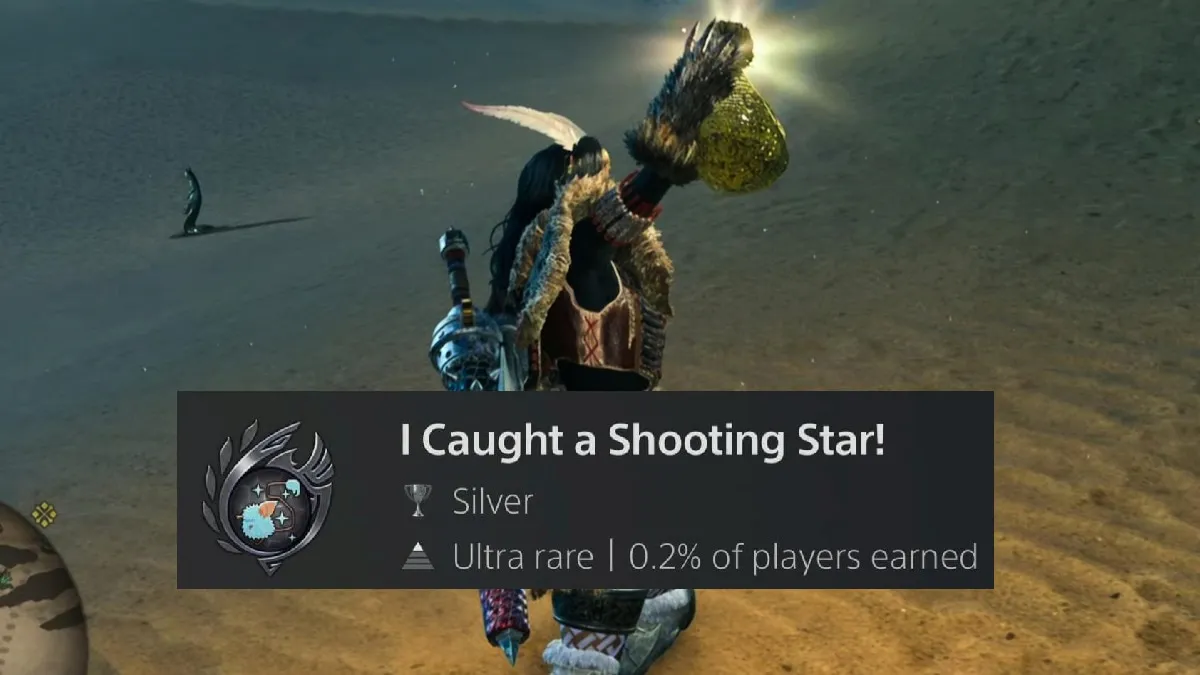
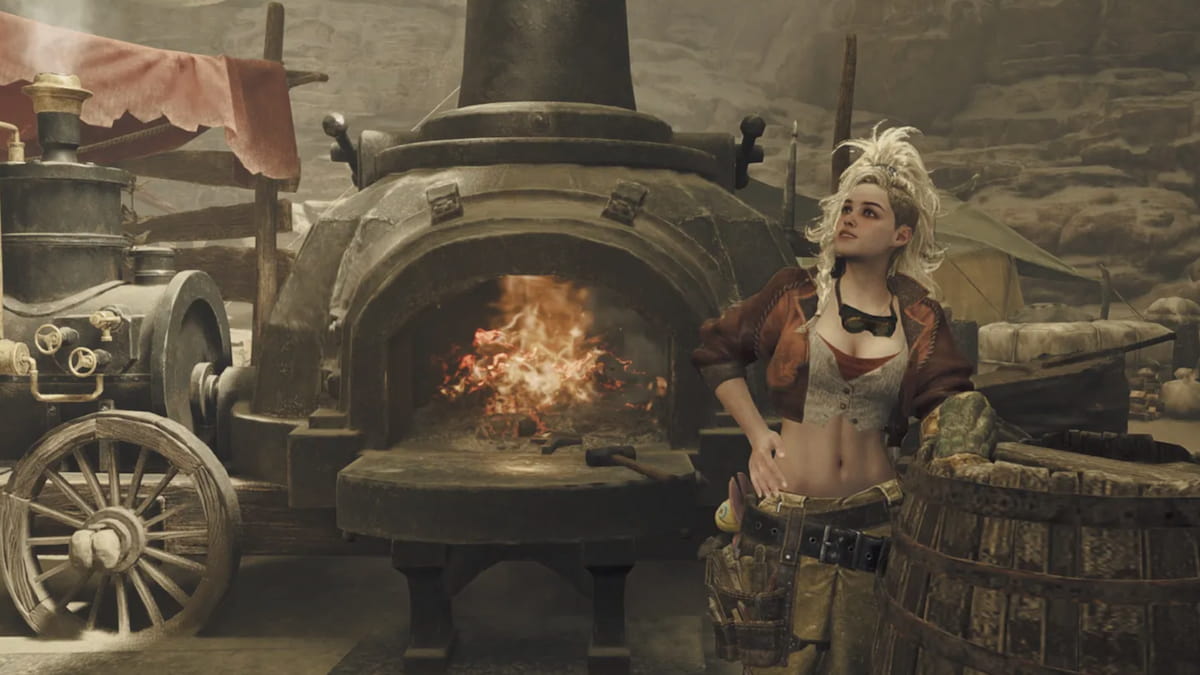
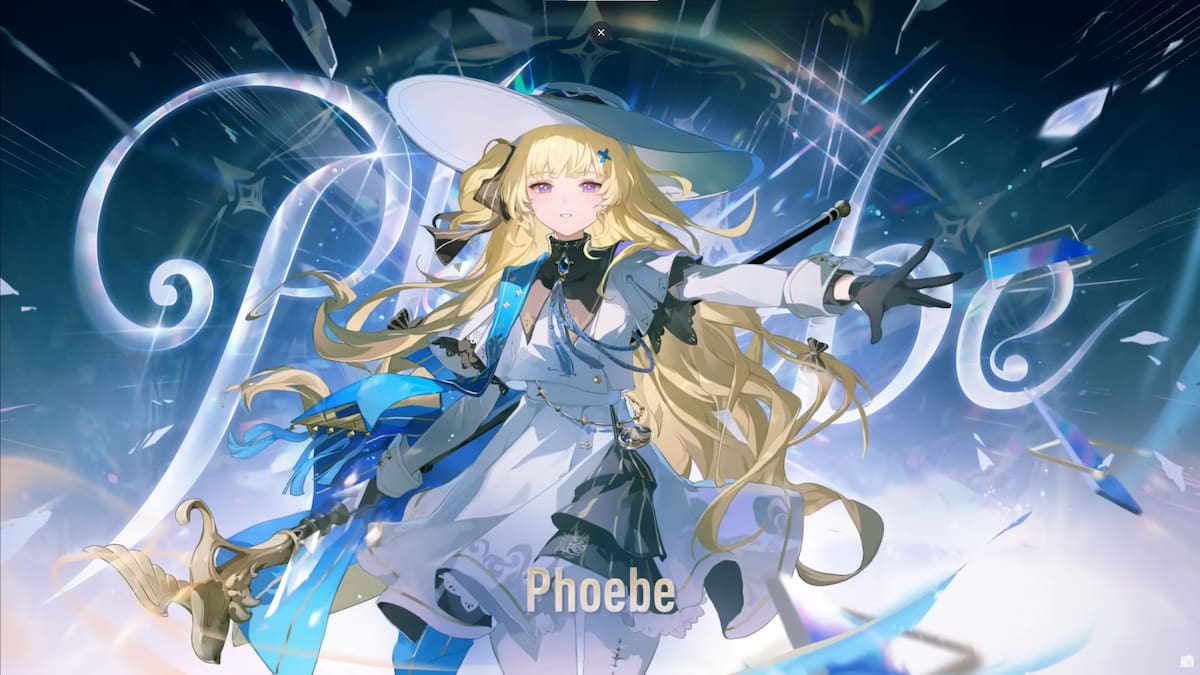
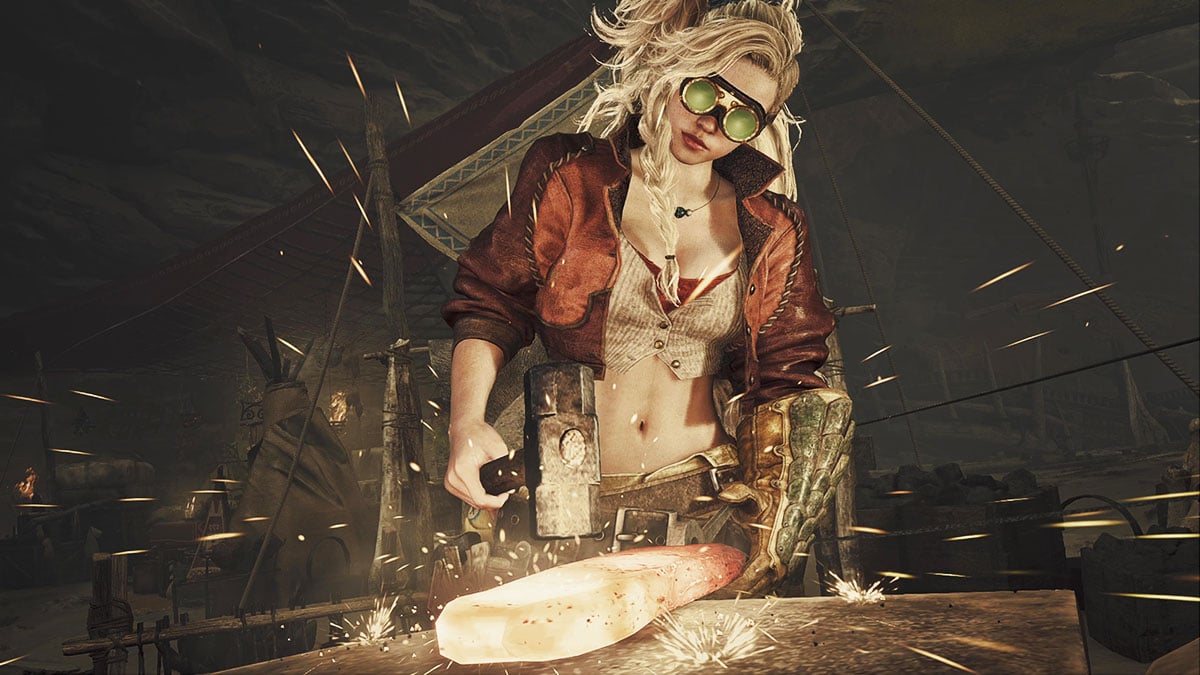
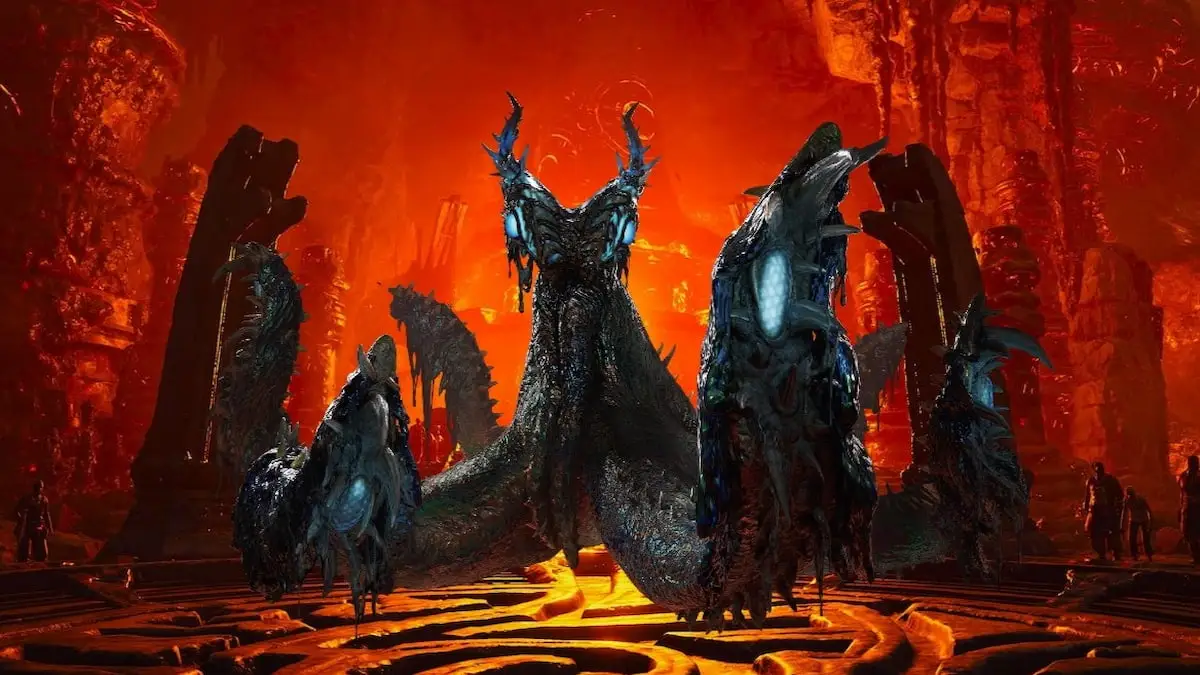

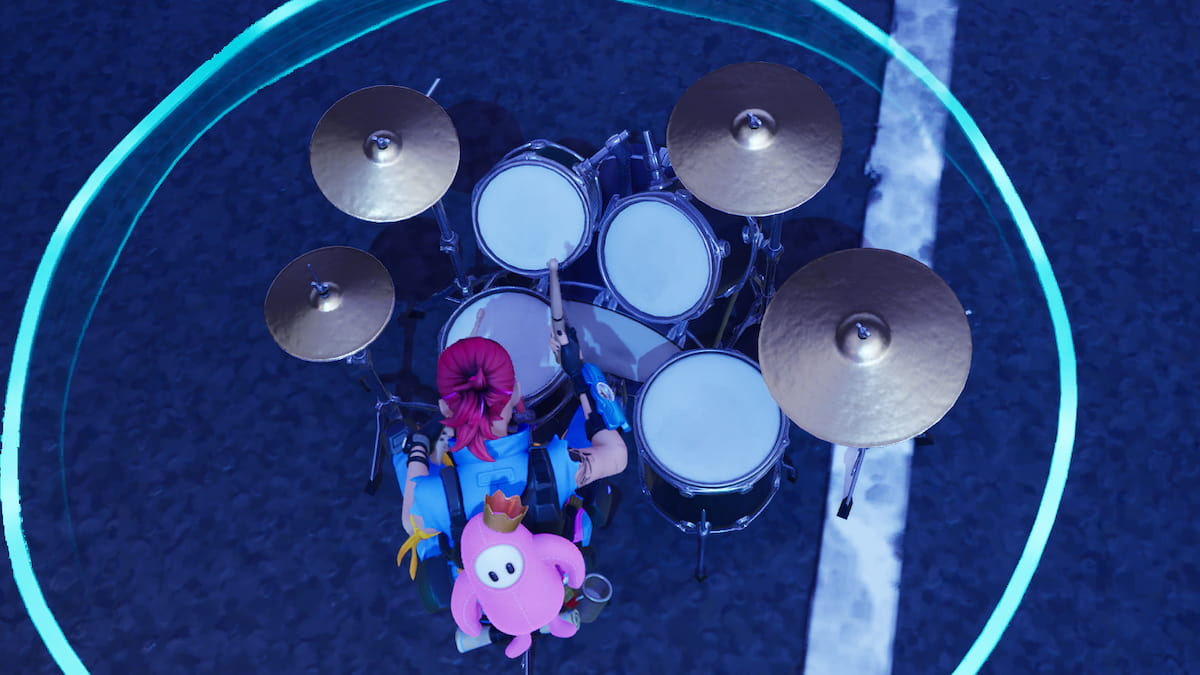


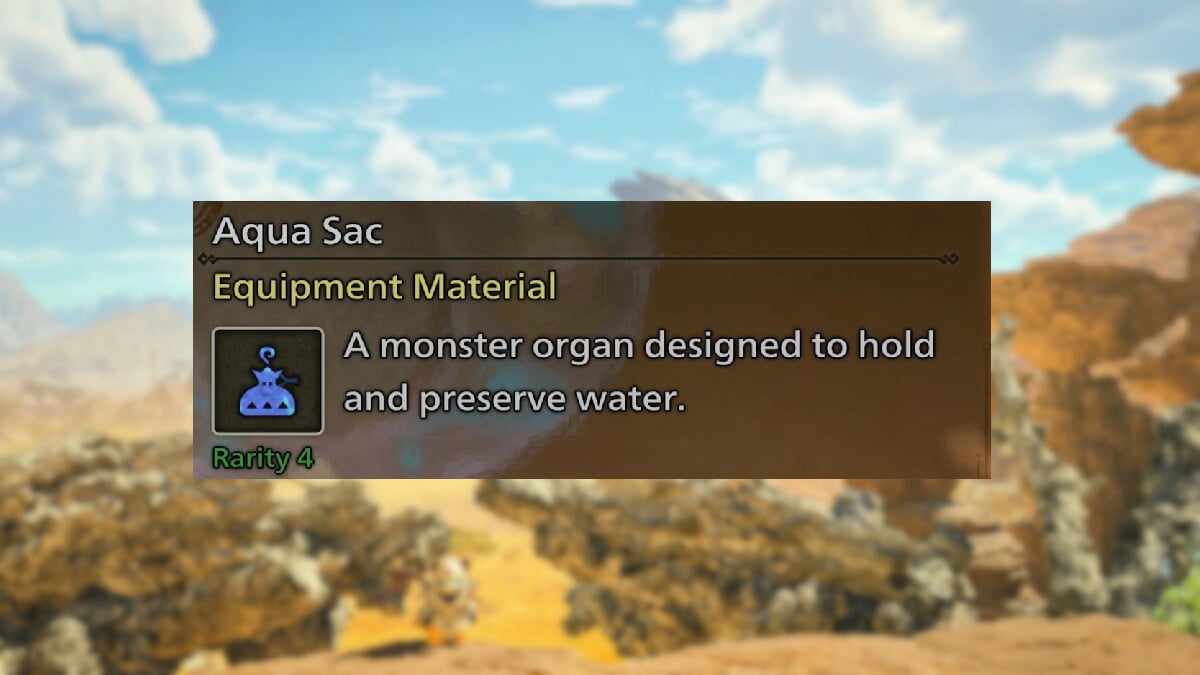

Gaming Instincts – Next-Generation of Video Game Journalism Friday, February 28, 2025 6:16 PM A trailer was also released. The post Terminator 2D: NO FATE Announced for PC and Consoles appeared first on Gaming Instincts - Next-Generation of Video Game Journalism. |
Gaming Instincts – Next-Generation of Video Game Journalism Friday, February 28, 2025 5:49 PM A trailer was also released. The post Action Adventure Game Blades of Fire Announced For PC and Consoles appeared first on Gaming Instincts - Next-Generation of Video Game Journalism. |
Gaming Instincts – Next-Generation of Video Game Journalism Friday, February 28, 2025 5:31 PM A trailer was also released. The post Zenless Zone Zero version 1.6 Update Release Date Announced appeared first on Gaming Instincts - Next-Generation of Video Game Journalism. |
Gaming Instincts – Next-Generation of Video Game Journalism Friday, February 28, 2025 5:07 PM According to SteamDB. The post Monster Hunter Wilds Crosses 1.3 Million Concurrent Steam Players appeared first on Gaming Instincts - Next-Generation of Video Game Journalism. |