GamersHeroes Wednesday, March 19, 2025 10:20 PM An officially licensed MLB game complete with lifelike stadiums, real MLB players, and high-quality graphics, Com2Us' MLB RIVALS is now available for the PC via Steam and mobile devices - complete with a massive 2025 season update. The post MLB RIVALS Now Available With Massive 2025 Season Update appeared first on GamersHeroes. |
GamersHeroes Wednesday, March 19, 2025 9:44 PM This summer's Fire & Ice RGX 2025 is playing with power - Nintendo Power! - with the Art of Nintendo Power special museum display by the Interactive Art Collection Inc. The post The Art of Nintendo Power Special Museum Display to Appear at Fire & Ice RGX 2025 appeared first on GamersHeroes. |
Twinfinite Thursday, March 20, 2025 3:32 AM  |
Twinfinite Thursday, March 20, 2025 3:30 AM  |
Twinfinite Thursday, March 20, 2025 3:18 AM  |
Twinfinite Thursday, March 20, 2025 3:00 AM  |
Destructoid Thursday, March 20, 2025 12:10 AM
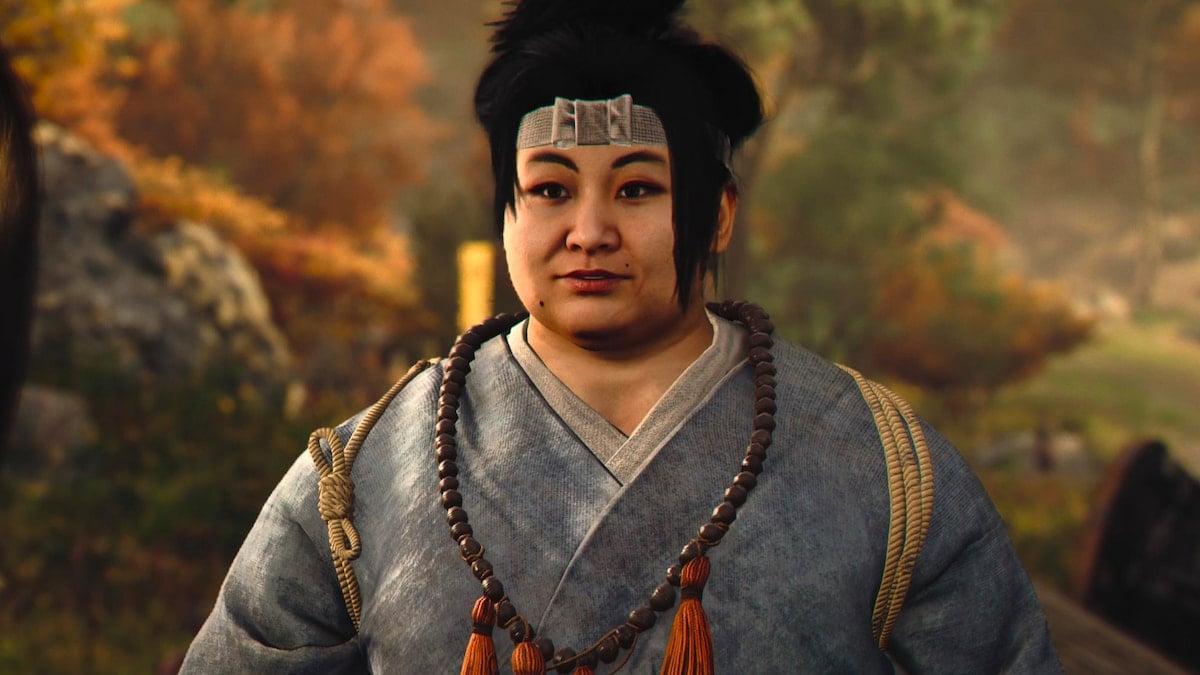
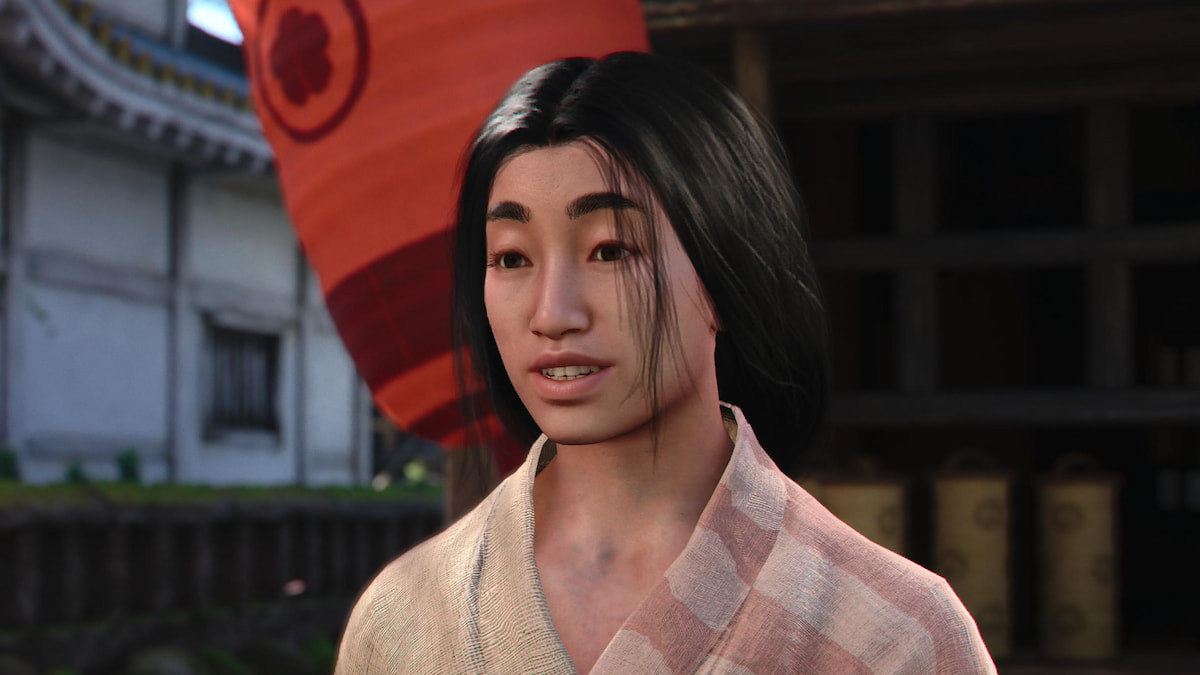
While on Naoe's quest for revenge, you'll have the chance to add powerful allies to your journey. Yaya will be one of the first ones you'll encounter, but you must make the right decisions to get her to join your group. Find out how to recruit Yaya in Assassin's Creed Shadows.
How do you recruit Yaya in AC: Shadows?
You can meet up with Yaya during the Fatherless Monk quest, which is a part of Wada Koretake's storyline (The Onryo section). After eliminating this boss in the Heads Will Roll mission, you must choose specific dialogue points when Yaya is involved. These instances will occur three times, and it's essential to get them right at least twice (it's fine if you make a mistake once). Here are the dialogue options you need to select for Yaya's recruitment in AC: Shadows (shown in bold):
Yaya is all about keeping the peace, so it's best to take the non-violent route. If you choose to spare the people in Heads Will Roll, she will ultimately respect this decision, positively influencing her relationship with you. However, you'll need to continue on this peaceful path in the following quest: Stray Dog.
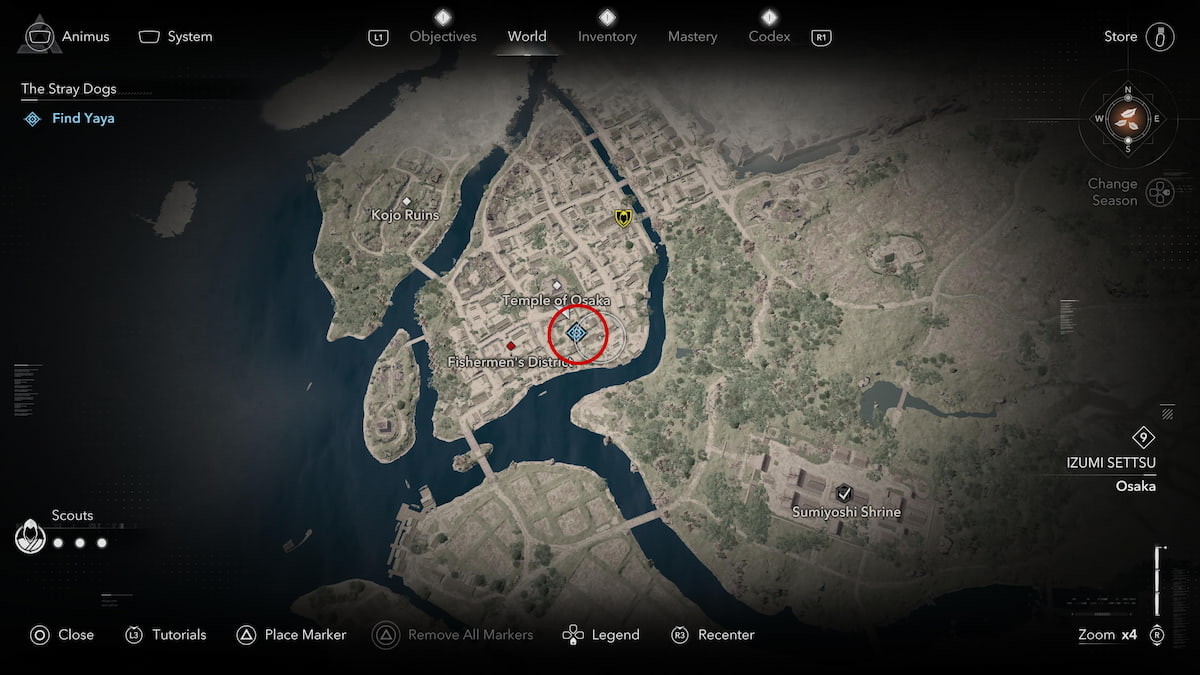
Track the Stray Dog mission on the League Objectives board, which will take you to Osaka in the Izumi Settsu region. Travel south of Osaka Temple and help Yaya take down some foes. You'll encounter a similar choice to Heads Will Roll, where you must decide the fate of an enemy. Choose to forgive him, and Yaya will be more pleased with your answer.
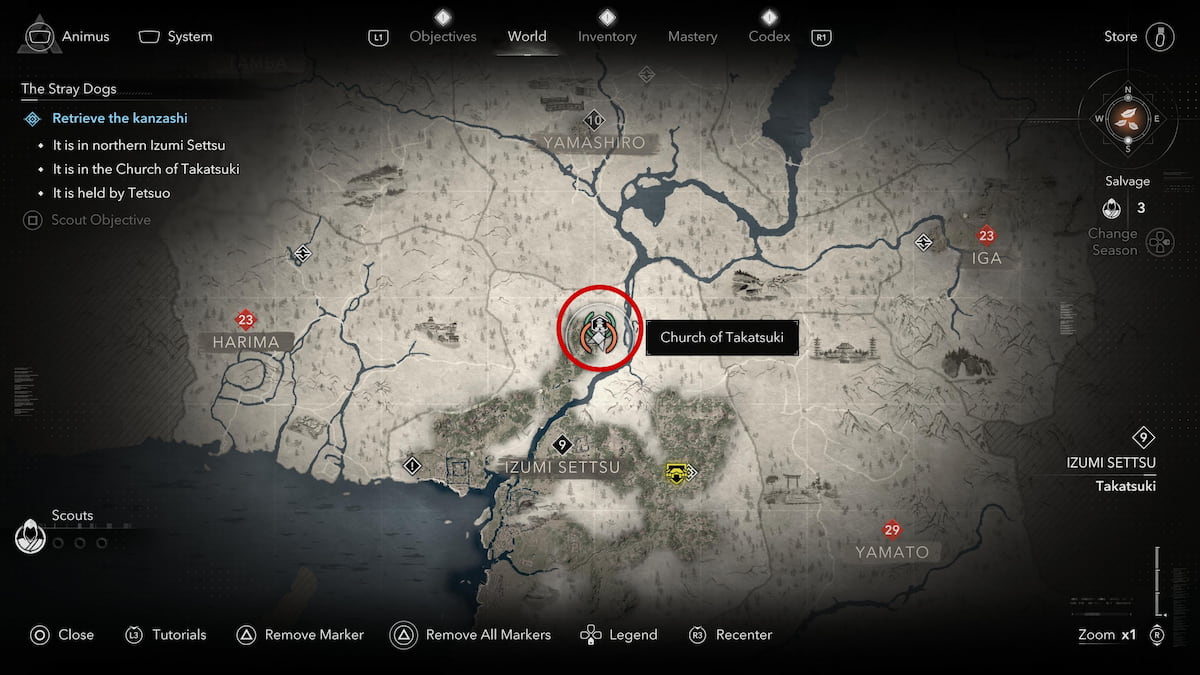
After selecting this choice, follow Yaya and retrieve the Kanzashi at the Church of Takatsuki. Speak to Tetsuo to progress further in this quest. Although he'll run away from you, Yaya will help you out and chase him down. Stick to the path of forgiveness, and you'll finally get to ask Yaya to join your group.
If you've chosen two of the three dialogue choices mentioned above, she'll be added to your Hideout, letting you call on her to tackle and knock out opponents. Otherwise, she will flat-out refuse your proposal, restricting you from using her in battle. I tried to see if there was a way to recruit her after her rejection, and there seemed to be no way to change. You may need to use a previous save file before you make those decisions.
The post How to recruit Yaya in Assassin's Creed Shadows appeared first on Destructoid. | ||||||||||||||||||||||||||||||||||||||||||||||||||||||||||||||||||||||||||||||||
Destructoid Thursday, March 20, 2025 12:09 AM
Almost every major location in Assassin's Creed Shadows holds a random event. One such occurrence can happen in Sakai, where a man asks you to solve a riddle. Find out what the correct answer is.
What is the correct answer to the man's riddle in Assassin's Creed Shadows?
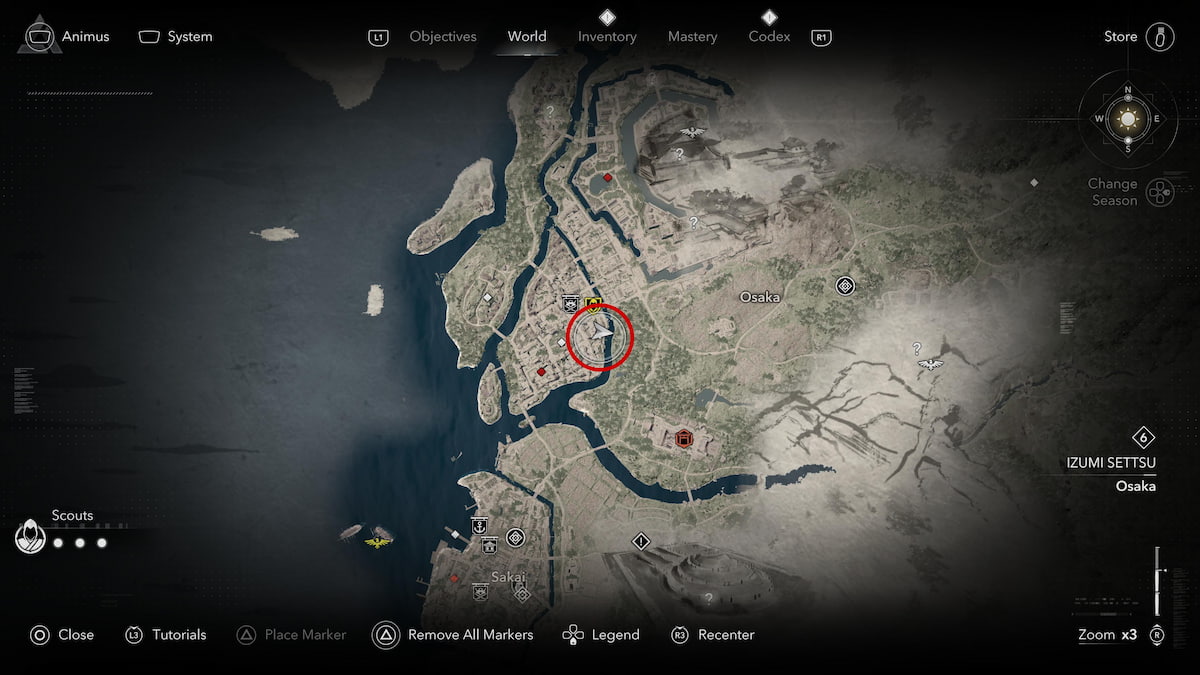
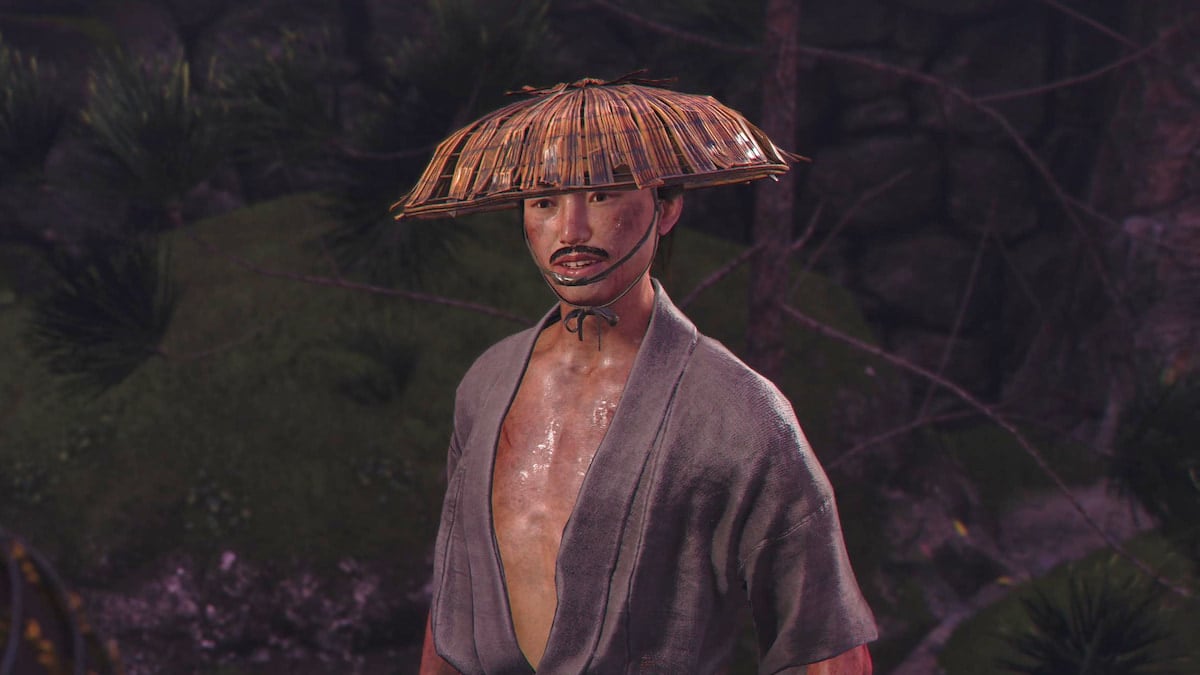
While roaming Sakai in Izumi Settsu, you may encounter a man near the Kakurega. You must wager 50 Mon to start the riddle challenge, where he will also wager 50 Mon. He'll then give you the riddle: "I am sucked in from the bottom and let out from the mouth. What am I?" The correct answer is, "Is it tobacco smoke?"

If you had chosen burp, he would've told you it doesn't originate from the mouth, while the evil spirit choice correlates more to the Kappa. However, tobacco smoke fits the bill, where the man will express his disappointment in your correct answer.
Should you let the riddle man keep the Mon or tell him 'I want my Mon"?
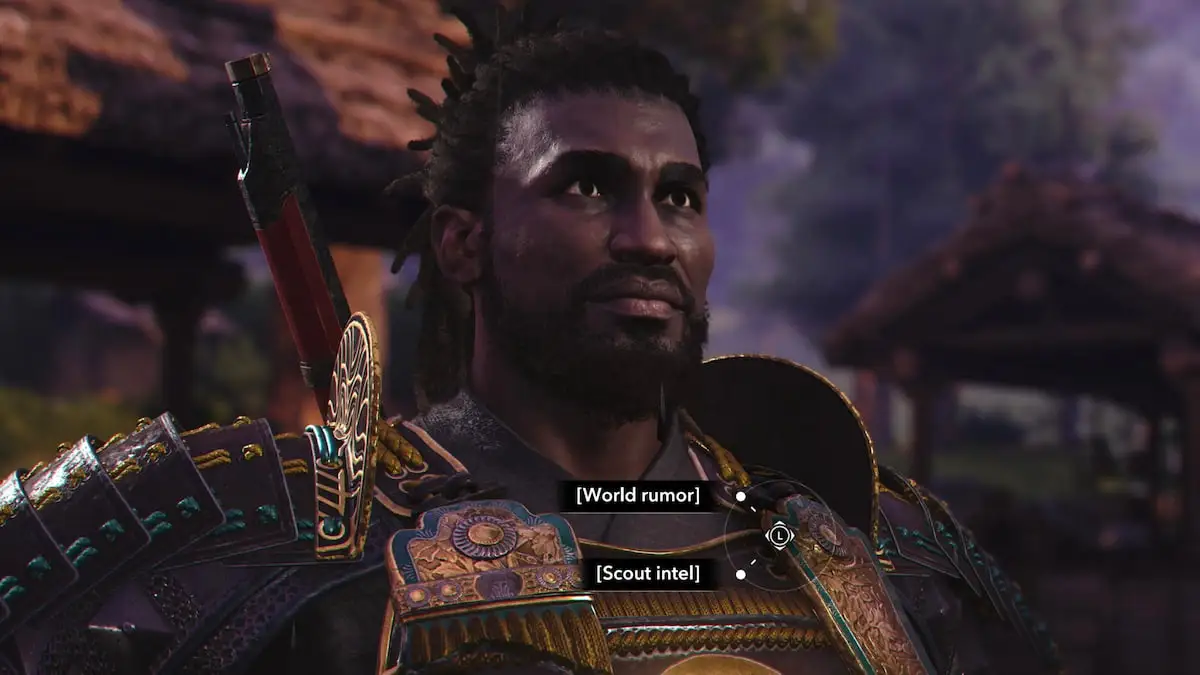
Even with the right answer, you'll still face another conundrum as the man explains how he needs the money for his family. If you choose 'I want my Mon,' you'll gain 100 Mon. But, if you let him keep it, he'll provide you with Scout Intel or a World Rumor. Since it's relatively easy to earn money in Assassin's Creed Shadows, it's best to let him keep it.

When faced with the choice between Scout Intel and World Rumor, remember that both are invaluable for knowledge gathering. The Scout Intel is particularly useful when your Scout meter is depleted, while the World Rumor can save you precious time by pinpointing a unique point of interest on the map. There's not necessarily a wrong choice here, so choose the one that better suits your needs.
As you progress through your Assassin's Creed Shadows playthrough, be prepared for more intriguing riddle situations like the one in Sakai. While I've only encountered this one so far, the randomness of these events means you could stumble upon this man or other NPCs elsewhere.
The post AC Shadows Riddle answer: What sucks in from the bottom and lets out from the mouth? appeared first on Destructoid. | ||||||||||||||||||||||||||||||||||||||||||||||||||||||||||||||||||||||||||||||||
Destructoid Thursday, March 20, 2025 12:09 AM
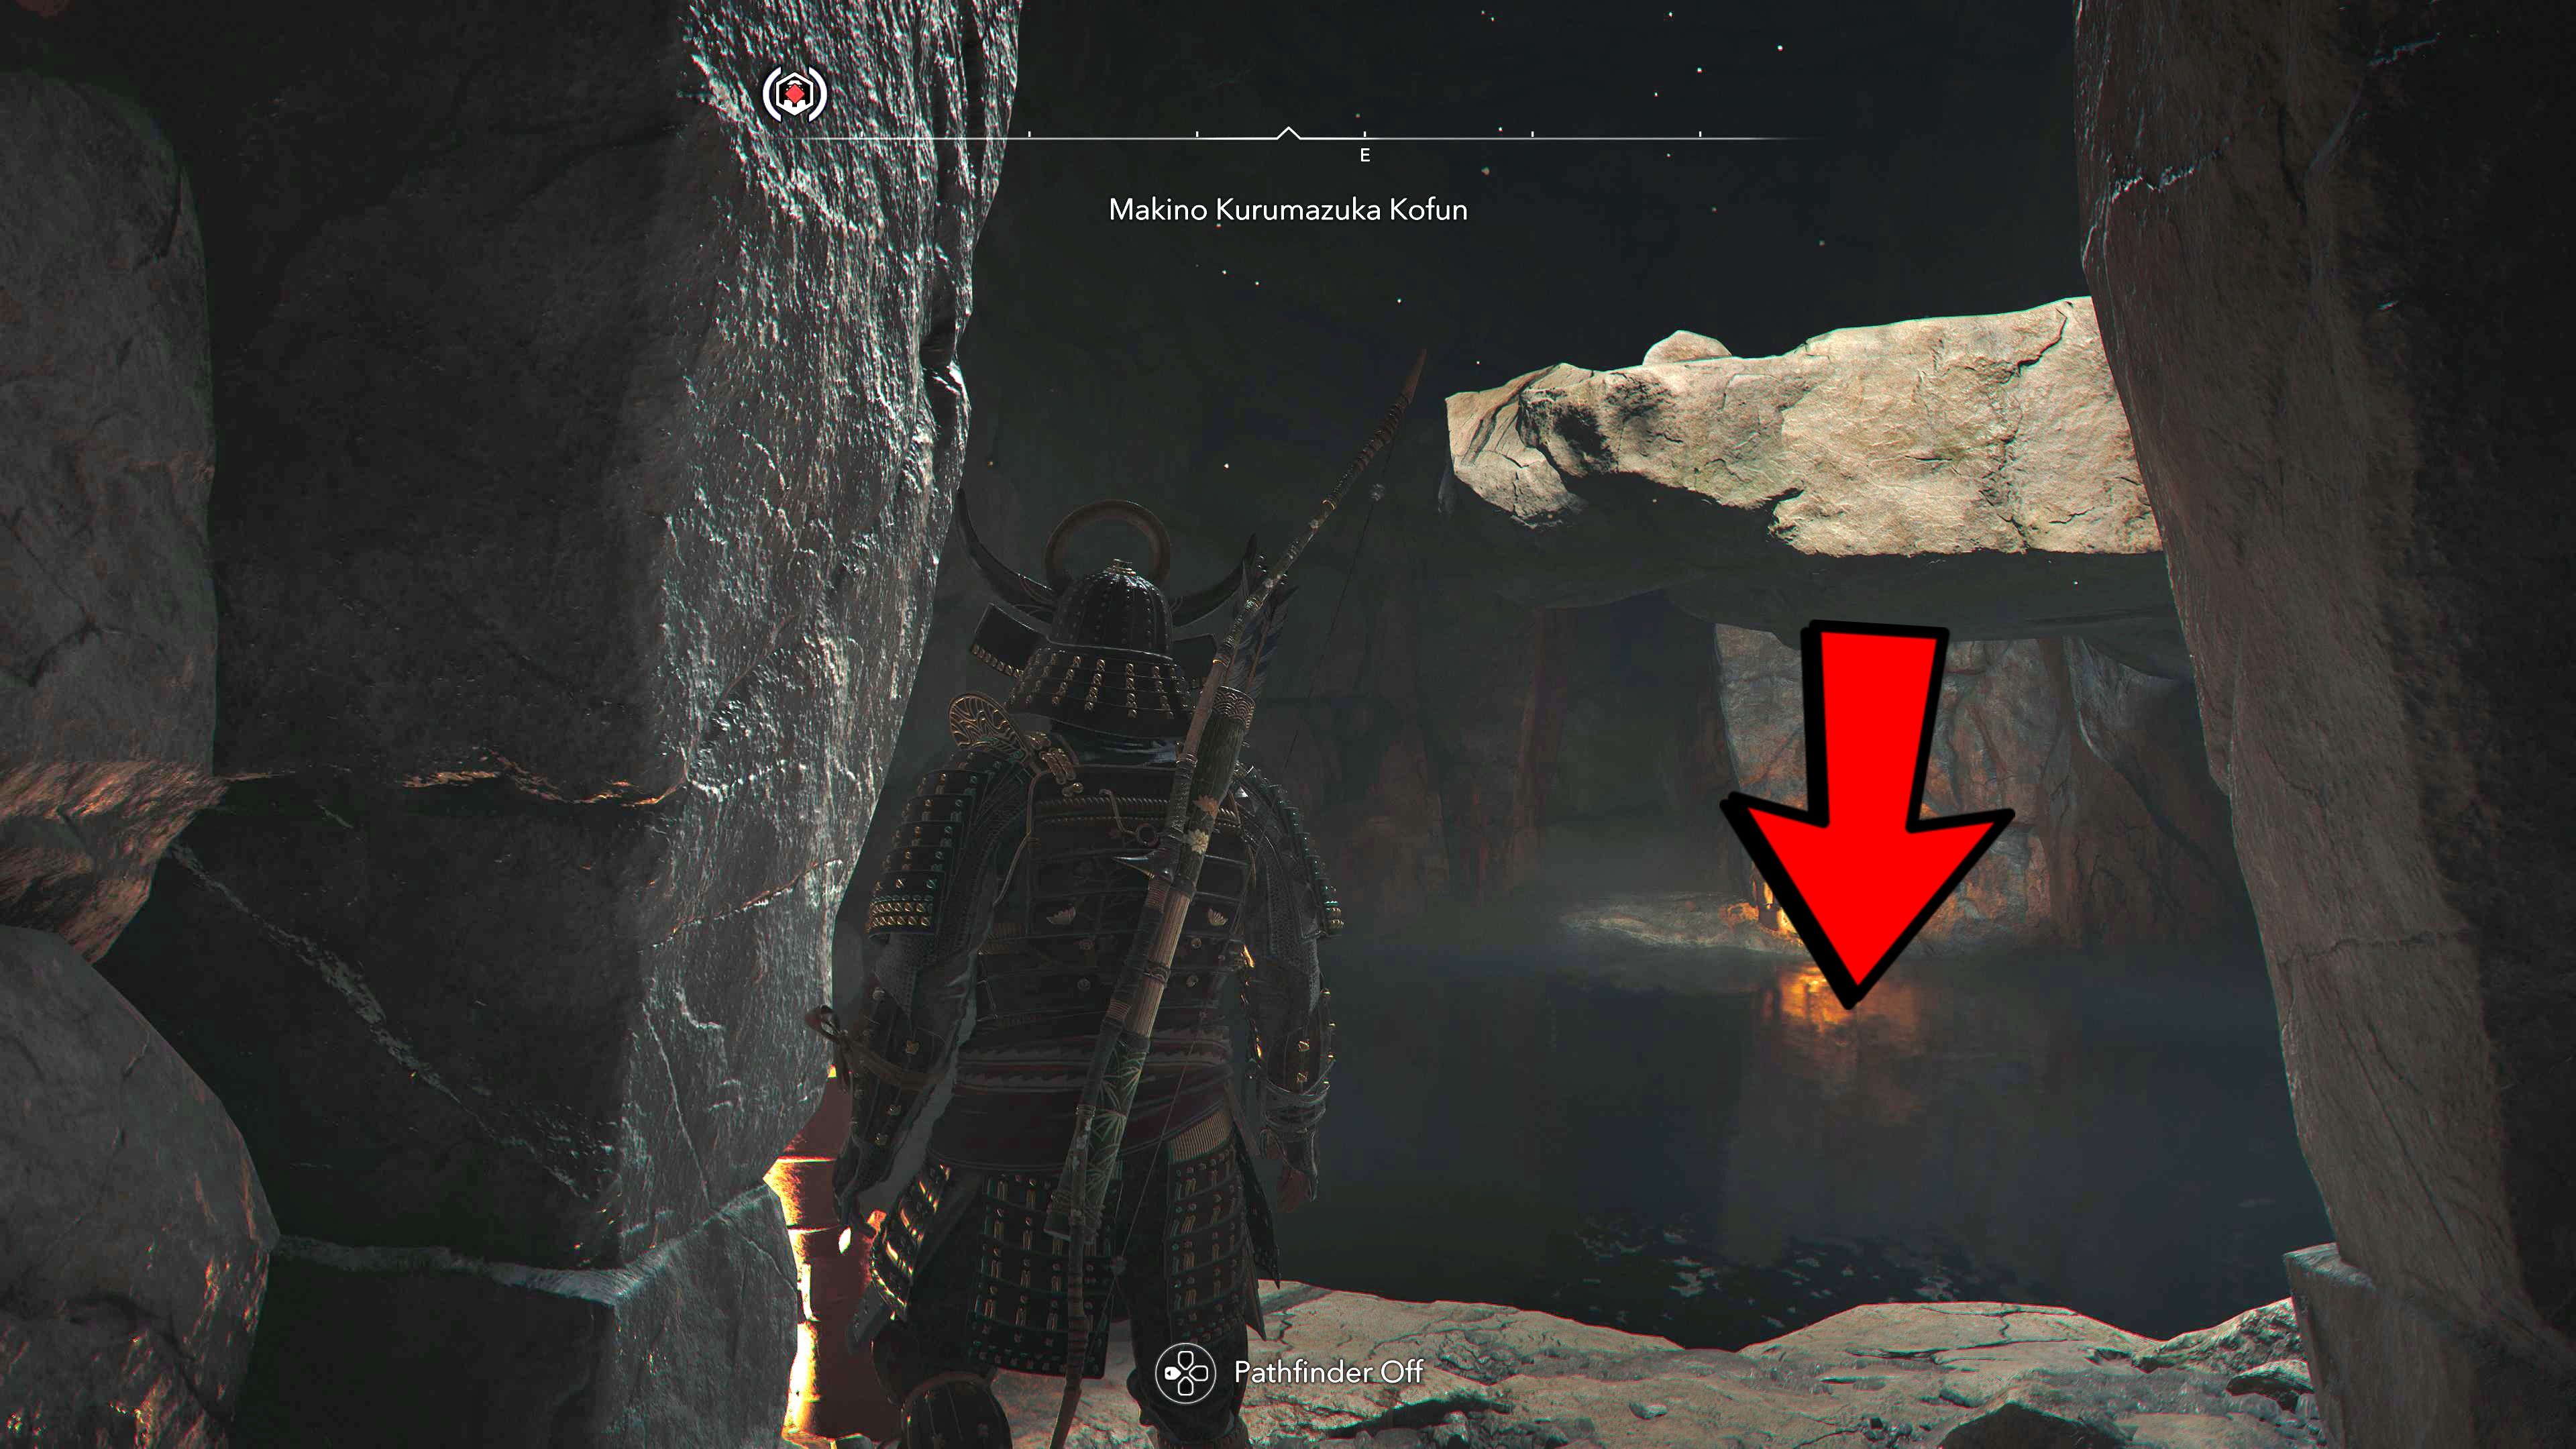
While roaming around Izumi Settsu, you may have stumbled upon a rumor about a mysterious Kofun. But, once you reach this tomb, the entrance is completely blocked off. We're here to show you how to unlock and solve the Makino Kurumazuka Kofun puzzle in Assassin's Creed Shadows.
Table of contents
Where to find Makino Kurumazuka Kofun in AC: Shadows
The Makino Kurumazuka Kofun can be found on the northern side of Izumi Settsu, above the Yawata Plains. A rumor from a villager can point you in this direction, or you can discover it yourself from standard exploration.

At the top of the hill, you'll find a set of stairs leading into the Kofun, with rocks blocking the entrance. Fortunately, no enemies are lingering here, so you can explore it freely.
How to unlock Makino Kurumazuka Kofun
To open the Makino Kurumazuka Kofun in AC: Shadows, switch to Yasuke. He harnesses the ability to carry explosives (items with a target), differing from Naoe, who doesn't have this skill set.


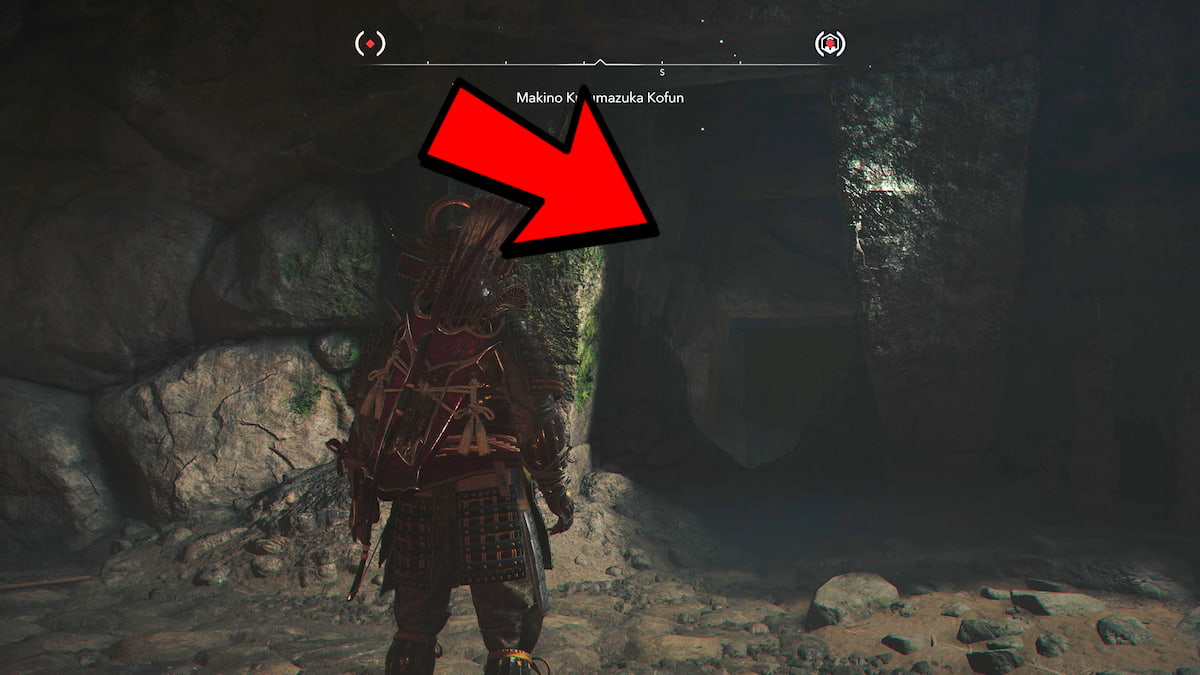
Look for the explosive at the top of the stairs and carry it to the blocked entryway. Then, step back a little to shoot this item with Yasuke's bow or teppo. The entrance should now be accessible once you've performed this attack. If it doesn't work, you can return up the stairs and try again with the second bomb.
How to get all chests in Makino Kurumazuka Kofun
The goal here is to explore the Kofun for valuables, all leading to the Legendary Chest at the end. We'll break down each location to get all the rewards in the Makino Kurumazuka Kofun.
Chest location #1
Once you use the stairs near the entrance, you'll find one small chest at the bottom. It'll be easy to uncover, but the rest are more challenging to locate.
Chest location #2
Look to the right of the first chest to locate a wooden structure. Move it to create a new pathway. If you're having difficulty navigating the darkness, light up any candles on this route. Continue to move more wooden structures out of the way, and you should encounter another rocky entrance. Repeat the procedure of using the nearby explosives to clear the path.

You'll end up back in one of the spots you were at earlier, but now you can use the second bomb to destroy the blocked entrance above.

Travel through this entryway and take a left at the crossroads to uncover a chest of resources at the end of the path.

Chest location #3
Return to the crossroads and take a right this time. Continue down this route, and you'll eventually reach a body of water. Dive down to open a chest on the right side.
Chest location #4
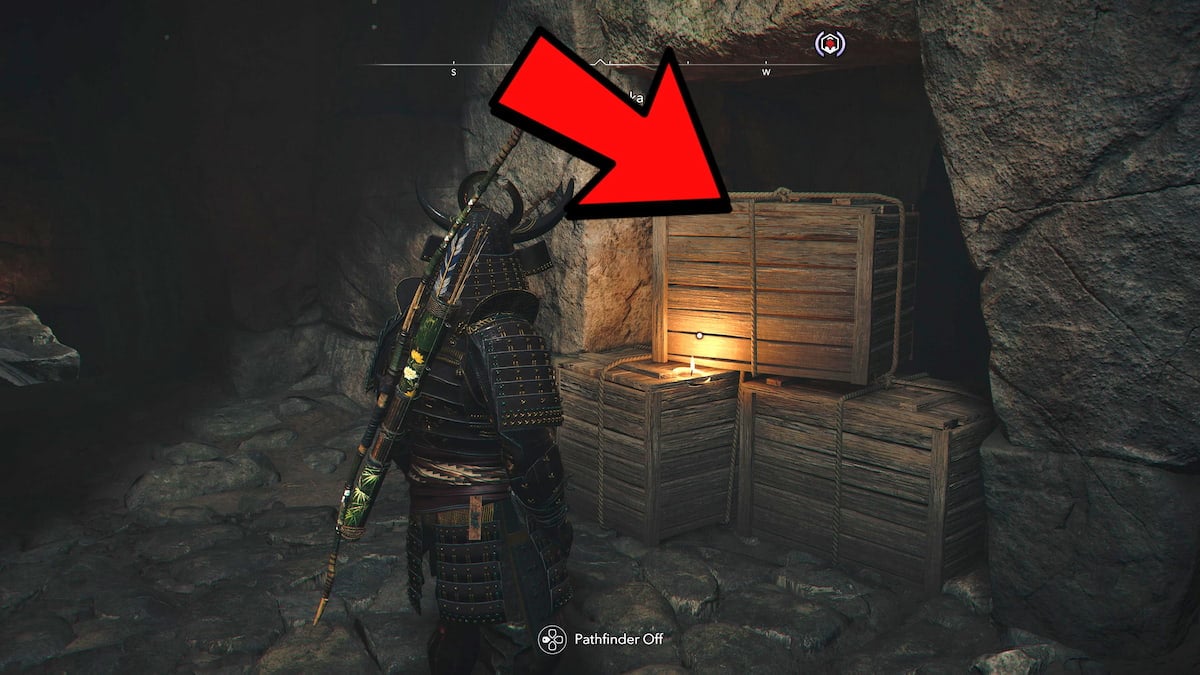
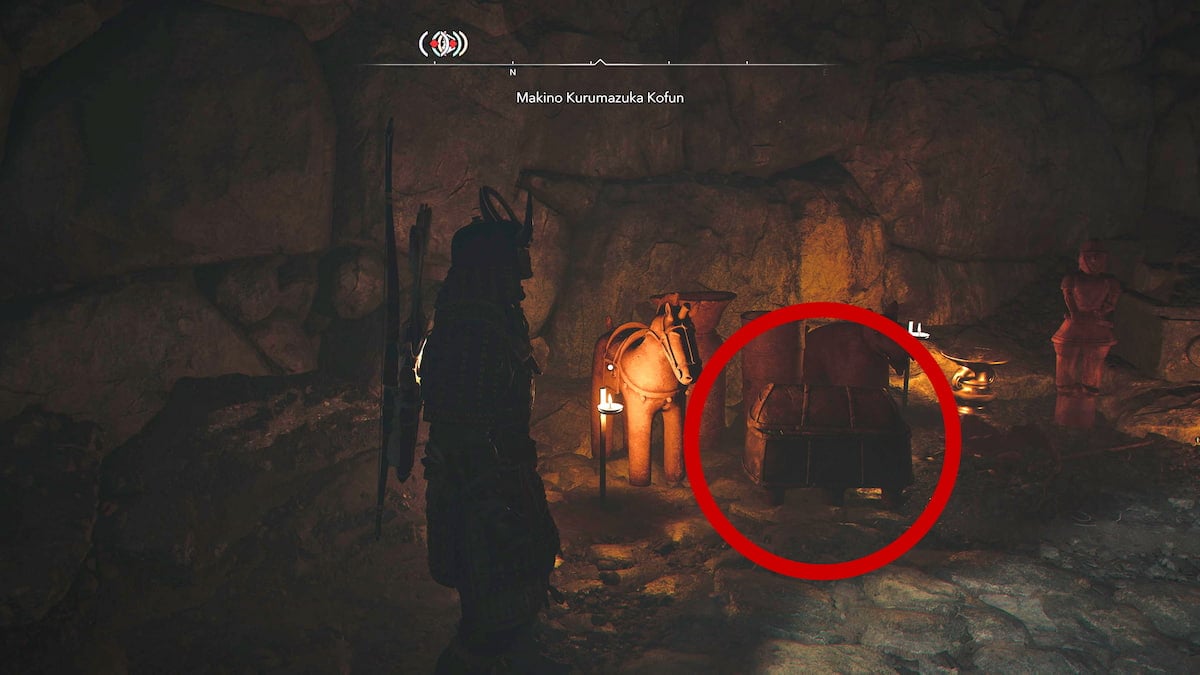
Swim across to the other side (at the third chest location) and walk forward. Strike a set of wooden crates with one of Yasuke's weapons. Pick up an explosive inside and throw it across the rocky terrain ahead. Shoot it to open another entryway.

You'll reach a crossroads here: the right turn lets you refill your tools, and the left turn gets closer to a nearby chest. Crouch at the left turn and then jump down. Although it looks like you can walk across the rope, it will break if Yasuke goes on it. Instead, move the wooden structure to the right, where you'll find the chest inside.
Legendary Chest location

While at the fourth chest location, move the wooden structure to the pit area to reach the elevated terrain (where the rope connects). Jump on top of it to get to the following location.
In the next room, you must move the wooden structure in the slot between two platforms on the left, creating a stair-like contraption. You'll also need to move the other wooden structure below one of the platforms to go through a hidden entryway. Move this one to the right slot, which will help you later. Then, go through this secret area and travel down this pathway.

Move two wooden structures at the new location and throw the explosives down into the room with the stair-like build.

Use your build to carry and throw the explosive to the rocky terrain above.

Shoot the bomb and jump across to claim the Legendary Chest at Makino Kurumazuka Kofun.

You'll earn the Blush of the Earth Legendary Bow and Extend Clear Mind Engraving. Plus, if it's your first time exploring a Kofun in AC: Shadows, you'll earn the Kofun Raider trophy. Exit out of this area by moving the two wooden structures on the right, taking you back to where you first started.
The post How to unlock and solve Makino Kurumazuka Kofun puzzle in Assassin's Creed Shadows appeared first on Destructoid. | ||||||||||||||||||||||||||||||||||||||||||||||||||||||||||||||||||||||||||||||||
Destructoid Thursday, March 20, 2025 12:08 AM
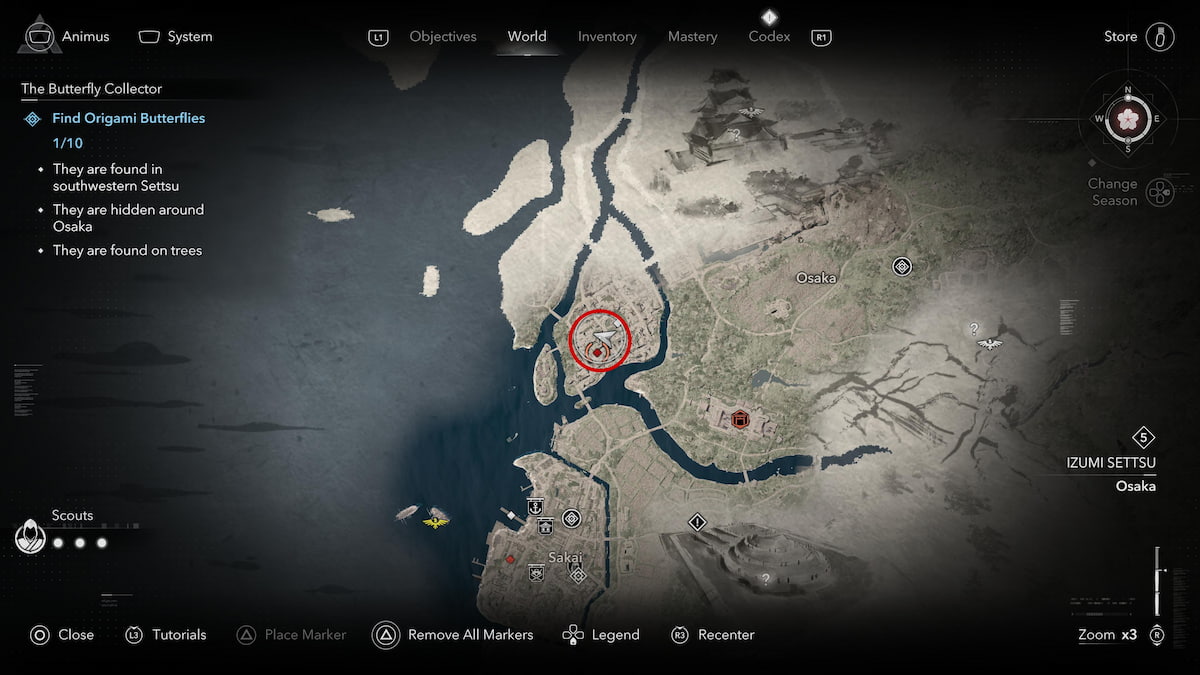
The mysterious butterflies found in the vibrant streets of Osaka are the key to unlocking The Butterfly Collector questline. One of these items will lead you to the All Will be Well mission, where you must locate and eliminate Richo. Here's where to find her in Assassin's Creed Shadows.
AC: Shadows The Butterfly Collector Richo location
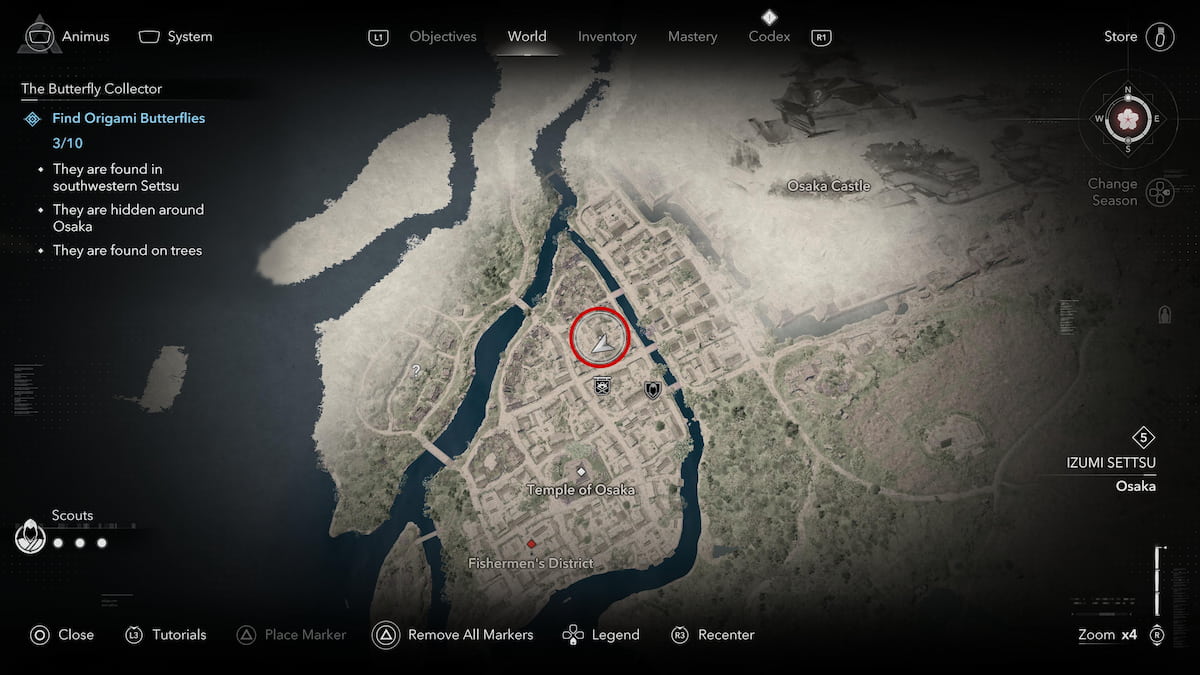
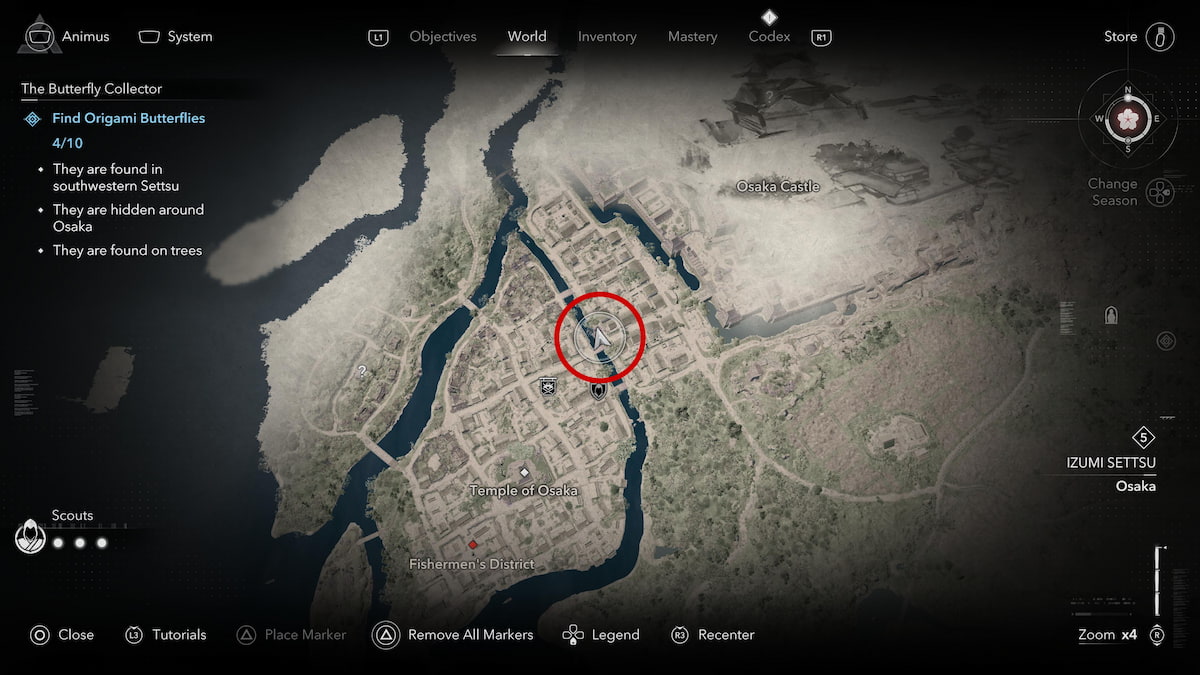
After you've collected the Secret Origami Letter from Richo Butterfly, you'll unlock the All Will be Well sub-quest in Osaka. According to the clues, you must find a burnt well north of the Temple of Osaka. There are a lot of wells around this area, but the one you're looking for will be above the Gear Vendor.

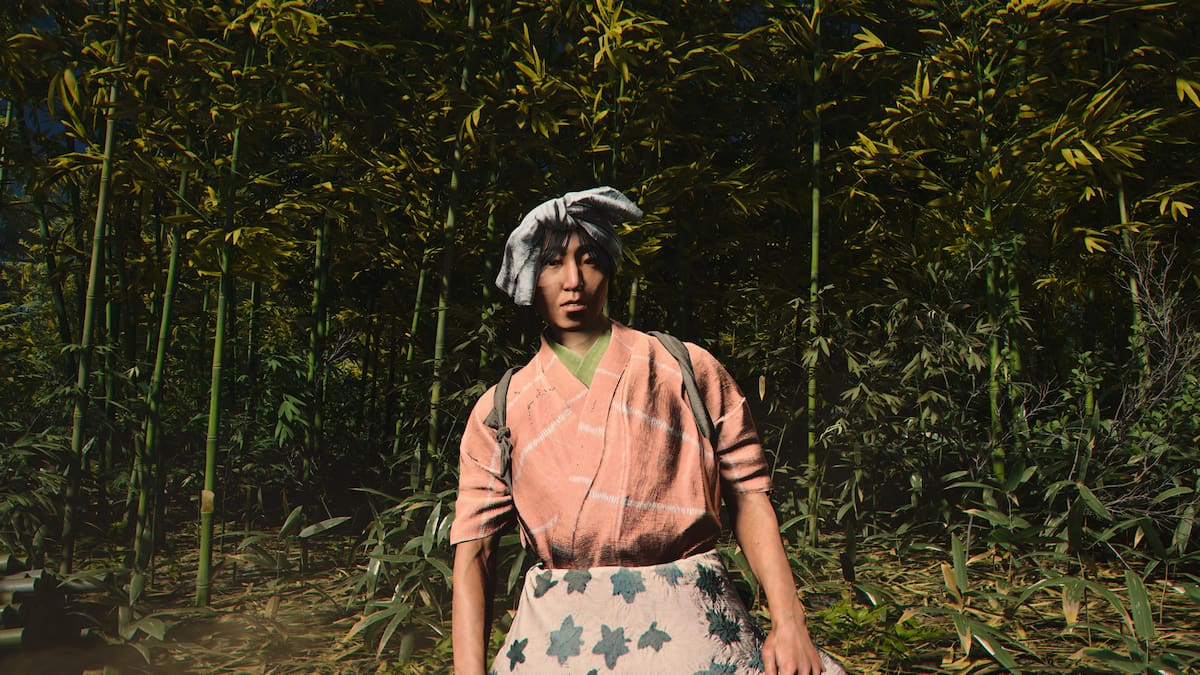
The burnt well will be surrounded by debris, and you must get closer to it to listen to gardeners nearby. Wait until their conversation ends, and you'll receive a hint about a "bamboo grove."

You'll then trigger the Forest Fugitive sub-quest in the Butterfly Collector storyline. Travel to the northeast side of Noda Village, which will be above the Osaka Castle.

While exploring Noda Village, you'll find a cabin deep inside the bamboo grove. Richo will be there, and you can sneak up behind her for a stealthy kill. Or, just run up to her for a full frontal assault. Although this battle isn't too challenging, you should still watch out for her deadly attacks. These Butterfly Collector targets have a pretty mean kick, so do your best to dodge them.

After the elimination, check the small cabin near Richo's body. One of the missing children is inside, and you can follow her to complete the Forest Fugitive quest in Assassin's Creed Shadows.
You'll receive rewards such as Mon, weapons, and the Trinket of Childlike Bravery. You can also check off one of the targets in the Butterfly Collector quest. In total, this AC: Shadows mission requires you to eliminate five targets, giving you a 5,000 XP bonus and more. Find all 10 Origami Butterflies to learn more about this evil group and their locations.
The post Where to find Richo in Assassin's Creed Shadows (The Butterfly Collector quest) appeared first on Destructoid. | ||||||||||||||||||||||||||||||||||||||||||||||||||||||||||||||||||||||||||||||||
Destructoid Thursday, March 20, 2025 12:07 AM
If you've been wandering around Osaka, you may have stumbled upon a few butterflies on a tree. They are classified as a 'Quest Item' without much instructions on unlocking or completing this mission. We're here to show you what to do with the butterflies in Assassin's Creed Shadows.
Table of contents
What to do with butterflies in AC: Shadows
To unlock the quest for the butterflies in AC: Shadows, you must find the Butterfly Collector in Katano. A rumor from a resident may point you in her direction (Scouts can point you there), leading you to the left side of Katano Castle. You'll find a woman here, right next to an Ornament Vendor.

Talk to the woman; she'll ask you to find ten origami butterflies in Osaka. Osaka will be just below Katano, and traveling there shouldn't take long if you haven't reached it yet.
All Origami Butterfly locations in AC: Shadows
To help you complete the Butterfly Collector's quest, we'll break down each butterfly location.
Pink Origami Butterfly location
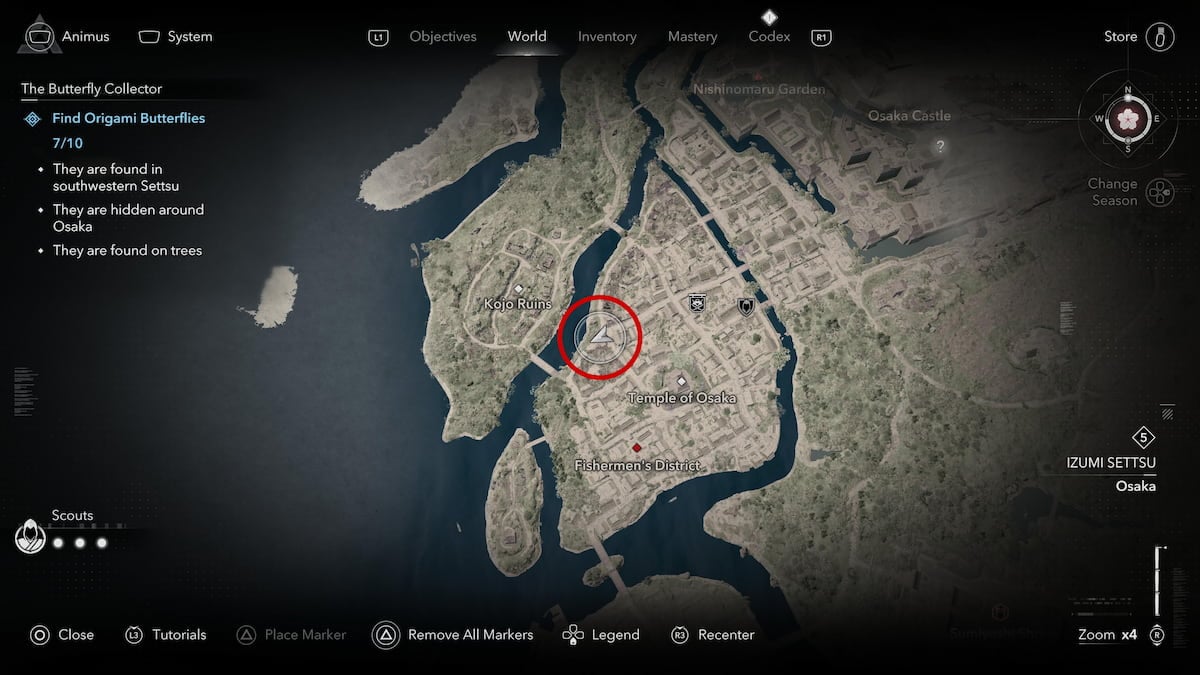
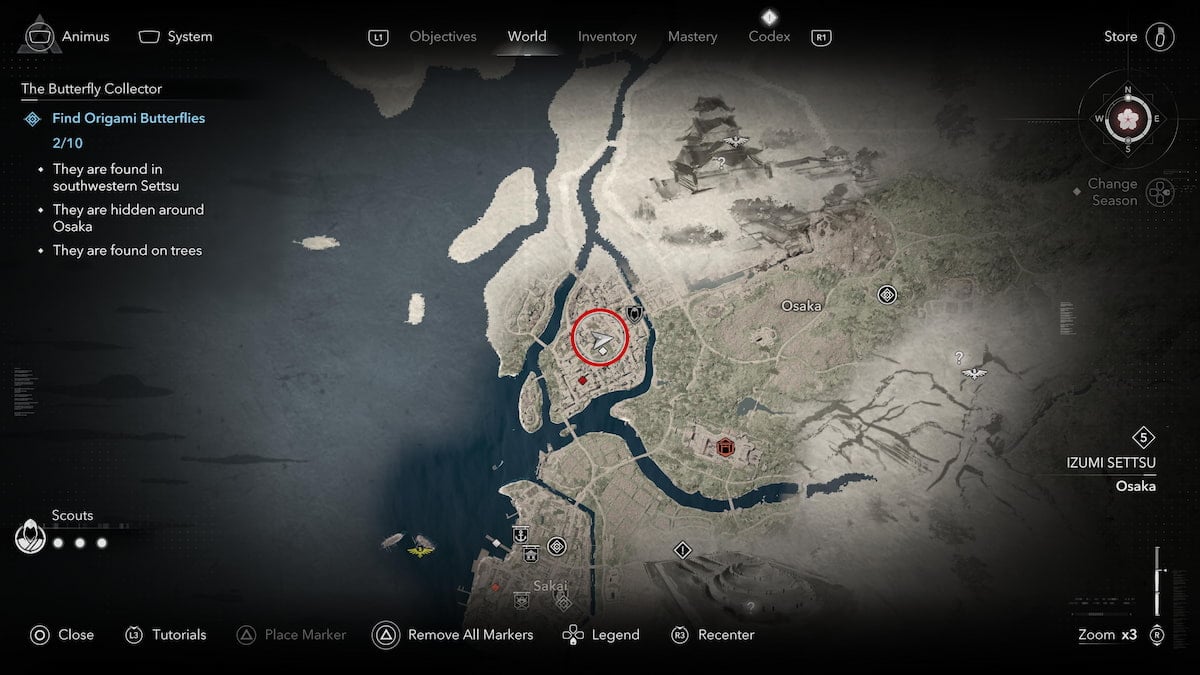
Travel to the bridge connecting Osaka and Sakai to locate a horse stable (left of Fishermen's District). Enter this establishment to find the Pink Butterfly on a tree near the water.

Blue Origami Butterfly location
Head towards the Temple of Osaka to spot a prayer area. Look above to grab the butterfly on another tree.

Secret Origami Message from Mucho Butterfly location
You can find a secret message when you discover the butterfly (hidden in bushes) near the Kojo Ruins bridge. This is one of the first items that triggers a mission, where you must kill targets in the Butterfly Collector hit list. You can start on this quest later on if you want to find the other butterflies first.

Red Origami Butterfly location
Another butterfly can be found nearby, towards the northern side of Osaka Temple.

Orange Butterfly location
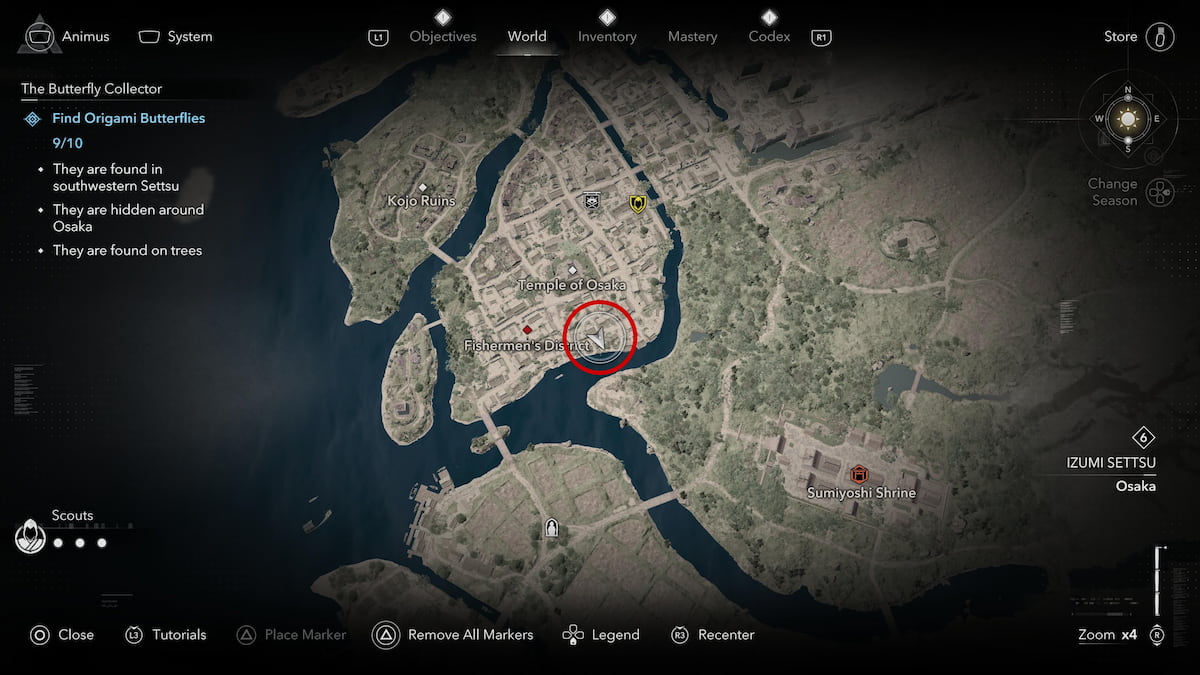
Go to the south side of Osaka Temple, towards the water. The Orange Butterfly will be to the left of the boat.

Yellow Butterfly location
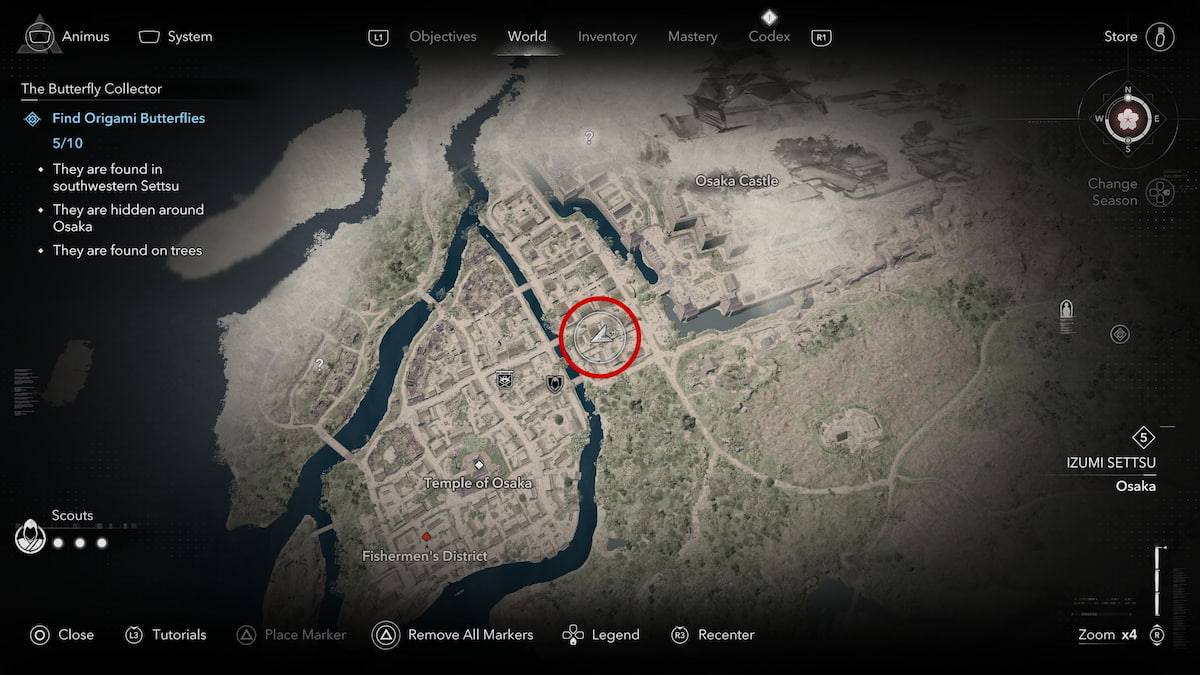
Above the Osaka Gear Trader, you'll find a butterfly near some houses and a forge station.

Secret Origami Letter from Richo Butterfly location
Travel to one of the bridges near the Osaka Kakurega location. Towards the waterside, you'll see a butterfly on a tree. Like the Secret Origami Message from Mucho, you'll unlock a mission to eliminate Richo.

Secret Origami Letter from Shucho Butterfly location
Travel further down from the Osaka Kakurega to locate a third secret message by the water. Explore the Fishermen's District to find one of the missing children near some horses.

Green Butterfly location
Travel to a residential area of Osaka to uncover the following butterfly near a shed.

Purple Butterfly location
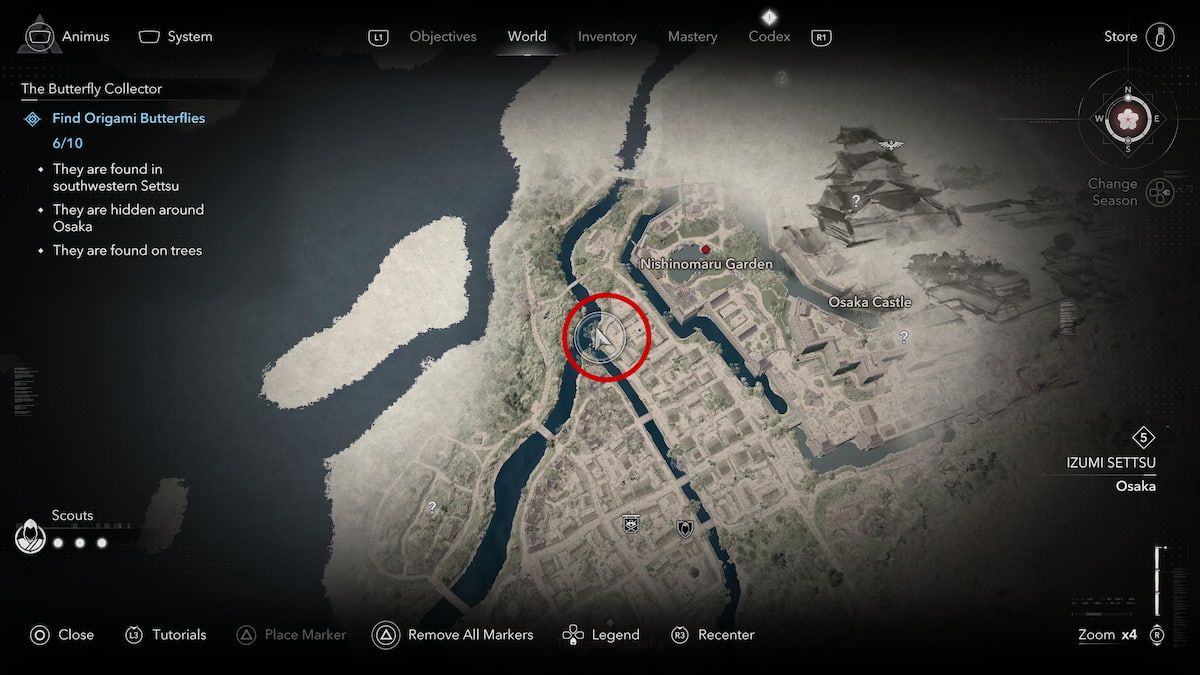
To the left of Nishinomaru Gardens, you'll discover a waterway where one of the butterflies resides. Find it on a tree near this area.

Use all the hints you've collected from the butterflies to locate the five targets in the Butterfly Collector quest.
The post Assassin's Creed Shadows: What to do with butterflies in Osaka (All butterfly locations) appeared first on Destructoid. | ||||||||||||||||||||||||||||||||||||||||||||||||||||||||||||||||||||||||||||||||
Destructoid Thursday, March 20, 2025 12:06 AM
Gold is one of the rarest and most coveted resources in Assassin's Creed Shadows, essential for powerful tool upgrades. There are some strategies to boost your chances of getting your hands on this precious currency, and we're here to show you what to do.
Table of contents
Where to find Gold in Assassin's Creed Shadows
You can acquire Gold in AC: Shadows by using the following methods:
If you have some extra Mon to spend, you can find traders with Gold in their inventory. While the other techniques will require more time and patience, they'll at least provide it to you at no cost. However, it should be noted that you can't farm a ton of Gold all at once, as you typically only get one or two from each drop. Let's break down each method to help you understand their procedures.
Trading with Itinerant Vendors

Itinerant Vendors are traders who pop up in various regions. One of the first ones I encountered was a Port Trader in Osaka, where she had a couple of Gold for sale. The only downside is that the price is pretty steep, costing 10,375 Mon for one Stock. You may have better luck with other vendors, especially with seasonal changes, to hopefully lower the cost of Gold.
Completing Contracts

When unlocking a Hideout, you'll gain access to Contracts, including ones from the Settsu Board. Gold sometimes appears as a reward, but you must complete a specific objective first. The tasks shouldn't be too complicated to achieve, from killing a particular target to destroying goods.
Eliminating Bandits

Almost every region has an Objective hub that's exclusive to their locations. Like the Contracts, you'll occasionally get Gold when eliminating a certain amount of Bandits. For instance, the Out to Pasture quest in the People of Settsu section offers a Gold piece after you've killed 100 Bandits. Other residents may provide you with this rare resource, so ensure to return to them once you've reached the target goal.
Assassinating mini-bosses

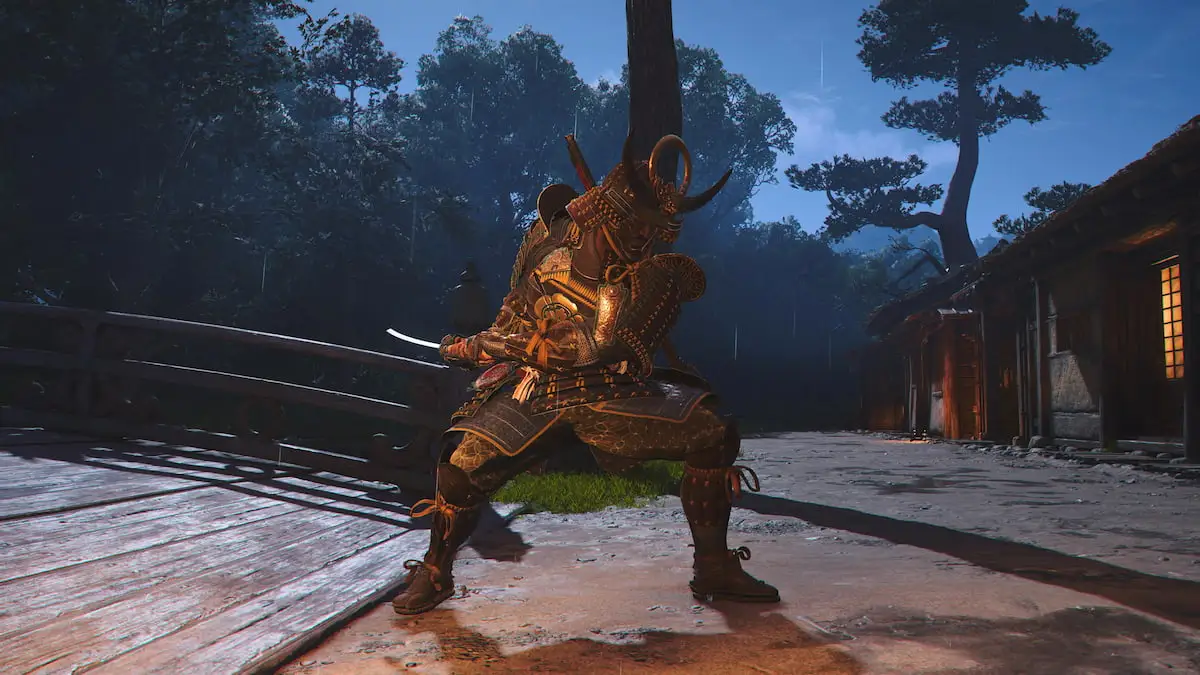
The mini-bosses, known as the Samurai Daisho, have the potential to drop Gold. Raid enemy castles to find these enemies, where they'll be marked with their distinct boss icon. I got a piece of Gold after taking a Samurai Daisho down at Katano Castle, and there are likely more of them at the other strongholds.
Exchange Keys in the Animus

Enter the Animus Exchange in the menu to unlock Gold rewards with Keys. You'll earn Keys with enough Data Fragments, which you'll obtain when stabilizing Anomalies throughout the map. With enough currency, you can exchange them from an active project and acquire the Gold from specific tiers (similar to a standard game battle pass).
How to use Gold in Assassin's Creed Shadows
You can utilize Gold to upgrade tool levels to match your player rank. Typically, you'll have to increase a tool's rank one by one with resources, but with the Gold, you can skip this entire process to match your level automatically. For instance, if I had a Level 10 Kusarigama and my rank was at Level 18, my weapon would instantly change to Level 18. Speak to the forge master, Heiji, at the Hideout to unlock these enhancements, where you can choose to 'Use 1 Gold'.

In addition to the rank boost, you won't need to use other crafting materials when exchanging Gold. Every upgrade generally utilizes a specific set of resources, but with Gold, you'll get to save up on these materials.
The post How to get Gold in Assassin's Creed Shadows appeared first on Destructoid. | ||||||||||||||||||||||||||||||||||||||||||||||||||||||||||||||||||||||||||||||||
Destructoid Thursday, March 20, 2025 12:05 AM
Instead of using Assassin's Creed's traditional eagle system, Shadows utilizes a unique Scout feature that determines key points of interest. Finding Kyonyo is one of the first objectives you'll encounter, and we're here to show you how to find him.
AC: Shadows Kyonyo location, explained
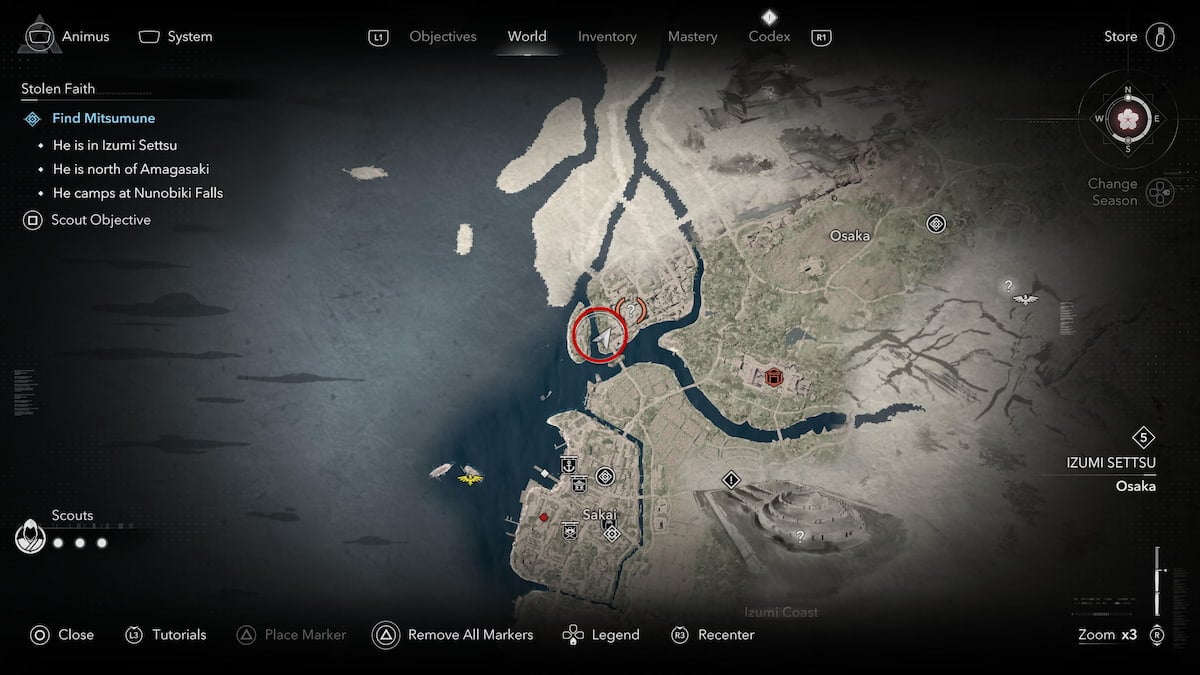
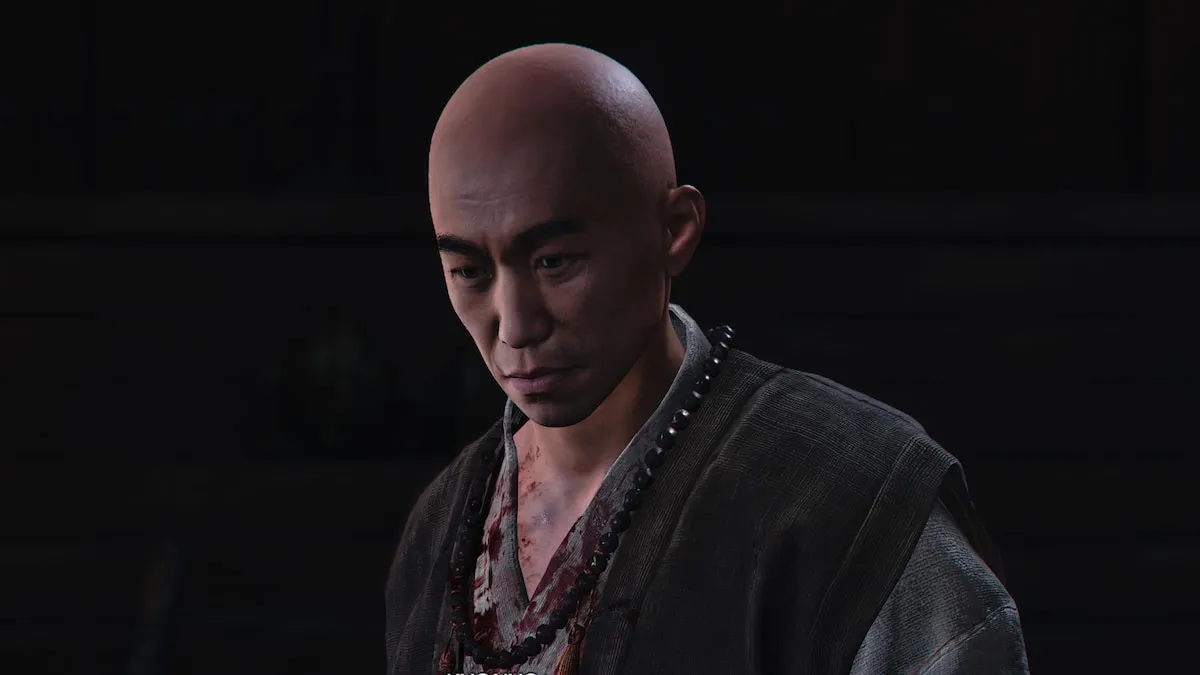
The Fatherless Monk quest enlists you to locate Kyonyo, a warrior monk who may have some clues about the killers of Fujibayashi Nagato. Based on the mission's hint, we know this monk is at the Gansenji Temple in south Sakai. You'll find Sakai in between Izumi Coast and Osaka. Just below it, you'll see a question mark where Kyonyo resides. You can select the Scout Objective to dispatch one of your allies, pinpointing the exact location.

When reaching the quest waypoint, continue toward the question mark below Sakai. You can also use your aim (L2/LT for the controller or right-click on the mouse for PC) to determine where Kyonyo is. Look around, and you should spot a blue dot. Mark it to guide you towards Gansenji Temple.

Defeat all the enemies once you reach the temple, whether with sneak attacks or full-frontal assaults. Then, talk to Kyonyo to discover the whereabouts of your father's killer. You'll have one of your first dialogue options with him: "I've come seeking vengeance" or "I'm here to keep a promise." Both options produce the same result, so select any one. You'll encounter another decision shortly after, but again, you're free to pick whichever one.
By the end of the Assassin's Creed Shadows' Fatherless Monk quest, you'll receive the Level 5 Shrouded Shinoni Robes and Kyonyo's Letter. This new gear is an exceptional starter armor, increasing your damage at night by +20 percent. Use it to survive through the target's following tasks: The Killing Field and Stolen Faith. You can utilize your Scouts here to help determine these mission's targets. However, you may need to refill your Scout meter if you don't have enough allies to send out.
The post Where to find Kyonyo in Assassin's Creed Shadows (The Fatherless Monk quest) appeared first on Destructoid. | ||||||||||||||||||||||||||||||||||||||||||||||||||||||||||||||||||||||||||||||||
Destructoid Thursday, March 20, 2025 12:05 AM
Gathering wood is one of the first steps you need to take for your crafting journey. Unlike most games, you can't simply chop down trees to get this resource, but there are a few alternative ways to find them. Here's how to get Wood in Assassin's Creed Shadows.
AC: Shadows Wood farming guide
You can acquire Wood in AC: Shadows through the following methods:
If you're just starting your Shadows journey, your main targets should be enemy strongholds. Although it'll be challenging to eliminate all enemies within this area, you'll earn plenty of rewards once you've cleared the place. You may earn money from these endeavors, giving you enough currency to buy them from vendors. Let's go over each method to help you farm wood.
Enemy strongholds
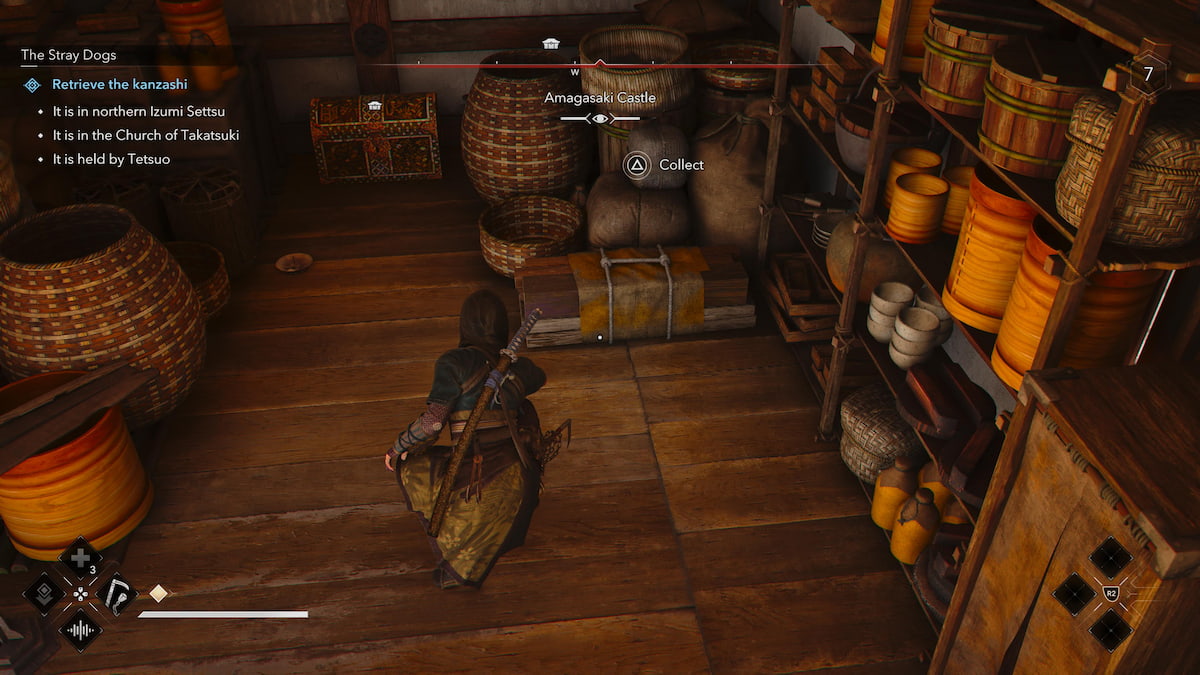
While at enemy castles or camps, you'll often find wood in bundles. You can initially start with strongholds like Katano Castle, Osaka Castle, and Amagasaki Castle. Look for gold circle icons using your aim, which may turn out to be wood. You may even discover rare resources like Gold when trying to take down the Samurai Daisho in these areas.
Smuggling resources
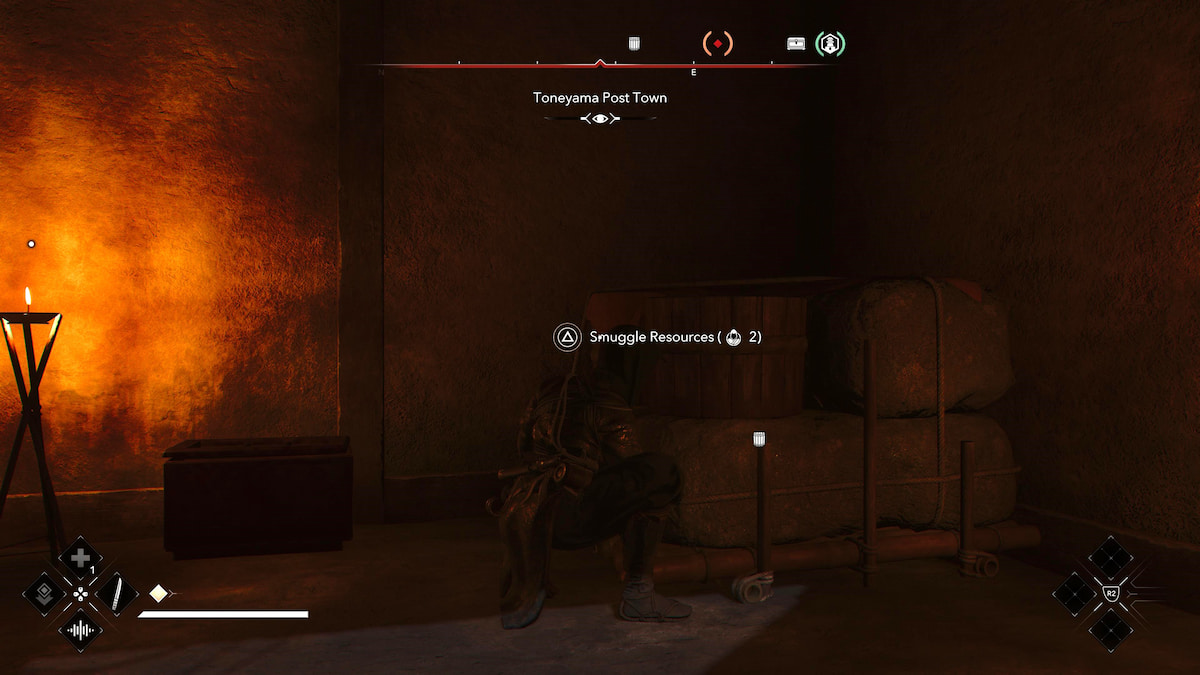
In addition to finding bundles, castles typically include a locked area filled with resources. Defeat the enemies in any of these locations, and you'll eventually find a key. Use it on any locked building, and instruct your Scouts to smuggle materials inside. Sometimes, you don't need to eliminate any enemies, as the smuggled resources will be out in the open. No matter what, smuggling typically costs two allies, so ensure to refill your Scout meter.
You should receive your smuggled materials by the following seasonal change. To alter the seasons, progress through the story, or manually do it via the menu screen.
Purchasing from vendors
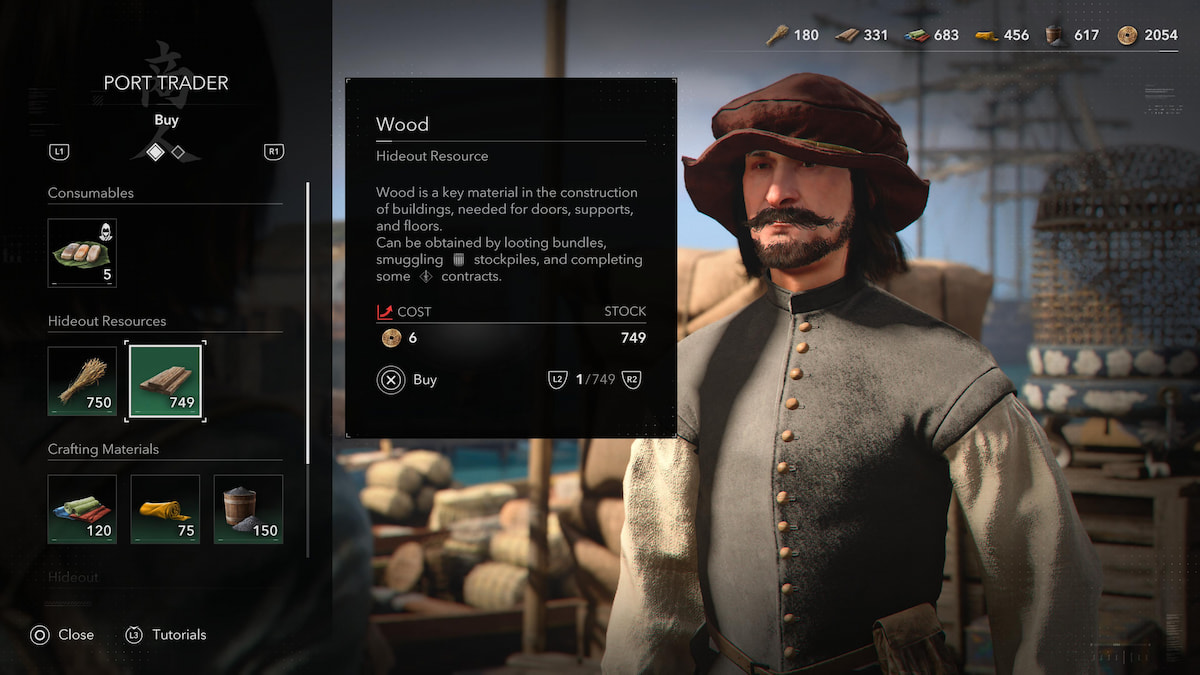
If you don't mind spending money, you can talk to vendors about purchasing wood with Mon. You can find one of the Port Traders at Sakai early on in your journey, where you can typically buy Wood for six Mon each. However, a vendor's inventory and prices seem to fluctuate, possibly depending on the season.
Settsu Board Contracts
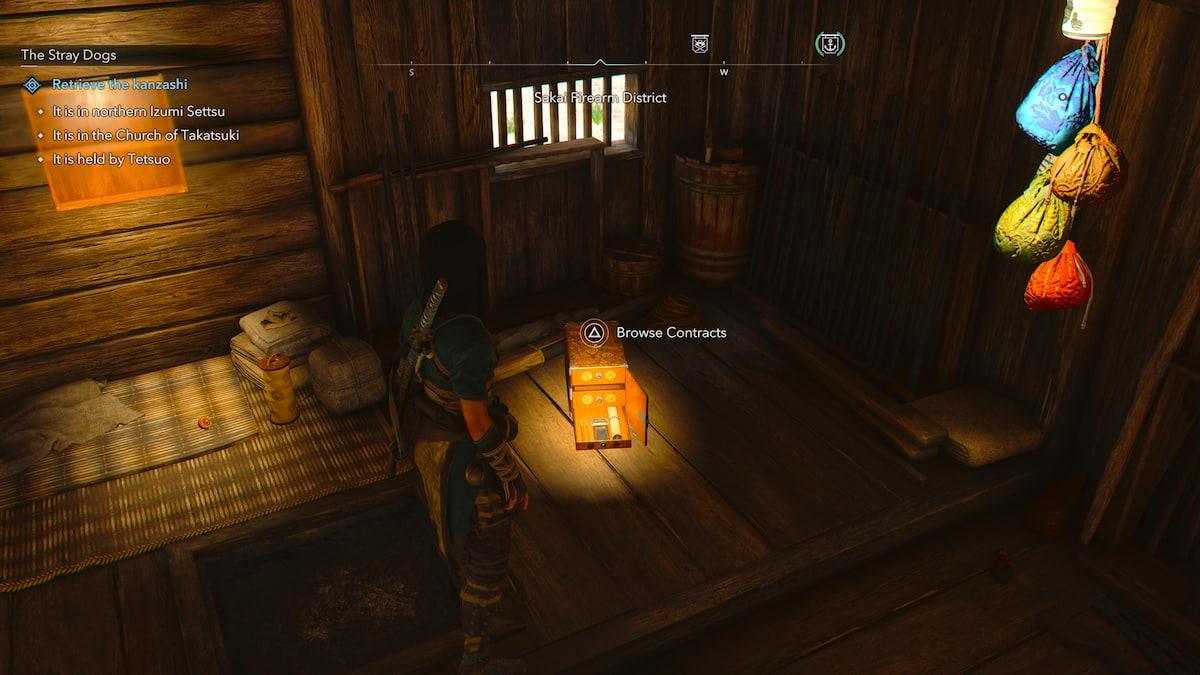
You'll have access to Contracts on the Settsu Board when unlocking additional Hideouts. Browse through these objectives to pinpoint ones with Wood rewards. For example, the mission 'Plunder resources' provides you with this material after you've looted all the targets northeast of Amagasaki.
The post How to get Wood in Assassin's Creed Shadows appeared first on Destructoid. | ||||||||||||||||||||||||||||||||||||||||||||||||||||||||||||||||||||||||||||||||
Destructoid Thursday, March 20, 2025 12:04 AM
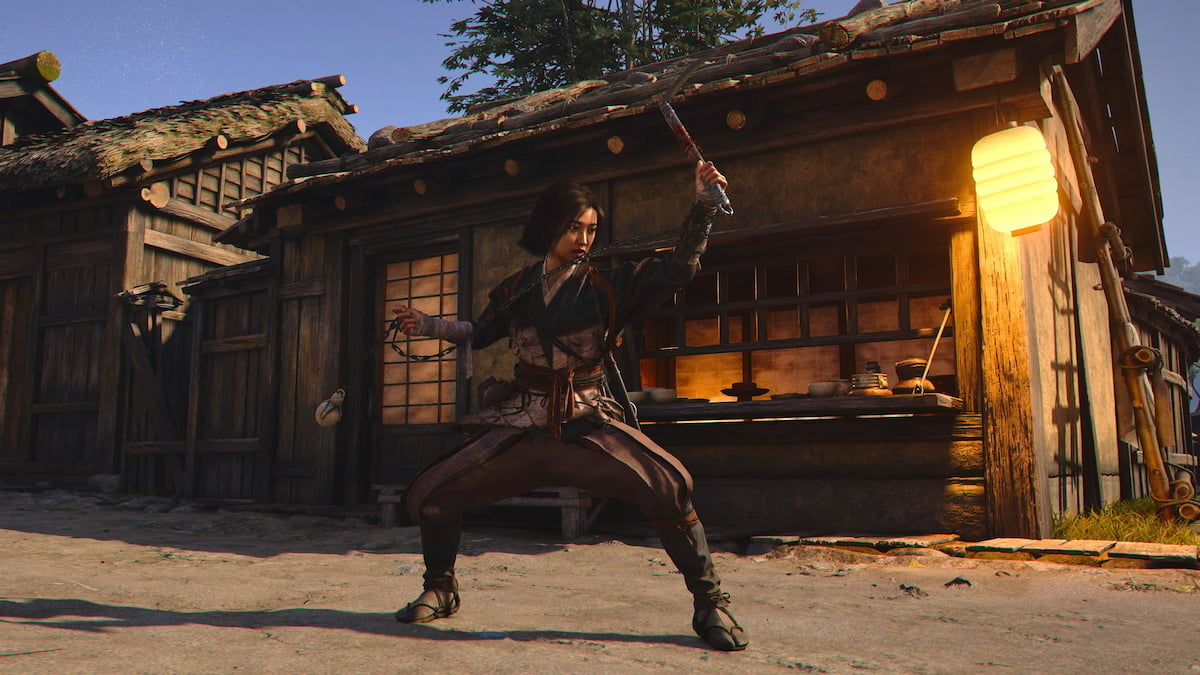
As a versatile assassin, Naoe has the power to wield various tools, from a long-range Kusarigama to a traditional Katana. We're here to rank them all with this Assassin's Creed Shadows Naoe weapon tier list.
Best Naoe weapons in AC: Shadows, ranked
AC: Shadows offers five weapon qualities: Common, Uncommon, Rare, Epic, and Legendary. While the Legendary rarity boasts some of the highest damage rates in the game, other types still have value, especially during the early stages. We'll break down the best weapons for Naoe, starting with the sought-after S Tiers and ending with the relatively adequate C Tiers.
S Tier
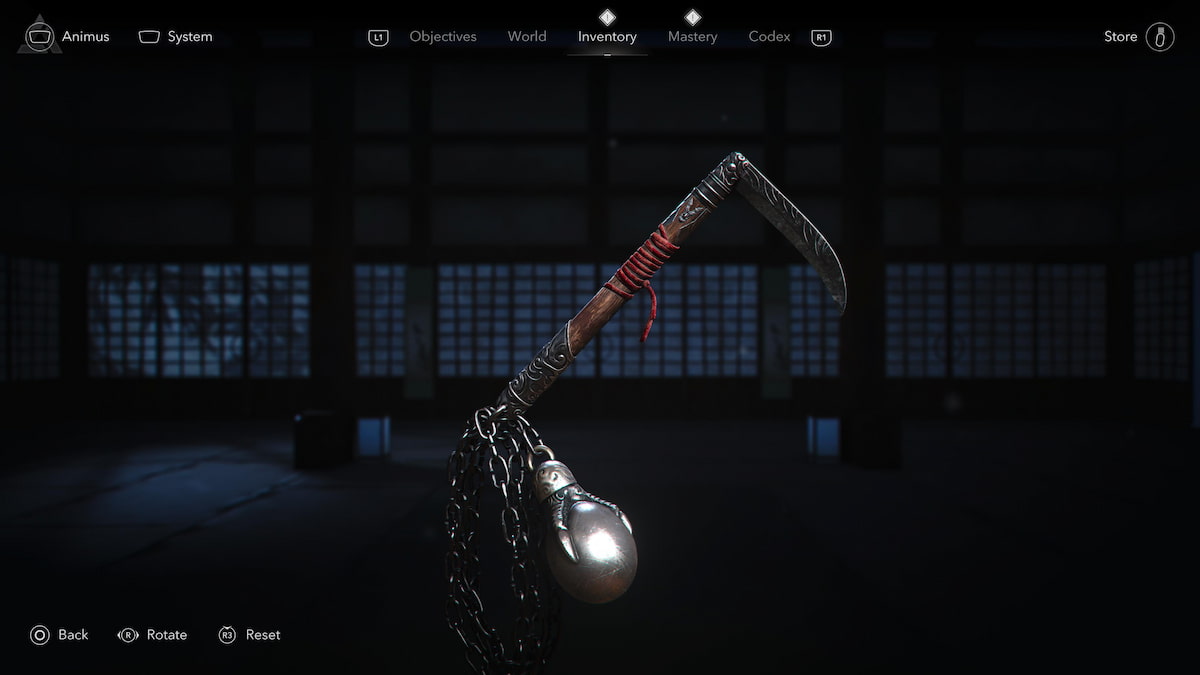
Most of Naoe's S Tier weapons derive from the Legendary class, where you'll often need to go against a formidable foe to unlock. The Death Whisperer Kusarigama is, by far, my most treasured weapon, inflicting +200 damage from enemy collisions. It's also great for large groups as you swing it around to hit multiple targets. What's more, you can get this Kusarigama pretty early on, making it an exceptional starter weapon.
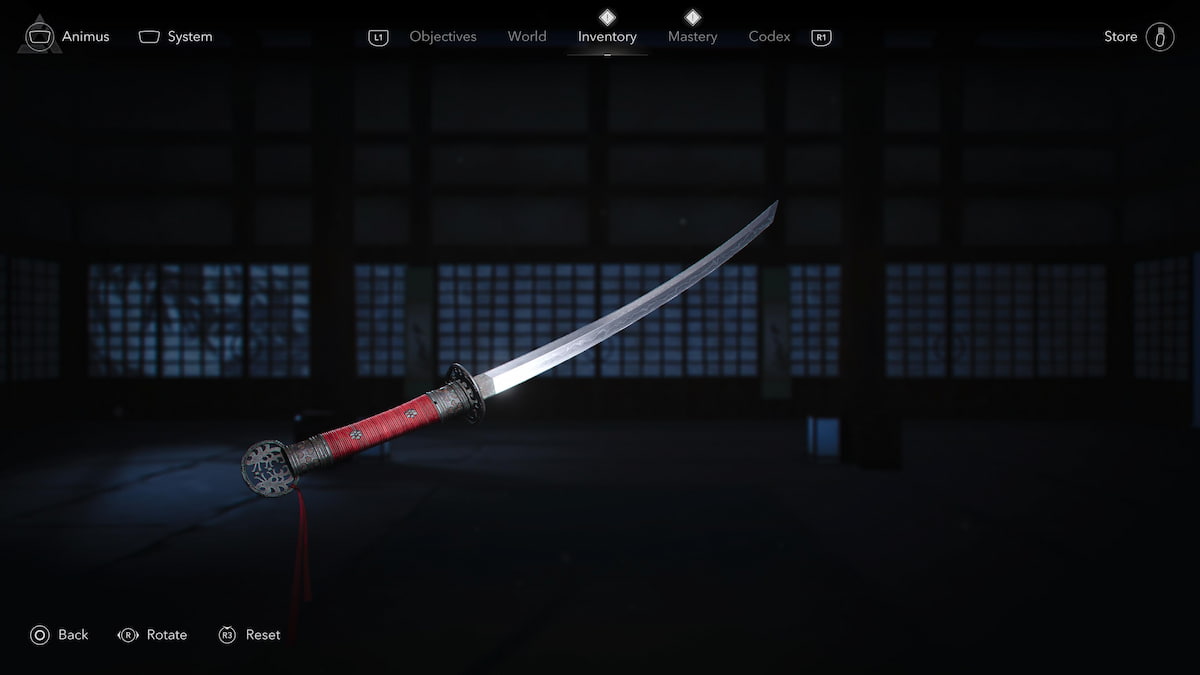
If you're looking for a more traditional approach to Naoe's build, go for a Katana. The Masked Death, in particular, harnesses one of the best Weapon DPS stats, depending on your rank. The remaining categories from this tool, including Posture DPS, Ability Damage, and Adrenaline Gain, are drastically superior, outpacing other weapons by a wide margin.
For close-range battles, the Call of the Void is a fantastic Tanto, inflicting +30% damage on tagged enemies. It's helpful for Naoe's many sneaking missions, primarily when you've scoped out a surrounding area.
A Tier

You can get your hands on the Shinobi's Fury and Igan Sunset Tantos from the starter Izumi Settsu region. Although they aren't as high-leveled as the Call of the Void, they are worthwhile with their unique abilities. While Igan Sunset slows down time with an Escape Strike, Shinobi's Fury makes enemies more vulnerable with weak point attacks.
The other two weapons in the A Tier come from exclusive bundles from the store or Animus. I've put them at this rank since they can be relatively challenging to get, either requiring a premium purchase or loads of Key farms. Regardless, these Kusarigama deliver outstanding DPS rates, serving as one of the best weapons for Naoe in AC: Shadows.
B Tier

The B-tier Naoe weapons fall under the Uncommon or Rare rarity categories, stepping down from the Legendary tier. Each tool packs a solid punch and proves to be essential as you navigate the early stages of your journey.
For example, Saburo's Deference provides a +100% Adrenaline Gain when you're in critical health, giving you more opportunities to trigger abilities and turn the tide of battle in your favor.
C Tier
Similar to the B Tier, C Tier weapons are great for beginners, but they start to fall short as you venture deeper into the game. Even though they serve their purpose early on, their damage output is noticeably weaker compared to higher-tier options, making it harder to mow down tougher enemies.
I recommend upgrading to more powerful gear as you advance through the story, aiming for those Legendary weapons once you're ready to take on the game's brutal challenges.
Considering the extensive size of the Assassin's Creed Shadows, there are a lot more weapons to discover for Naoe. I'll be sure to update this Naoe weapon tier list once I've acquired more tools in my playthrough.
The post Assassin's Creed Shadows: Naoe Weapons tier list appeared first on Destructoid. | ||||||||||||||||||||||||||||||||||||||||||||||||||||||||||||||||||||||||||||||||
Destructoid Thursday, March 20, 2025 12:02 AM
The Assassin's Creed series has evolved its ally systems, with Shadows offering a more complex dynamic with Scouts. These companions are crucial for tackling tough challenges but are somewhat limiting in numbers. Here's how to refill your Scout meter in AC: Shadows.
How to recharge Scout meter in AC: Shadows
As you embark on your Assassin's Creed Shadows adventures, your first task is to acquire a Scout. These companions are invaluable for exploring regions and smuggling resources. However, each use depletes the Scout meter, temporarily limiting your access to these allies. You can replenish this meter with the following techniques:
If you don't want to spend any coin, you can progress through the main campaign to change the seasons. You may alter it yourself from the World Map, where you'll see an option to 'Change Season.' It won't always be available, but it will be accessible from time to time. In return, all your Scouts will come back, allowing you to use them again.

You can also buy a refill at a nearby Kakurega home base, typically costing around 800 Mon to unlock. Look for some bags on the wall and select 'Refill Scouts.' Each Scout replenishment requires 200 Mon each, but it may come at a higher price later in the game.

Lastly, you can refill your Scouts by helping random NPCs around the map. These characters won't have any quest markers, so you'll need to keep your eyes sharp while exploring. One such example is the man who prompts you with a riddle challenge in Sakai. Once you've assisted NPCs like this, you'll have the choice between Scout Intel or World Rumor. Choose the former option to recharge the meter.
Additional Scouts can be recruited by completing various quests or upgrading the Study room. Boosting your allies is essential, as at least two are needed to smuggle materials. Smuggling brings in more resources for your hideout and reduces Scout costs through Stable enhancements. Plus, if you need help with combat, you can recruit unique characters like Yaya.
The post How to refill Scouts in Assassins Creed Shadows appeared first on Destructoid. | ||||||||||||||||||||||||||||||||||||||||||||||||||||||||||||||||||||||||||||||||
Destructoid Thursday, March 20, 2025 12:02 AM
While the assassin life can be brutal, it's not all doom and gloom. You can unwind by snuggling up to cats and dogs, even bringing them back to your Hideout. Discover how to adopt pets in Assassin's Creed: Shadows, adding a lot more cuteness to your home base.
How do you adopt pets in AC: Shadows?
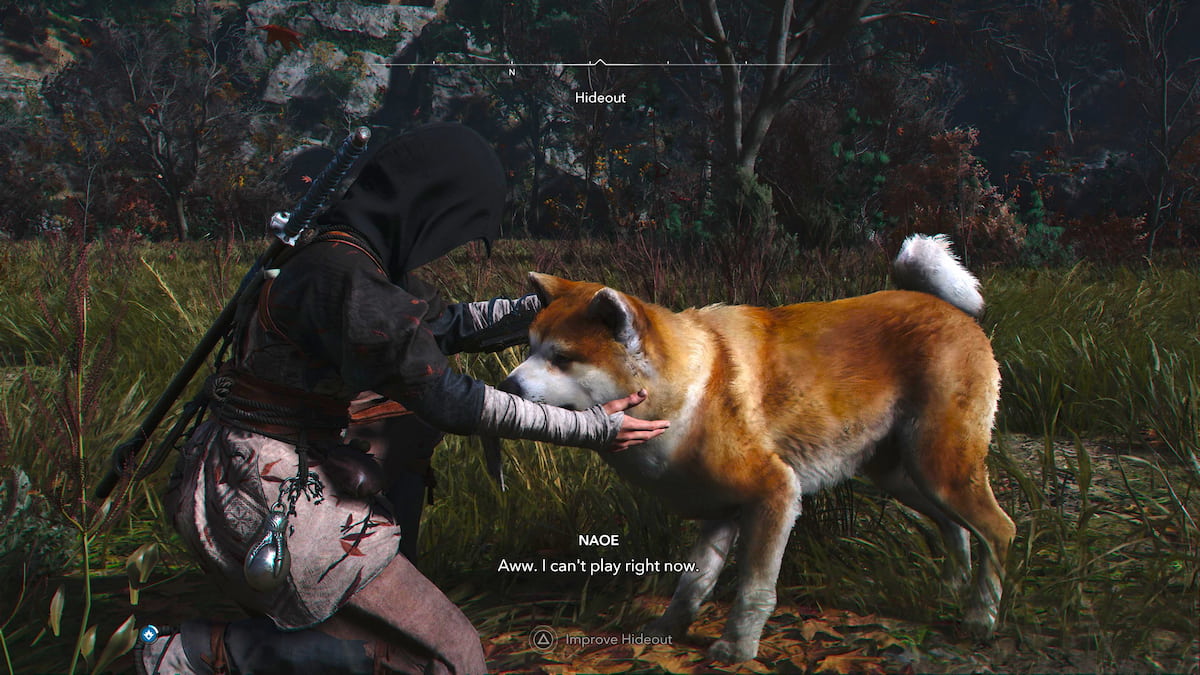
Almost every town in the AC: Shadows map includes an animal, and you can pet a cat or dog to add them to your Codex. Look around places like Osaka and Sakai to trigger their appearance. However, it's best not to look in enemy strongholds since they don't seem to roam there. If you pre-ordered the game, you'll get an exclusive animal in the Thrown to the Dogs quest. Once you've some good pets in, you'll transport the animals to your Hideout.

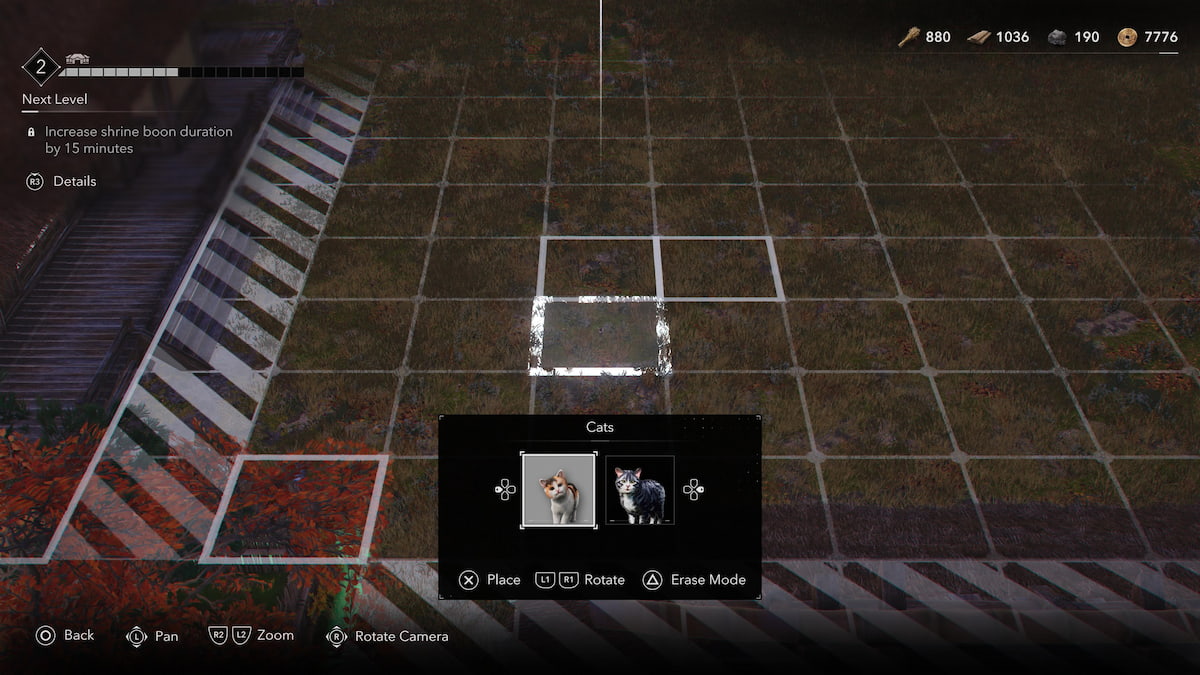
While at your Hideout, select 'Improve Hideout' when exploring or via the table in the main house. You can now place down a pet in the Build section to adopt them. Select any cat or dog in an open area at the Hideout. After encountering a particular breed, you can set down multiple of them and build an animal empire. The Tsuki-maru from the Thrown to the Dogs quest is the only exception, as this unique companion doesn't come in packs.
You'll earn the AC: Shadows Everybody Benefits! trophy once you've adopted a pet. In return, you can find and interact with the dogs and cats at your home base. Although they don't offer any rewards, the animals are just too adorable to resist giving a pet or two. If you aren't sure where the Tsuki-maru is, you can use the 'Locate' button in the Build menu to narrow down their location (the others don't have this feature.)
Continue to travel around the regions to find more pets to adopt. There are a lot of breeds to discover, including Black Akita, Calico Kitten, and Tabby Bobtail. You can go full Pokémon Trainer mode and catch 'em all—just like it's your ultimate quest to collect every last one in Shadows.
The post How to adopt a pet in Assassin's Creed Shadows appeared first on Destructoid. | ||||||||||||||||||||||||||||||||||||||||||||||||||||||||||||||||||||||||||||||||
Destructoid Thursday, March 20, 2025 12:01 AM
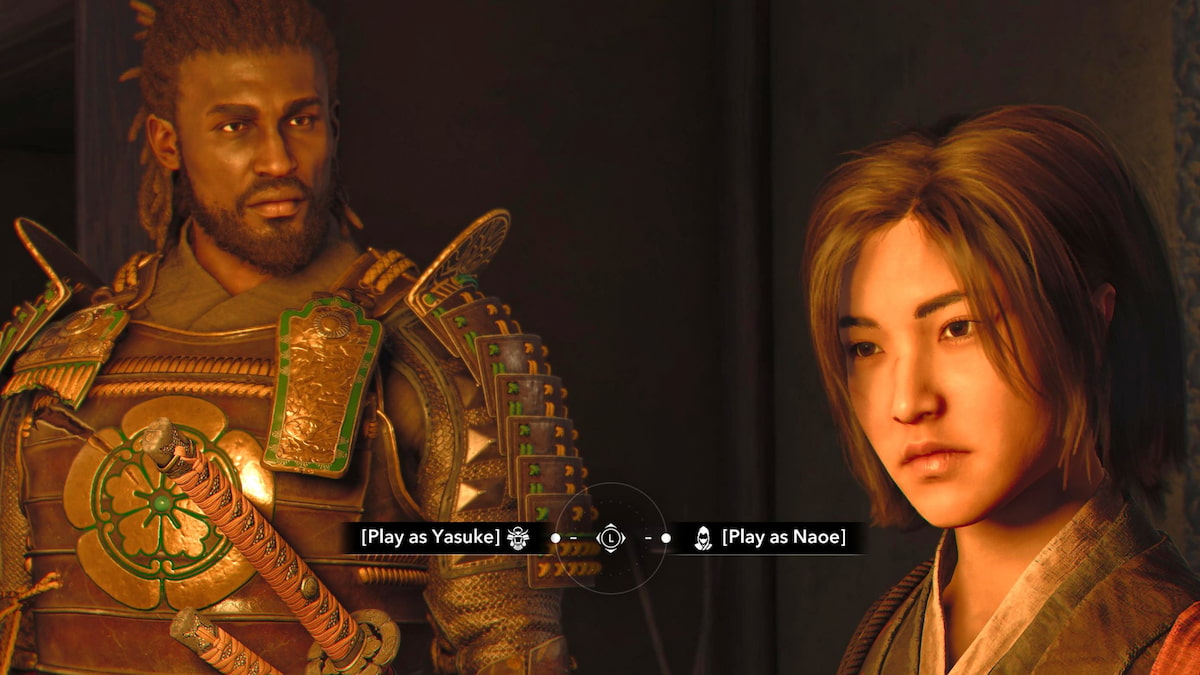
Unlike Assassin's Creed Odyssey, Shadows allows you to control Naoe and Yasuke, giving you a unique perspective on various storylines. You'll have the freedom to change characters, but it won't be available initially. We're here to show you how to switch between Naoe and Yasuke in AC: Shadows.
How to change characters in AC: Shadows
During the beginning of Assassin's Creed Shadows, you'll play as Yasuke for a short while, followed by a much longer gameplay with Naoe. You must complete Act 1 to gain the 'Character Switch' feature, which unlocks after you've killed the third target on the Shinbakufu hit list. Reaching this point may take a bit, especially if you're getting lost in side content. I didn't even get to Act 1 until 16 hours later, so it will undoubtedly take some time.
Once you complete this act, you can switch between Yasuke and Naoe via Inventory or Fast Travel. Avoid conflict or restricted zones when using this feature, as you won't be able to utilize it otherwise. The Inventory route is the most accessible option, letting you make the change right from the menu.

If you've opened a Fast Travel point on the map, you can choose to travel with your current character or switch them out for an alternate route. It's perfect for situations when a specific character is Wanted in a region, where you can substitute them with another character with a clean slate.

Sometimes, you can't access the Character Switch feature, even if you're out of enemy zones. You'll likely need to progress in the main campaign or return to your Hideout (certain situations can lock you out of content).
While Naoe excels in climbing and sneaky missions, Yasuke is great for large enemy groups or when you simply need his brute force. Areas like the Makino Kurumazuka Kofun require Yasuka's skillset, as Naoe cannot pick up particular objects. In general, it's best to make the switch anytime you're stuck in an area, given that Naoe and Yasuke possess distinct abilities.
The post How to switch between Naoe and Yasuke in Assassin's Creed Shadows appeared first on Destructoid. | ||||||||||||||||||||||||||||||||||||||||||||||||||||||||||||||||||||||||||||||||
Destructoid Thursday, March 20, 2025 12:00 AM
When starting your adventure in Assassin's Creed Shadows, you'll be presented with three separate mode options, each of which can be toggled on and off. Let's go over what each of the modes does and how it will affect your gameplay in Assassin's Creed Shadows.

How does Guided Exploration mode work?
In Assassin's Creed Shadows, when Guided Exploration mode is enabled, you will be given a precise marker as to where to go to complete certain mission objectives and where to find requisite mission items. When Guided Exploration mode is turned off, you will instead get markers indicating the general area in which objectives can be completed, but once there it's up to you to explore and interact with the NPCs in that area to find where exactly you're supposed to go.
If you're wondering if you should play with Guided Exploration mode on or off, I recommend trying to play with it off. It's a much more rewarding experience, as it makes the entire world of Shadows much more realistic and immersive. Additionally, if you find it to be too difficult, you can always choose to turn Guided Exploration mode on at any time. I did not find things to be too difficult with it disabled, so I recommend trying with it off first.
Also, enabling Guided Exploration mode will disable some achievements/trophies, so if you're worried about that sort of thing, definitely make sure to keep it off!
Canon mode explained
As for Canon mode, it basically locks you to the authentic "canon" version of Assassin's Creed Shadows in terms of choices and dialogue. Instead of being presented with various choices such as whether to play as Yasuke or Naoe for certain segments, or presenting you with dialogue options, the game instead defaults to what it considers canon for the Assassin's Creed storyline.
Unfortunately, this cannot be toggled on or off once you start the game, and you must start a completely new game save in order to switch this mode. I personally turned this mode off, as I wanted to be able to make the choices I wanted to make, as well as choose when to play as Yasuke and when to play as Naoe. However, if you're really interested in knowing what's considered canon story-wise for the Assassin's Creed lore, this is an intriguing mode.
Canon mode does not affect achievements or trophies in any way.
What does Immersive Mode do?
The Immersive Mode in Assassin's Creed Shadows locks the voiceover language to Japanese throughout the entire game, and blends in Japanese and Portuguese dialogue as those are the two languages spoken by most of the inhabitants of this region at this time historically. It therefore creates a more immersive experience, hence the name.
It's important to note that even when this mode is turned off, there will be times that certain characters may still speak Japanese or Portuguese instead of whatever voiceover language you have selected. Regardless of if you turn Immersive Mode on or not, anytime a different language is spoken than the default you have enabled for voiceover language, captions will be presented in the language you have selected.
You can toggle Immersive Mode on or off at any time in Assassin's Creed Shadows by heading to the Audio tab in the Settings. Immersive Mode does not affect achievements or trophies in any way.
The post Assassin's Creed Shadows Guided Exploration mode, Canon mode, and Immersive mode explained appeared first on Destructoid. | ||||||||||||||||||||||||||||||||||||||||||||||||||||||||||||||||||||||||||||||||
Destructoid Thursday, March 20, 2025 12:00 AM
The first building you need to place inside your hideout in Assassin's Creed Shadows is the Kakurega, which is also one of the most important buildings in the entire game. Here is where you should build the Kakurega to make the most of its usefulness.

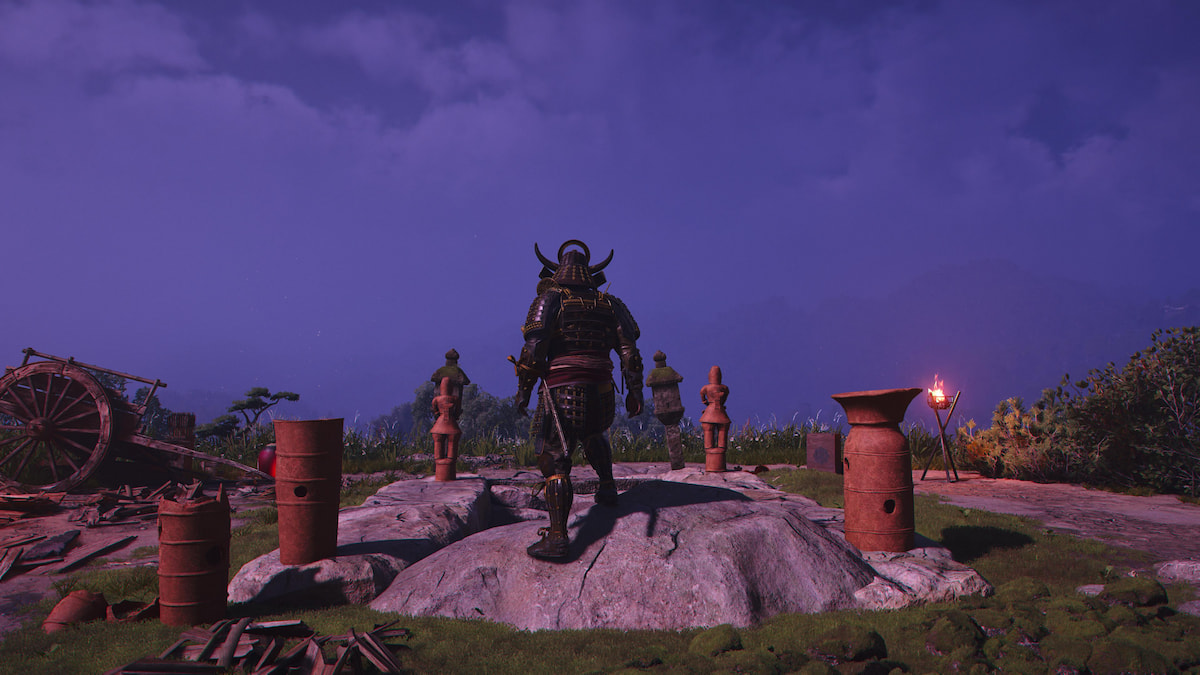
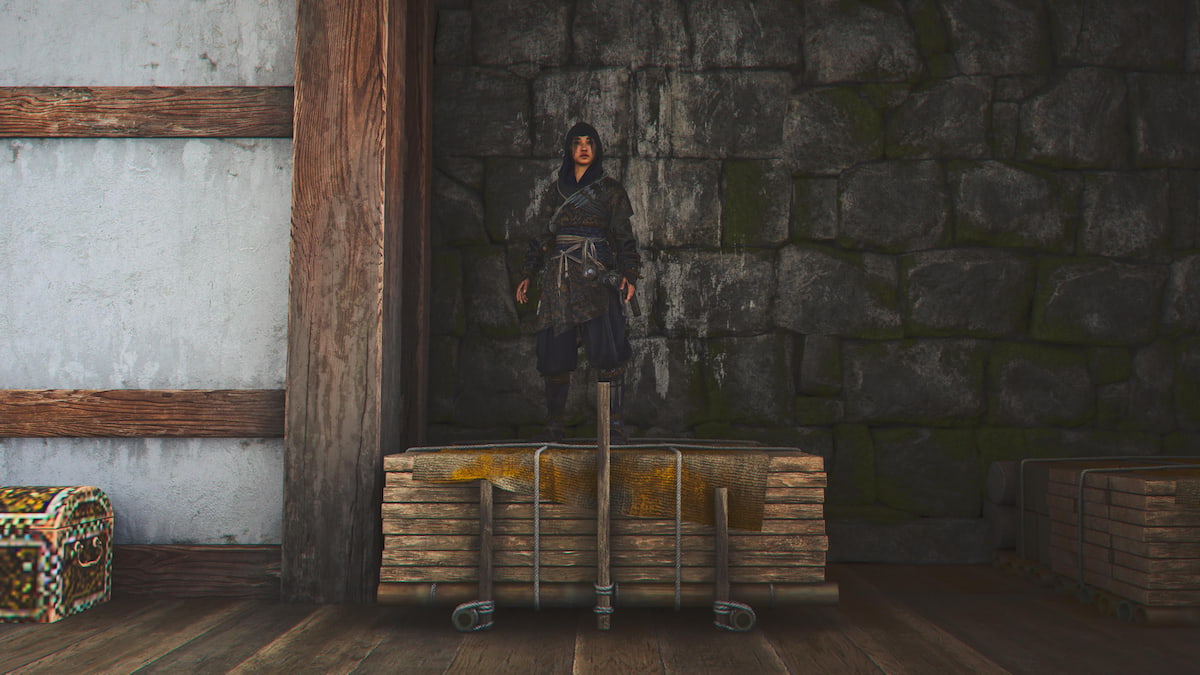
Best place to build the Kakurega
The absolute best place to build the Kakurega is attaching it directly to your main building, as highlighted in the screenshot above. You'll need to rotate it around a bit to get it to line up right where it fits in a position it can snap onto your main building. Another solid option is to place it right outside the front door of your main building as well.
Basically, you want the Kakurega placed in a location that you can quickly and easily get to, as you'll be visiting this building a ton throughout Assassin's Creed Shadows. As you clear out regions throughout Japan, you'll unlock the ability to purchase, claim, and build safehouses throughout Japan, which are called Kakurega's. This will provide various benefits to that region as well as give you access to fast travel points throughout Japan.
You can also access regional contract boards to do various contracts in regions as you establish Kakurega's in them. Another benefit is that you can refill your tools, replenish scouts—which is invaluable for progressing through the story—and manage various allies that you want to bring with you on various missions.
As you continue to upgrade your Kakurega, you'll access more benefits and rewards, making it the most important building.
Here are the materials required to build the Kakurega:
Thankfully, you will gain all these materials in the brief quest right before you unlock the option to place the Kakurega, which once again, should be built as close as possible to your main building.
The post Where should you build the Kakurega in Assassin's Creed Shadows appeared first on Destructoid. | ||||||||||||||||||||||||||||||||||||||||||||||||||||||||||||||||||||||||||||||||
Destructoid Thursday, March 20, 2025 12:00 AM
The Izumi Settsu region in Assassin's Creed Shadows is full of explorable areas and collectibles, including visiting all the shrines in and around the Sumiyoshi Shrine area. Here is where you can find all the shrine locations in Sumiyoshi Shrine in Assassin's Creed Shadows.

All Shrine Locations in Sumiyoshi Shrine
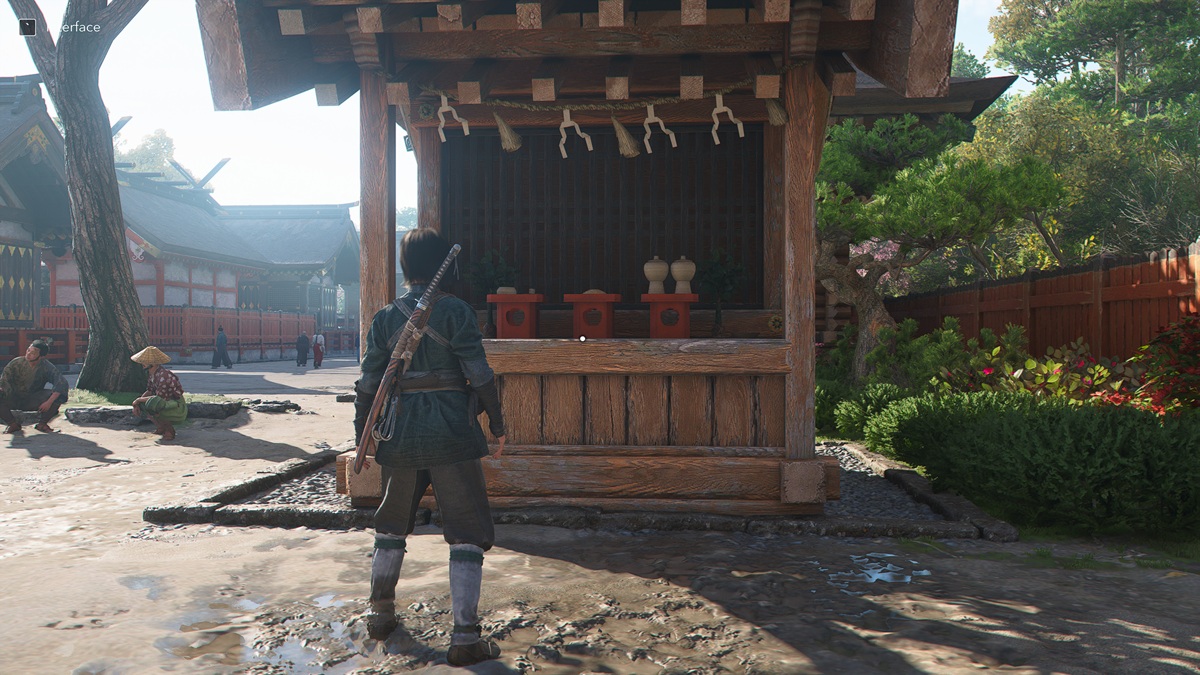
There are three shrines in total located in the Sumiyoshi Shrine, all of which are located inside the actual walls that surround Sumiyoshi Shrine. The first shrine point is located just inside the northern gate entrance. Head inside the gate and immediately to your right you will see a small structure with three red objects placed on the wall. Head up to this structure and Pray at it to complete the objective.
The second shrine which looks almost identical to the first is located on the far western side of Sumiyoshi Shrine, also just inside the gate. If you're just coming inside the western gate, once again look to your right and you will see the shrine. Once again Pray at it to complete this objective.
A third and final shrine in Sumiyoshi Shrine can be found by visiting the entrance of the actual main shrine building in the area, located to the far right of Sumiyoshi Shrine. While the first two shrines look almost identical, this third shrine is completely separate, and rather than having an actual shrine structure, you must head to the gate entrance to the main temple where you will get the opportunity to Pray and complete the third and final objective.
With that, you have completed the objective to find all three shrines at Sumiyoshi Shrine. If you have any trouble finding any of the three shrines simply check out the map above and you will see each shrine location marked with a red circle.
The post All Shrine Locations in Sumiyoshi Shrine in Assassin's Creed Shadows appeared first on Destructoid. | ||||||||||||||||||||||||||||||||||||||||||||||||||||||||||||||||||||||||||||||||
Destructoid Thursday, March 20, 2025 12:00 AM
Early on in Assassin's Creed Shadows you unlock and start building up your hideout. One of the early NPCs you can unlock and recruit for your hideout is Heiji, the Blacksmith. Here is how to unlock the Blacksmith for your hideout in Assassin's Creed Shadows.

How to recruit the Blacksmith - Way of the Blacksmith quest guide
The first step toward recruiting the Blacksmith to your hideout in Assassin's Creed Shadows is to start the Way of the Blacksmith questline. Head to the indicator on your map for the Way of the Blacksmith quest, or look at the reference spot on the map above. Here you will find the Blacksmith engaged with three assailants which you will need to take out, though they are very easy to kill.
Afterwards speak with Heiji, the Blacksmith, and offer for him to join your hideout, which he will agree to. Make sure you grab the collectible items behind and near Heiji here as they are Minerals that you will need for building later.
The next step of the Way of the Blacksmith is to build a Forge, which you can do at your Hideout, so fast travel there. Head inside the HQ to the table in the back corner where you can Improve Hideout and open up the build menu.
Build the Forge at your Hideout
From here, you want to build the Forge. The Forge is a non-connectable room meaning it has to be a standalone building and not connected to your main HQ. Here are the materials required to build the Forge:
If you are short on Wheat or Wood, you can explore nearby landmark locations for the resources randomly lying around, or you can head to the Kakurega you built at your Hideout as part of the main story quest and complete various Contracts. Some of these Contracts will reward you with resources including Wheat, Food, and Minerals, and it should only take one or two to have enough to build the Forge.
Once you've built the Forge, Heiji the Blacksmith will become a permanent resident of your Hideout. From this point on, visit Heiji at your Hideout and you can craft, upgrade, and dismantle your gear.
The post How to unlock the Blacksmith for your hideout in Assassin's Creed Shadows appeared first on Destructoid. | ||||||||||||||||||||||||||||||||||||||||||||||||||||||||||||||||||||||||||||||||
Destructoid Wednesday, March 19, 2025 9:55 PM
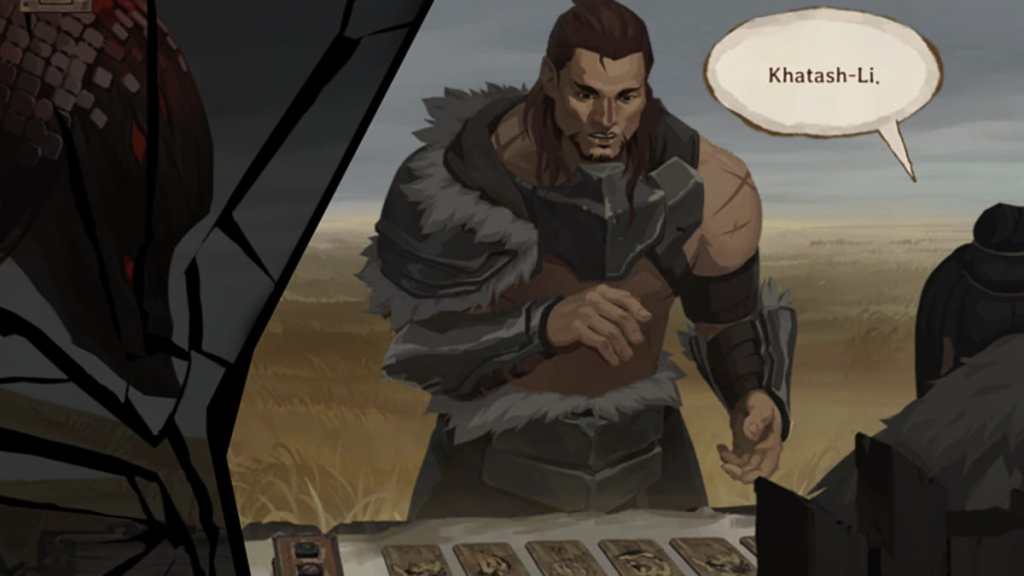
There's a lot of lore behind The Demon's Hand within the League of Legends universe. With Atakhan, known in his human host's form as Khatash-Li, taking center stage, you'll gradually uncover details about Noxus' current state and a few key characters within it as you complete The Demon's Hand's stages.
While events throughout LoL's history have taught us about Noxus and its residents, The Demon's Hand expands on this by continuing Atakhan and Khatash-Li's stories. Let's dive deep into The Demon's Hand story in League of Legends. Watch out from here onwards, as we'll be touching heavily on spoiler territory.
What is the story behind League of Legends' The Demon's Hand?
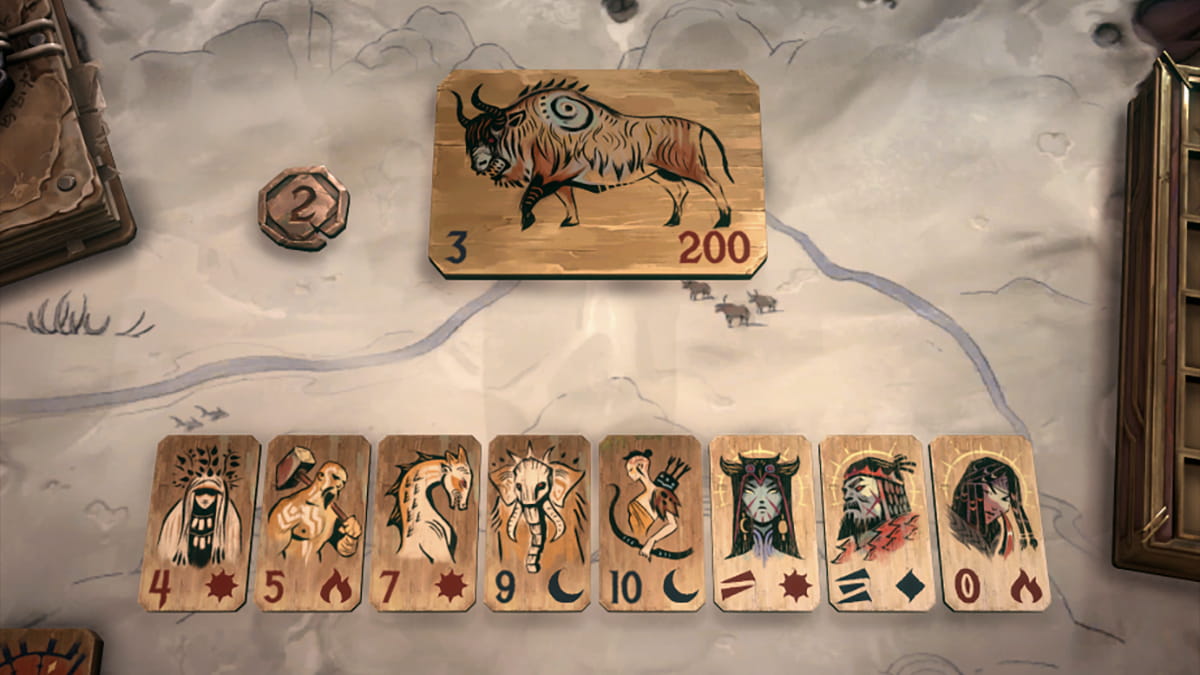
The introduction to League of Legends' The Demon's Hand starts with Atakhan, a demon freed from over 1,000 years of imprisonment. Since returning to the mortal world, Atakhan starts feeding on the battlegrounds of Noshthay Valley before encountering a man at a table. While he doesn't know who the man is, he feels an urge to join the man at the table to play cards.
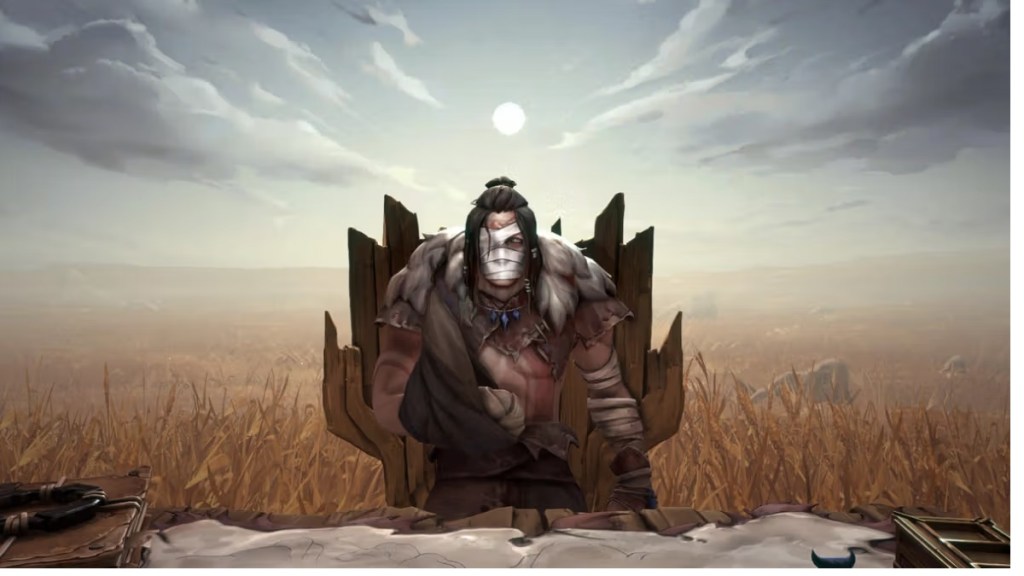
Throughout the game, we learn more about Atakhan and his human host, Khatash-Li. While the game starts by introducing Atakhan and briefly showing his human form, the mysterious man slowly divulges information about Atakhan and his ties with Mordekaiser.
As you advance into The Demon's Hand, you'll learn more about Atakhan's host, Khatash-Li, and his past with Mordekaiser. We discover that he was Mordekaiser's, known in the past as Sahn-Uzal's, most loyal and strongest general with no equal. The man at the table has thought-provoking questions for Atakhan and Khatash-Li, but beyond that, the dialogue follows much of what we know from Atakhan's origins.
Atakhan's origins date back to ancient times in the League of Legends universe when he fought against Sahn-Uzal, more commonly known as Mordekaiser. Sahn-Uzal was known for his endless and brutal conquests, which attracted Atakhan's attention and led to their meeting. While Sahn-Uzal defeated the demon, he lost one of his generals, Khatash-Li, along the way.
Following the loss of Khatash-Li, Sahn-Uzal bound Atakhan to the late general's helmet, enslaving the demon and keeping him as both a warrior at his service and a pet. After some time, Sahn-Uzal met his end to LeBlanc and Vladimir, freeing Atakhan for some time before being controlled again by Sahn-Uzal's undead form, Mordekaiser. It would take another battle against the Black Rose, led by LeBlanc, to defeat Mordekaiser once and for all. This event prompted LeBlanc to take Khatash-Li's helmet and bind Atakhan to her, letting her control him indefinitely.
This journey is reflected in The Demon's Hand, which reveals the man at the table's identity in its third act. While Atakhan experiences a moment of freedom, it is just as quickly taken away by LeBlanc herself, who, while holding Khatash-Li's helmet, binds the demon once more. She gives Atakhan a proposition: in exchange for his freedom, he has to reveal the location of a Darkin weapon. The Demon's Hand doesn't reveal more details beyond this, leaving us to speculate what this weapon is and which Darkin might be behind it.
Who is Khatash-Li?
Khatash-Li is the human host to whom Atakhan is bound. While protecting Sahn-Uzal in battle, Khatash-Li fell to Atakhan, causing the warlord to retaliate and bind the demon to the general's helmet. This binding enslaves Atakhan, forcing him, within Khatash-Li's body, to become Sahn-Uzal's new general against his will.
While we initially see Atakhan in his demon form at the beginning of The Demon's Hand, we glimpse him at the end of the game's introductory comic. Throughout the game, we learn more about Khatash-Li and Atakhan's backstories in greater detail, including their relation to Sahn-Uzal and the events leading up to the present day.
The post The Demon's Hand story in LoL, explained appeared first on Destructoid. |


PC Invasion - FeedDDD Thursday, March 20, 2025 3:57 AM  Updated March 20, 2025: Found a new code! Enter a classic survivor experience in which you'll battle hordes of enemies and choose amazing upgrades to stay alive as long as possible. The design is beautifully minimalistic, and the way you take your enemies down is deeply satisfying. If you're in trouble, Survivor.io codes can help! All Survivor.io codes list Survivor.io codes (Active) equinox25 — 200 Gems, 20 Energy, and 3 Special Op Tickets (New) clanrecruit25 — 250 Gems, 300 Energy Essence, and 5 S Supply Keys insects25 — 200 Gems, 20 Energy, and 3 Special Op Tickets WaterRain — 200 Gems, 20 Energy, and 3 Special Op Tickets 2ndAnniversary — 222 Gems, 22 Energy, and 222 Energy Essence LANTERN2025 — Free rewards snake2025 — Free rewards HAPPYLNY2025 — 200 Gems, 5 S Supply Keys, and 2,500 Energy Essence coldfeb — 200 Gems, 20 Energy, and 3 Random Survivor Shards LUCKY2025 — 200 Gems, 10 Energy, and 1 Revival Coin... Updated March 20, 2025: Found a new code! Enter a classic survivor experience in which you'll battle hordes of enemies and choose amazing upgrades to stay alive as long as possible. The design is beautifully minimalistic, and the way you take your enemies down is deeply satisfying. If you're in trouble, Survivor.io codes can help! All Survivor.io codes list Survivor.io codes (Active) equinox25 — 200 Gems, 20 Energy, and 3 Special Op Tickets (New) clanrecruit25 — 250 Gems, 300 Energy Essence, and 5 S Supply Keys insects25 — 200 Gems, 20 Energy, and 3 Special Op Tickets WaterRain — 200 Gems, 20 Energy, and 3 Special Op Tickets 2ndAnniversary — 222 Gems, 22 Energy, and 222 Energy Essence LANTERN2025 — Free rewards snake2025 — Free rewards HAPPYLNY2025 — 200 Gems, 5 S Supply Keys, and 2,500 Energy Essence coldfeb — 200 Gems, 20 Energy, and 3 Random Survivor Shards LUCKY2025 — 200 Gems, 10 Energy, and 1 Revival Coin... |
PC Invasion - FeedDDD Thursday, March 20, 2025 3:51 AM  Updated March 20, 2025: Added a new code. There's no time to waste when the Corrupted Hero is planning to destroy everything you hold dear. His armies march into your territory, and it's up to you and your team to fend them off. The victory is guaranteed with Anime World Tower Defense codes. All Anime World Tower Defense codes list Active Anime World Tower Defense codes ShutdownForBalancingNYPT2 — 100 Reroll Tokens, 1,500,000 Gold, 50 Celestial Crystals, 13,500 Puzzles, and 10 Miracle Shards (New) Sorry4NYPT2Bugs — 100 Reroll Tokens, 1,500,000 Gold, 50 Celestial Crystals, 13,500 Puzzles, and 10 Miracle Shards AWTD10KPlayers — Free rewards NewYear2025PT2Update — Free rewards OurValentineIsAWTD — Free rewards Sorry4Inconveniences — Free rewards NewYear2025Update — Free rewards MagicalGirlsEvent — Free rewards 170MVisits — Free rewards AWTDBestYear — Free rewards SorryForDelayDBSUpdate — Free rewards (Priv... Updated March 20, 2025: Added a new code. There's no time to waste when the Corrupted Hero is planning to destroy everything you hold dear. His armies march into your territory, and it's up to you and your team to fend them off. The victory is guaranteed with Anime World Tower Defense codes. All Anime World Tower Defense codes list Active Anime World Tower Defense codes ShutdownForBalancingNYPT2 — 100 Reroll Tokens, 1,500,000 Gold, 50 Celestial Crystals, 13,500 Puzzles, and 10 Miracle Shards (New) Sorry4NYPT2Bugs — 100 Reroll Tokens, 1,500,000 Gold, 50 Celestial Crystals, 13,500 Puzzles, and 10 Miracle Shards AWTD10KPlayers — Free rewards NewYear2025PT2Update — Free rewards OurValentineIsAWTD — Free rewards Sorry4Inconveniences — Free rewards NewYear2025Update — Free rewards MagicalGirlsEvent — Free rewards 170MVisits — Free rewards AWTDBestYear — Free rewards SorryForDelayDBSUpdate — Free rewards (Priv... |
PC Invasion - FeedDDD Thursday, March 20, 2025 3:43 AM  Updated March 20, 2024: Added a new code! If you want to avoid going through the things Kaneki had to experience in Tokyo Ghoul, you'll need all the help you can get. If you're going to unlock the coolest masks and strongest abilities, check out the Ro Ghoul codes listed below. Anime Ro Ghoul codes list Active Ro Ghoul codes !Code SorryMobilePlayers! — 100 Color Credits and 10 Hearts (New) !Code It'sShotgunTime — 100 Color Credits !Code BangBang — 100 Color Credits and 10 Hearts !Code 1kLikesOvernightRC — 30 Color Credits, 2M RC, and 10 Levels !Code 1kLikesOvernightYEN — 30 Color Credits, 20M Yen, and 10 Levels !Code Valent-eye-nes — Exclusive Mask, 60 Color Credits, 1M RC and 10M Yen !Code ByeLaggyGyaMobs — 100 Color Credits and 100 Hearts !Code HNY25 — 75 Color Credits, 2.5M RC, 25M Yen, and 25 Levels !Code HappyHolidays24! — 75 Color Credits, 2.5M RC, 25M Yen and 25 Levels !Code AllIWantForChristmasIsCod... Updated March 20, 2024: Added a new code! If you want to avoid going through the things Kaneki had to experience in Tokyo Ghoul, you'll need all the help you can get. If you're going to unlock the coolest masks and strongest abilities, check out the Ro Ghoul codes listed below. Anime Ro Ghoul codes list Active Ro Ghoul codes !Code SorryMobilePlayers! — 100 Color Credits and 10 Hearts (New) !Code It'sShotgunTime — 100 Color Credits !Code BangBang — 100 Color Credits and 10 Hearts !Code 1kLikesOvernightRC — 30 Color Credits, 2M RC, and 10 Levels !Code 1kLikesOvernightYEN — 30 Color Credits, 20M Yen, and 10 Levels !Code Valent-eye-nes — Exclusive Mask, 60 Color Credits, 1M RC and 10M Yen !Code ByeLaggyGyaMobs — 100 Color Credits and 100 Hearts !Code HNY25 — 75 Color Credits, 2.5M RC, 25M Yen, and 25 Levels !Code HappyHolidays24! — 75 Color Credits, 2.5M RC, 25M Yen and 25 Levels !Code AllIWantForChristmasIsCod... |
PC Invasion - FeedDDD Thursday, March 20, 2025 3:35 AM  Updated March 20, 2025: We added new codes! Explore a magical world filled with food-themed heroes and adventures! Form teams, engage in battles, and complete various challenges to advance through the game. If you need additional Diamonds, Summon Tickets, and other freebies, redeem Isekai Feast: Tales of Recipes codes! All Isekai Feast: Tales of Recipes codes list Working Isekai Feast: Tales of Recipes codes LetsLaughTdy — Free rewards (New) JoinCoolRebate — Free rewards GongXiFaCai — Free rewards WelcomeTo2025 — Free rewards CHRISTMASDAY24 — Free rewards CubanSandwic — Free rewards FriedChicken — 2 Summon Tickets, 500K Hero EXP, and 500K Coins jollymax — 188 Diamonds, 2 Summon Tickets, and 100K Hero EXP IFTOR — Miya & Yuri SSR Hero, 10 Hunt Tokens, 5 Elite Scrolls, 1.5K Diamonds, and 5M Coins Recipes — 5 Wish Crystals, 1 Bubble-Storyline, 5 Hunt Tokens, 1K Diamonds, and 500K Coins Tales — 1 Storybook, 15 Summon ... Updated March 20, 2025: We added new codes! Explore a magical world filled with food-themed heroes and adventures! Form teams, engage in battles, and complete various challenges to advance through the game. If you need additional Diamonds, Summon Tickets, and other freebies, redeem Isekai Feast: Tales of Recipes codes! All Isekai Feast: Tales of Recipes codes list Working Isekai Feast: Tales of Recipes codes LetsLaughTdy — Free rewards (New) JoinCoolRebate — Free rewards GongXiFaCai — Free rewards WelcomeTo2025 — Free rewards CHRISTMASDAY24 — Free rewards CubanSandwic — Free rewards FriedChicken — 2 Summon Tickets, 500K Hero EXP, and 500K Coins jollymax — 188 Diamonds, 2 Summon Tickets, and 100K Hero EXP IFTOR — Miya & Yuri SSR Hero, 10 Hunt Tokens, 5 Elite Scrolls, 1.5K Diamonds, and 5M Coins Recipes — 5 Wish Crystals, 1 Bubble-Storyline, 5 Hunt Tokens, 1K Diamonds, and 500K Coins Tales — 1 Storybook, 15 Summon ... |
PC Invasion - FeedDDD Thursday, March 20, 2025 3:31 AM  Updated March 20, 2025: Added new codes! Ever heard of an anime Roblox game where you can shoot guns? This engaging futuristic title has many different styles of combat, challenging quests, and epic PvP battles. You can also redeem the Project Trigger codes that can help you improve your hero faster than usual! All Project Trigger codes list Project Trigger codes (Working) LastSpin4Now! — 40 Spins (New) Grind4Update! — 2x Money (New) RK4Update! — 2x XP (New) Project Trigger codes (Expired) AceFeelNiceTdy! — 20 Spins GratefulForYall! — 15 Spins ForTheWait! — 5 Spins ShutDown! — 5 Spins Whoops! — 10 Spins TYFORPLAYING! — 2x Money 1KLIKES! — 30 Spins AceTiredOfFixing!! —10 Spins 100! — 2x EXP CMajorisTired! — SP Restoration NewSystem! — 35 Spins WeBack! AceIsaW! Hereyougo! Related: Project XL codes and Project Slayers codes How to redeem codes in Project Trigger H... Updated March 20, 2025: Added new codes! Ever heard of an anime Roblox game where you can shoot guns? This engaging futuristic title has many different styles of combat, challenging quests, and epic PvP battles. You can also redeem the Project Trigger codes that can help you improve your hero faster than usual! All Project Trigger codes list Project Trigger codes (Working) LastSpin4Now! — 40 Spins (New) Grind4Update! — 2x Money (New) RK4Update! — 2x XP (New) Project Trigger codes (Expired) AceFeelNiceTdy! — 20 Spins GratefulForYall! — 15 Spins ForTheWait! — 5 Spins ShutDown! — 5 Spins Whoops! — 10 Spins TYFORPLAYING! — 2x Money 1KLIKES! — 30 Spins AceTiredOfFixing!! —10 Spins 100! — 2x EXP CMajorisTired! — SP Restoration NewSystem! — 35 Spins WeBack! AceIsaW! Hereyougo! Related: Project XL codes and Project Slayers codes How to redeem codes in Project Trigger H... |