PCGamesN Sunday, August 10, 2025 4:58 PM August 10, 2025: See off the weekend with some new free Bingo Blitz credits links. What are the new free Bingo Blitz credits? You won't be playing much bingo without them, that's for sure. Even if you've exhausted your usual free credits in Bingo Blitz through login rewards and premium subscriptions, the secret to playing another round is through our Bingo Blitz credits links. New Bingo Blitz free credits links work in much the same way as Monopoly Go dice links. One click and your account is automatically topped up with credits ready to be used on multiple rounds or one big blow-out session with multiple cards. The choice is yours. Continue reading Free Bingo Blitz credits August 2025 MORE FROM PCGAMESN: Bingo Blitz credits, Best card games, Best PC board games |
PCGamesN Sunday, August 10, 2025 12:00 PM What do the frighteningly classic FPS FEAR, the rush of hitting criminals in the Batman Arkham games, and the Left 4 Dead-style action of Back 4 Blood have in common? Well, they are all games published by Warner Bros. Games, but they're also part of the new WB Play the Legends Bundle from Humble, and you can score 16 excellent games for just $12 / £10.93 right now - which is ridiculously cheap, and well worth the price. Continue reading Get the entire Batman Arkham series and 12 other games for $12 MORE FROM PCGAMESN: Arkham Knight System Requirements, Best Batman games, Best superhero games |
Twinfinite Sunday, August 10, 2025 2:24 PM  |
Twinfinite Sunday, August 10, 2025 12:36 PM  |
Twinfinite Sunday, August 10, 2025 12:32 PM  |
Siliconera Sunday, August 10, 2025 3:00 PM
The Small-Animallike Lady is Adored by the Ice Prince is one of those shojo manga that honestly doesn't focus all that much on conflicts and drama. Which is great and a relief! We've got tons of those! Liliana and Prince William already know they are about each other, are fine with the engagement, and want to be together. This does mean that some of the conflicts that do come up in these types of tales end up handled a bit differently. So when we get to the third volume, dealing with a third-party who might be a possible rival in the form of the visiting Princess Marianne instead offers another approach to dealing with an interloper. As such, it means we see how Liliana deals with the problems of being a soon-to-be princess.
Editor's Note: There are some spoilers for volume 3 of The Small-Animallike Lady is Adored by the Ice Prince manga below.
The pace of The Small-Animallike Lady is Adored by the Ice Prince is rather swift for this type of manga. The first involved Liliana meeting the prince, being chosen as Will's fiance, and realizing what she'd heard about him early on wasn't quite accurate. That even though he seemed "cold," he is really just a quieter kind of person. The two honestly got on perfectly! Which means by the second volume, we're already seeing that while he's accepted he cares about her and does want to marry her, she's realized that he's "her" person too. Now that we're in the third volume, the two are a genuinely cute couple and seem pretty healthy. It's absolutely a honeymoon phase.

While Hisui's story does involve leaning more on the relaxed and positive side, it does play with shojo expectations by introducing a potential rival in volume 3 of The Small-Animallike Lady is Adored by the Ice Prince manga. Princess Marianne of Belluno headed to Zavanni for a diplomatic visit and, as future king, Will must act as host. While part of the drama here does involve rumors that she's visiting in search of a husband or possible arrangement with Will, things are handled in such a way that the concept doesn't provide the expected drama.
While it does eventually start to bother Liliana, and there is a concern about being abandoned, Hisui handles it in a clever way. The author takes a more mature approach and instead makes it about Liliana realizing something about herself. She knew she loved Will. She knew she felt uncomfortable. But we see her unable to understand or properly voice it, causing a bit of a block even though he's conveyed his own feelings about the situation. So instead of blowing things up more, we're watching her realize what's going on and how she can personally grow from that and fix things.
This also means that, again, part of the volume also deals with other incidental elements that come from now being basically royalty. Liliana can't dash off to see certain sorts of plays as she pleases. She needs to be more mindful of who she is and what her role as the prince's fiance means. We're watching how that develops and how she deals with that, which keeps the volume from feeling like it's dedicated to the possible "rival" problem.
Which means once again, The Small-Animallike Lady is Adored by the Ice Prince ends up feeling like a somewhat atypical shojo manga. There's a small wrench in the gears keeping the relationship from being 100% perfect. However, Hisui makes the actual approach to the problem feel a little more mature and realistic. Also, because it isn't completely the one and only focal point, we do get to see how life is developing for Liliana in the palace.
Volume 3 of The Small-Animallike Lady is Adored by the Ice Prince is available now, and Yen Press will release volume 4 of the manga on January 20, 2026.
The post The Small-Animallike Lady Is Adored by the Ice Prince Manga Covers New Princess Problems appeared first on Siliconera. |

Destructoid Sunday, August 10, 2025 3:59 PM
Adventure Escape Mysteries has numerous murder mystery stories you can unravel by unlocking chapters. Rendezvous, introduced in July 2025, follows the story of two characters, Kate and Melissa, as they search for Kate's sister, Allie, in France.
Let's dive right into a complete walkthrough of Adventure Escape Mysteries: Rendezvous, including every item you need to find to progress throughout its seven chapters.
Table of contents
Adventure Escape Mysteries: Rendezvous chapter one walkthrough
Adventure Escape Mysteries: Rendezvous's first chapter begins with Kate and Melissa talking about a mysterious package addressed to Allie, Kate's sister, and how to open it. Here's a complete step-by-step to solving this section:

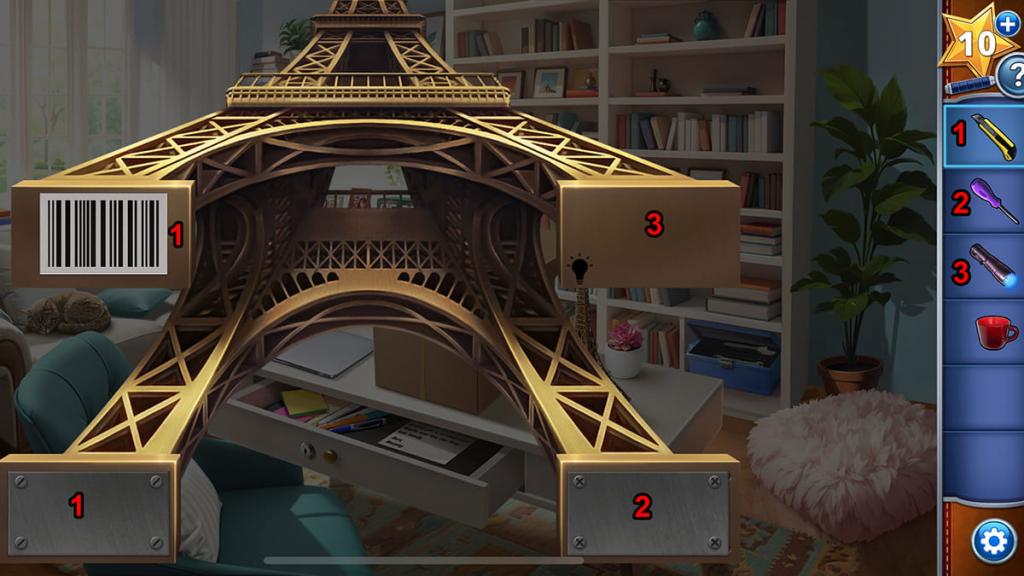


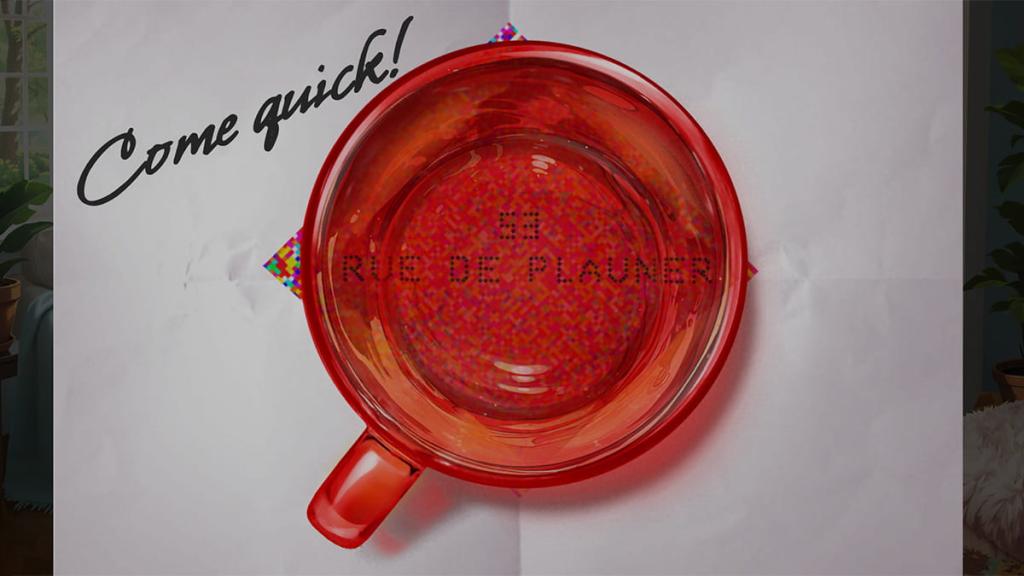
After solving this set of puzzles, Kate and Melissa will take a trip to France to find Kate's sister, Allie. You'll now have another batch of items to find and puzzles to solve, as detailed below:

Completing this puzzle will reveal a card reader next to the elevator. Use your new keycard to unlock it, letting you access Allie's penthouse room. Here are your next steps to solving this section:


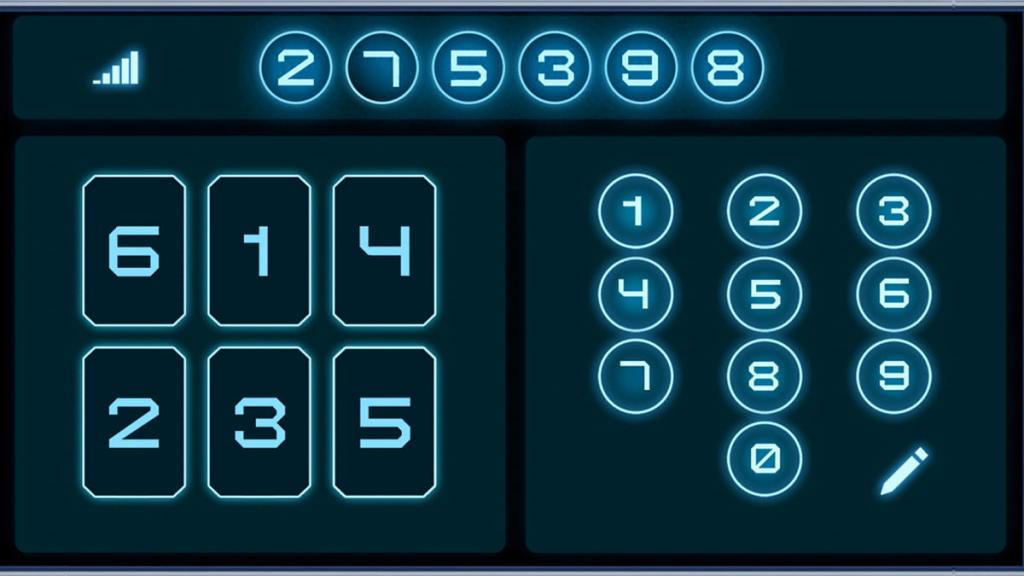
Completing the puzzle above will reveal a keypad that unlocks the door. The panel appears as another puzzle that references the previous number set. This time, the set on its left side reveals the order in which you need to input each number.
With this in mind, use your stylus to input 275398 into the panel, letting you unlock Allie's room.
Finishing this puzzle will lead to a cutscene involving you, Allie, and Melissa. Watching it will wrap up Adventure Escape Mysteries: Rendezvous's first chapter, leading directly into its second part.
Adventure Escape Mysteries: Rendezvous chapter two walkthrough
As you begin Adventure Escape Mysteries: Rendezvous's second chapter, you'll learn more about Allie and her fiancé, Mark. You'll visit Mark's cafe gallery and witness a customer, Lynn, talking about the disappearance of her boyfriend, Luc. Your first objective is to disable the cafe's Wi-Fi before investigating further.
With these new clues in mind, take the steps below to start Adventure Escape Mysteries: Rendezvous's second chapter:


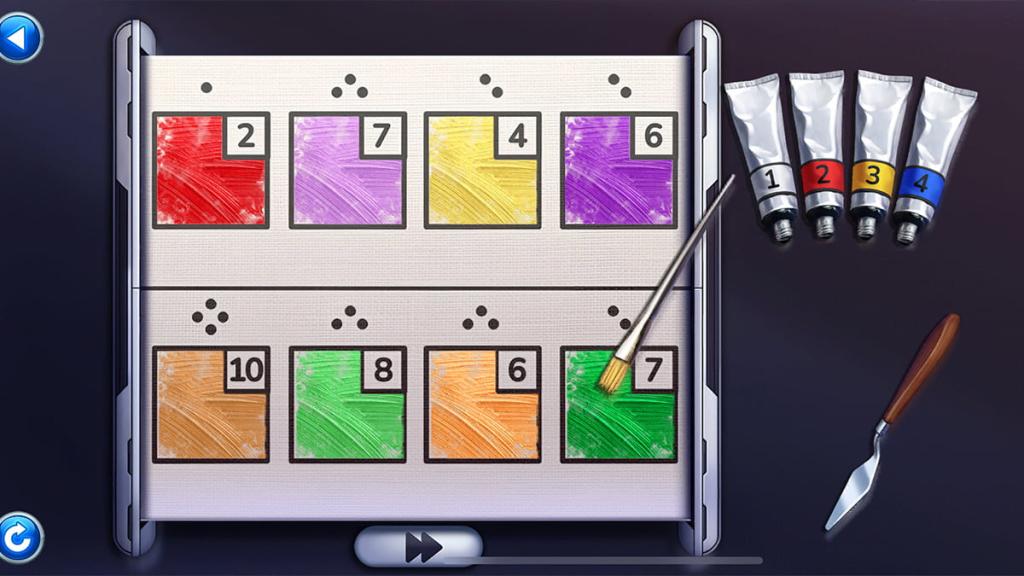
There are multiple aspects to this next puzzle. Using the four paint colors and their numbers, you'll need to place paint drops based on each square's sum and the number of droplets they require, shown by the dots above each square. Here's how each square should look before completing the puzzle:
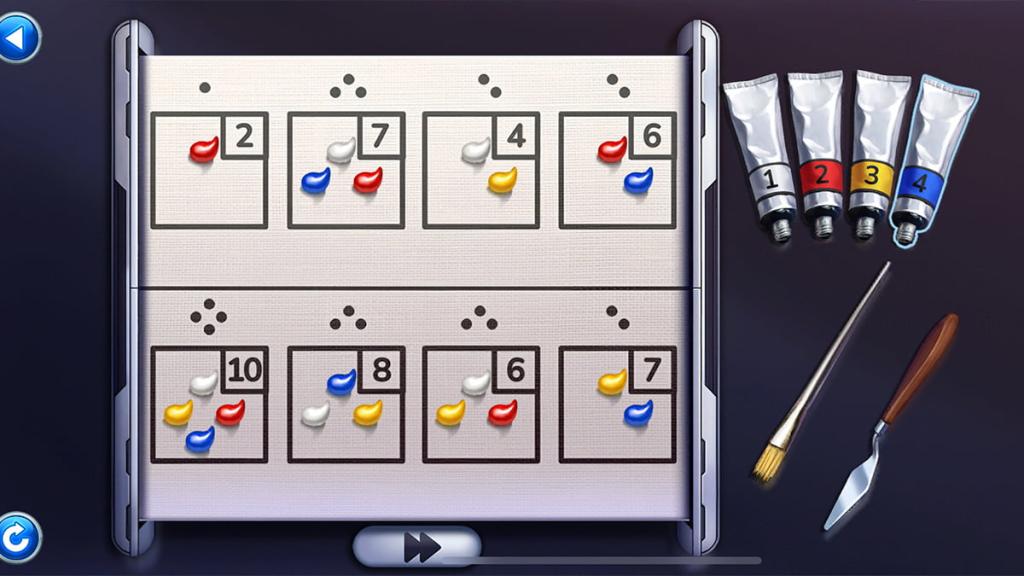
Once you place every droplet, use your brush on each space to paint them in. If you accidentally use the wrong paint, you can use the paint knife to scrape it away. After completing all eight squares, press the arrows to process them and wrap up the puzzle.
Finishing the puzzle will reveal a 3D printer with a USB beside it. Follow the steps below to finish the rest of the chapter:
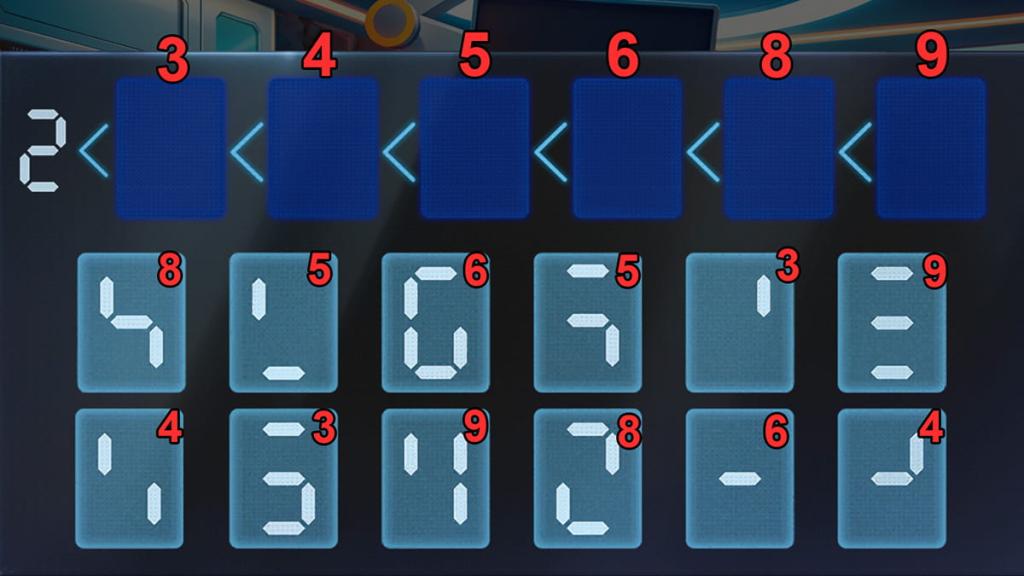
You'll now have one final puzzle to complete for this second chapter. Your goal is to insert each set of numbers into each square. You'll need to align them so that those below and above the equal signs match. Here are the solutions for all three parts:


Completing the puzzle reveals multiple plot points that Kate and Melissa will discuss in the next chapter. Following this conversation, you'll complete Adventure Escape Mysteries: Rendezvous's second chapter and be ready to begin part three.
Adventure Escape Mysteries: Rendezvous chapter three walkthrough
After Kate and Melissa tell Allie about their findings regarding Mark's AI usage, Camille's card, and Luc's disappearance, Allie will call Camille and Luc to see what's going on. The situation is suspicious, prompting Kate and Melissa to investigate further. Here are some initial steps to take:
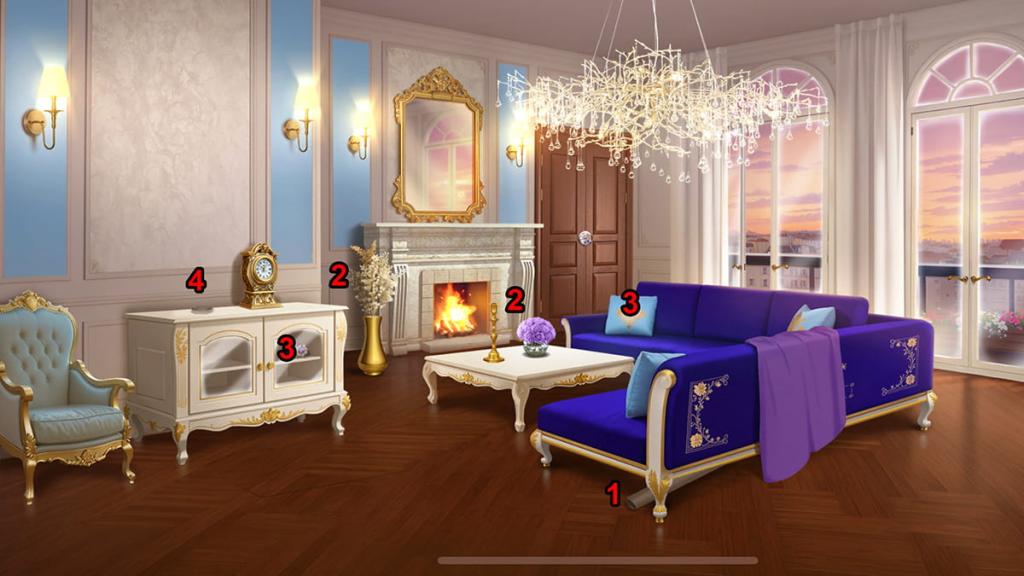

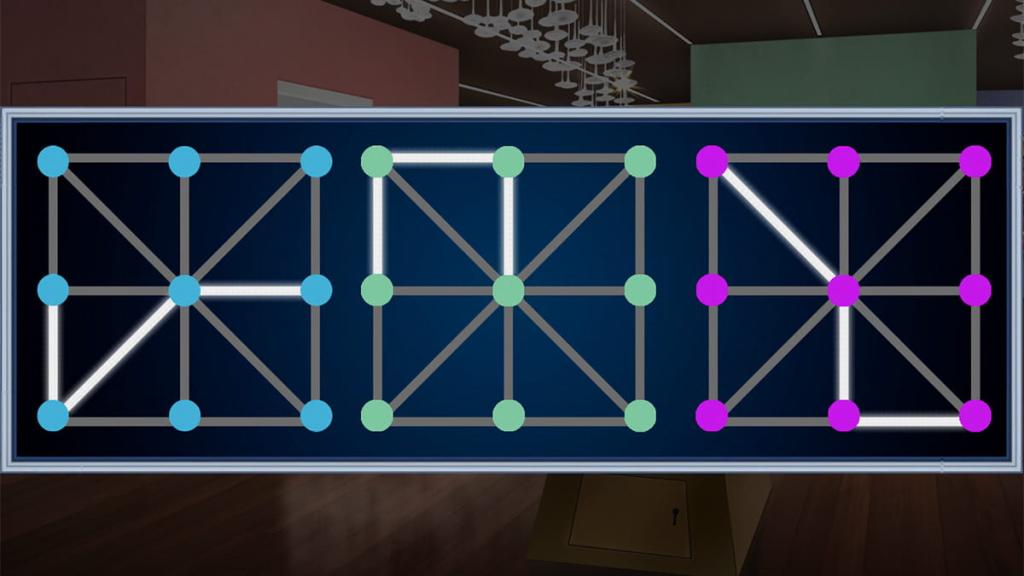
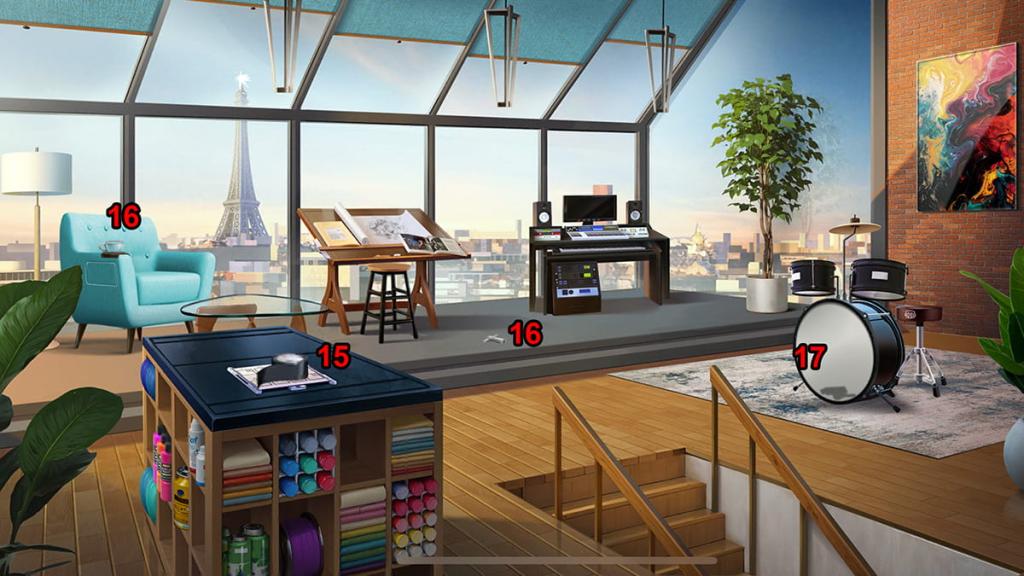
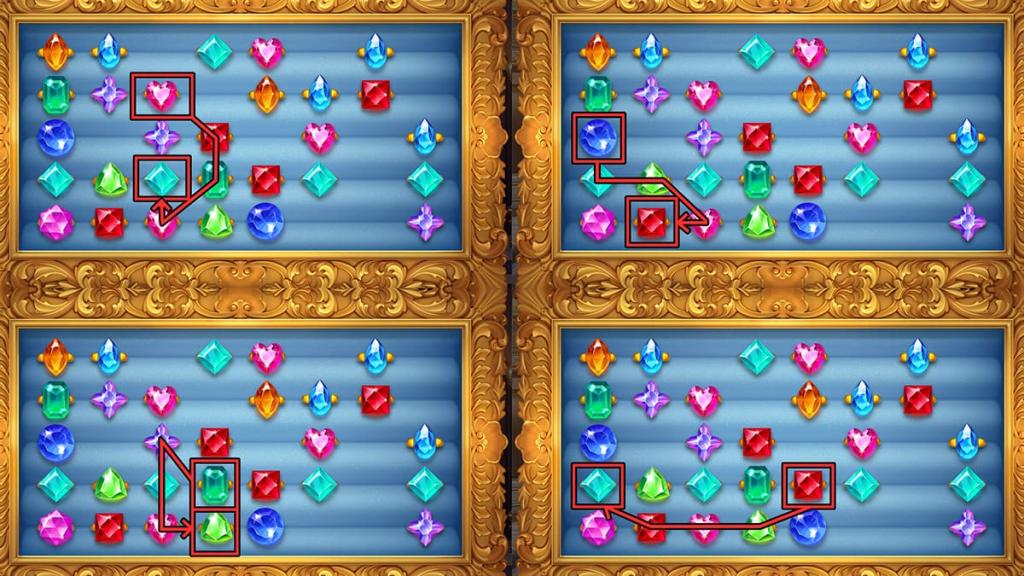
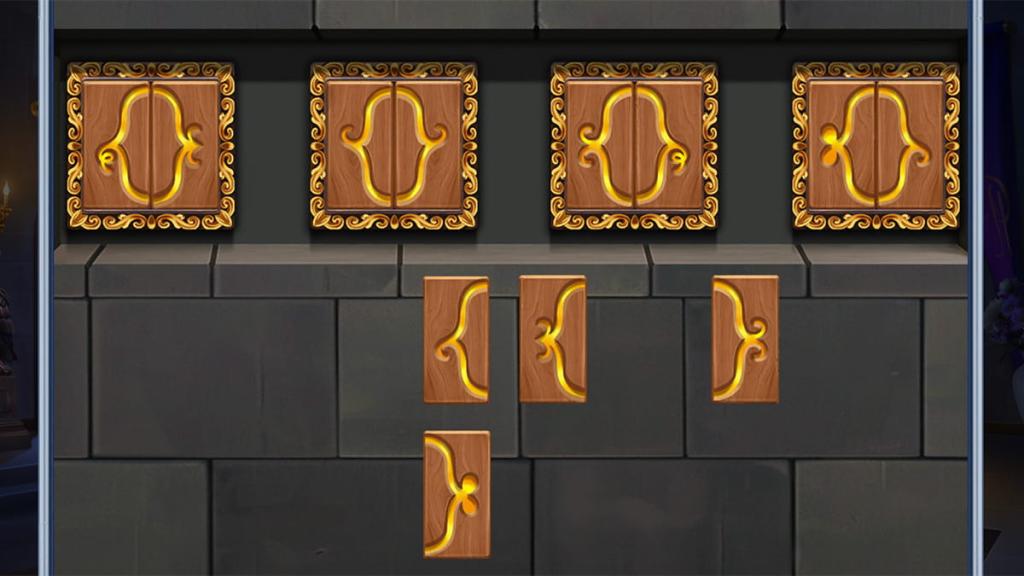
Now that we've collected every item from this area, it's time to solve a puzzle involving the couch pattern, the flowers on the cabinet, and the bedroom door's lock. Our first step is to look at the couch's puzzle. Each circle has a pattern, which you can match up with four squares on the cabinet's flower puzzle.
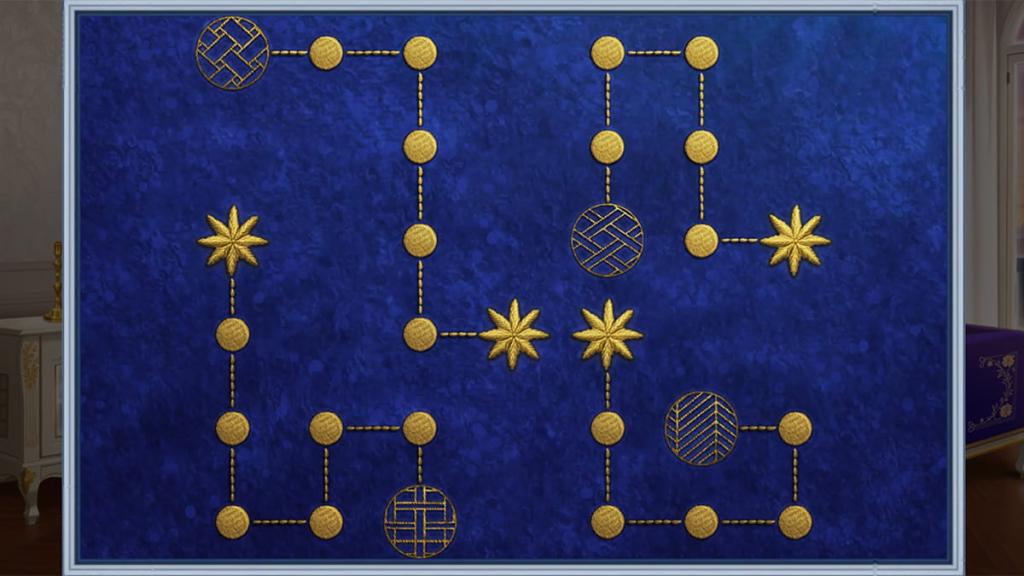
Using this as a reference, trace the flower puzzle's paths for each of the four patterns. You'll find the four paths and destinations in the images below.


As you mentally map out each path, note the locations of the flowers' dark petals. Head to the bedroom door and tap on each circle to match the four petals. Doing so will unlock the door, allowing you to explore Allie's bedroom for more clues.
Now that we're in a new area, use the steps below to advance further:
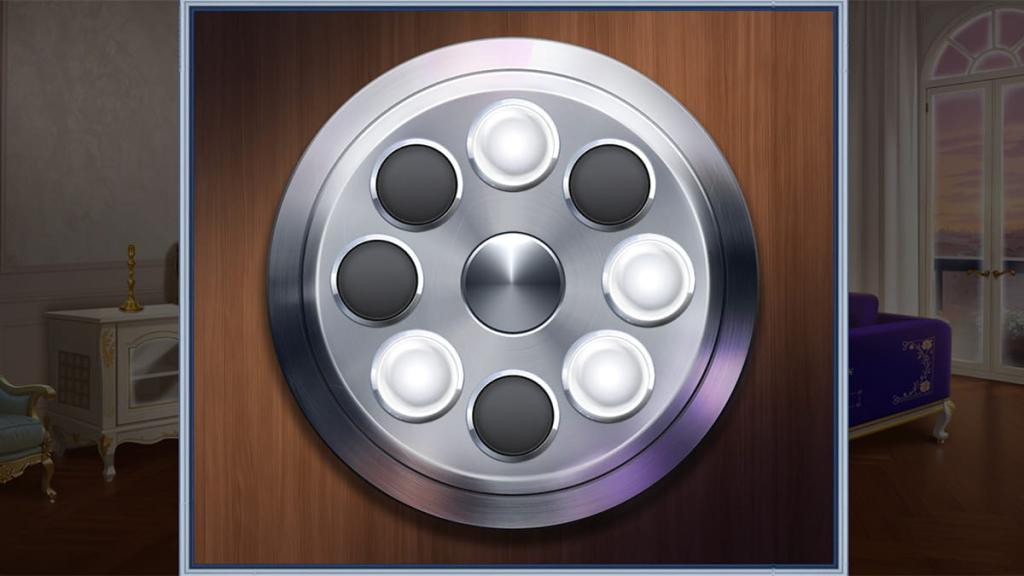
With this puzzle, your objective is to place and rotate each knob until they're pointing to the number of knobs shown on their center circle. You need to do this for the ones already on the board and the four purple versions you picked up earlier in this chapter. You'll find the solution in the picture below:
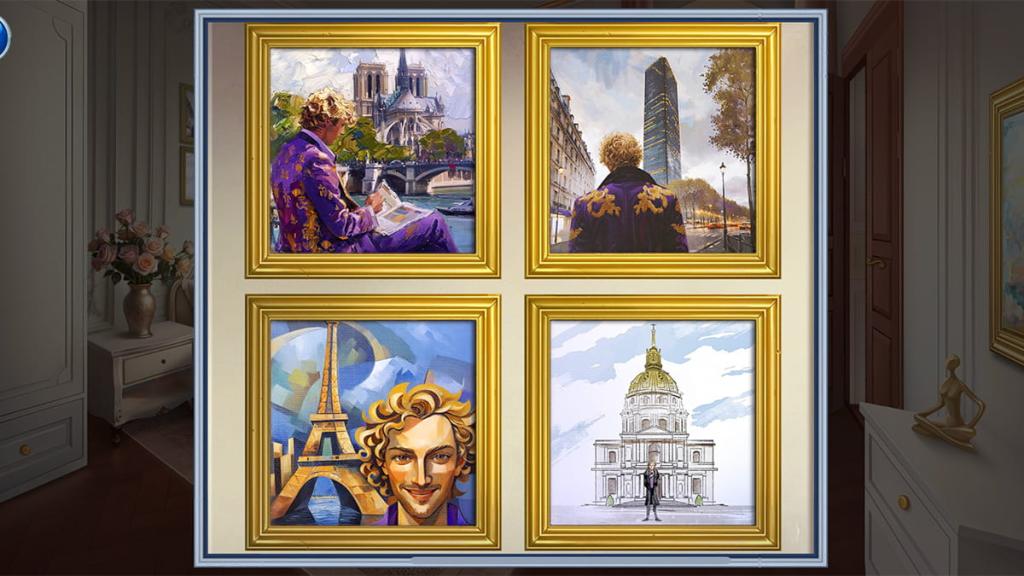
Finishing the puzzle will reward you with another painting and a note. Reading the note will give you a clue, "From east to west," with an arrangement that matches the paintings above Allie's bed. Return to her bedroom and place your paintings within the four canvases to begin another puzzle.
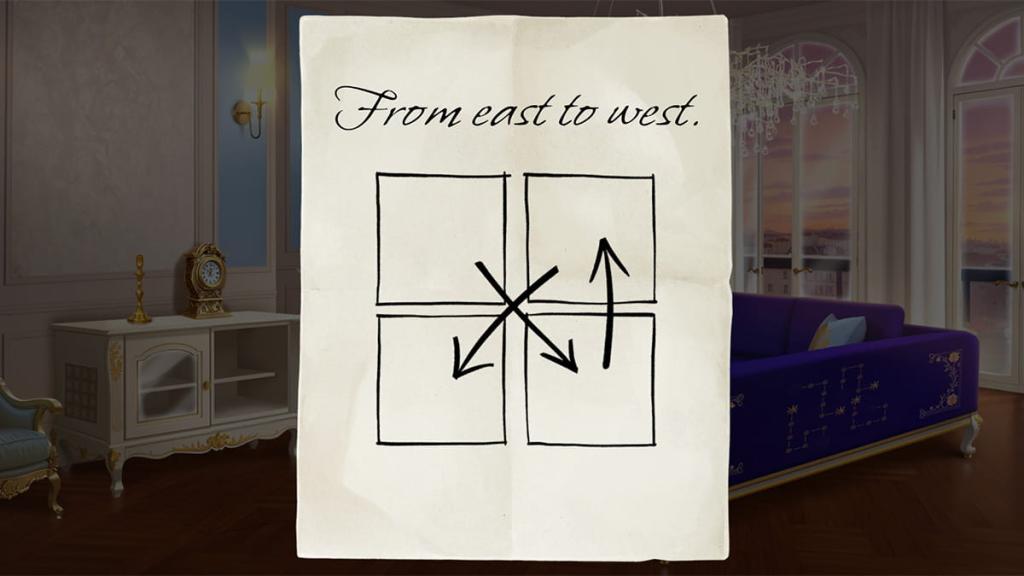
The solution lies beyond the terrace. There are four landmarks—the Eiffel Tower, Notre-Dame, Les Invalides, and the Tour Montparnasse. You'll arrange each painting by looking at the easternmost landmark and moving west while following the arrows shown on the note. The images below show the answer to this puzzle.
Solving this puzzle reveals another note, telling you "the clock is the key. Turn the time to 3:08." Interact with the clock in the living room. Before Kate gets a chance to do so, a dart will fly at her, sending her through a trapdoor.
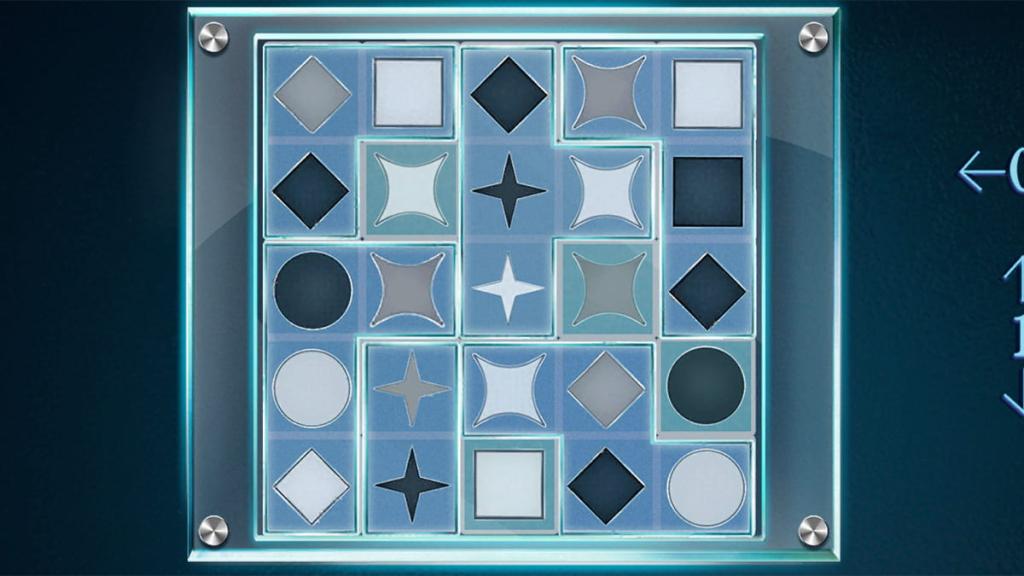
We're now stuck inside an underground cell. Follow the steps below to get Kate out of this predicament:
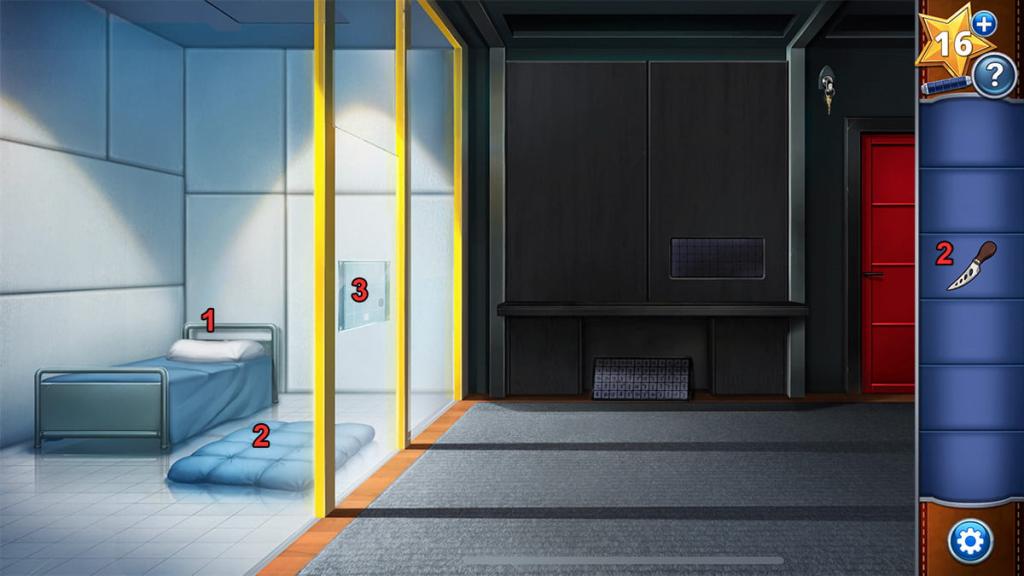
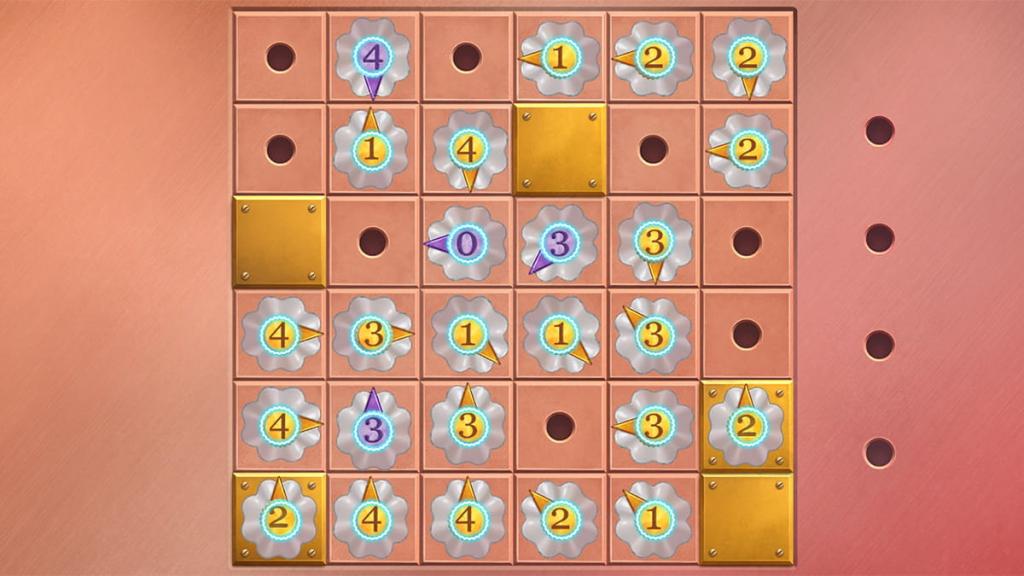
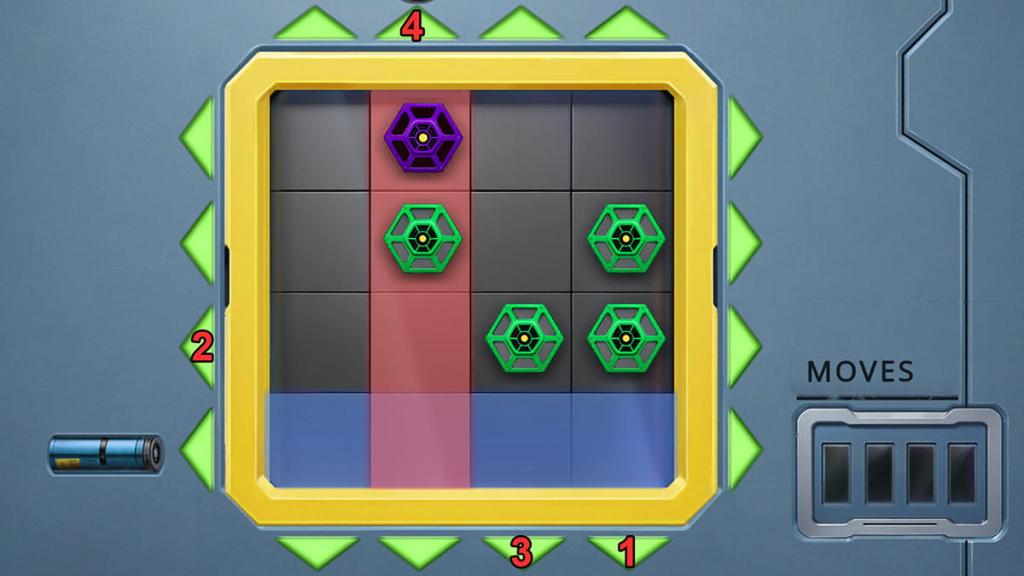
For this puzzle, you need to place each glass piece onto the grid. They all have symbols with two traits—shape and color. Each shape has to share exactly one trait with those above or below it, while also sharing zero traits with those to its left or right. The picture below shows this puzzle's solution:
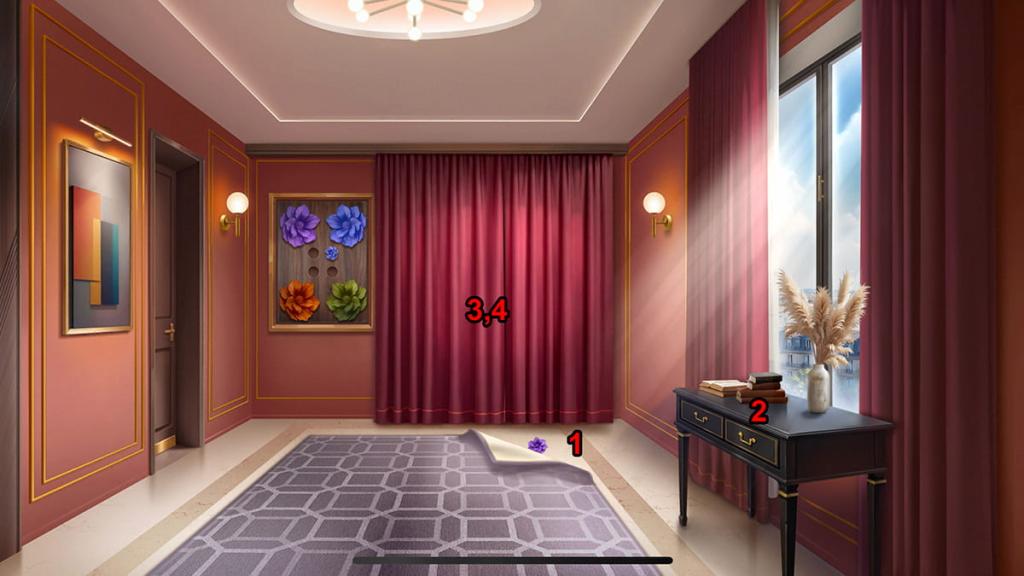
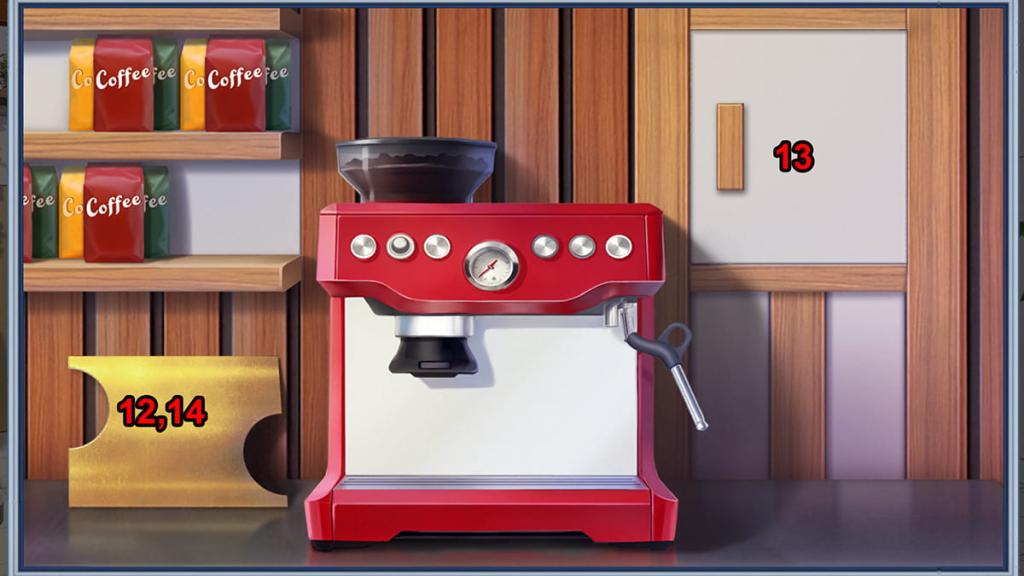
Now that you're out of the cell, pick up the number board underneath the TV stand and look at it. At first, you'll see dozens of numbers and arrows. Placing the board atop it will reveal your starting position and number: a one with an arrow pointing northeast. The arrow signifies which direction the next number is, while the number indicates how many squares away it is.


With this information in mind, tap on the display next to the red door. Select the square that matches the one on the number board and follow its directions to activate the rest. You'll find the full solution below:
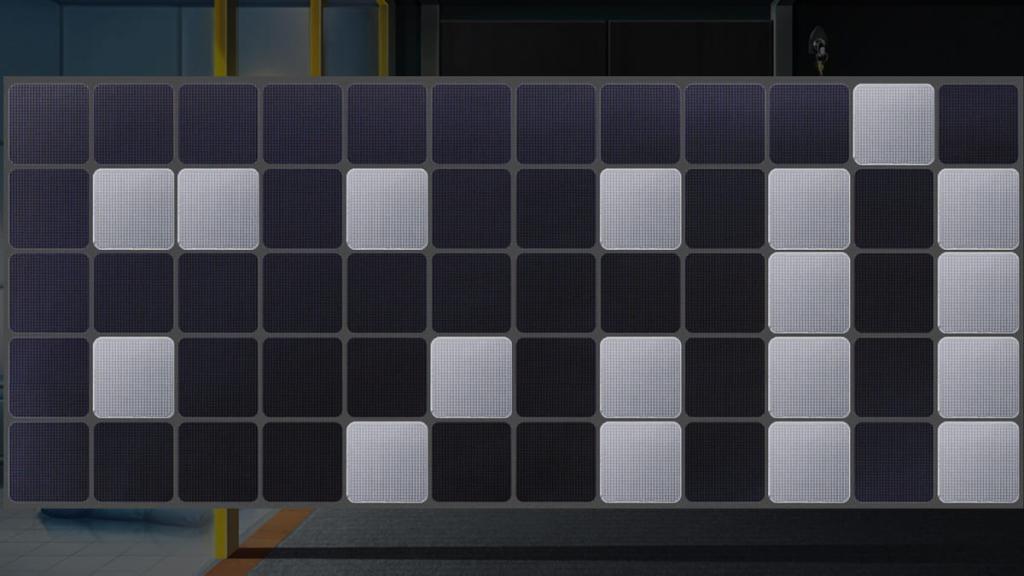
After activating every square, you'll discover that it spells out "GRAY." You'll unlock a video surveillance area and gain an invitation. Once you're ready, grab the baguette from the desk and use it to knock over the key above the red door. Unlock the door to escape the underground area, find Melissa, and wrap up Adventure Escape Mysteries: Rendezvous's third chapter.
Adventure Escape Mysteries: Rendezvous chapter four walkthrough
In the last chapter, Kate found a party invitation that led her and Melissa to a castle. However, they're unable to get in, so it's up to us to find a way in. Here are some first steps to doing so:
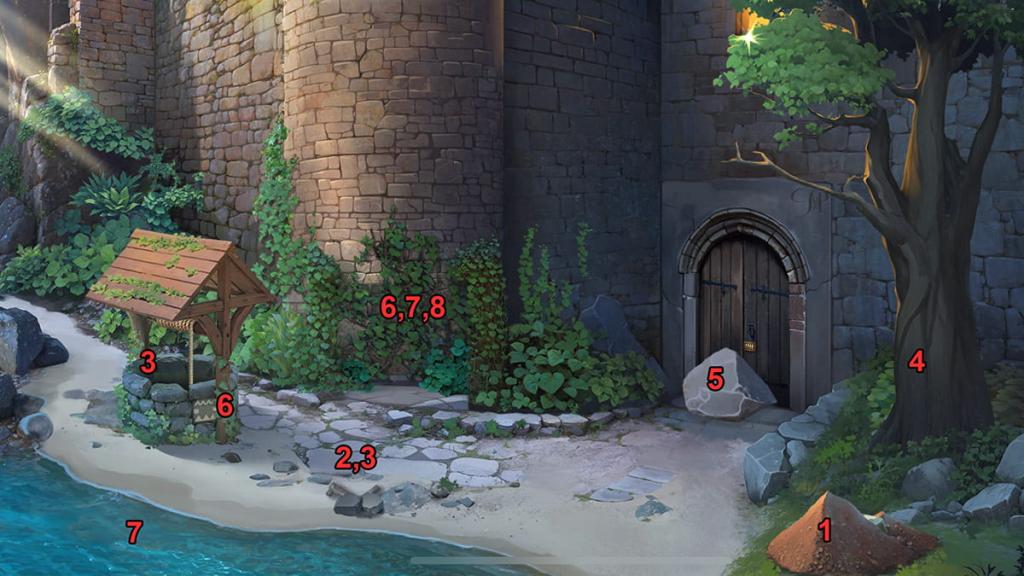
We now have a mysterious stone puzzle to solve. Starting with the two slots with outer designs as hints, your goal is to place each stone so that its sides match. You'll find the solution to this puzzle below:

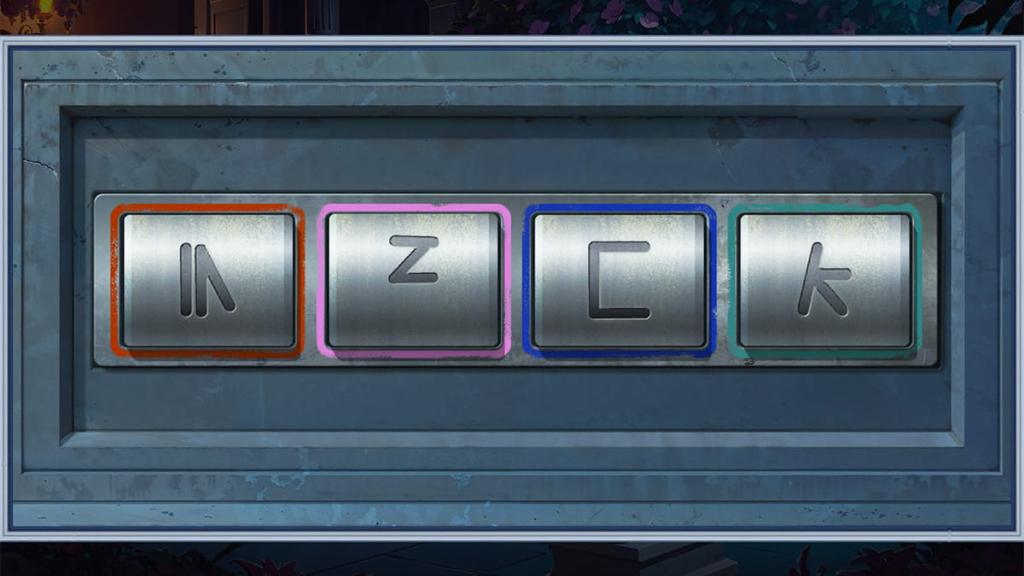
Once you complete the puzzle, you'll find new cracks have formed around it. Use your dagger to break them and uncover the following codes:
You'll also find arrows pointing to each clue. A down 1 has one arrow pointing down to it, R down 1 has two, P down 3 at three, and L down 5 at four. With these clues in mind, we can now unlock the castle door.
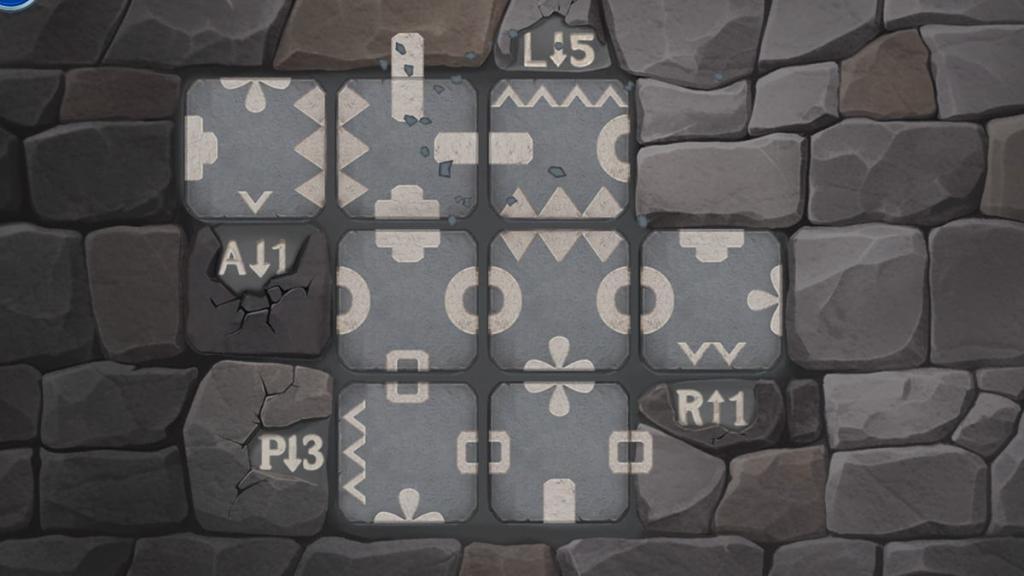
Head out of this menu and tap on the door. The first dial is already set to A, so you can tap it once to bring it to C. From here, take the second dial and turn it until it's one letter above R. Repeat this using the hints above to get the solution, CLEF.

We're now inside the castle's wine cellar. Here's a step-by-step guide to solving this area:
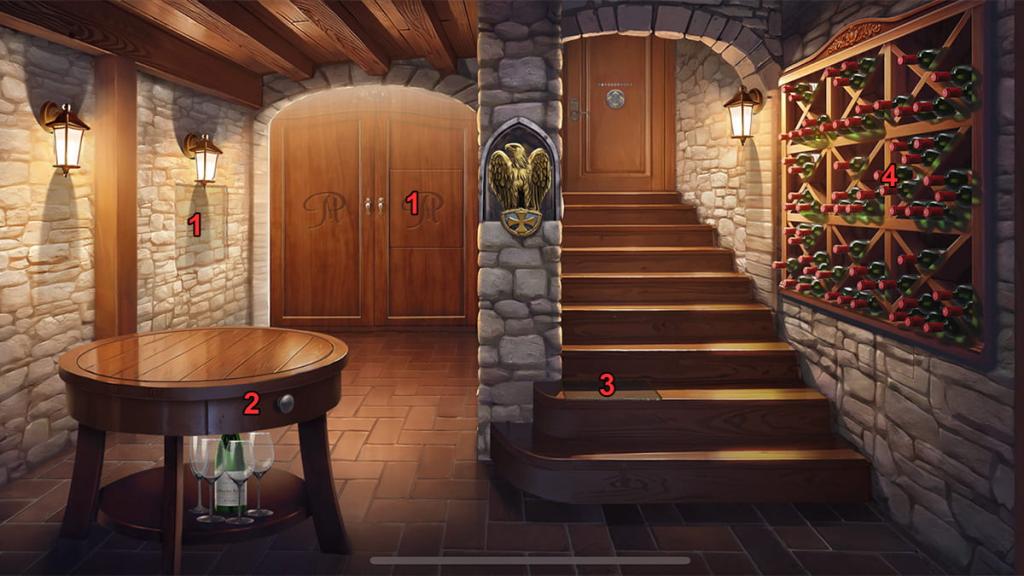
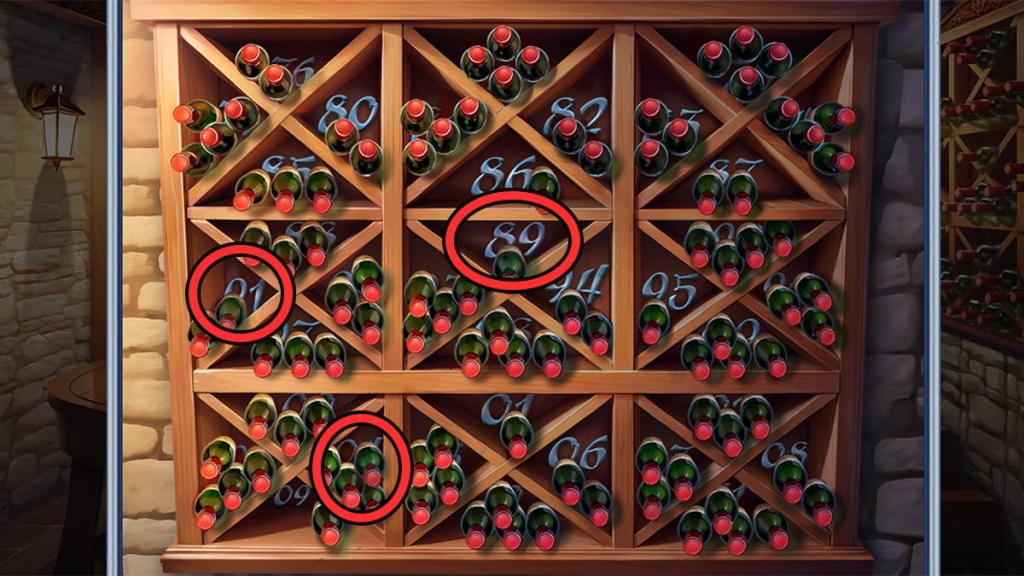
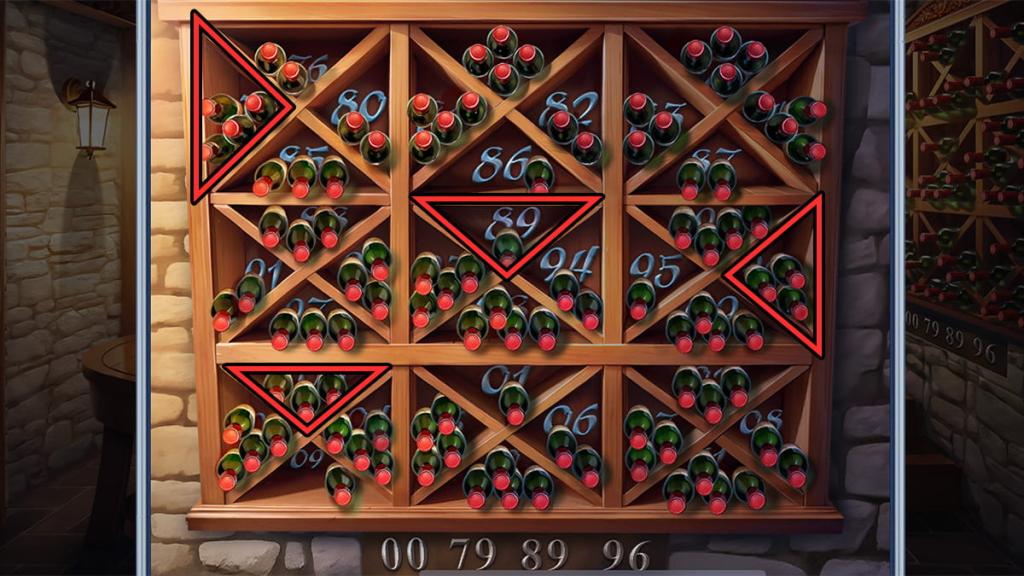
Completing this mini puzzle will reveal a hint, "00 79 89 96," underneath the display. Find these four wine sections and count how many bottles are in each and what direction they're facing. You'll end up with the following answers:
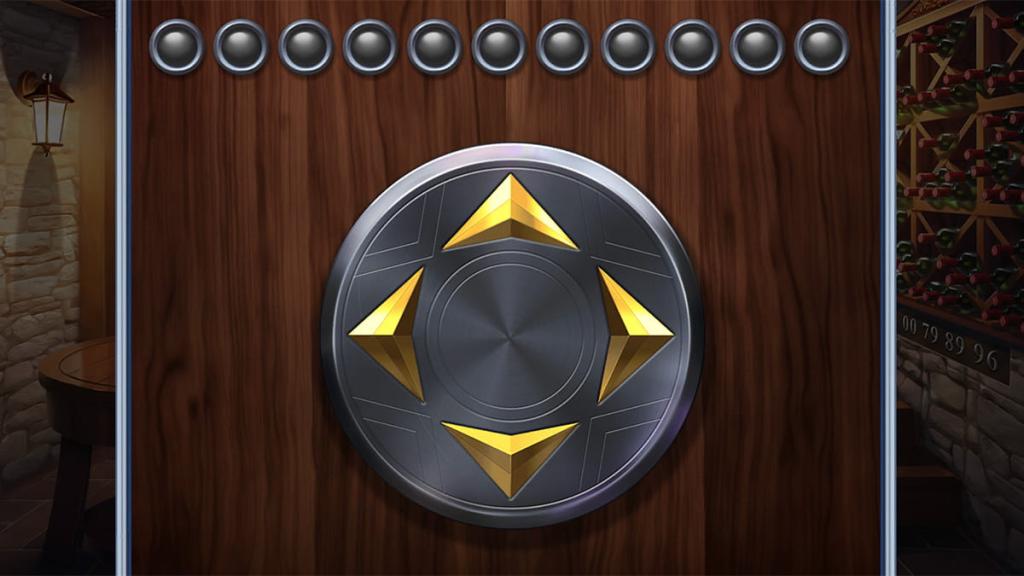
Now that we know the answer, tap on the door up the stairs and input this code using the arrow dial. Doing so will open the door, leading you to a room connected to the ballroom.
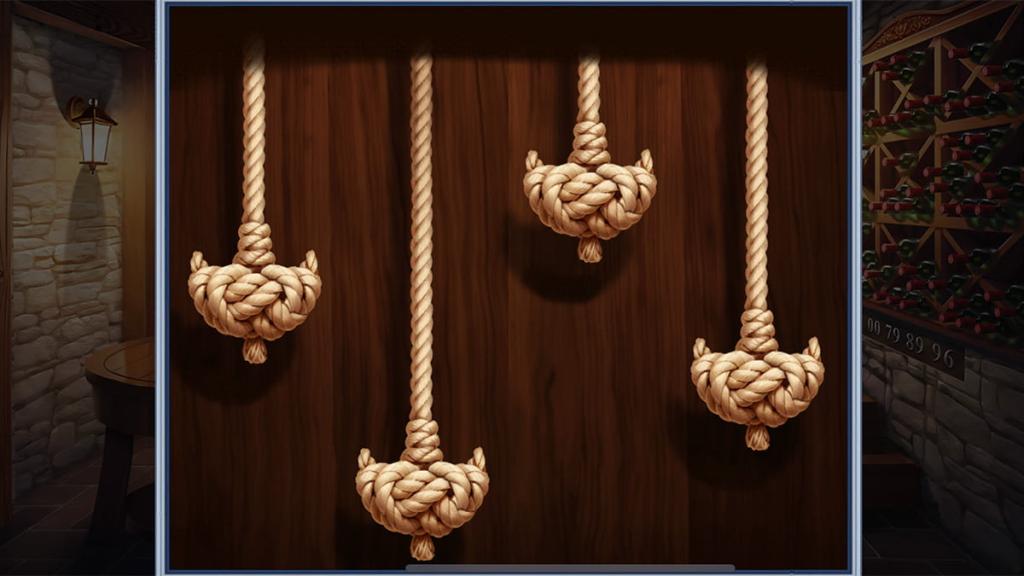
In this room, pick up the rope from the chair and tap on the purple curtain. Remember the heights of each chandelier. Now, head back downstairs and insert the rope into the door's compartment from earlier.
From here, you'll need to raise and lower each rope to match the chandelier heights. The image below shows the solution.
Completing this puzzle will reward you with a blue dress to wear to the party. Along the way, pick up the plaque and hidden star inside the closet. Remember the hat's location.
With that done, head back upstairs and open the curtain to find the ballroom. From here, you can take the steps below to progress:
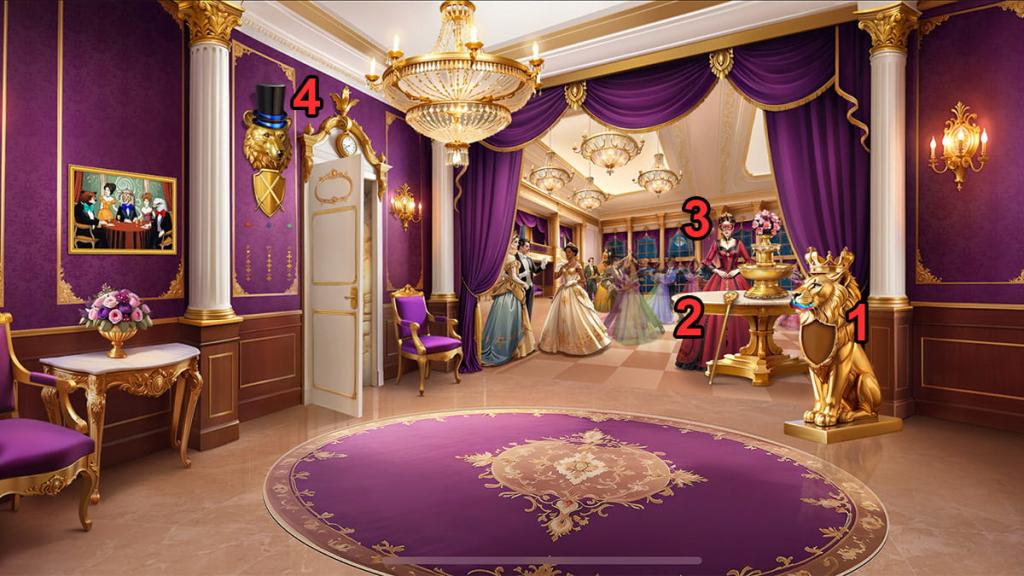
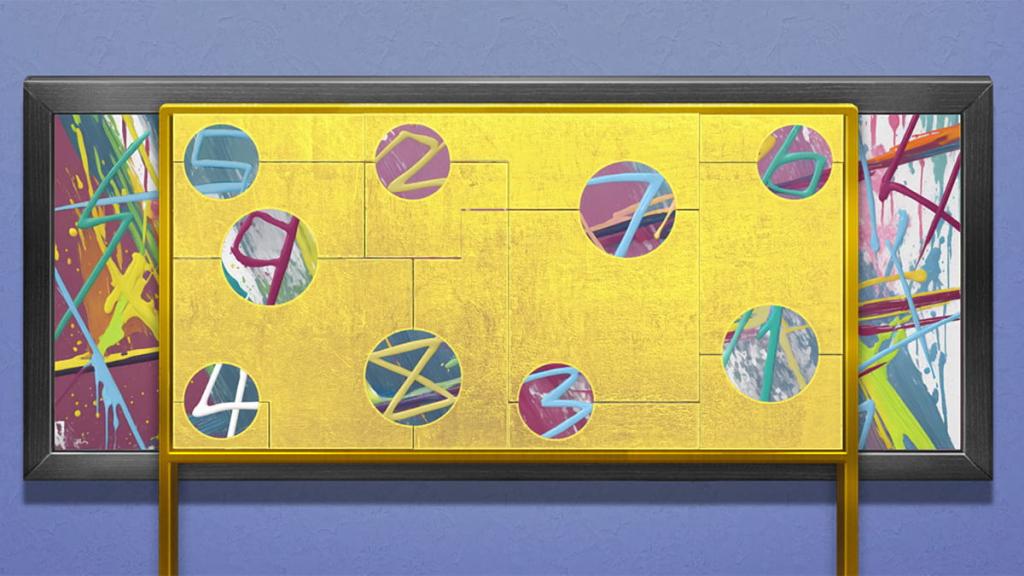
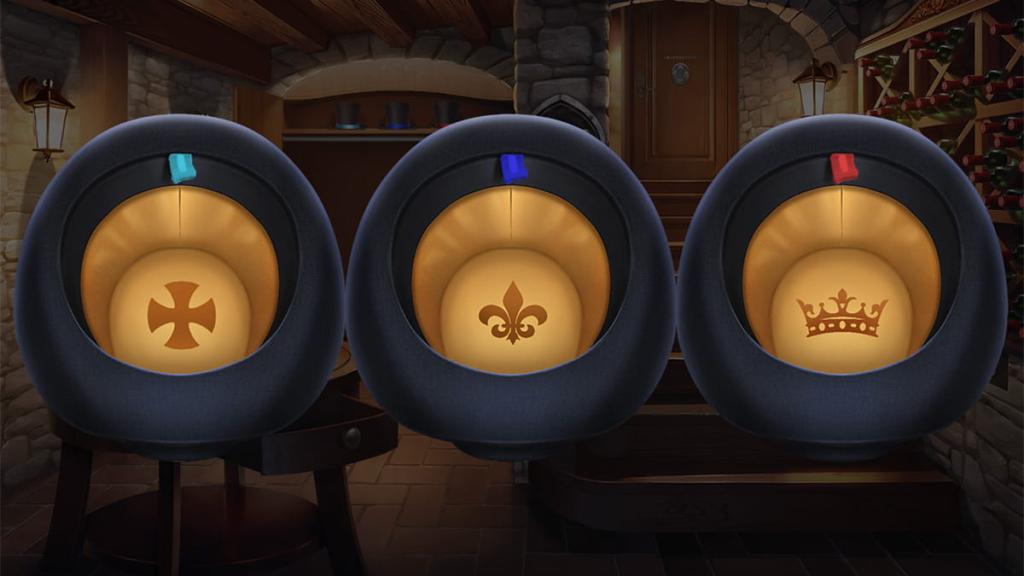
Now that we have the dance card and two hats, we have three mini-puzzles to complete. To access the first, tap on the three pegs under the bear's head. Place the masks on them before filling out the mask section of your dance card with the three symbols that appear.
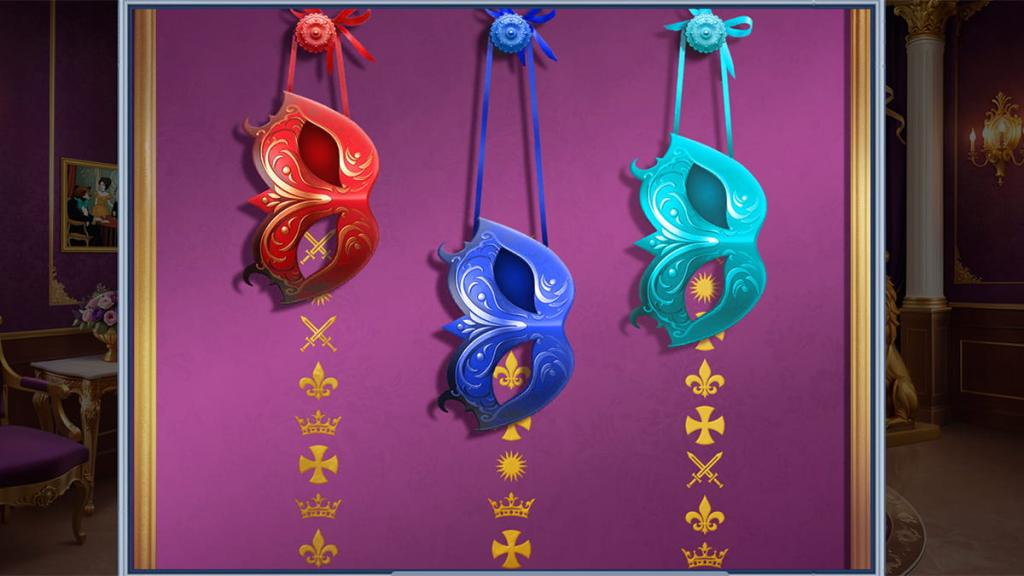
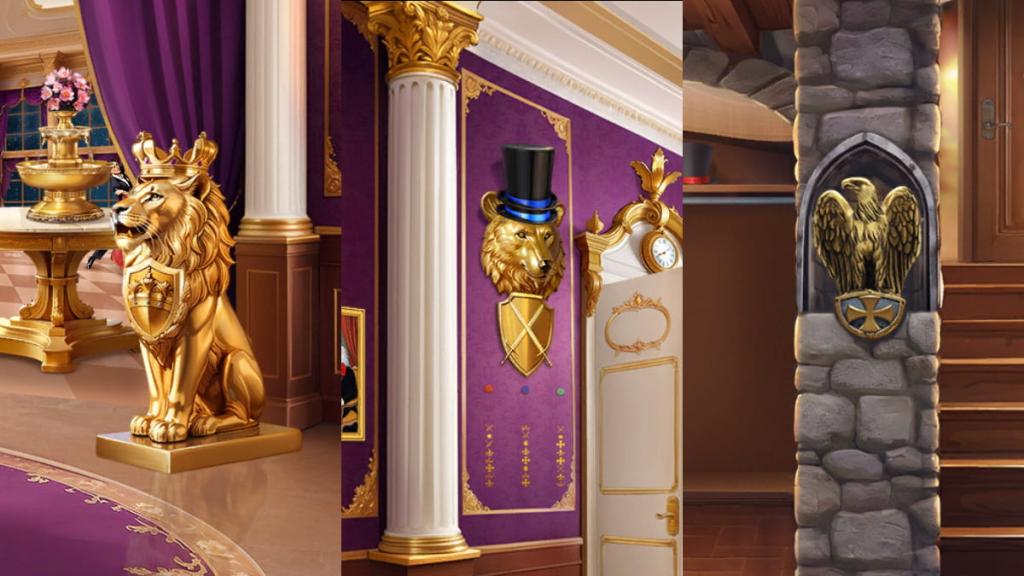
Next, we'll check out the animal painting next to the masks. Each animal has a colored bowtie. You'll need to check out the lion statue and bear head's symbols, alongside the eagle in the wine cellar. Here are each of their symbols:
Our last puzzle involves the hats. Go to the hat from earlier and use your two hats on it. Selecting them will display colored ribbons and symbols. Jot this down on your dance card to complete it and begin a new puzzle.
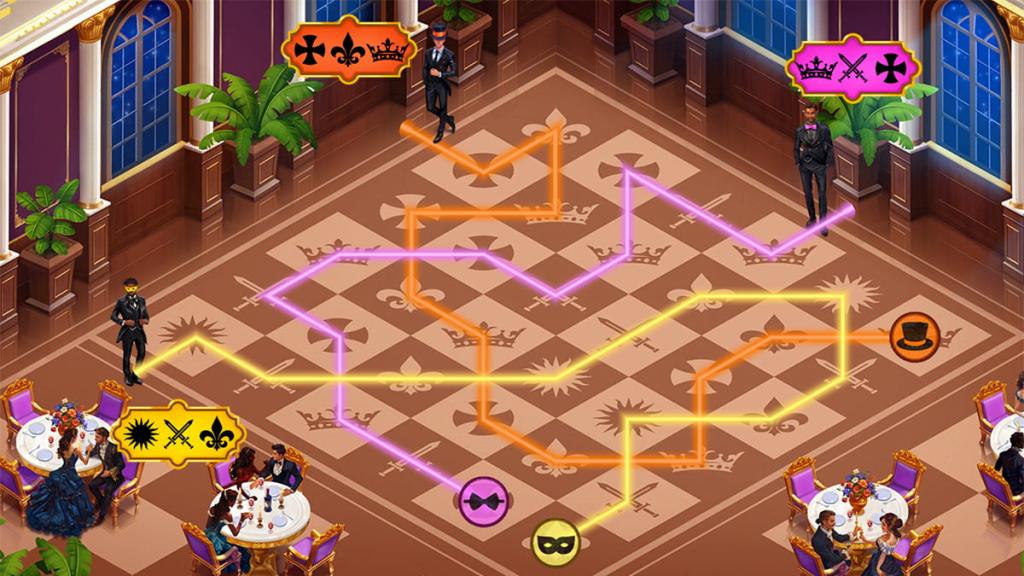
You'll now dance with three partners. Each dance has 12 steps that follow each partner's symbol sequence, with each symbol appearing on a floor grid. You can only use each square once. You'll find the answer to this puzzle below:
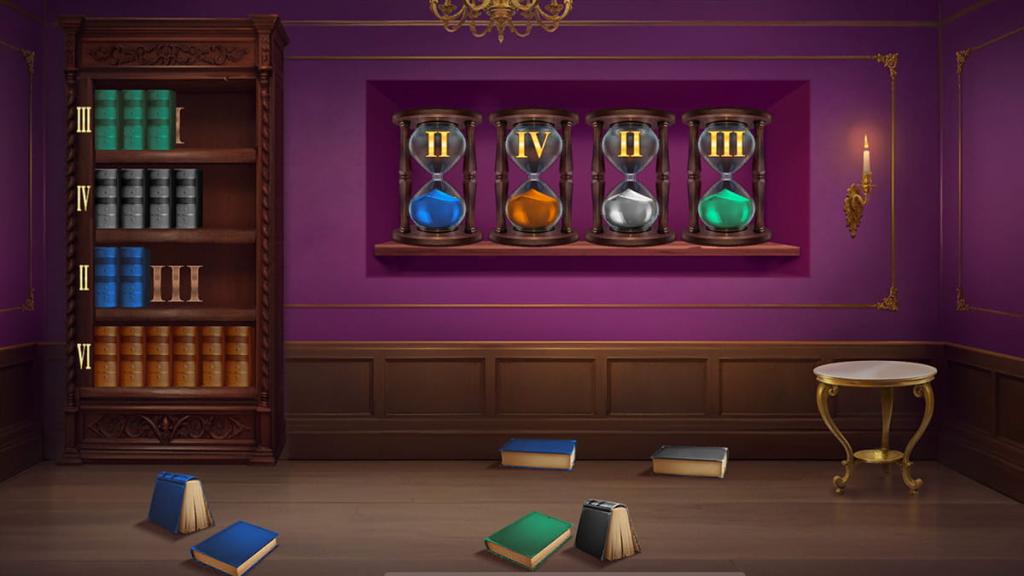
Following a cutscene involving Mark, we'll find ourselves inside a dark room with scattered books and numbered shelves. Pick up the matches and light the candlestick to reveal four hourglasses. Tap on each hourglass to find two numbers, one on each half. One number shows how many books to put on each bookshelf, while the other reveals which shelf to place them on.
Using this information, we'll place the books in the following locations:
Solving this puzzle will immediately complete Adventure Escape Mysteries: Rendezvous's fourth chapter, letting you begin the fifth and get one step closer to discovering Allie's whereabouts.
Adventure Escape Mysteries: Rendezvous chapter five walkthrough
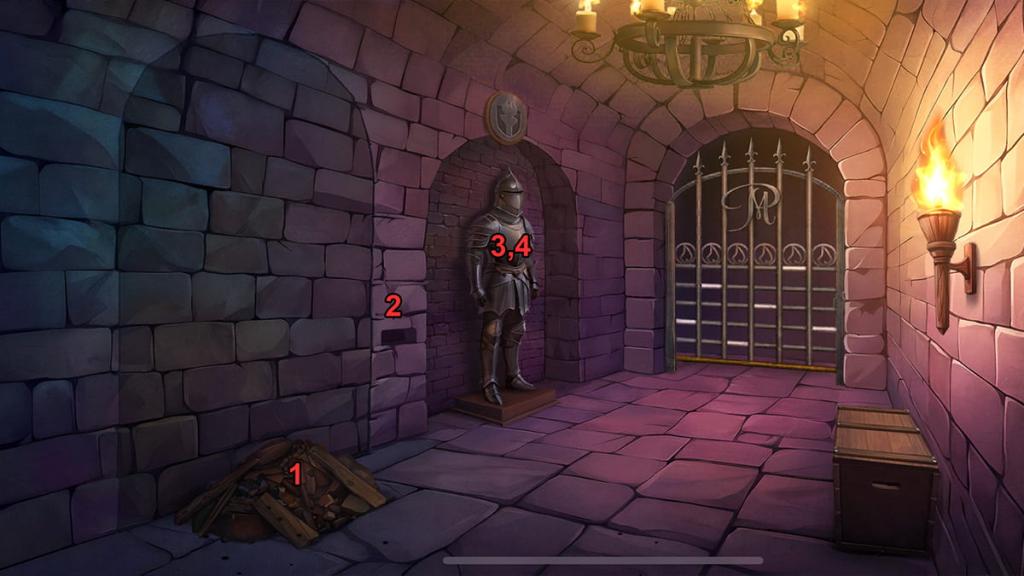
We're now in a dungeon-like room. Start by picking up the sparkling torch on the floor and using the lit torch to ignite it. You can now use your handheld torch on the chandelier to light up the room.
Here's a complete step-by-step guide to solving this first section:
These candles are our first puzzle of this chapter. You'll find the answer by looking at the cell door. The heights of each candle need to match these lines in the order they appear. Use your torch to light them. You'll find the exact solution below.


Once you complete the puzzle, light the final candle to obtain a key. Unlock the door to find a new area to explore. You can now take the following steps to escape this area:

Using the torch on the map will reveal six directional arrows. Rather than looking from our perspective, we need to envision it as if we're driving each boat and moving in the six directions shown. The only viable option is the one with 278 along its path.
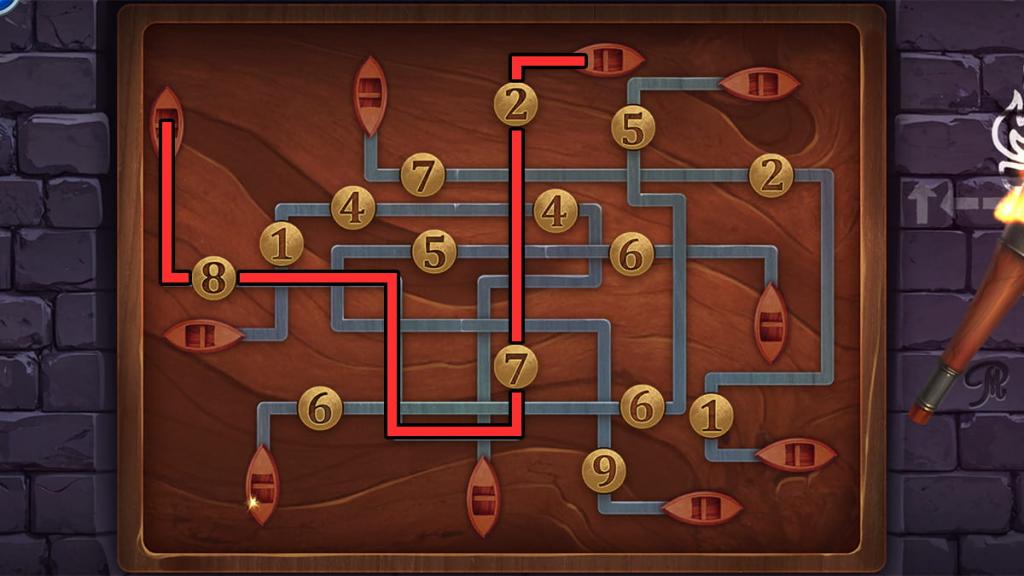
Tap on the pillar near the wooden boat to find the puzzle that requires this three-digit combination. Tap each dial until you get 278 to unhook the boat.
With this done, return to the previous room and use the hammer to open the chest. Grab the sword and use it to break the box, giving you some building supplies. You can gain additional building supplies by placing the sword and torch in the suit of armor's hands.
After reclaiming the torch and sword, return to the boat area and follow the steps below to progress:
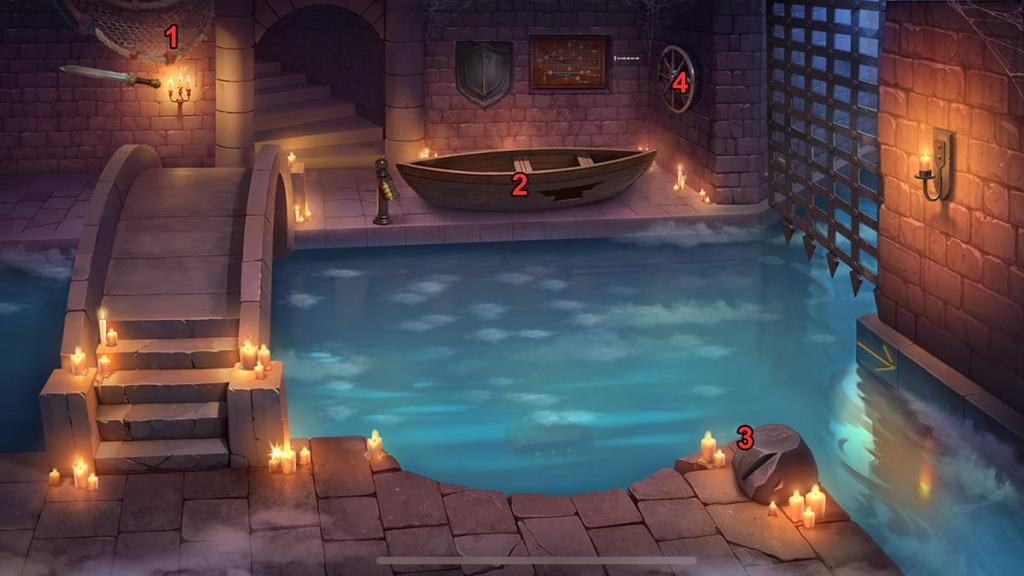
With every new area comes additional items to collect. Here are some steps to take to tackle this section:
The key to solving this next puzzle is figuring out where each cube symbol is located. You can't rotate the cubes, so you'll need to use the process of elimination to determine their orientations before swapping each white dial. The easiest answer to start with is the top-left, as the top-right shows that the square is directly connected to the triangle and circle.
The picture below shows the solution to this puzzle:
Completing this puzzle will unveil a second one that we'll tackle later. For now, return to the other area and head down the second path leading south. You'll find a total of three keys, which you'll need to fish out with your net. Use these keys on the treasure chest to receive some metal pieces.
With these pieces on hand, tap on the MP puzzle and place them in its display. You'll now have to fit every piece into the letters. A small hint you can use is checking if your piece snaps into place when you slot it in. You'll find the answer below:

You'll receive a crossbow after completing this puzzle. Go through the tunnel where you found the keys and use your crossbow to shoot wooden boards on the ceiling. Every board has a symbol, which appears in the following order:
Before we can do anything with this information, we need to find some gems for another puzzle. Here are the steps to doing so:
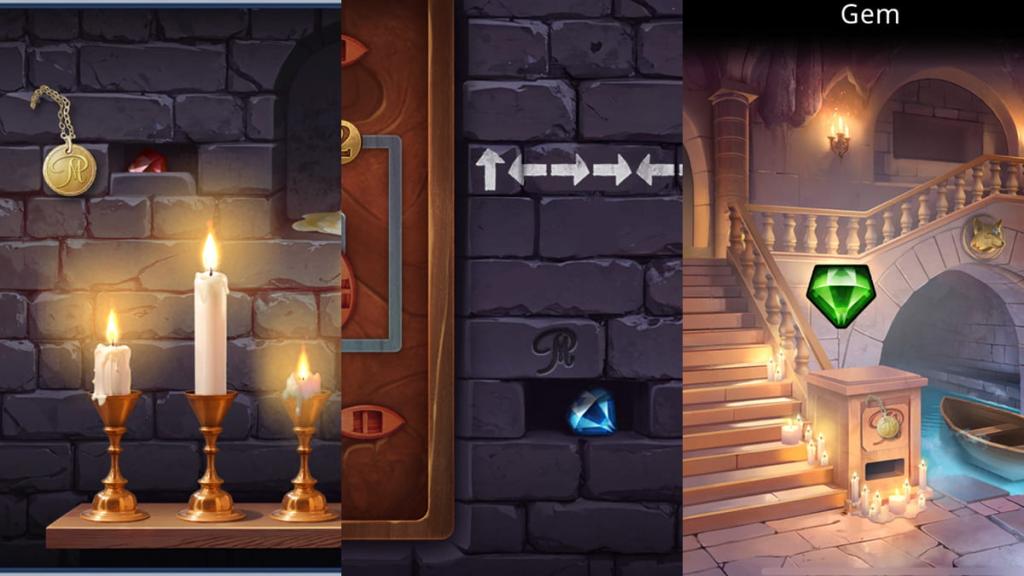
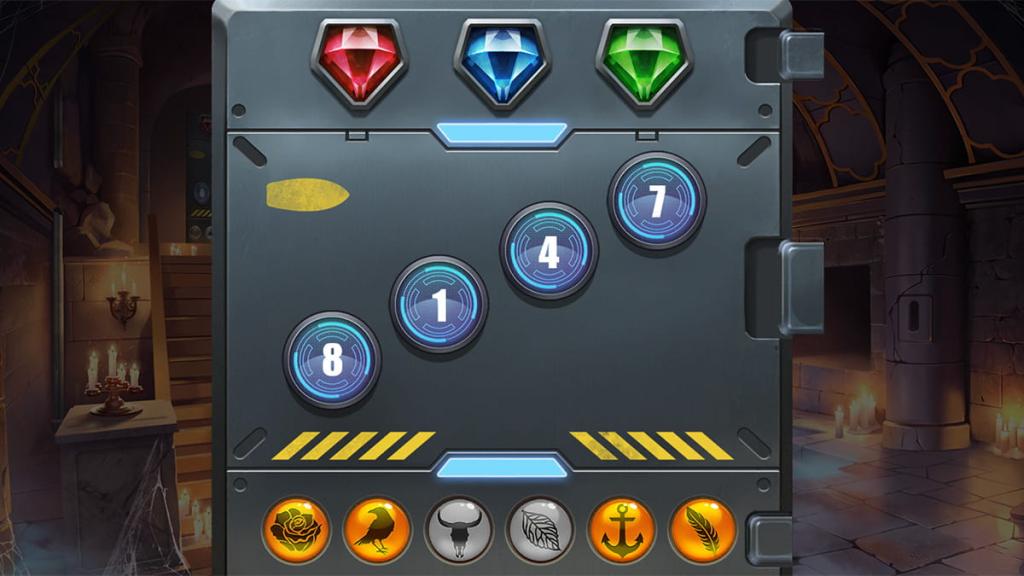
We now have everything we need to solve the final puzzle. Tap on the sci-fi gate and insert all three gems. Input 8147 into the middle number orbs, and select the four symbols we found during the boat ride to unlock the final latch.
Opening this door will wrap up Adventure Escape Mysteries: Rendezvous's fifth chapter. We're now ready to press forward with the game's sixth part.
Adventure Escape Mysteries: Rendezvous chapter six walkthrough
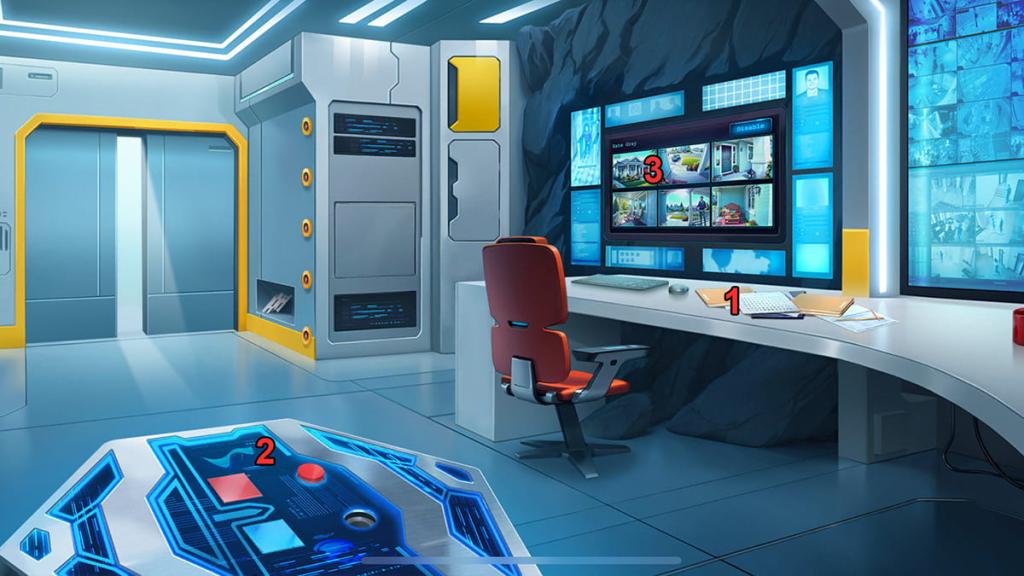
We've now arrived in a high-tech lab designed by Mark. Although Kate is confused, she's determined to find Allie and figure out what's going on. Here's an initial step-by-step guide to advancing through this area:
Following these steps will open a cell with Camille and Luc inside. You'll also find a hidden star under the bed. They'll give you a blue keycard, which you can use to open the yellow door in the top-right corner of the area. Insert the blue and yellow keycards here to proceed.
From here, you can take some additional steps to learn more about your current situation:
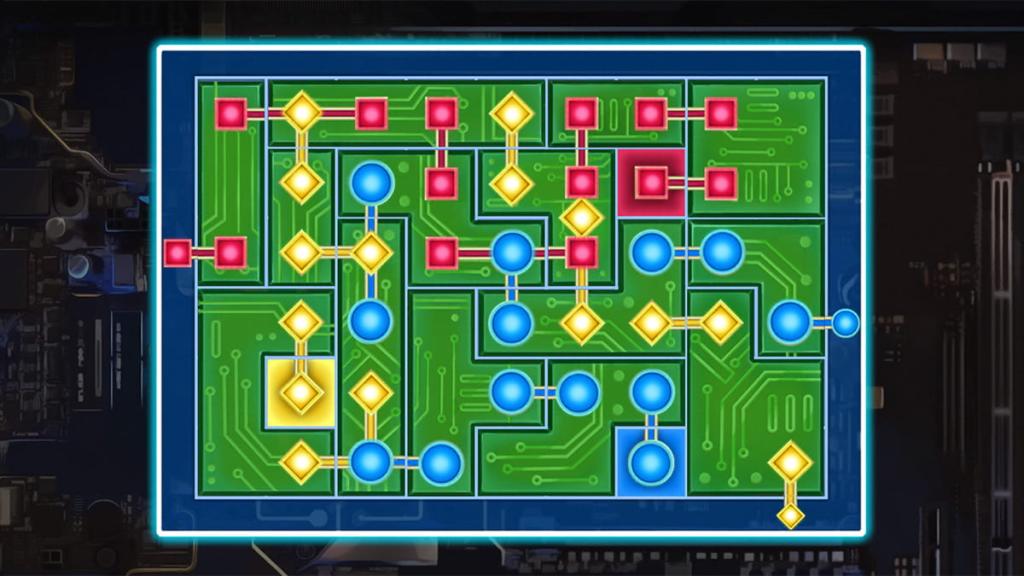
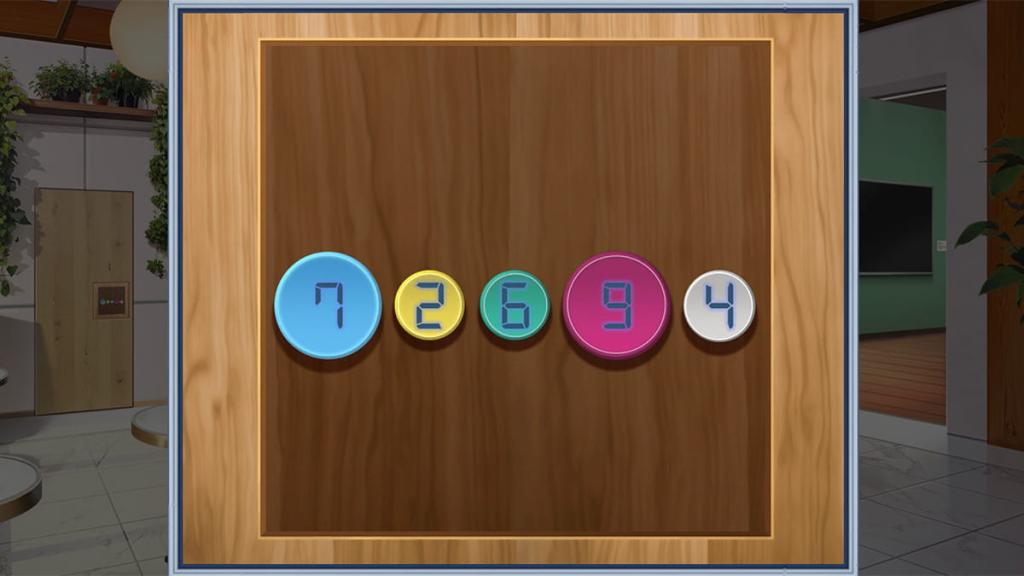
For this next puzzle, we'll need to combine pairs of blue squares to create numbers. They need to be in ascending order and can't repeat. Right away, we can eliminate seven as an option, as no pairs combine to make it. With this information in mind, we know that 3-6, 8, and 9 are the numbers we need to make.
The picture below shows which squares you need to combine to finish this puzzle:
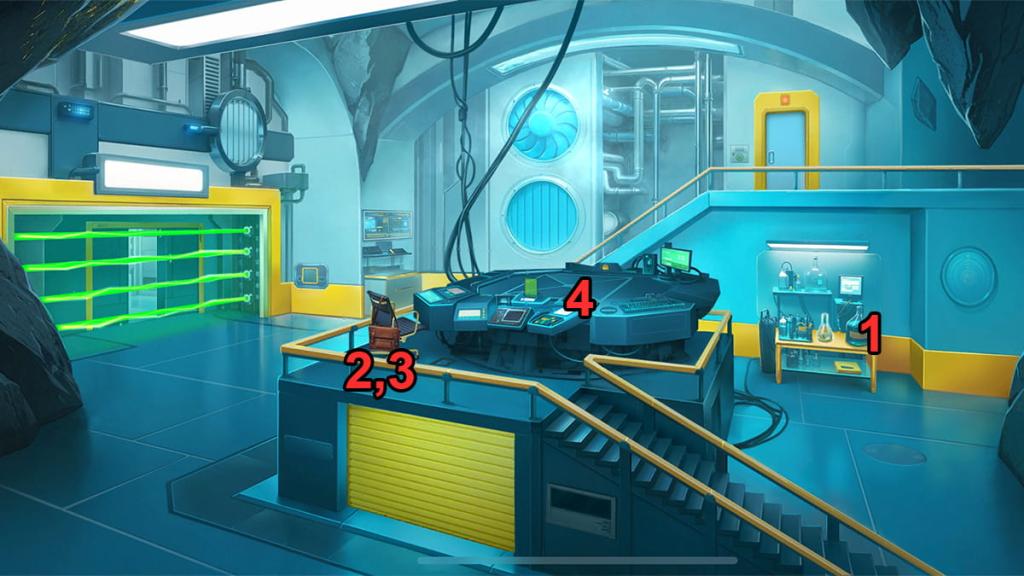
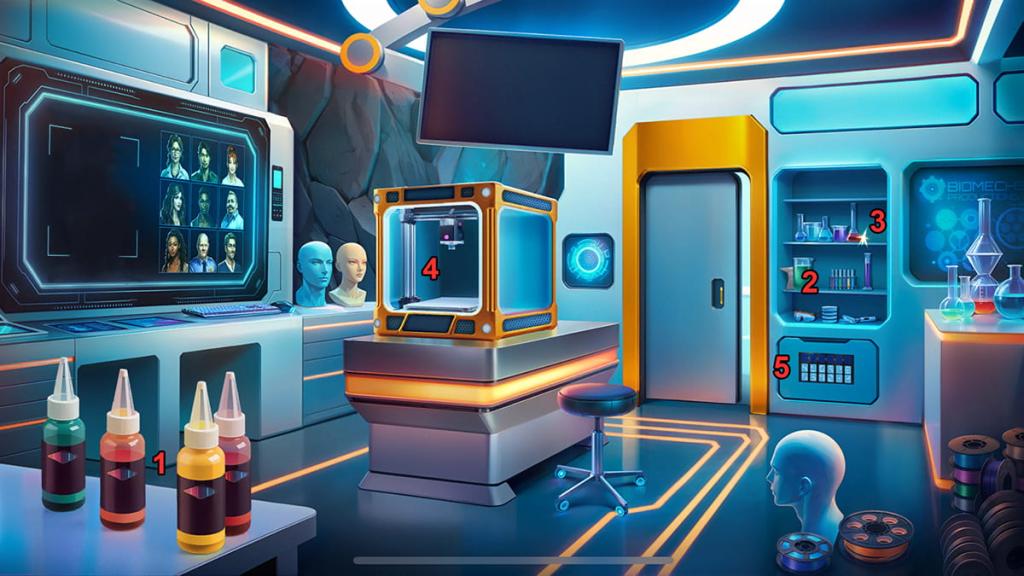
Inside this display is silicone and synthetic hair, giving you everything you need to use the 3D printer. Insert everything into the printer and tap on the face screen. Pick Allie to begin making a mask of her face before returning to the previous room.
With the mask on hand, use it on the scanner next to the large green gate to deactivate its lasers. You can now enter another new room and take the steps below to progress:
This next puzzle is a standard word search. In this case, you're looking for the five numbers that are on Allie's tracking code screen. The catch is that several of the numbers are unknown, so you'll need to find potential matches using the limited information you have.
Below is a picture of each number on the word search screen and the final solution:

Once you input the five codes, you'll learn Allie's whereabouts. Along the way, a cabinet will open, revealing a blue button and a key. Grab both before plugging the blue button into the empty slot next to the red one. Pressing it will cause a blue laser to rise from the table for you to grab.
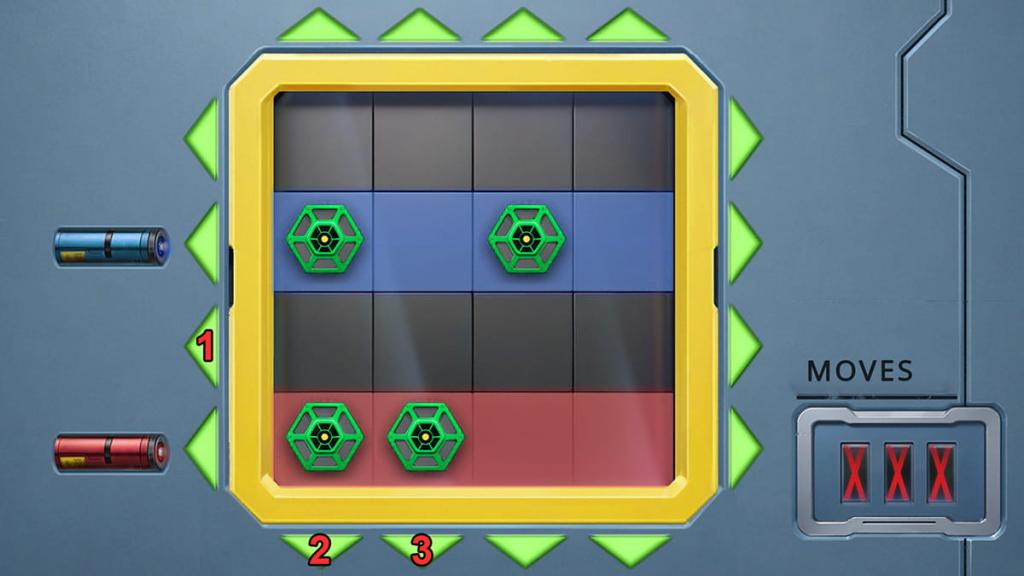
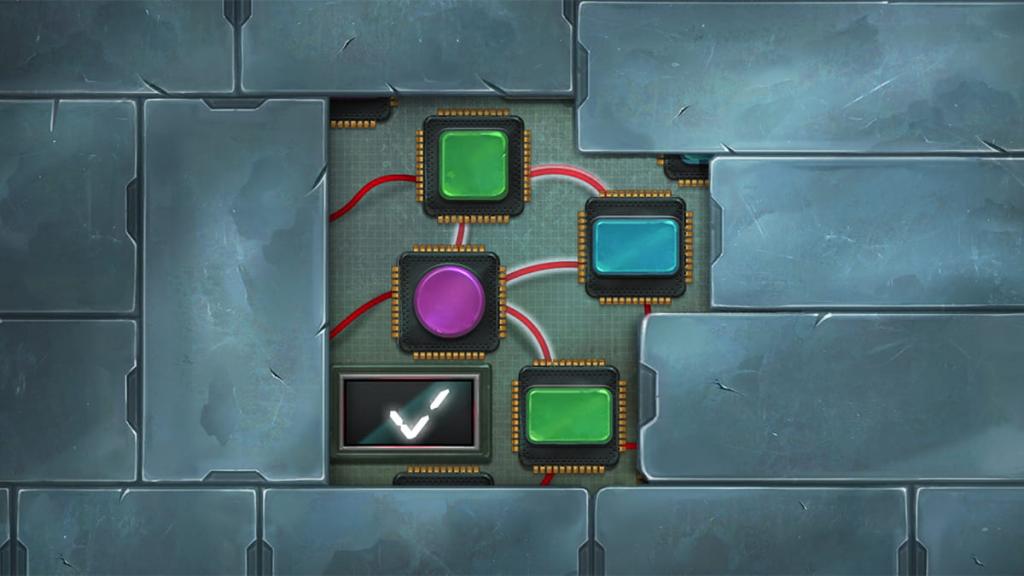
If you attempt to leave the room from here, red lasers will block your way, preventing you from escaping. A panel will also appear, which you can slot the red and blue lasers into to begin another puzzle.
There are two phases to this puzzle. The first requires you to move four green sensors so that they fall within the lines of the red and blue lasers. You only have three moves to get all four into the correct spots. You'll find a working sequence below:
The next version introduces a purple sensor that has to be hit by both lasers at the same time. You have four attempts this time. The picture below shows the solution for the second half:
Completing this puzzle will lower the lasers, letting you collect a third metal piece. Leaving the room will bring you back to your starting point, where you can give Camille and Luc the key you acquired earlier. Dozens of numbers will appear on the walls, with a fourth metal piece falling from the ceiling.
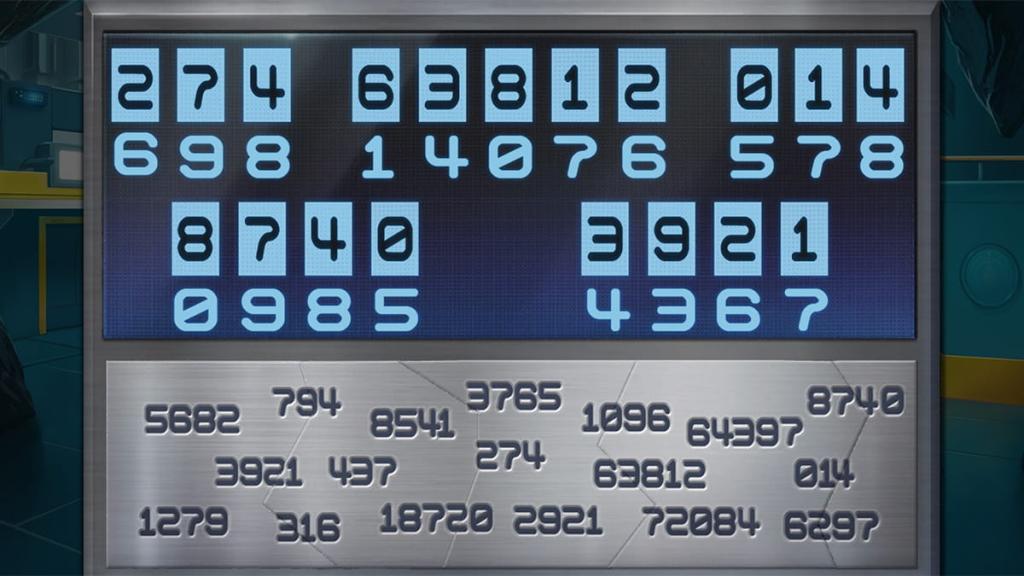
Leave this menu and take the metal pieces to the screen next to their cell. You'll encounter a cryptogram lock and several codes. It works like a normal cryptogram that has you deciphering letters based on their numerical equivalent, except this time, you're converting other numbers to their coded counterpart.
The easiest place to start is the two sets of three-digit codes that end in 8. When searching through the grey numbers, "4" is the only number that appears multiple times at the end of each three-digit sequence, which translates to 8 in this cryptogram. Tapping on the light blue spaces lets you set each box to its respective number, making them easier to track.
From here, it's a matter of using the process of elimination to determine each remaining number. The image below shows the correct sequence:
Completing this puzzle will activate another on the opposite side of the cell. The terminal will also turn into a black and white button, which you'll need to activate a couple of times for the next puzzle. For this second puzzle, you'll find six white and black shapes, which have matching pairs in Camille and Luc's cell. Initially, the cell is bright with lights on. You need to activate the button to darken it, revealing the second half of the number set.
Below shows exactly what six numbers you're looking for and the final number sequence:


Opening the cell will cause Mark to appear, wrapping up Adventure Escape Mysteries: Rendezvous's sixth chapter and leaving us on a cliffhanger. It's time to enter the final chapter and complete this storyline.
Adventure Escape Mysteries: Rendezvous chapter seven walkthrough
Following a lengthy conversation between Kate and Mark, we're now ready to wrap up Adventure Escape Mysteries: Rendezvous's story. Our first challenge is a maze puzzle involving Melissa and Kate.
During the puzzle, you have a limited number of moves between the two characters. You'll need to step on colored buttons to unlock doors, with the overall objective being to grab the golden key and reach the top-right corner of the map.
Here's a complete step-by-step guide to completing this puzzle:


Right away, Kate and Melissa notice that there's no Allie in the dressing room. Instead, you can find the following items:
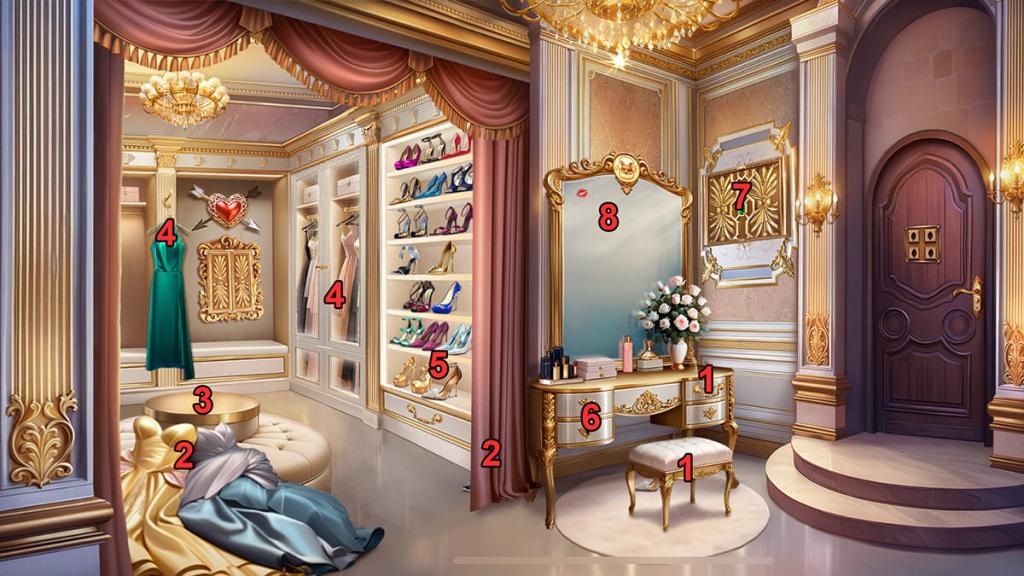
We now have everything we need for the ring puzzle. Starting with a heart-shaped ring, you'll follow the arrows to each adjacent ring until you find its endpoint. The shape of this endpoint is what you'll input into the door's combination lock. You'll need to repeat this three more times to uncover all four answers.
We're now inside a giant throne room. Remember the foxes for later. For now, tap on the thrones and focus on the left one. The rings around each pink button determine the order in which you press them. Start with the top-right button and move down, up diagonally, then down again to receive a gold pendant.
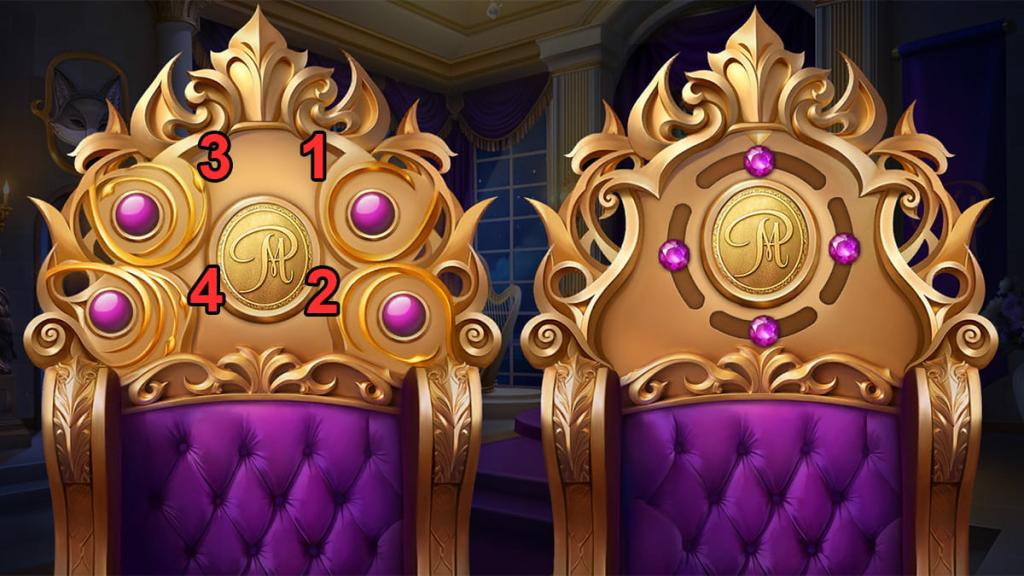
Alongside the pendant, you'll also find the answer to the right throne. Since the triangle is on the bottom in the answer, orient the answer around this. You'll receive another gold pendant for your efforts.
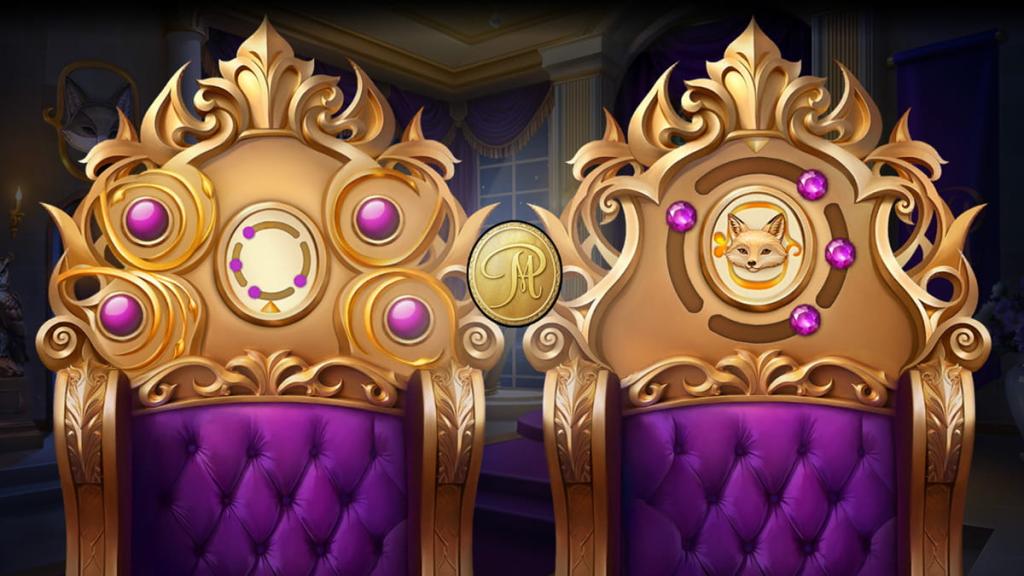
Once you finish both puzzles, move the purple curtain to the right of the thrones to uncover two empty circles. Insert the pendants inside to reveal another puzzle. This time, we need to take a look at the foxes.
Each fox—the three from the throne room and one in the dressing room—has distinct traits. They're differentiated using the following in-game hints:
Every fox face is also surrounded by specific golden patterns that you'll need to match within the puzzle's display. You can determine their order by looking at the tapestry and counting how many of each fox is within the picture. Doing so reveals that you're one orange-faced fox, two gray foxes, three light streak nose foxes, and four light-colored face foxes.
With these hints in mind, we can deduce the following solution:
We're now inside a garden. Here are the steps you'll need to take to progress:


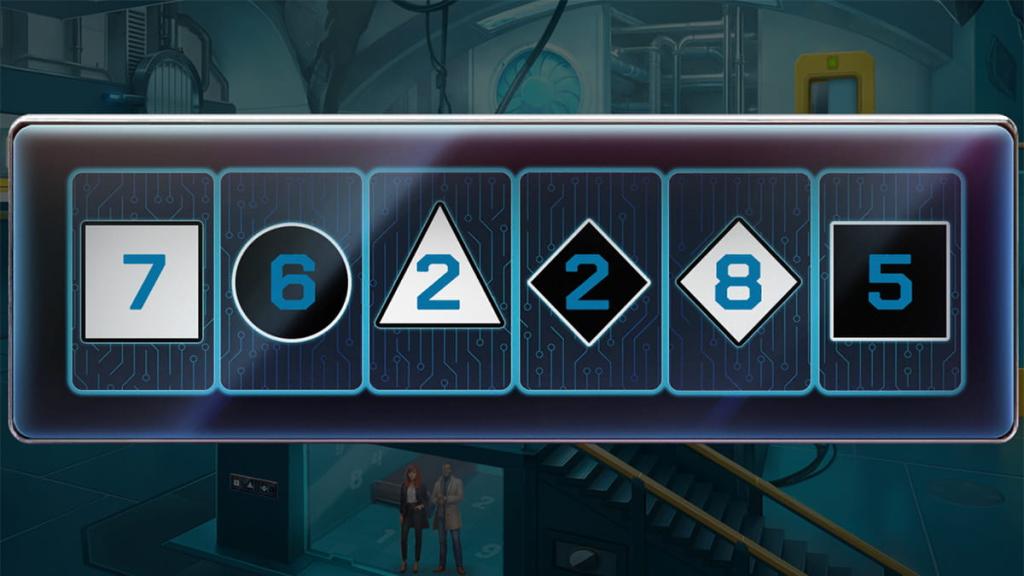
Completing these steps will reveal a combination lock under the statue. Return to the throne room and use the shears on the tapestry to reveal the answer to this puzzle. Every colored line creates various shapes, which we can input into the lock based on how they combine. Below shows the solution to the lock:
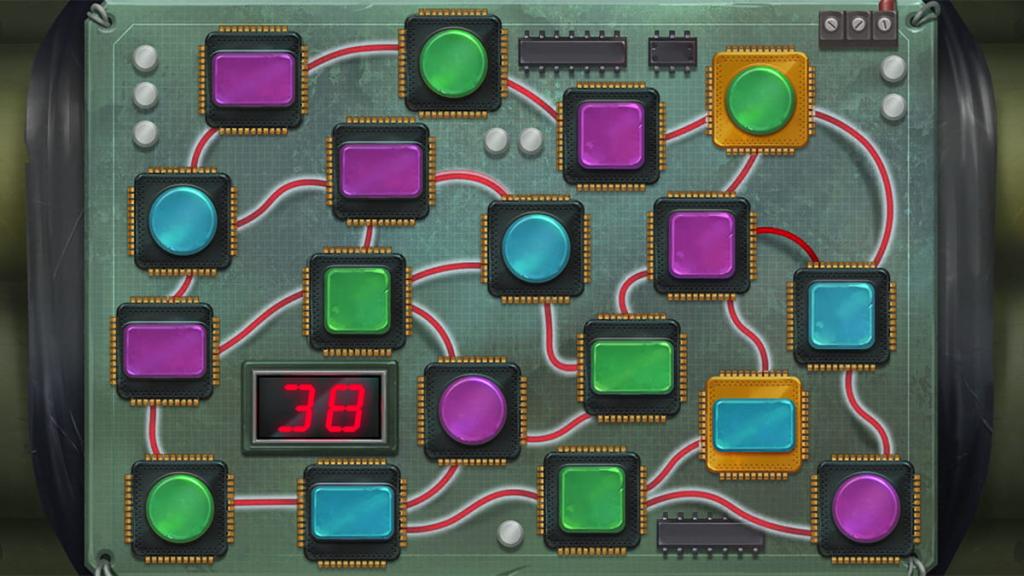
We've officially unearthed the bomb Mark planted in the castle. To finish this puzzle, you'll need to move each chip so the connected chips have different colors and shapes. It takes place over multiple rounds, with the first only having two moves. Here's a step-by-step guide for the first sequence:
This was just a tutorial round. Now, we have a much larger array to work with. For this round, there will be one connection that shares a characteristic. You'll need to cut the wire between these using your shears. Fortunately, you have 50 rounds to complete this one when you only need around 20. There are also multiple solutions to it.
Here's an example of a solution you can encounter while completing this puzzle:
Finishing this puzzle will end in one final cutscene, wrapping up Rendezvous and readying you for Feline Frenzy alongside future Adventure Escape Mysteries storylines.
The post Adventure Escape Mysteries: Rendezvous walkthrough – All chapters appeared first on Destructoid. | ||||||||||||||||||||||||
Destructoid Sunday, August 10, 2025 3:28 PM
The FUTTIES Co-op Cup is live in EA FC 25, and you have a guaranteed way of obtaining a brand new FUTTIES card for free of cost.
The latest cup objective has several tasks to complete for players in order to get all the rewards. Let's take a look at how to complete all of them, along with the rewards available.
EA FC 25 FUTTIES Co-op Cup explained
The EA FC 25 FUTTIES Co-op Cup has seven tasks.
Completing the full objective gets you the Rui Costa FUTTIES Hero item. The 97-rated card has decent in-game stats, and features four playstyle+. Unfortunately, the card can only play as a CAM, which is a huge limitation.
As a free card, it has decent stats, and the process of obtaining all the rewards is simple. It will be interesting to see when we get 97-rated evolutions, which will allow us to improve this Costa item and its stats.
The post All EA FC 25 FUTTIES Co-op Cup rewards and tasks appeared first on Destructoid. | ||||||||||||||||||||||||
Destructoid Sunday, August 10, 2025 1:52 PM
The Picasso Mode Evolution is now live in EA FC 25, and you can upgrade one of your lower-rated items to an overall rating of 98.
Your selected item will receive plenty of stat boosts, new playstyles, roles, and more. Naturally, you'll want to be perfect with your choice to make the most of this expensive evolution. There are lots of amazing options, but few stand tall from the rest.
Table of contents
EA FC 25 Picasso Mode Evolution requirements
Here are the requirements of the Picasso Mode Evolution in EA FC 25.
EA FC 25 Picasso Mode Evolution upgrades
There are five levels of upgrades, and here are the requirements.
Level 1 upgrades
Level 2 upgrades
Level 3 upgrades
Level 4 upgrades
Level 5 upgrades
Level 1 upgrade conditions
Level 2 upgrade conditions
Level 3 upgrade conditions
Level 4 upgrade conditions
Level 5 upgrade conditions
Best players to use in Picasso Mode Evolution
Here are some of the best players to use in this evolution.
Your club's evo chain candidates can provide unique solutions exclusive to your Ultimate Team squad.
The post Best players for EA FC 25 Picasso Mode Evolution appeared first on Destructoid. | ||||||||||||||||||||||||
Destructoid Sunday, August 10, 2025 1:38 PM
The 95+ Encore Icon Pack SBC is live in EA FC 25, and it's an interesting endgame challenge to earn guaranteed icons for your squads.
The latest version is similar to the last iteration, but the rewards are better. Cards rated 95 or higher have been added to the rewards pool, and you can also obtain the FUTTIES Icons if you're lucky enough.
Table of contents
Complete list of EA FC 25 95+ Encore Icon Pick SBC rewards
The SBC includes Icons from three promos: FUT Immortals, Shapeshifters, and FUTTIES. For FUTTIES, Icons from Team 1, right up to Team 4, have been included.
FUT Immortals
Shapeshifters
FUTTIES
You'll get to pick between four options, which will have cards from the ones mentioned above. If you're lucky enough, you can even land a 99-rated FUTTIES Icon.
The post All EA FC 25 95+ Encore Icon Pack SBC Rewards appeared first on Destructoid. | ||||||||||||||||||||||||
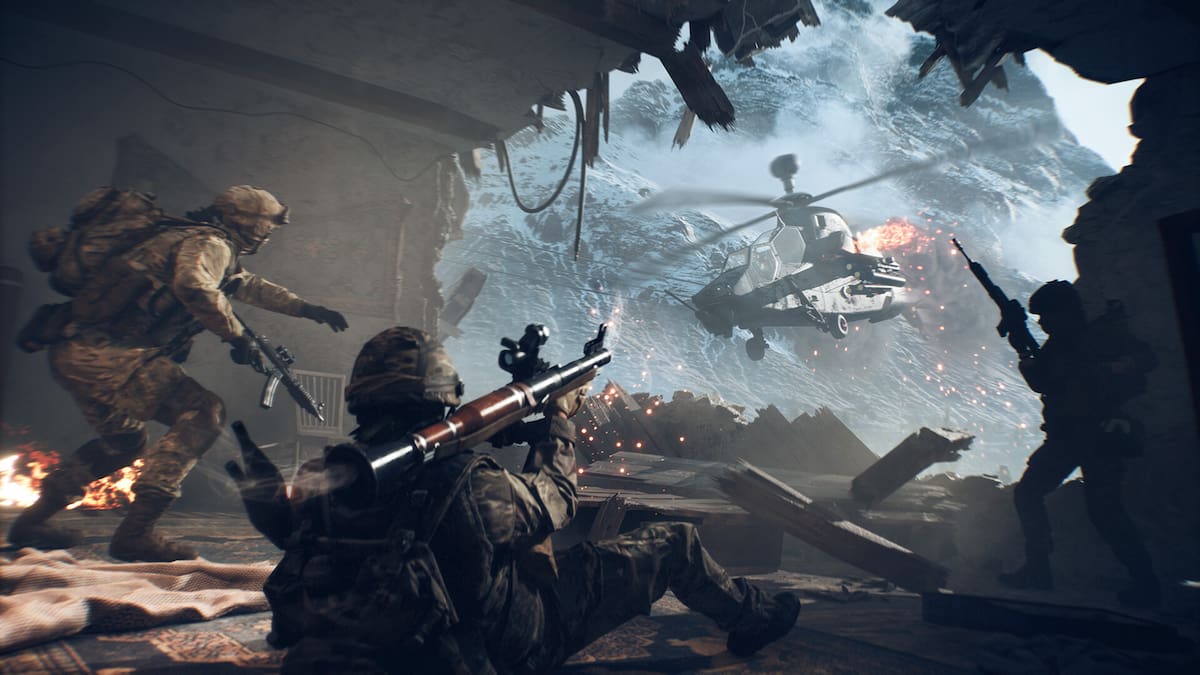
Destructoid Sunday, August 10, 2025 1:13 PM
Battlefield 6 is on a rampage as its open beta attracts over 520,000 concurrent players. The game is yet to launch fully, and it's already stomping most of the competition, Call of Duty included. Mike Ybarra, former Blizzard exec, said this is a good thing—and he's absolutely right.
According to Ybarra, BF6 will "boot stomp CoD" in 2025, which should prompt Call of Duty to not be "lazy" anymore, in turn resulting in everyone getting better first-person shooters down the line. That might seem like a pretty straightforward take, but not everyone agreed with it. Lots of players, especially those favoring Call of Duty, disagreed with Ybarra's message, while those on Battlefield's side ran with it like their lives depended on it.
However, reality lies somewhere in the middle.
BF6 is the solution to a stale market

Call of Duty maintains a large player base both on PC and consoles, selling millions of copies every year and topping charts across the world every time it launches. No matter what, the CoD franchise will almost certainly never fail, and it'll be a long, long time before we see Activision's pride and joy roll off a cliff (if ever).
What Ybarra is implying here is that Battlefield 6, given how popular it already is, will bash heads with CoD and, potentially, steal a bit of its market share (both BO7 and BF6 launch around the same time).
Given EA and DICE's decision to speed gameplay up a bit and lower the TTK (time-to-kill), a lot of CoD players are finding comfort in Battlefield 6, particularly its smaller-scale modes like Domination and King of the Hill, which they'll surely find familiar. Additionally, the game completely walks back most of the decisions made in 2024, making BF6 more akin to 4 and 3 than newer entries in the series, opening it up to veterans to come back and, hopefully, stay.
It is a win-win situation for two groups of players who have gotten tired of both EA's newer shooters and Call of Duty's yearly regurgitations, and the open beta numbers prove it.
What I hope ends up being true is that Battlefield 6 will maintain its popularity and dominance post-Oct. 10 when it fully launches, disturbing Activision hopefuls who believed they could just roll the same old dice again and rake in the millions. I mean, sure, they probably still will, but a few million less is certainly going to get some coats pulled, with the company rethinking how CoD can survive in this new market environment.
No competition killed CoD

CoD hasn't had a proper competitor since Battlefield V, and even that was a lackluster release compared to its predecessor, Battlefield 1, which is by far the best Battlefield game ever made (at least, it is for me). With 2042's horrible launch in 2022, CoD has had free rein over the arcade shooter market, which, as we all know, saw its games get progressively worse since MW2, while Activision continues to chase trends and ludicrous partnerships.
Battlefield 6 thus stands to not only revitalize an ailing franchise, but to revamp the shooter genre as a whole, leading to both Call of Duty and Battlefield becoming bigger, better, more serious franchises with games that people actually like and love and do not whale out over.
It all depends on EA, though.
The post Mike Ybarra is right: Battlefield 6 stomping CoD will benefit both appeared first on Destructoid. | ||||||||||||||||||||||||
Destructoid Sunday, August 10, 2025 12:33 PM
Unfortunately for some staffer at Ubisoft, the company has revealed that a Far Cry TV show is currently in the making at FX. In a now-removed news article on its website, Ubisoft detailed this upcoming TV adaptation of its long-standing franchise, including who will run it.
Though the post is now long gone and hopefully didn't get the staffer fired, users on the Far Cry subreddit were quick enough to note down everything it had to say. Far Cry is set to star Rob Mac (Rob McElhenney) known for It's Always Sunny in Philadelphia, while Noah Hawley of Fargo fame will serve as the showrunner. Both Mac and Hawley are going to serve as executive producers, among others.

FX was purposefully chosen to work on the series, as its productions are often darker, grittier, and more serious in tone.
"This collaboration is really an embarrassment of riches. Far Cry is a psychological tailspin that doesn't shy away from the darkest and most absurd parts of humanity, which aligns perfectly with FX's bold and fearless storytelling style," said Ubisoft's film and television content chief, Margaret Boykin.
While this is by no means a comprehensive list of details regarding this upcoming Far Cry adaptation, one thing is certain: it's in the works and coming, hopefully soon.
Video game adaptations have been on the rise in the past few years and, to the shock of just about anyone, have been actually turning out good. Popular both among newcomers and hardcore fans, video game movies and TV shows are at the top of their game, washing away (most of) the stigma surrounding early 2000s attempts at the same.
How Far Cry will turn out is anyone's guess, and especially because of Ubisoft's overall track record this past decade, but the people involved certainly are promising.
The post Uh oh, Ubisoft has accidentally revealed a Far Cry TV show appeared first on Destructoid. | ||||||||||||||||||||||||
Destructoid Sunday, August 10, 2025 12:32 PM
The Franchise mode in Madden 26 and its gameplay are different from the typical online-based competitive action, and there are different game styles to pick from.
Separate from the in-game difficulty settings, Game Styles determine how the AI reacts and operates in the game. The three choices are all vastly different from one another—and one of them is definitely more suitable than the rest.
Table of contents
All Game Styles in Madden 26
The three options available this year are the same as the last game.

Best Madden 26 Franchise mode gameplay
While Competitive is usually the favorite for most players (it's the default for all online games), the best choice is Simulation. The beauty of Franchise mode isn't the action happening on the field. Instead, having unexpected outcomes is also part of the fun, which is where Simulation comes in.
For example, managing the workloads of your athletes is an important task for any NFL coach. If you're going with Arcade or Competitive, your players will never get injured. In Simulation, your athletes will pick up injuries, and more so, if you're not careful with your rotations. On one hand, this might seem irritating, but in the long run, injuries add a flavor of excitement in Franchise mode.
The realistic nature of on and off-field aspects makes Simulation the best choice in my books, and by some distance. To enjoy Competitive, modes like Ultimate Team and Online H2H is far more suitable.
The post Best Game Style for Madden 26 Franchise Mode appeared first on Destructoid. |


WGB Sunday, August 10, 2025 7:37 PM Hell Clock mashes rogue-lite grind with ARPG chaos, then cranks the particle effects up to "seizure warning." It's a whirlwind of absurd builds, meteors, Catholic Guards, and a ticking timer daring you to push further before it all ends. The repetition and balance quirks are real, but so is the joy of watching your screen turn into an unholy fireworks show. |
Gaming Instincts – Next-Generation of Video Game Journalism Sunday, August 10, 2025 5:28 PM A trailer was also released. The post One Piece: Pirate Warriors 4 Character Pass 3 Announced appeared first on Gaming Instincts - Next-Generation of Video Game Journalism. |
Gaming Instincts – Next-Generation of Video Game Journalism Sunday, August 10, 2025 4:47 PM The beta is currently ongoing. The post Battlefield 6 Open Beta Surpasses 521,000 Players Surpassing Call of Duty appeared first on Gaming Instincts - Next-Generation of Video Game Journalism. |
Gaming Instincts – Next-Generation of Video Game Journalism Sunday, August 10, 2025 4:08 PM Its Steam page. The post Light of Motiram Updates Steam Page After Lawsuit appeared first on Gaming Instincts - Next-Generation of Video Game Journalism. |