GamersHeroes Saturday, October 11, 2025 6:28 PM Launching October 22 alongside Genshin Impact's Version "Luna II," players will be able to take advantage of HoYoverse's brand-new UGC system, dubbed "Miliastra Wonderland," in the title. The post Genshin Impact UGC System "Miliastra Wonderland" Launching October 22 appeared first on GamersHeroes. |
GamersHeroes Saturday, October 11, 2025 1:05 PM In what is proving to be an amazing Saturday for SNK fans, the mystics at Code Mystics have shadowdropped classic two-on-two fighter Kizuna Encounter: Super Tag Battle on Steam today - complete with a 25% introductory discount! The post Kizuna Encounter: Super Tag Battle Shadowdropped on Steam appeared first on GamersHeroes. |
GamersHeroes Saturday, October 11, 2025 1:05 PM Kizuna Encounter: Super Tag Battle set the stage for two-on-two fighters, burning bright decades later in Code Mystics' Steam release. The post Kizuna Encounter: Super Tag Battle Review appeared first on GamersHeroes. |
GamersHeroes Saturday, October 11, 2025 1:01 PM Rocking you like a Hurricane (Upper) this weekend, Joe Higashi has officially been released for SNK's FATAL FURY: City of the Wolves roster as a surprise shadowdrop. The post Joe Higashi Now Available in FATAL FURY: City of the Wolves appeared first on GamersHeroes. |
Kotaku Saturday, October 11, 2025 5:50 PM
This Amazon soundbar is one of the cheapest on the market, and its performance more than delivers. The post Fire TV Soundbar Is Selling for Pennies Post Prime Day, Now 5x Less Than Sony or Bose Rivals appeared first on Kotaku. |
Kotaku Saturday, October 11, 2025 5:15 PM
This 2025 Xbox controller has never been more affordable. The post Xbox Controllers Are Now Selling for Pennies, Microsoft Is Offloading Prime Day Leftovers appeared first on Kotaku. |


Twinfinite Saturday, October 11, 2025 1:30 PM  |
Twinfinite Saturday, October 11, 2025 1:14 PM  |
Siliconera Saturday, October 11, 2025 3:00 PM
Aka Akasaka doesn't shy away from the dangerous and devastating real-life situations celebrities face in the Oshi no Ko manga and anime. After all, Ai Hoshino is murdered by a stalker and had to hide her teen pregnancy of Aqua and Ruby Hoshino, and an early volume deals with an online harassment campaign against Akane Kurokawa. Now with the eleventh volume of Oshi no Ko, we return to the concept by showing how damaging paparazzi can be to a career by putting Kana Arima in a series of scary situations. At the same time, that's being used as a device to set in motion the plans to take us through the end of the series.
Editor's Note: There will be some spoilers for the first half of volume 11 of the Oshi no Ko manga below.
While in the past we've seen Akane and Ruby appear as possible victims or targets, this time Oshi no Ko Kana is a target. But not just in one way. Instead, Akasaka is using the story to show exactly how vulnerable the industry is even to someone who is as savvy and aware as she is. She's been acting since she was a child. She knows how fickle people are and the shady underbelly. When she gets a chance to meet with Masanori Shima, a famous and award-winning director, she knows he cheats on his wife, sleeps with young women for casting calls, and can be a jerk. But she thinks she's savvy enough to head it off. Which leads to the first possible mistake.

When confronted, she almost seems willing to go back on things and give up control of the situation. However, due to her personality and love for Aqua, she unexpectedly manages to "win" that encounter. She gets to be herself. She shows how captivating she is and manages to be "interesting" to Masanori even though she doesn't become his lover.
What makes it interesting is Akasaka shows how even a seasoned professional can be caught off-guard and that threats are multifaceted. Because while Kana passes the one challenge with flying colors, the real danger is in what comes after. We're vaguely aware of the influence of media and outsiders due to past situations in Oshi no Ko, but now Kana ended up being "caught" by a Weekly True Entertainment Stories reporter who was stalking Masanori and realized it would be a much better story to catch an up-and-coming idol going back to his apartment with him.
It's terrifying.
Because before this, Kana is always the confident and stable one in Oshi no Ko. She's established and a street smart member who seems aware of pitfalls. But once that paparazzi catches her, she's frozen. As smart as Kana is, and she is absolutely one of the more media-savvy members of the cast, she is paralyzed. She has no idea how to handle it, and even Miyako Saitou is a bit flummoxed as to possibly making it go away.
Akasaka handles the tension and horror of it all perfectly. Especially as we see what this means for B-Komachi as a whole. Since because Kana is part of a group, it would reflect poorly on Ruby and Mem-cho too, potentially ruining their careers.
But it also means the resolution is fantastic. I won't spoil it for folks here. However, in recent volumes we've seen Aqua working toward his goal of avenging Ai. Once Miyako brings up what could save Kana, Aqua sees how it could benefit him and others. His actions and the result are cathartic in some ways, but also equally terrifying given what we know is coming.
Volume 11 of the Oshi no Ko manga maintains Akasaka's trend of not being afraid to be brutally honest about what can happen in the entertainment industry and allow readers to feel afraid for and uncomfortable with the situations Aqua, Ruby, Kana, and Akane find themselves in throughout the series. It's a dangerous job! We don't realize it! And while these performers can seem mature sometimes, they are young! It's a wake-up call and realistic peek at the inner workings.
Volume 11 of Oshi no Ko is available now, and Yen Press will release volume 12 on December 16, 2025.
The post Oshi no Ko Volume 11 Deals With Paparazzi and Idol Scandals appeared first on Siliconera. |

Destructoid Saturday, October 11, 2025 4:10 PM
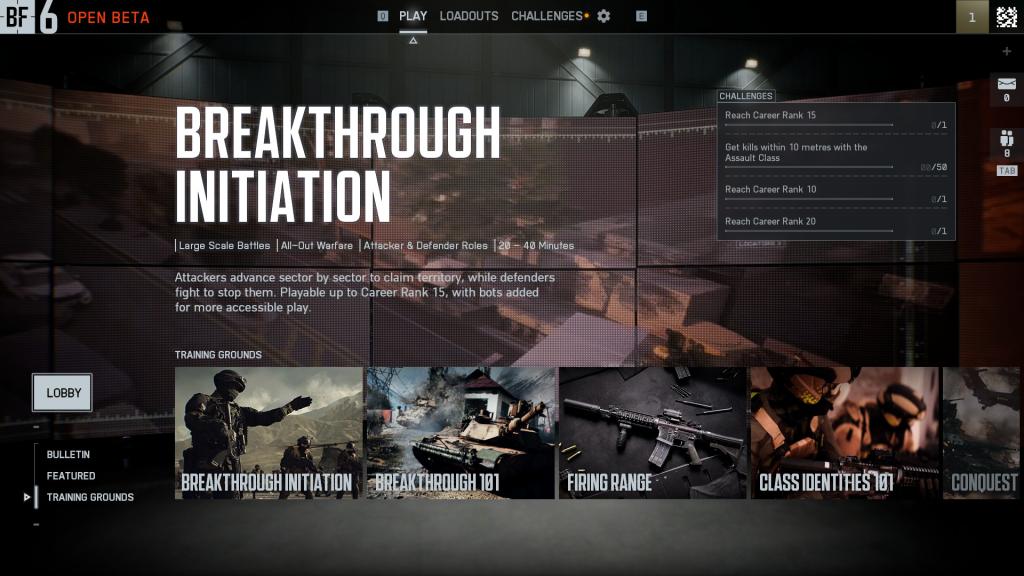
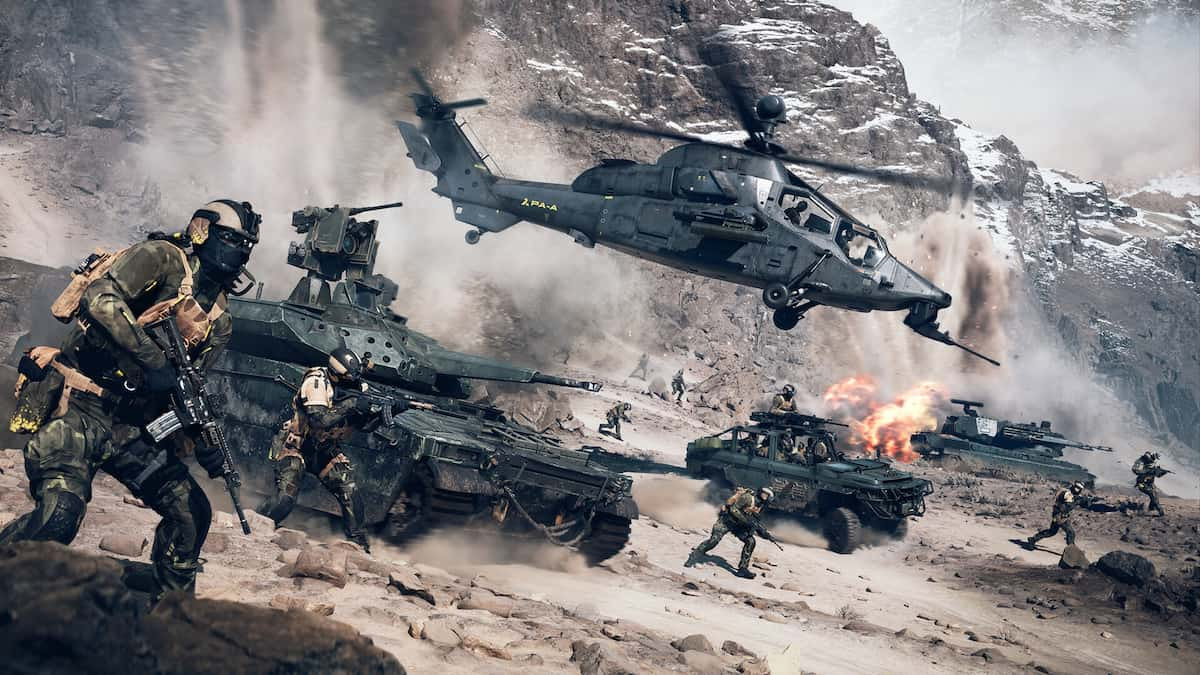
Battlefield 6 has numerous challenges for you to complete, and doing so will help you gain various rewards. The objectives are divided into different categories, and some of them are easier to complete than the rest. Here's every challenge currently in Battlefield 6, along with how to complete them.
Table of contents
Complete list of Battlefield 6 challenges and rewards
We begin with the Initiation category, which has the easiest tasks.
Weapons
Class
Unit
Like our content? Set Destructoid as a Preferred Source on Google in just one step to ensure you see us more frequently in your Google searches!
The post All Battlefield 6 challenges and rewards appeared first on Destructoid. | |||||||||||||||||||||||||||||||||||||||||||||||||||||||||||||||||||||||||||||||||||||||||||||||||||||||||||||||||||||||||||||||||||||||||||||||||||||||||||||||||||||||||||||||||||||||||||||||||||||||||||||||||||||||||||||||||||||||||||||||||||||||||||||||||||||||||||||||||||||||||||||||||||||||||||||||||||||||||||||||||||||||||||||||||||||||||
Destructoid Saturday, October 11, 2025 4:01 PM
Battlefield 6 is now available on PC and consoles, and you can play easily with your buddies.
While there are dedicated servers that allow you to matchmake, you can also form a lobby with your friends. The full version, just like the open beta, offers crossplay that will enable you to co-op with your friends and try out the available game modes.
This guide will help you to matchmake with your friends.
How to play Battlefield 6 with friends?
The exact process of forming a lobby in Battlefield 6 depends on whether all of you are on the same platform. For simplicity's sake, let's assume that all of you're on different platforms. If that's the case, crossplay must be turned on for all of you. There are a few additional steps to complete along with that.
The next step is to invite your friends to your lobby and play together. Once the home screen, you'll find the Lobby option on the left side of your screen. Click on it, and you'll get the chance to invite your friends. If you've linked your accounts properly, you can invite friends on the same/different platforms. As long as they're online, you'll be able to send them an invite.
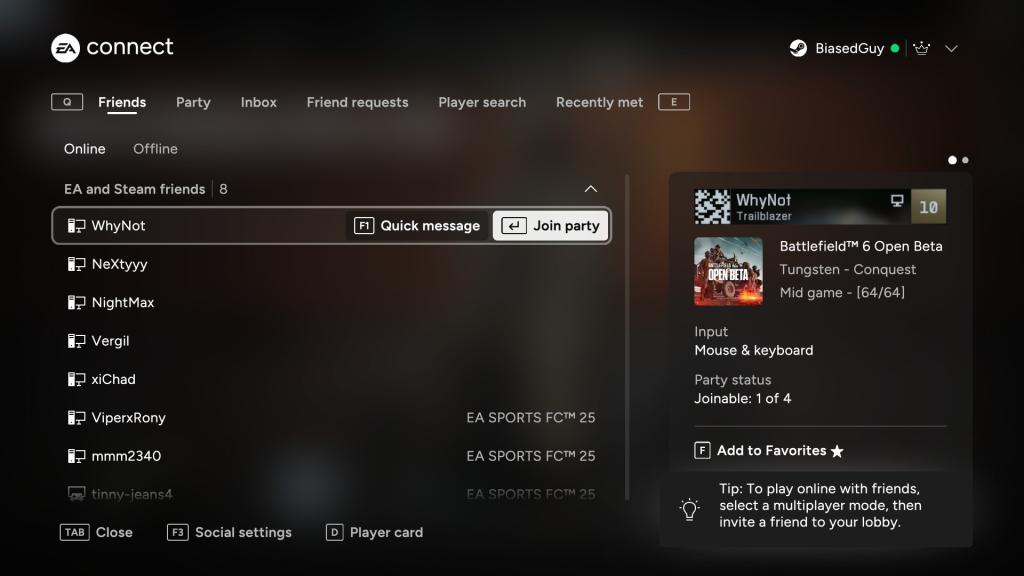
Similarly, you can also join their lobby and play together. Once you've set up your party, proceed to choose the mode you'll want to play. That's pretty much all you need to do to play with your friends.
Like our content? Set Destructoid as a Preferred Source on Google in just one step to ensure you see us more frequently in your Google searches!
The post Battlefield 6 multiplayer guide – How to play with friends appeared first on Destructoid. | |||||||||||||||||||||||||||||||||||||||||||||||||||||||||||||||||||||||||||||||||||||||||||||||||||||||||||||||||||||||||||||||||||||||||||||||||||||||||||||||||||||||||||||||||||||||||||||||||||||||||||||||||||||||||||||||||||||||||||||||||||||||||||||||||||||||||||||||||||||||||||||||||||||||||||||||||||||||||||||||||||||||||||||||||||||||||
Destructoid Saturday, October 11, 2025 2:53 PM
The Support class can be one of the best choices for beginners in Battlefield 6, and you can make the most of it with a good loadout.
Compared to the other classes in the game, the Support is trickier to master. Your main priority is to help your teammates and allow them to survive for a longer time. This guide will help you get the best loadout for the class and win more games to ease your grind.
Best Support loadout in Battlefield 6
Unlike Assault, you don't need to unlock the best specialization for Support, as it comes unlocked by default. Your key ability is Restock Allies, which allows you to resupply and heal nearby allies for 10 seconds. You also take only 1.7 seconds to revive nearby teammates.
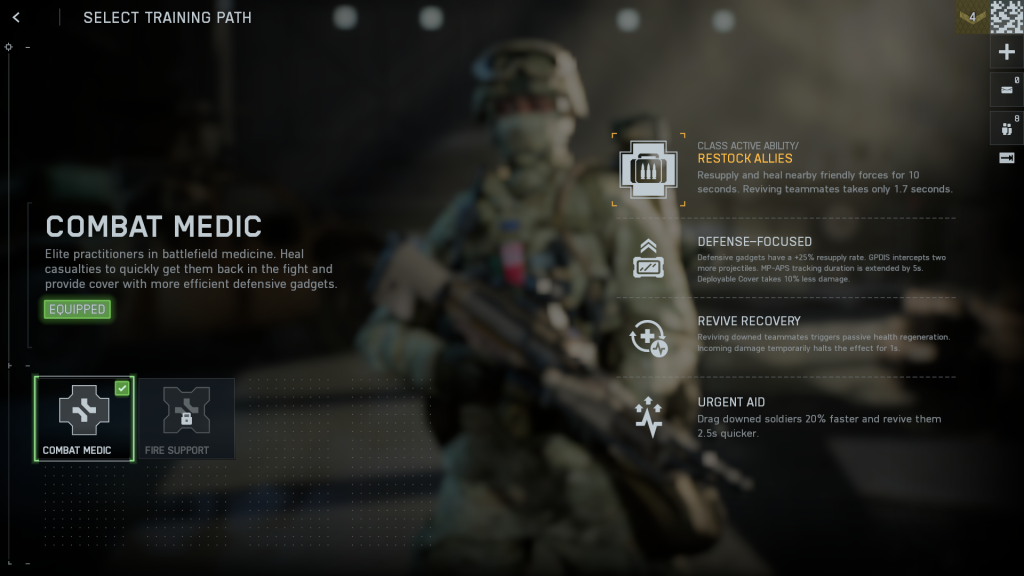
On one hand, you can reduce the chances of your allies dying on the field, and also revive them faster than other classes. Defense-Focused makes defensive gadgets have a +25% resupply rate, and GPDIS intercepts two more projectiles. These buffs benefit your Gadgets directly.
Additionally, you can also heal yourself by reviving allies, and the effect continues as long as you don't get hit. You can also use Urgent Aid to drag downed soldiers 20% faster, and revive them 2.5 seconds quicker.
Your primary aim is to help your Assault with the heals, and use the Smoke Grenade to confuse. As a primary weapon, any LMG works well with the Combat Medic spec. However, try to unlock the KTS100 Mk8 as quickly as possible since the gun provides good reload speed, a healthy dose of damage, and steady aiming. If you're a beginner, getting your hands on this gun will take some time, but it's well worth the effort.

As a support, you'll almost always want to have the Defibrillator in your hands, as it will quickly revive your fallen teammate. Just tab the Defib near an ally, and it will instantly revive your fallen teammates. The gadget can also damage enemies (honestly, don't try that).
For Gadget 2, the Grenade Intercept System is my go-to choice, but you can also opt for the Missile Intercept System if you're getting targeted by long-range options. Getting stuck by grenades is far more common in my experience, so I have chosen it in my preferred loadout.
Like our content? Set Destructoid as a Preferred Source on Google in just one step to ensure you see us more frequently in your Google searches!
The post Best Support build and loadout in Battlefield 6 appeared first on Destructoid. | |||||||||||||||||||||||||||||||||||||||||||||||||||||||||||||||||||||||||||||||||||||||||||||||||||||||||||||||||||||||||||||||||||||||||||||||||||||||||||||||||||||||||||||||||||||||||||||||||||||||||||||||||||||||||||||||||||||||||||||||||||||||||||||||||||||||||||||||||||||||||||||||||||||||||||||||||||||||||||||||||||||||||||||||||||||||||
Destructoid Saturday, October 11, 2025 2:05 PM
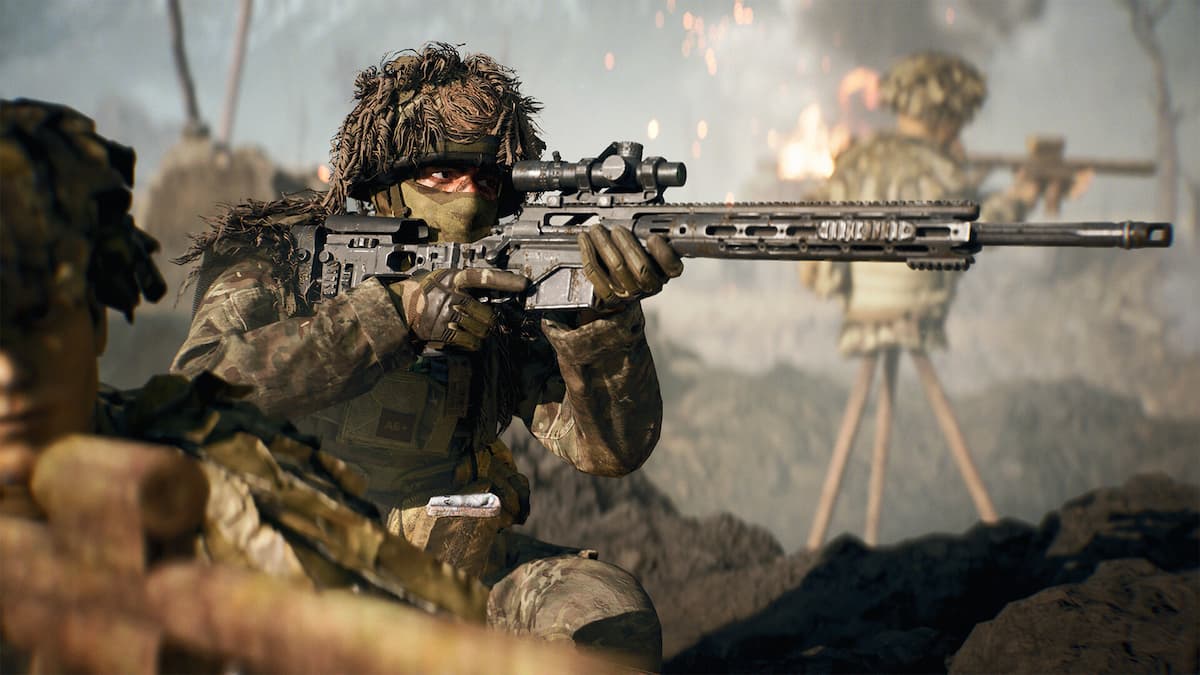
Battlefield 6 is finally here, and you know what that means: you can now camp to your heart's content, clicking heads no matter what's happening to your objectives.
Ignoring the fact that you're actively losing the game means nothing, even if professionals have standards. The only standard you're following is the one keeping you at the top of the scoreboard (in no other category but the K/D ratio, of course). So, if you're one of many playing as a Sniper Recon in Battlefield 6, this is the loadout guide for you.
Most optimal Recon loadout in Battlefield 6
The beauty of the Recon class is that it starts with its best weapon, the M2010 ESR. Whether you want to go for one of its many presets unlocked by playing and killing enemies, or to customize it yourself, the gun remains the top priority for the Recon. It's fast, easy to use, and hits super hard, giving one-shot kills to the chest or head consistently. It has a wide array of attachments you can use to make it fit your playstyle, which can be either mid-range quick scoping or hard-scoping from distance.
As for the gadgets, it wouldn't be Recon without C4 Explosives, which you can tack onto enemy vehicles in the absence of a good Engineer, or put on your own expendable crew's jeep and send them to their (and the enemy's) demise. To help protect you and your immediate surroundings, the Anti-personnel Mine (Claymore) is the perfect choice, and you can plant them at door entrances or other choke points and prevent enemies from sneaking up from behind.
A Proximity Detector can also help spot enemies that are nearby, though I prefer the Frag Grenade for its anti-personnel utility much more.
Of course, you'll want the Sniper Training Path selected, as it gives you a host of bonuses for, as the name implies, sniping, which is probably the most common thing you'll be doing as a Recon. With the loadout above, you should be able to maximize your output. Just make sure to aim well and take your time with each shot.
Like our content? Set Destructoid as a Preferred Source on Google in just one step to ensure you see us more frequently in your Google searches!
The post Best Recon class build and loadout in BF6 appeared first on Destructoid. | |||||||||||||||||||||||||||||||||||||||||||||||||||||||||||||||||||||||||||||||||||||||||||||||||||||||||||||||||||||||||||||||||||||||||||||||||||||||||||||||||||||||||||||||||||||||||||||||||||||||||||||||||||||||||||||||||||||||||||||||||||||||||||||||||||||||||||||||||||||||||||||||||||||||||||||||||||||||||||||||||||||||||||||||||||||||||
Destructoid Saturday, October 11, 2025 1:34 PM
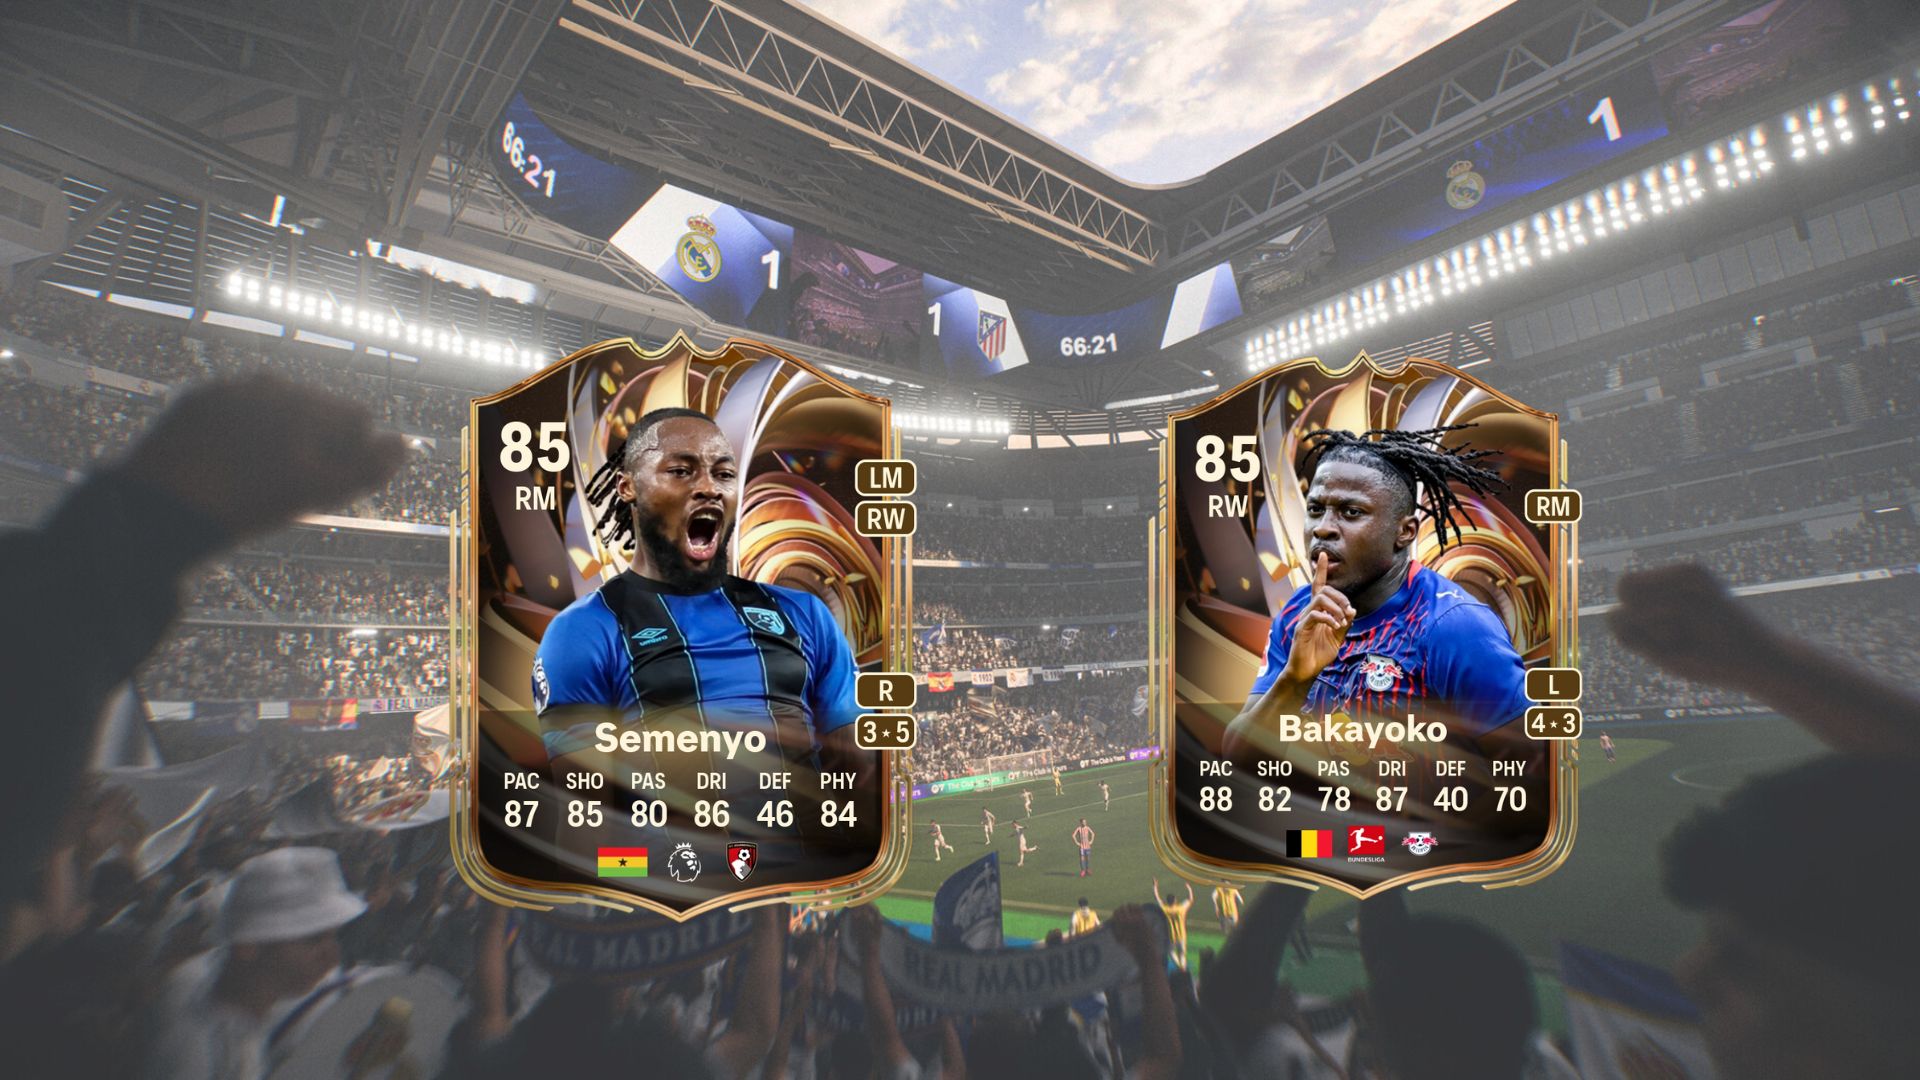
The Bakayoko vs. Semenyo Ratings Reload Duo Pick SBC is an exciting challenge to complete in FC 26 if you're looking to add a promo card to your squad.
The SBC offers you two promo cards, but there's a catch: you can select only one. Both cards have great in-game stats, and you'll have to complete four tasks. This guide will provide you with the cheapest solutions and help you decide which card to get.
Table of contents
FC 26 Bakayoko vs. Semenyo Ratings Reload Duo Pick SBC tasks
Here are the requirements of the four tasks.
Bundesliga
Premier League
Top Form
84-Rated Squad
FC 26 Bakayoko vs. Semenyo Ratings Reload Duo Pick SBC solutions
Bundesliga
Premier League
Top Form
84-Rated Squad
Who should you pick?
Ideally, I would have wanted to go for Semenyo, and you can, if you have a Premier League-based squad. The Frenchman has three different positions, good Shooting (85), Pace (87), and 5* Weak Foot. However, he offers 3* Skills, which is really poor.
Bakayoko might have less Shooting (82) and just two positions, but he has 4* Skills. Having 3* Weak Foot isn't a big problem at the current stage of the game. More importantly, he has Inside Forward++ in RM, which is an excellent option in the meta.
Either card is excellent, but you should opt for Bakayoko if both of them can fit well with your squad.
Like our content? Set Destructoid as a Preferred Source on Google in just one step to ensure you see us more frequently in your Google searches!
The post FC 26 Bakayoko vs. Semenyo Ratings Reload Duo Pick SBC: Who should you pick and solutions appeared first on Destructoid. | |||||||||||||||||||||||||||||||||||||||||||||||||||||||||||||||||||||||||||||||||||||||||||||||||||||||||||||||||||||||||||||||||||||||||||||||||||||||||||||||||||||||||||||||||||||||||||||||||||||||||||||||||||||||||||||||||||||||||||||||||||||||||||||||||||||||||||||||||||||||||||||||||||||||||||||||||||||||||||||||||||||||||||||||||||||||||
Destructoid Saturday, October 11, 2025 12:39 PM
The Assault class appears to be the most popular choice among Battlefield 6 players (based on my experience with random strangers), and it's very easy to misunderstand what you have to do.
The Assault class is simple to learn but extremely hard to master. Like all other classes, there are different ways to build and play with it. Here's how you can make it shine with the best loadout in Battlefield 6.
Best Assault loadout in Battlefield 6
A number of components of this loadout will be locked when you're just getting started in Battlefield 6. Your first task will be to unlock three components—the Frotliner class, the High Explosive Launcher, and the NVO-228E Assault Rifle.
Unlocking all three will take a fair amount of time and effort. You should only play with the Assault class and try to complete as many objectives as possible.
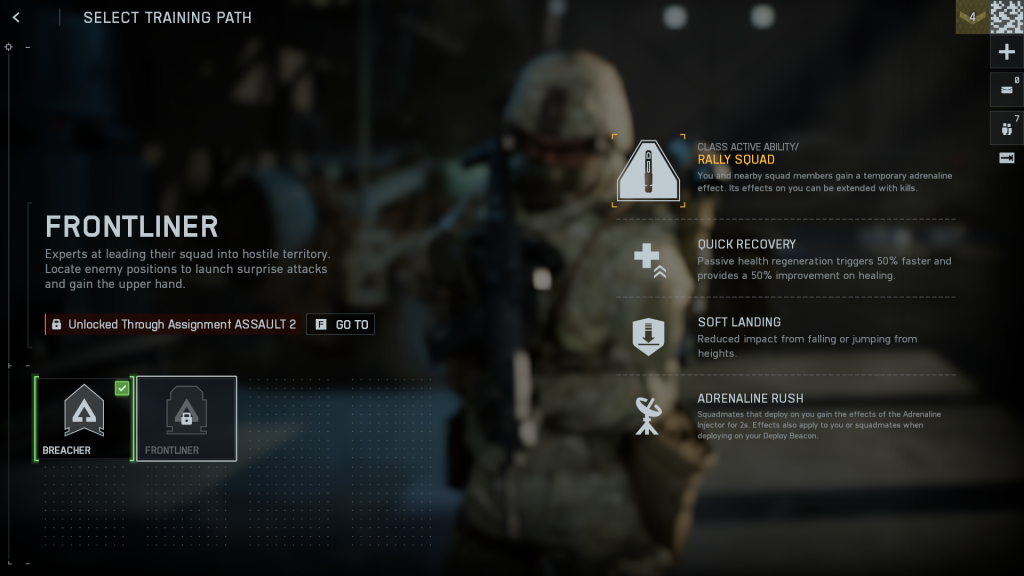
Let's begin with Frontliner. While Breacher is fine for beginners, Frotline is better due to the Quick Recovery ability. As you'll be leading your offense, you're guaranteed to get hit. Quick Recovery allows you to get 50% faster healing at a 50% improved rate. Secondly, Rally Squad grants you and your teammates a temporary Adrenaline effect that gets extended with your kills. Soft Landing and Adrenaline Rush are also advantageous bonuses.
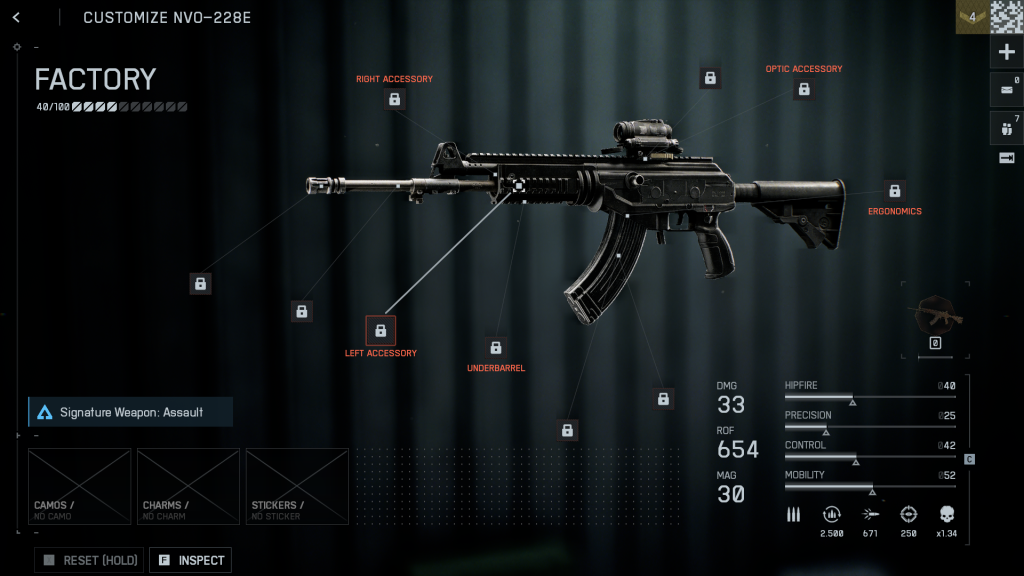
NVO-228E is the king of current meta, and it's arguably the best assault rifle. While the range isn't the best, its damage is top-notch. It can shred through multiple enemies in one round as long as you can manage the aim. You also get plenty of choices with different attachments to tweak the weaknesses.
The Assault class can carry a second primary weapon as one of its gadgets, and I have gone for the M87A1. It's unlocked by default, does a lot of damage in short range, and satisfies all my needs. It's excellent at getting you out of tight or low-ammo situations.
While the Thermobaric Launcher is pretty decent at breaching down doors and corners, I have opted for High Explosive instead. The launcher, combined with frag grenades, can often land you some unlikely kills and also provide you with strategic benefits in modes where you can capture locations.
Here are key tips to excel with this loadout.
Like our content? Set Destructoid as a Preferred Source on Google in just one step to ensure you see us more frequently in your Google searches!
The post Best Assault class build and loadout in Battlefield 6 appeared first on Destructoid. | |||||||||||||||||||||||||||||||||||||||||||||||||||||||||||||||||||||||||||||||||||||||||||||||||||||||||||||||||||||||||||||||||||||||||||||||||||||||||||||||||||||||||||||||||||||||||||||||||||||||||||||||||||||||||||||||||||||||||||||||||||||||||||||||||||||||||||||||||||||||||||||||||||||||||||||||||||||||||||||||||||||||||||||||||||||||||
Destructoid Saturday, October 11, 2025 12:26 PM
The Recon class is one of spotting and sniping, and the Range Finder is a fantastic tool that helps you gauge the distance between yourself and the enemy. This, in turn, allows aim correction and more efficient long-range sniping.
But the game never explains how to use the Range Finder, only offering it as an attachment. So, here's everything you need to know.
How to use Range Finder in BF6

After you've attached the Range Finder to your weapon, you can use it by holding down B on PC or the Down Arrow on Console. You first need to point your scope at someone or something, and the Range Finder will automatically adjust your zeroing to the appropriate distance.
The game never explicitly states how this functions, so I hope you're now up and ready to snipe people no matter how far they are on the map.
How to spot enemies in BF6

If you're playing Recon and using the Range Finder, odds are you're also trying to spot as many enemies as possible, near and far, to help your team stay alert to incoming hostiles.
To spot in BF6, you need to aim down sights towards the enemy, then press Q on PC, LB on Xbox, and L1 on PlayStation. This is only applicable to enemies you have a line of sight on, and will not appear to allies through walls like they did in BF1.
Recons can spot enemies automatically by aiming down sights at them, and do not need to press any buttons. Simply looking at the enemy with sights down is enough. With the Sniper Training Path, you'll also eventually gain another ability, which spots any enemy you've dealt damage to, further improving your spotting efficiency.
The Recon also has several tools to use for more spots, including the Recon Drone, the Motion Sensor, and the Proximity Detector, each able to spot enemies at a distance or nearby, depending on the gadget.
Spots usually last only a few seconds and cannot be spammed on most classes, but you can still double-tap the relevant button to place a red marker on the map that your allies can see and be aware of.
Like our content? Set Destructoid as a Preferred Source on Google in just one step to ensure you see us more frequently in your Google searches!
The post How to use the Range Finder in Battlefield 6 appeared first on Destructoid. | |||||||||||||||||||||||||||||||||||||||||||||||||||||||||||||||||||||||||||||||||||||||||||||||||||||||||||||||||||||||||||||||||||||||||||||||||||||||||||||||||||||||||||||||||||||||||||||||||||||||||||||||||||||||||||||||||||||||||||||||||||||||||||||||||||||||||||||||||||||||||||||||||||||||||||||||||||||||||||||||||||||||||||||||||||||||||
Destructoid Saturday, October 11, 2025 12:07 PM
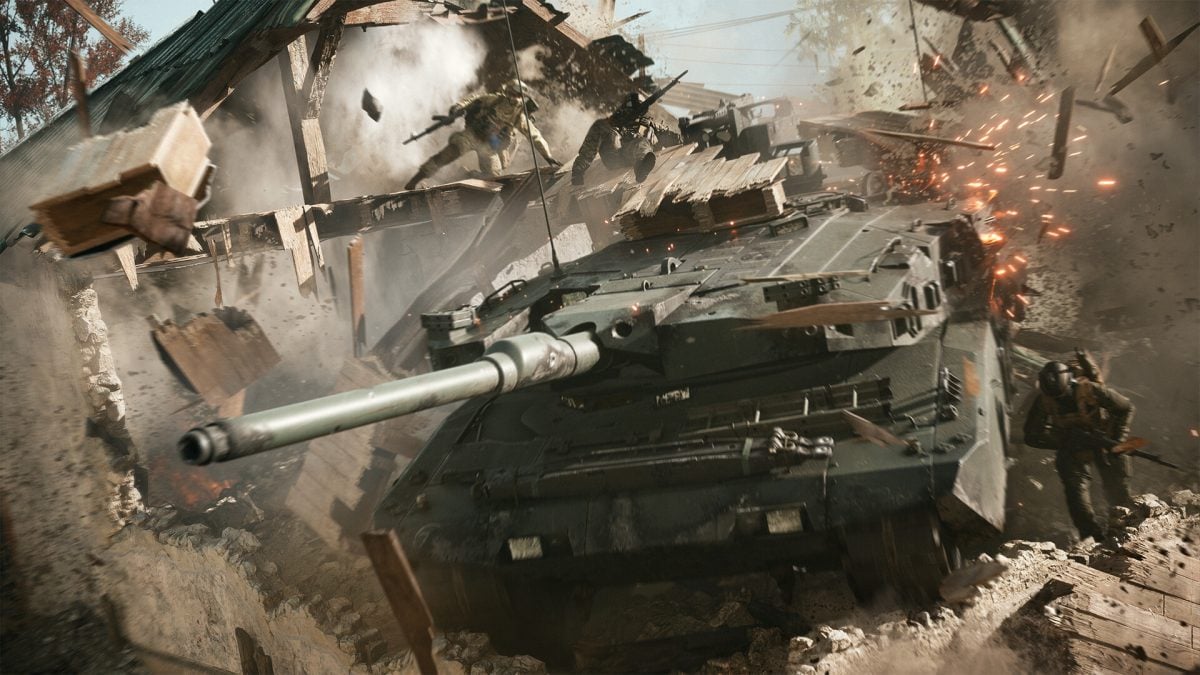
With Battlefield 6 out, we can finally enjoy all of its revived classes in their full glory, utilizing all they have at their disposal, rather than their somewhat limited counterparts from the beta.
The Engineer is one of the most crucial members of any squad, with the devastating capacity to take down entire buildings, blow up enemy vehicles, and all around be a nuisance to the opposing side. It's an amazing class with lots of weapon and gadget choices, so here's our most optimized loadout for the Engineer.
Optimal loadout for the Engineer in Battlefield 6
The Engineer is a supportive class, meant to provide utility to its team, whether by disabling enemy vehicles like tanks, choppers, and jets, or destroying buildings and planting mines. Its signature weapon class is the SMGs, though open weapon queues can and will allow you to take any gun you want.
For the sake of this guide, we'll be sticking to SMGs, as that also seems to be what the Engineer works best with, what with the extra mobility and speed.
Here's what your loadout should generally be with the Engineer:
The Engineer is a devastating one-man army, with more than a few tools at its disposal to blow everything sky-high. In general, you should prioritize assaulting vehicles, disrupting enemy gadgets with explosives and rockets, and destroying buildings where hostiles have set up shop. If you're going to focus more on anti-armor play, then taking the RPG-7V2 will prove more beneficial, while bigger maps with more helicopters can be a good playground for the lock-on-bases MAS 148.
The MP5 (PW5A3) will help you with close-range engagements, as the Engineer will almost always be up close and personal with the enemy, meaning any other category outside SMGs is detrimental to his mobility. Being nimble, light on your feet, and moving from place to place to mine it or blow it up is the name of the game here, hence the choice of weaponry. When applying attachments to the SMG, prioritize those that grant more control and precision, such as Vertical Grips.
I also advise sticking to AV Mines and removing the AV Grenades from your loadout, replacing the latter with regular Frag, since you'll be able to wreck vehicles with the rest of your arsenal anyways. Frag Grenades will give you more anti-infantry potential, helping with situations that don't involve Tank Busting.
Lastly, the Anti-Armor Training Path provides a lot of nice buffs and bonuses that synergize well with this loadout, from extra rockets, faster reloads, and repair bonuses.
Like our content? Set Destructoid as a Preferred Source on Google in just one step to ensure you see us more frequently in your Google searches!
The post Best Engineer class build and loadout in BF6 appeared first on Destructoid. |
WGB Saturday, October 11, 2025 5:31 PM Remedy faces a $14.9 million loss due to poor sales of its multiplayer shooter FBC: Firebreak. Player counts dropped significantly, leading to revised profit forecasts and recognition of substantial development impairments. |
Gaming Instincts – Next-Generation of Video Game Journalism Saturday, October 11, 2025 4:11 PM A trailer was also released. The post Invincible VS Adds Cecil Stedman As a Playable Character appeared first on Gaming Instincts - Next-Generation of Video Game Journalism. |
Gaming Instincts – Next-Generation of Video Game Journalism Saturday, October 11, 2025 3:02 PM A trailer was also released. The post Borderlands 4 'Bounty Pack 1: How Rush Saved Mercenary Day' DLC Announced appeared first on Gaming Instincts - Next-Generation of Video Game Journalism. |
Gaming Instincts – Next-Generation of Video Game Journalism Saturday, October 11, 2025 2:08 PM Announced in a recent livestream. The post Metaphor: ReFantazio 'Guidebook Edition' Digital Bundle Announced appeared first on Gaming Instincts - Next-Generation of Video Game Journalism. |